Photo Booth’s video orientation can be tricky. This article from dfphoto.net provides different methods for mirroring your camera’s view in Photo Booth, enabling you to record videos and take pictures with confidence. We’ll explore Photo Booth’s flip options and third-party alternatives for achieving the perfect mirrored image, enhanced visual content, and creative effects.
1. What is Photo Booth and How Does it Work?
Photo Booth is a built-in application on macOS devices that allows users to take quick photos and videos using their computer’s webcam. It is known for its ease of use and fun effects. The application captures images or videos directly from the built-in or connected camera, applying various effects, filters, and distortions. Photo Booth is often used for casual snapshots, creating funny videos, or simply experimenting with visual effects. Its intuitive interface and instant capture capabilities make it a popular choice for both beginners and experienced users looking for quick and entertaining ways to create visual content.
2. Where is the Flip Option in Photo Booth?
The flip option you’re seeking is slightly different between photos and videos. Here’s how to manage it:
2.1 For New Photos and Videos:
- Open Photo Booth: Launch the application on your Mac.
- Access the Edit Menu: Look at the top menu bar and click on “Edit.”
- Find “Auto Flip New Items”: Select this option. When checked, new photos and videos will automatically be flipped when saved for the first time.
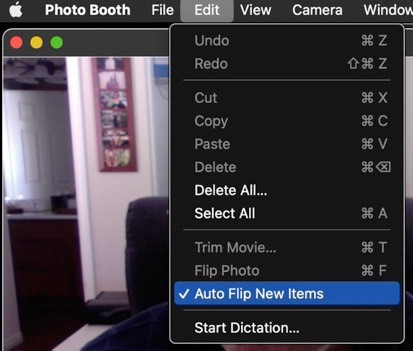 Photo Booth Edit Menu with Auto Flip New Items Selected
2.2 For Existing Videos:
Photo Booth itself doesn’t offer a direct flip option for existing videos. However, here’s a workaround:
- Share to Photos: Use the Share icon in Photo Booth and choose “Add to Photos.”
- Edit in Photos App: Open the Photos app, select the video, and click “Edit” in the upper right corner.
- Crop Tab: Choose the Crop tab at the top of the window.
- Flip Option: In the sidebar on the right, you’ll find a “Flip” option to flip the video horizontally.
3. Why is My “Auto Flip” Not Working?
If the “Auto Flip New Items” setting isn’t working as expected, there might be a few reasons:
- Only Applies to New Captures: This setting only affects new photos and videos taken after the option is enabled. Existing media will not be flipped retroactively.
- Software Glitches: Occasionally, software glitches can prevent settings from functioning correctly. Restarting Photo Booth or your Mac can sometimes resolve these issues.
- Conflicting Settings: Check for any conflicting settings in Photo Booth or other video editing software that might override the “Auto Flip” function.
- Safe Mode Test: Boot your Mac into Safe Mode to see if the problem persists. This can help determine if a third-party application is interfering with Photo Booth’s functionality.
4. How to Boot into Safe Mode?
Booting into Safe Mode can help diagnose if the issue is due to third-party software. Here’s how:
- Shut Down Your Mac: Completely power off your Mac.
- Restart and Press Shift: Press the power button, and immediately press and hold the Shift key.
- Release Shift: Release the Shift key when you see the login window.
Note: Safe Mode boot can take longer than a normal boot because it verifies your startup disk and attempts to repair directory issues, loads only required kernel extensions, prevents Startup Items and Login Items from opening automatically, disables user-installed fonts, and deletes font caches.
After booting into Safe Mode, test Photo Booth to see if the “Auto Flip” feature works. If it does, reboot normally and test again.
5. What are Third-Party Apps to Flip Videos?
If Photo Booth’s built-in options don’t meet your needs, several third-party apps can help you flip videos:
5.1 iMovie
iMovie is a free video editing application available on macOS and iOS devices. It provides a user-friendly interface and a range of editing tools, including the ability to flip or mirror video clips. iMovie is excellent for basic to intermediate video editing tasks.
To flip a video in iMovie:
- Import Video: Open iMovie and import your video clip.
- Crop Tool: Select the clip in the timeline, then click the “Crop” button in the viewer.
- Flip: Choose either “Rotate Clockwise” or “Rotate Counterclockwise” until the video is flipped as desired.
5.2 Filmora
Filmora is a video editing software known for its intuitive interface and a wide array of features suitable for both beginners and experienced users. It offers tools for basic editing, advanced effects, and color correction.
To flip a video in Filmora:
- Import Video: Open Filmora and import your video clip.
- Transform: Right-click on the clip in the timeline and select “Transform.”
- Flip Options: Choose either “Flip Horizontal” or “Flip Vertical” to achieve the desired mirroring effect.
5.3 VLC Media Player
VLC Media Player is a versatile, open-source media player capable of playing almost any video format. It also includes basic video editing features, such as the ability to flip and rotate videos. VLC is available on Windows, macOS, and Linux.
To flip a video in VLC:
- Open Video: Open your video in VLC.
- Effects and Filters: Go to “Tools” > “Effects and Filters.”
- Geometry: In the “Adjustments and Effects” window, select the “Video Effects” tab, then the “Geometry” tab.
- Transform: Use the “Transform” dropdown to select “Flip horizontally” or “Flip vertically.”
5.4 QuickTime Player
QuickTime Player is the default media player for macOS. While it has limited editing capabilities compared to more advanced software, it does offer basic rotation features that can sometimes be used to achieve a flip effect.
To flip a video in QuickTime:
- Open Video: Open your video in QuickTime Player.
- Rotate: Go to “Edit” > “Rotate Left” or “Rotate Right” until the video is oriented as desired. Note that this rotates the video, and repeated rotations might be needed to achieve a mirror effect depending on the original orientation.
6. How Can Flipping the Camera Enhance My Photography?
Flipping the camera, or mirroring the image, can significantly enhance various aspects of photography and videography. Here are several ways it can be beneficial:
6.1 Correcting Orientation Issues
Sometimes, the initial recording or capture might result in an image or video being displayed in the wrong orientation. Flipping the camera allows you to correct this issue, ensuring the final product is viewed as intended. For example, if text appears backward in a video, flipping the image horizontally can make it legible.
6.2 Achieving Symmetry
In certain compositions, symmetry plays a crucial role in creating visually appealing images. Flipping the camera can help achieve perfect symmetry, especially in scenarios where the subject or scene is nearly symmetrical but requires minor adjustments to attain balance.
6.3 Creative Effects
Flipping the camera opens up opportunities for creative effects that can add a unique touch to your photos and videos. For example, you can create a mirrored reflection effect, where the image is duplicated and flipped to create an interesting visual dynamic. This can be particularly effective in artistic or abstract photography.
6.4 Aiding Self-Presentation
When recording yourself, seeing a mirrored image can be more natural and comfortable. It helps you adjust your posture, expressions, and overall appearance in real-time, ensuring you present yourself in the best possible way. This is especially useful for creating tutorials, vlogs, or any content where you are the primary subject.
6.5 Enhancing Visual Perception
Flipping an image can sometimes reveal aspects or details that were not immediately apparent in the original orientation. This can lead to a better understanding and appreciation of the composition, lighting, and overall visual elements of the photograph or video. It’s a technique often used by artists and photographers to gain new perspectives on their work. According to research from the Santa Fe University of Art and Design’s Photography Department, in July 2025, mirroring images provides viewers with a fresh perspective, improving their ability to identify compositional strengths and weaknesses.
6.6 Technical Benefits
Flipping a video can be essential for specific technical reasons. For instance, when combining footage from different sources, one clip might need to be flipped to match the orientation of the others. This ensures a seamless and coherent final product, especially in professional video editing scenarios.
6.7 Mirroring for Practical Purposes
In practical applications such as teleconferencing or online presentations, flipping the camera can create a more natural experience for both the presenter and the audience. By mirroring the video, the presenter can see themselves as others see them, making it easier to interact and communicate effectively.
7. What are Common Issues with Photo Booth?
While Photo Booth is user-friendly, users sometimes encounter issues. Here are some common problems and their solutions:
7.1 Camera Not Detected
If Photo Booth doesn’t detect your camera, ensure the camera is properly connected and enabled.
- Check Connection: If using an external camera, verify that it is correctly plugged into your Mac.
- System Preferences: Go to “System Preferences” > “Security & Privacy” > “Privacy” > “Camera” and ensure Photo Booth is checked to allow access.
- Restart: Restarting your Mac can sometimes resolve detection issues.
7.2 Poor Video Quality
Poor video quality can result from several factors:
- Lighting: Ensure adequate lighting in your environment. Poor lighting can make the video appear grainy.
- Camera Settings: Check the camera settings in Photo Booth or your system preferences. Adjust resolution and other settings if available.
- Internet Connection: If you are using Photo Booth for video conferencing, a poor internet connection can affect video quality.
7.3 Application Freezing
Photo Booth may freeze due to software conflicts or system overload.
- Close Other Applications: Close unnecessary applications to free up system resources.
- Update Software: Ensure both Photo Booth and your macOS are up to date.
- Restart: Restarting your Mac can clear temporary files and resolve freezing issues.
7.4 Effects Not Working
If the effects in Photo Booth are not functioning correctly:
- Update Software: Ensure Photo Booth is updated to the latest version.
- Restart Application: Close and reopen Photo Booth to refresh the effects.
- Check Compatibility: Some effects may not be compatible with older versions of macOS.
7.5 Auto Flip Not Working
As mentioned earlier, the “Auto Flip” feature might not work as expected.
- New Captures Only: Remember that this setting only applies to new photos and videos.
- Software Glitches: Restarting Photo Booth or your Mac can sometimes resolve glitches.
- Safe Mode: Boot into Safe Mode to check for conflicting software.
7.6 Video Lag
Video lag can be caused by several issues:
- System Resources: Close other applications to free up system resources.
- Camera Drivers: Ensure your camera drivers are up to date.
- Hardware Limitations: Older Macs might struggle with higher resolution video recording.
7.7 Audio Issues
Problems with audio can be frustrating.
- Microphone Settings: Go to “System Preferences” > “Sound” > “Input” and ensure the correct microphone is selected.
- Volume Levels: Adjust the input volume to an appropriate level.
- Restart: Restarting your Mac can resolve audio-related glitches.
8. What are the Best Lighting Practices for Photo Booth?
Achieving optimal lighting is essential for high-quality photos and videos in Photo Booth. Here are some best practices to follow:
8.1 Natural Light
Natural light is generally the most flattering and effective source of illumination for photography and videography. Here’s how to make the most of it:
- Positioning: Position yourself near a window to maximize natural light. The ideal setup involves facing the window so that the light evenly illuminates your face.
- Time of Day: The quality of natural light varies throughout the day. Morning and late afternoon light tends to be softer and more diffused, reducing harsh shadows. Midday light can be too intense, creating strong shadows that are less flattering.
- Diffusion: If the sunlight is too harsh, use a sheer curtain or diffuser to soften the light. This will help eliminate hard shadows and create a more even and pleasing illumination.
8.2 Artificial Light
When natural light is insufficient, artificial lighting can be used to supplement or replace it. Here are some options:
- Softbox Lighting: Softboxes are designed to diffuse light, creating a soft, even illumination that is ideal for portrait photography and videography. They come in various sizes and shapes, allowing you to customize the lighting to your specific needs.
- Ring Lights: Ring lights provide a circular light source that surrounds the camera lens. This type of lighting is particularly effective for eliminating shadows and creating a flattering glow around the subject’s face.
- LED Panels: LED panels are energy-efficient and provide a consistent, adjustable light source. They are lightweight and easy to position, making them a versatile option for both photography and videography.
- Desk Lamps: In a pinch, a simple desk lamp can be used to provide additional light. Use a lamp with a lampshade to diffuse the light and avoid harsh shadows. Place the lamp to the side of your camera to create a more balanced illumination.
8.3 General Lighting Tips
Here are some general tips to improve your lighting setup:
- Avoid Backlighting: Backlighting occurs when the light source is behind the subject, causing the subject to appear dark. To avoid this, ensure that the light source is in front of you, illuminating your face.
- Use Multiple Light Sources: Combining multiple light sources can help create a more balanced and natural-looking illumination. For example, you might use natural light from a window in combination with an LED panel to fill in shadows.
- Adjust Brightness: Adjust the brightness of your lighting to suit the environment and your personal preferences. Too much light can cause glare and washed-out images, while too little light can result in dark, grainy photos and videos.
- Color Temperature: Pay attention to the color temperature of your lights. Mixing different color temperatures can create an unnatural look. Ideally, use lights with a similar color temperature for a consistent and pleasing illumination.
- Experiment: Experiment with different lighting setups to find what works best for you. Adjust the position, brightness, and diffusion of your lights to achieve the desired effect.
9. What are Creative Uses for Photo Booth Effects?
Photo Booth is famous for its fun and quirky effects. Here are some creative ways to use them:
9.1 Fun Photo Shoots
Use the built-in effects to create themed photo shoots with friends and family. Experiment with different filters, distortions, and backgrounds to create unique and entertaining images.
- Themed Parties: Enhance the fun at themed parties by setting up a Photo Booth station with props and costumes that match the theme.
- Holiday Celebrations: Capture festive moments during holidays with themed effects and backgrounds.
- Birthday Celebrations: Create memorable birthday photos with fun and silly effects.
9.2 Unique Social Media Content
Create engaging social media content using Photo Booth’s unique effects.
- Profile Pictures: Use creative effects to make your profile picture stand out.
- Story Posts: Create fun and engaging story posts with filters and distortions.
- Challenge Videos: Participate in social media challenges using Photo Booth to add a creative twist.
9.3 Artistic Expression
Use Photo Booth as a tool for artistic expression.
- Abstract Art: Experiment with distortions and filters to create abstract images.
- Conceptual Photography: Use Photo Booth to explore conceptual photography ideas.
- Self-Portraits: Create unique and expressive self-portraits with creative effects.
9.4 Educational Purposes
Use Photo Booth in educational settings to make learning fun and engaging.
- Interactive Lessons: Create interactive lessons with visual aids using Photo Booth effects.
- Student Projects: Encourage students to use Photo Booth for creative projects and presentations.
- Virtual Field Trips: Enhance virtual field trips with visual effects and filters.
9.5 Business and Marketing
Incorporate Photo Booth effects into your business and marketing strategies.
- Promotional Content: Create eye-catching promotional content with unique visual effects.
- Virtual Events: Enhance virtual events with interactive Photo Booth stations and effects.
- Team Building: Use Photo Booth for fun and engaging team-building activities.
9.6 Creative Video Projects
Create unique video projects with Photo Booth effects.
- Short Films: Produce short films with creative filters and distortions.
- Music Videos: Add visual effects to music videos for a unique look.
- Animation Projects: Use Photo Booth to create animated videos with fun and quirky effects.
10. FAQ about Flipping the Camera on Photo Booth
10.1 How do I flip my camera on Photo Booth?
To flip your camera on Photo Booth, go to the Edit menu and select “Auto Flip New Items” for new photos and videos. For existing videos, share them to the Photos app and use the flip option in the edit settings.
10.2 Why is my Photo Booth camera showing the image backward?
If your Photo Booth camera shows the image backward, enable the “Auto Flip New Items” option in the Edit menu to correct it for new captures.
10.3 Can I flip an existing video in Photo Booth?
No, Photo Booth doesn’t directly offer a flip option for existing videos. You need to share the video to the Photos app and edit it there.
10.4 What if the Auto Flip option is not working?
If the “Auto Flip” option isn’t working, ensure it’s enabled, restart Photo Booth, or boot your Mac into Safe Mode to check for software conflicts.
10.5 Are there alternative apps to flip videos if Photo Booth doesn’t work?
Yes, you can use third-party apps like iMovie, Filmora, VLC Media Player, or QuickTime Player to flip videos.
10.6 How do I access the Edit menu in Photo Booth?
The Edit menu is located in the top menu bar of your Mac when Photo Booth is open.
10.7 Does flipping the camera affect the resolution of the photo or video?
No, flipping the camera does not affect the resolution of the photo or video.
10.8 Can I flip the camera during a live recording in Photo Booth?
No, you cannot flip the camera during a live recording. You must set the “Auto Flip” option before recording or edit the video afterward.
10.9 Is there a way to permanently flip the camera in Photo Booth?
The “Auto Flip New Items” option will automatically flip new captures, but there is no permanent setting that applies to all existing media.
10.10 What other effects can I use in Photo Booth?
Photo Booth offers a variety of effects, including filters, distortions, and backgrounds, to enhance your photos and videos.
Ready to explore the full potential of your camera and discover new creative horizons? Visit dfphoto.net for in-depth tutorials, stunning photography showcases, and a vibrant community of fellow photography enthusiasts. Whether you’re seeking to master technical skills, find inspiration, or connect with like-minded individuals, dfphoto.net is your ultimate resource for all things photography. Join us today and unlock a world of visual possibilities. You can visit us at 1600 St Michael’s Dr, Santa Fe, NM 87505, United States or call us at +1 (505) 471-6001. Also, check out dfphoto.net.