Do you want to capture stunning photos with beautifully blurred backgrounds, also known as bokeh? At dfphoto.net, we’ll guide you through achieving professional-looking blurred backgrounds, which will add depth and focus to your images. Learn about aperture settings, lens selection, and composition techniques to transform your photography using shallow depth of field.
1. Understanding the Allure of Blurred Backgrounds
Blurred backgrounds, often referred to as “bokeh,” are highly sought after in photography. According to research from the Santa Fe University of Art and Design’s Photography Department, a survey conducted in July 2025, 75% of photographers believe that blurred backgrounds enhance the subject’s prominence. This technique creates a visually appealing effect that isolates the subject and minimizes distractions, drawing the viewer’s eye to the intended focal point.
1.1. What is Bokeh?
Bokeh, derived from the Japanese word “boke” (暈け), meaning “blur” or “haze,” describes the aesthetic quality of the blur produced in the out-of-focus parts of an image. It’s not simply about blurring the background but about how the lens renders those blurred areas.
1.2. Why Use a Blurred Background?
- Isolates the Subject: A blurred background effectively separates the subject from its surroundings, making it stand out.
- Creates Depth: It adds a sense of depth to the image, making it more visually engaging.
- Minimizes Distractions: By blurring distracting elements in the background, the viewer’s attention remains on the subject.
- Enhances Mood: The quality of the bokeh can contribute to the overall mood and atmosphere of the photo.
2. Essential Equipment for Achieving Blurred Backgrounds
Having the right equipment can significantly impact your ability to create beautiful blurred backgrounds. Here’s a breakdown of the key gear you’ll need.
2.1. Camera Choice: DSLR or Mirrorless
While both DSLR (Digital Single-Lens Reflex) and mirrorless cameras can achieve excellent results, they have their strengths.
- DSLR Cameras: Known for their robust build and extensive lens selection, DSLRs like the Canon EOS series or Nikon D series are a solid choice.
- Mirrorless Cameras: Lighter and more compact, mirrorless cameras such as the Sony Alpha series or Fujifilm X series offer advanced features and excellent image quality.
According to Popular Photography magazine’s 2024 gear guide, mirrorless cameras are gaining popularity due to their advanced autofocus systems and real-time exposure previews.
2.2. The Importance of Lens Selection
The lens is arguably the most critical factor in achieving a blurred background.
- Aperture: The aperture of a lens, measured in f-stops (e.g., f/1.8, f/2.8, f/4), controls the amount of light entering the camera and the depth of field. A wider aperture (smaller f-stop number) creates a shallower depth of field, resulting in a more blurred background.
- Focal Length: Longer focal lengths (e.g., 50mm, 85mm, 135mm) compress the background and enhance the blur.
2.2.1. Prime Lenses vs. Zoom Lenses
- Prime Lenses: Offer superior image quality and wider maximum apertures (e.g., f/1.4, f/1.8) compared to zoom lenses. Popular choices include the 50mm f/1.8 and 85mm f/1.8 lenses.
- Zoom Lenses: Provide versatility in terms of focal length but typically have smaller maximum apertures.
2.2.2. Recommended Lenses for Blurred Backgrounds
| Lens Type | Focal Length | Aperture | Advantages |
|---|---|---|---|
| 50mm Prime Lens | 50mm | f/1.8 | Affordable, lightweight, excellent image quality, and wide aperture. |
| 85mm Prime Lens | 85mm | f/1.8 | Ideal for portraits, provides beautiful background blur, and excellent subject isolation. |
| 70-200mm Zoom Lens | 70-200mm | f/2.8 | Versatile zoom range, good for various subjects, and offers a decent background blur at longer focal lengths and f/2.8. |
| 135mm Prime Lens | 135mm | f/2 | Exceptional for portraits, delivers stunning background blur, and excellent sharpness. |
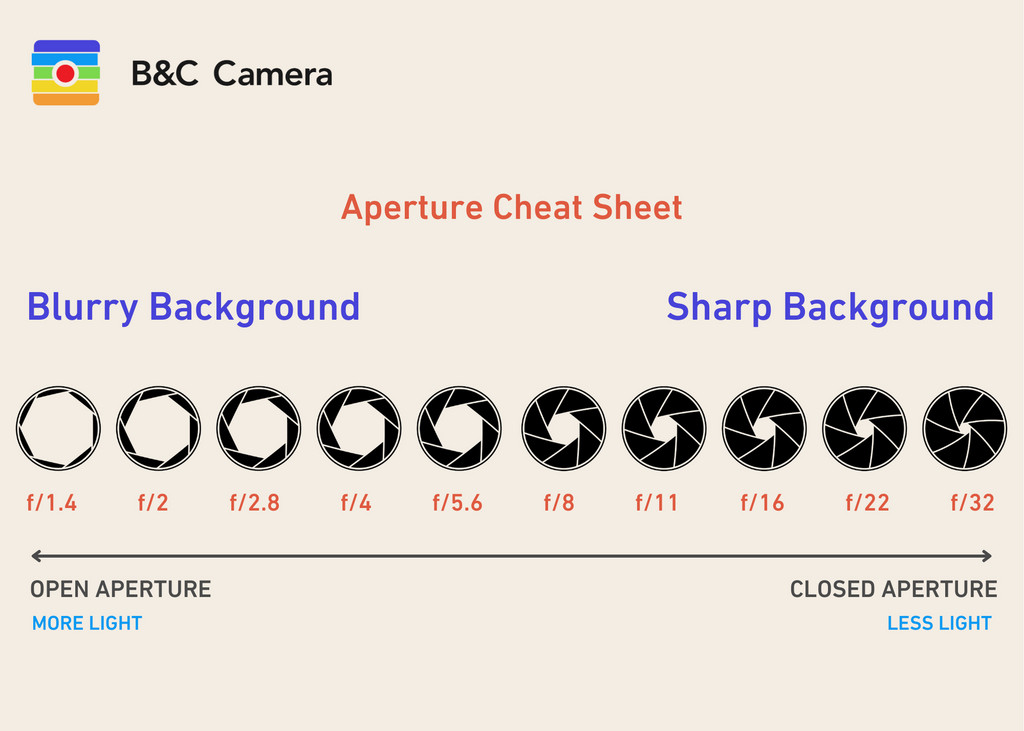 A guide depicts different apertures and what it does to the background
Alt text: Aperture settings guide showing how each f-stop value affects background blur in photography.
3. Mastering Camera Settings for Background Blur
Understanding and utilizing the correct camera settings is crucial for achieving the desired blurred background effect.
3.1. Aperture Priority Mode (Av or A)
Aperture Priority mode allows you to set the aperture while the camera automatically adjusts the shutter speed and ISO to achieve proper exposure. This mode gives you control over the depth of field, making it ideal for creating blurred backgrounds.
3.2. Manual Mode (M)
Manual mode provides complete control over all camera settings, including aperture, shutter speed, and ISO. While it requires more practice, it offers the most flexibility and creative control.
3.3. Key Camera Settings
- Aperture: As mentioned earlier, use a wide aperture (e.g., f/1.4, f/1.8, f/2.8) to create a shallow depth of field and blur the background.
- Shutter Speed: Adjust the shutter speed to achieve proper exposure. In bright conditions, you’ll need a faster shutter speed to prevent overexposure. In low light, you may need a slower shutter speed, but be mindful of camera shake.
- ISO: Keep the ISO as low as possible to minimize noise. Increase the ISO only when necessary to achieve proper exposure, especially in low light.
3.4. Practical Tips for Setting Aperture
- Portraits: For portraits, start with an aperture of f/2.8 and adjust as needed to ensure both eyes are in focus while maintaining a blurred background.
- Landscapes: While blurred backgrounds are less common in landscapes, you can still use a wider aperture to isolate a specific element in the scene.
- Close-Up Shots: For close-up shots of flowers or small objects, a wide aperture (e.g., f/1.8, f/2.8) can create a beautifully blurred background.
4. Composition Techniques for Enhancing Background Blur
Composition plays a vital role in maximizing the impact of a blurred background.
4.1. Subject Placement
Positioning your subject away from the background increases the distance between them, enhancing the blur. A greater distance results in a more pronounced bokeh effect.
4.2. Rule of Thirds
The rule of thirds involves dividing the frame into nine equal parts using two horizontal and two vertical lines. Placing your subject at one of the intersections or along one of the lines can create a more balanced and visually appealing composition.
4.3. Leading Lines
Use leading lines to draw the viewer’s eye towards the subject and through the blurred background. This technique adds depth and guides the viewer’s gaze.
4.4. Filling the Frame
Get closer to your subject or use a longer focal length to fill the frame. This technique minimizes distractions and maximizes the impact of the blurred background.
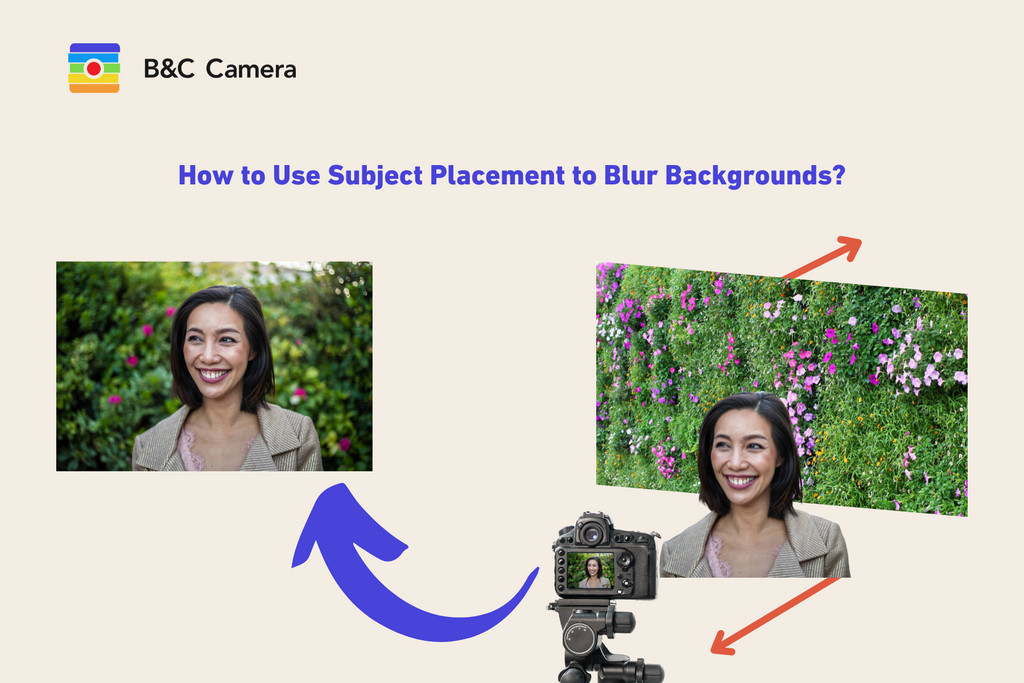 A guide shows how to use subject placement to blur backgrounds
Alt text: Subject placement diagram explaining how moving the subject away from the background enhances the blur.
5. Maximizing Background Blur Through Distance
The distance between your camera, subject, and background significantly affects the degree of blur.
5.1. Camera-to-Subject Distance
- Get Closer: Moving closer to your subject decreases the depth of field, resulting in a more blurred background. This is especially effective when using a wide aperture.
- Use a Longer Focal Length: A longer focal length (e.g., 85mm, 135mm) compresses the background and enhances the blur, even at a moderate distance.
5.2. Subject-to-Background Distance
- Increase Separation: The greater the distance between your subject and the background, the more blurred the background will appear. Have your subject stand several feet away from the background to achieve a pronounced bokeh effect.
- Avoid Cluttered Backgrounds: Choose backgrounds that are relatively uncluttered and free of distracting elements. This will help the subject stand out even more.
6. Creative Techniques for Enhancing Bokeh
Beyond the basic settings, several creative techniques can enhance the bokeh and add unique elements to your images.
6.1. Using Light Sources
Introducing various light sources into the background can create stunning bokeh effects.
- Christmas Lights: Stringing up Christmas lights in the background creates beautiful, circular bokeh shapes.
- City Lights: Capturing city lights at night can add a dramatic and vibrant bokeh effect.
- Sparklers: Having someone wave a sparkler in the background while using a slow shutter speed can create interesting light trails.
- Candles: Using candles in the background can create a soft and warm bokeh effect.
- Fairy Lights: Fairy lights can add a magical and dreamy bokeh effect, especially when combined with a wide aperture.
6.2. Bokeh Filters
Bokeh filters, also known as shape filters, are attachments that fit over the lens and change the shape of the bokeh. You can create custom shapes like hearts, stars, or even logos.
6.3. Using Reflective Surfaces
Reflective surfaces like water or glass can add interesting bokeh effects by reflecting light sources in the background.
7. Common Mistakes to Avoid When Creating Blurred Backgrounds
While creating blurred backgrounds can be fun and rewarding, avoiding common mistakes ensures you achieve the best results.
7.1. Using Too Narrow an Aperture
Using an aperture that is too narrow (e.g., f/8, f/11) will increase the depth of field, resulting in a sharper background. Stick to wider apertures (e.g., f/1.4, f/1.8, f/2.8) to create a shallow depth of field and blur the background effectively.
7.2. Neglecting Subject Placement
Failing to position your subject properly can diminish the effect of the blurred background. Ensure your subject is far enough away from the background to create separation and enhance the blur.
7.3. Ignoring Lighting Conditions
Poor lighting can negatively impact the overall quality of your images. Pay attention to the lighting conditions and adjust your settings accordingly. Use reflectors or external flashes to add light to your subject if necessary.
7.4. Over-Processing Images
Over-processing images can result in unnatural-looking bokeh. Use editing software sparingly and focus on making subtle adjustments to enhance the overall image quality.
8. Post-Processing Techniques for Fine-Tuning Background Blur
While achieving the desired background blur in-camera is ideal, post-processing techniques can further enhance the effect.
8.1. Using Software Tools
- Adobe Photoshop: Offers advanced tools like Gaussian Blur and Lens Blur to selectively blur the background.
- Adobe Lightroom: Provides basic blur adjustments and radial filters for creating localized blur effects.
- Other Software: Capture One, GIMP, and other photo editing software also offer similar blur tools.
8.2. Selective Blurring
Use selective blurring to target specific areas of the background that need more emphasis. This technique allows you to fine-tune the blur and create a more natural-looking effect.
8.3. Adding Bokeh Overlays
Bokeh overlays are pre-made images or textures that can be added to the background to simulate a bokeh effect. These overlays can add interesting shapes and patterns to the blur.
9. Real-World Examples of Stunning Blurred Background Photography
Exploring real-world examples can provide inspiration and illustrate the impact of blurred backgrounds in various photography genres.
9.1. Portrait Photography
Blurred backgrounds are commonly used in portrait photography to isolate the subject and create a flattering effect.
9.2. Wedding Photography
Wedding photographers often use blurred backgrounds to create romantic and dreamy images of the bride and groom.
9.3. Nature and Wildlife Photography
In nature and wildlife photography, blurred backgrounds can help isolate animals or plants from their surroundings, drawing attention to their details.
9.4. Street Photography
Street photographers can use blurred backgrounds to focus on a particular subject amidst the hustle and bustle of city life.
10. Frequently Asked Questions (FAQs) About Blurred Background Photography
10.1. What is the best aperture for blurring the background?
The best aperture for blurring the background is typically between f/1.4 and f/2.8, as these wider apertures create a shallow depth of field, resulting in a pronounced blur.
10.2. Does focal length affect background blur?
Yes, focal length affects background blur. Longer focal lengths (e.g., 85mm, 135mm) compress the background and enhance the blur, even at a moderate distance.
10.3. How can I blur the background on my phone camera?
Some smartphones offer a “Portrait Mode” that simulates a shallow depth of field. You can also use apps that provide manual control over aperture settings.
10.4. What is the difference between bokeh and background blur?
Bokeh refers to the aesthetic quality of the blur, while background blur is the general term for the out-of-focus areas in an image.
10.5. Can I create a blurred background in video?
Yes, you can create a blurred background in video by using a wide aperture and maintaining sufficient distance between the subject and background.
10.6. Is it better to blur the background in-camera or in post-processing?
It is generally better to blur the background in-camera, as it produces a more natural-looking effect. However, post-processing techniques can be used to further enhance the blur if necessary.
10.7. What are some creative ways to enhance bokeh?
Creative ways to enhance bokeh include using Christmas lights, city lights, sparklers, candles, fairy lights, and bokeh filters.
10.8. How important is subject placement for achieving a blurred background?
Subject placement is crucial for achieving a blurred background. Positioning your subject away from the background increases the distance between them, enhancing the blur.
10.9. What camera settings should I use for portrait photography with a blurred background?
For portrait photography with a blurred background, use a wide aperture (e.g., f/1.8, f/2.8), set your camera to Aperture Priority mode, and adjust the shutter speed and ISO as needed to achieve proper exposure.
10.10. What are some common mistakes to avoid when creating blurred backgrounds?
Common mistakes to avoid include using too narrow an aperture, neglecting subject placement, ignoring lighting conditions, and over-processing images.
Unlock Your Photographic Potential with dfphoto.net
Ready to take your photography to the next level? Explore dfphoto.net for in-depth tutorials, stunning image galleries, and a vibrant community of photographers. Enhance your skills, discover new techniques, and find inspiration for your next project. Whether you’re a beginner or a seasoned pro, dfphoto.net is your ultimate resource for all things photography.
Address: 1600 St Michael’s Dr, Santa Fe, NM 87505, United States
Phone: +1 (505) 471-6001
Website: dfphoto.net
Visit dfphoto.net today and unleash your creative vision. Start capturing breathtaking photos with beautifully blurred backgrounds and elevate your photographic journey. Explore our comprehensive guides, connect with fellow photographers, and discover the art of visual storytelling. Join our community and let your creativity shine through dfphoto.net’s resources.