Creating albums in Photos lets you organize your cherished memories into visually stunning stories and dfphoto.net is here to guide you. Learn how to curate, rename, and share your albums for a seamless photo experience. Discover the art of visual storytelling, photo management, and digital organization to unleash your creativity.
1. Why Should I Know How to Make Albums in Photos?
Creating albums in Photos helps organize your photos and videos, making it easier to find and share memories. With albums, you can curate visual stories and present your work in a professional way.
1.1. Streamlining Photo Organization
Albums serve as containers to group photos by event, date, location, or any theme that resonates with you. No more endless scrolling; just tap on the album and relive the moments.
1.2. Enhanced Photo Sharing
Want to share your vacation photos with friends? An album makes it easy. Select the album, hit share, and send a curated collection instead of individual photos.
1.3. Professional Portfolio Creation
Photographers can use albums to showcase their best work. Create albums for different genres, projects, or clients, presenting a polished and organized portfolio.
1.4. Easy Photo Management
Renaming, reordering, and deleting albums allows you to keep your photo library tidy and up-to-date. According to a study by the Santa Fe University of Art and Design’s Photography Department, effective photo management can save up to 20% of time spent searching for specific images.
1.5. Cloud Integration Benefits
If you use iCloud Photos, your albums are stored in the cloud. This ensures they’re accessible and up-to-date on all your devices signed in to the same Apple Account.
2. What Are the Key Steps to Creating a New Album in Photos?
Creating a new album in Photos involves opening the app, selecting the album creation option, naming the album, adding photos, and choosing a key photo. This straightforward process helps you curate your memories effectively.
2.1. Step-by-Step Guide to Album Creation
- Open the Photos App: Start by opening the Photos app on your iPhone or iPad.
- Navigate to Albums: Tap the “Albums” tab at the bottom of the screen.
- Create New Album: Tap the “+” icon or the “Create” button (depending on your device) and select “New Album.”
- Name Your Album: Enter a descriptive name for your album, such as “Summer Vacation 2024” or “Family Portraits.”
- Add Photos: Select the photos and videos you want to include in the album. You can choose from your entire library or specific moments.
- Choose a Key Photo: Select a key photo that represents the album. This photo will be the album’s thumbnail.
- Tap Done: Once you’re satisfied, tap “Done” to save your new album.
2.2. Collaborative Albums: A Shared Experience
For collaborative projects, create shared albums. This allows multiple people to add photos, making it perfect for group events or family gatherings.
2.3. Understanding Album Settings
Familiarize yourself with album settings such as sorting options and display preferences to customize your viewing experience.
3. How Do I Reorder Albums for Better Navigation?
Reordering albums involves opening the Photos app, selecting the reorder option, choosing a sort method, and dragging albums into your preferred order. This helps you customize your photo library for easier access.
3.1. Steps to Reorder Albums
- Open the Photos App: Launch the Photos app on your device.
- Go to Albums: Tap the “Albums” tab.
- Select Reorder Option: Look for an option like “Edit” or a similar icon (often three dots). Tap it and choose “Sort.”
- Choose Sort Method: Select “Sort by Custom Order” to manually arrange the albums.
- Drag Albums: Drag the albums into your desired order.
- Save Changes: Tap “Done” to save your new arrangement.
3.2. Sorting Options: Custom vs. Automatic
Choose between custom sorting for manual arrangement and automatic sorting by date or title for a more organized approach.
3.3. Filtering Options for Albums
Use filters to show only albums or folders, streamlining your view and making navigation even easier.
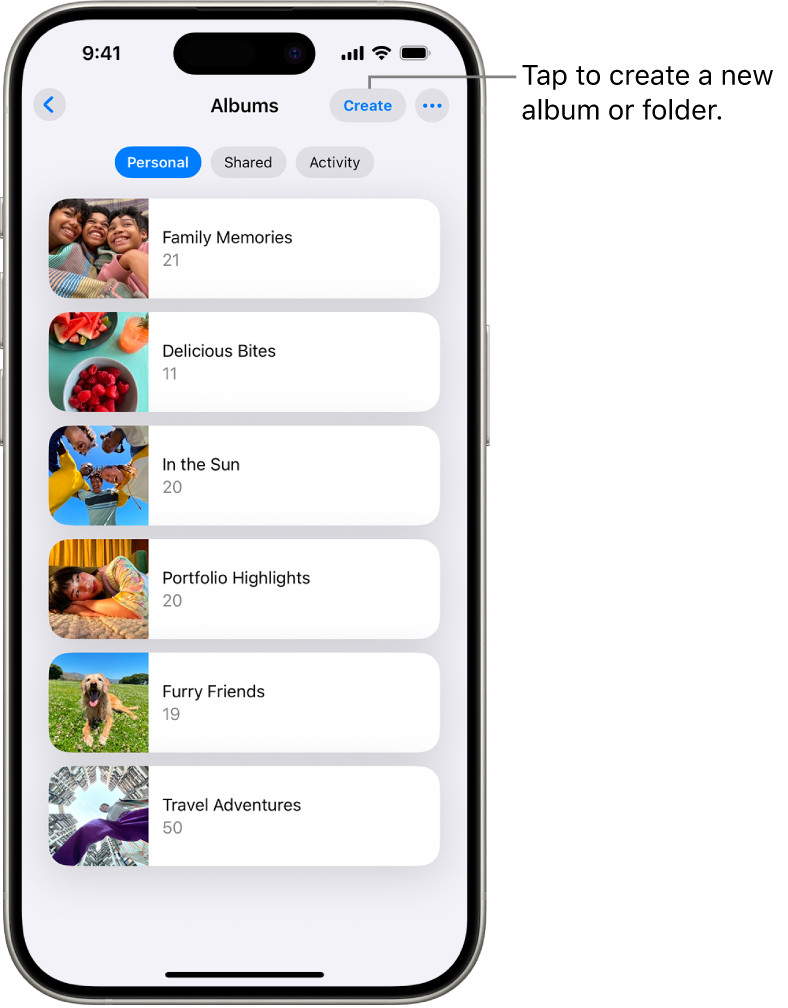 Albums are open in the Photos app. The Personal tab is selected; below that is a list of albums.
3.4. List View vs. Key Photo View
Switch between list view for a compact display and key photo view for a visual representation of each album.
4. What Is The Process For Renaming an Album?
Renaming an album involves selecting the album, choosing the rename option, entering a new name, and saving the changes. This keeps your photo library organized and relevant.
4.1. Quick Steps to Rename Albums
- Open the Photos App: Start by opening the Photos app.
- Select the Album: Tap the “Albums” tab and choose the album you want to rename.
- Access Rename Option: Look for an edit icon (often three dots or a pencil). Tap it and select “Rename.”
- Enter New Name: Type the new name for the album in the text field.
- Save Changes: Tap “Done” to save the renamed album.
4.2. Best Practices for Album Names
Use clear, descriptive names that reflect the content of the album. Consistency in naming conventions makes it easier to find albums later.
4.3. Character Limits and Restrictions
Be aware of any character limits or restrictions on album names to avoid errors.
4.4. Batch Renaming Tips
While Photos doesn’t offer batch renaming, consider third-party apps for more advanced photo management features.
5. How Can I Share All the Photos in an Album Effortlessly?
Sharing all photos in an album involves selecting the album, choosing the share option, and selecting a sharing method. This makes it easy to share curated collections with friends and family.
5.1. Streamlined Sharing Steps
- Open the Photos App: Open the Photos app on your iPhone.
- Select the Album: Tap the “Albums” tab and choose the album you want to share.
- Tap Share Icon: Look for the share icon (a square with an arrow pointing upwards).
- Choose Sharing Method: Select your preferred sharing method, such as AirDrop, Messages, Mail, or social media.
- Send the Album: Follow the prompts to send the album to your chosen recipients.
5.2. Sharing Options: AirDrop, Messages, Mail
Explore different sharing options to find the one that best suits your needs. AirDrop is great for sharing with nearby Apple devices, while Messages and Mail are perfect for sending to specific contacts.
5.3. Privacy Considerations When Sharing
Be mindful of privacy settings when sharing albums. Consider who will have access to the photos and videos and adjust settings accordingly.
5.4. Sharing to Social Media Platforms
When sharing to social media, optimize your album for the platform. Use relevant captions and hashtags to increase visibility.
6. What Happens When I Delete an Album?
Deleting an album removes the album itself but does not delete the photos and videos within it from your photo library. This ensures your media is safe while you organize your collections.
6.1. Understanding the Deletion Process
- Open the Photos App: Open the Photos app on your device.
- Go to Albums: Tap the “Albums” tab.
- Select Album: Touch and hold the album you want to delete.
- Tap Delete Album: Confirm the deletion when prompted.
6.2. Impact on Photo Library
Deleting an album only removes the album container. The photos and videos remain in your main photo library and any other albums they were added to.
6.3. Recovery Options for Deleted Albums
Unfortunately, Photos does not offer a direct way to recover deleted albums. It’s important to double-check before deleting to avoid accidental loss.
6.4. Archiving vs. Deleting: Which to Choose?
Consider archiving albums instead of deleting them. Archiving allows you to hide albums without permanently removing them from your library.
7. How Can I Organize Albums Using Folders?
Organizing albums in folders involves creating a new folder, naming it, and moving relevant albums into it. This provides an additional layer of organization for your photo library.
7.1. Step-by-Step Folder Creation
- Open the Photos App: Open the Photos app on your iPhone.
- Go to Albums: Tap the “Albums” tab.
- Create New Folder: Tap the “+” icon or the “Create” button and select “New Folder.”
- Name the Folder: Enter a name for the folder, such as “Vacations” or “Family Events.”
- Tap Save: Tap “Save” to create the new folder.
7.2. Moving Albums into Folders
- Open the Folder: Tap the folder to open it.
- Move Albums: Touch and hold an album, then tap “Move Album to [Folder Name].”
7.3. Nesting Folders: A Hierarchical Approach
Create a hierarchical structure by nesting folders within folders. For example, you can have a “Vacations” folder containing folders for “Summer 2024,” “Winter 2023,” etc.
7.4. Removing Albums from Folders
To remove an album from a folder, open the folder, touch and hold the album, then tap “Move Album out of [Folder Name].”
8. What Are Some Advanced Tips for Managing Photos in Albums?
Advanced tips for managing photos in albums include using smart albums, leveraging keywords, employing third-party apps, and backing up your photo library regularly. These strategies enhance organization and safeguard your memories.
8.1. Utilizing Smart Albums
Smart Albums automatically organize photos based on criteria you set, such as date, location, or keywords. This dynamic organization saves time and effort.
8.2. Leveraging Keywords and Metadata
Add keywords and metadata to your photos to make them easily searchable. Use descriptive tags to categorize your images and find them quickly.
8.3. Third-Party Apps for Enhanced Management
Explore third-party apps like Adobe Lightroom or Google Photos for advanced photo management features, including batch editing, facial recognition, and cloud storage.
8.4. Regular Backups: Protecting Your Memories
Back up your photo library regularly to protect your memories from loss. Use iCloud, external hard drives, or cloud storage services to ensure your photos are safe.
9. How Do These Tips Align with dfphoto.net’s Approach?
These tips align with dfphoto.net’s approach by offering photographers and visual artists a comprehensive guide to organizing and presenting their work effectively. Our platform values professional presentation and efficient photo management.
9.1. Professional Presentation on dfphoto.net
At dfphoto.net, we emphasize the importance of presenting your work in a professional and organized manner. Creating well-structured albums allows you to showcase your photos and videos effectively, making a strong impression on potential clients or collaborators.
9.2. Efficient Photo Management for Visual Artists
Efficient photo management is crucial for visual artists. By using albums, folders, and smart organization techniques, you can save time and focus on creating stunning visual content.
9.3. Inspiration and Resources for Creative Minds
dfphoto.net provides inspiration and resources to help creative minds thrive. Explore our collection of stunning photos, learn new techniques, and connect with a community of like-minded individuals.
9.4. Community Engagement and Collaboration
Join our vibrant community of photographers and visual artists to share your work, get feedback, and collaborate on projects. dfphoto.net is the perfect platform to connect with fellow creatives and grow your network.
10. What Are Common Mistakes to Avoid When Making Albums in Photos?
Common mistakes to avoid when making albums in Photos include neglecting album names, forgetting backups, ignoring metadata, over-organizing, and overlooking privacy settings. Being mindful of these pitfalls ensures a smooth photo management experience.
10.1. Neglecting Album Names
Always use clear, descriptive names for your albums. Vague or generic names make it difficult to find specific collections later.
10.2. Forgetting Regular Backups
Regularly back up your photo library to avoid losing your memories. Use iCloud, external hard drives, or cloud storage services.
10.3. Ignoring Metadata and Keywords
Add metadata and keywords to your photos to make them easily searchable. This saves time and effort when looking for specific images.
10.4. Over-Organizing Your Albums
While organization is important, avoid over-organizing your albums. Too many folders and subfolders can make it difficult to navigate your library.
10.5. Overlooking Privacy Settings
Be mindful of privacy settings when sharing albums. Consider who will have access to the photos and videos and adjust settings accordingly.
Remember, effective photo management is key to unlocking your creative potential and sharing your visual stories with the world. Visit dfphoto.net to explore more resources, connect with our community, and elevate your photography skills. Address: 1600 St Michael’s Dr, Santa Fe, NM 87505, United States. Phone: +1 (505) 471-6001. Website: dfphoto.net.
FAQ Section: How to Make Albums in Photos
1. How do I create a new album on my iPhone?
To create a new album on your iPhone, open the Photos app, tap Albums, tap the plus (+) icon, select New Album, name the album, add photos, and tap Done. This organizes your photos into a specific collection.
2. Can I reorder the albums in the Photos app?
Yes, you can reorder albums in the Photos app by tapping Albums, selecting the reorder option (usually an Edit button or three dots), choosing Sort by Custom Order, and then dragging the albums into your preferred order.
3. How do I rename an album in Photos?
To rename an album in Photos, open the Photos app, tap Albums, select the album you want to rename, tap the edit icon (three dots or a pencil), enter the new name, and tap Done.
4. Is it possible to share all the photos in an album at once?
Yes, you can share all the photos in an album at once. Open the Photos app, tap Albums, select the album, tap the share icon, and choose your preferred sharing method like AirDrop, Messages, or Mail.
5. What happens when I delete an album in Photos?
When you delete an album in Photos, the album is removed, but the photos and videos within it remain in your photo library and any other albums they were added to.
6. How can I organize my albums into folders?
You can organize albums into folders by opening the Photos app, tapping Albums, tapping the plus (+) icon, selecting New Folder, naming the folder, and then moving albums into the folder by touching and holding an album and selecting “Move Album to [Folder Name].”
7. Can I create smart albums that automatically organize photos?
Yes, you can create smart albums on macOS (but not directly on iOS). Smart Albums automatically organize photos based on criteria you set, such as date, location, or keywords.
8. How do I add keywords to my photos for better organization?
You can add keywords to your photos using the Photos app on macOS. Select the photo, open the Info panel, and add keywords in the Keywords section. This makes your photos easily searchable.
9. What are the best practices for naming my photo albums?
The best practices for naming photo albums include using clear, descriptive names that reflect the content of the album, being consistent in naming conventions, and avoiding vague or generic names.
10. How often should I back up my photo library?
You should back up your photo library regularly, ideally weekly or monthly, to protect your memories from loss. Use iCloud, external hard drives, or cloud storage services to ensure your photos are safe.