Sending photos via email from your iPhone is a common and convenient way to share memories, work documents, or anything visual directly from your mobile device. Whether it’s a snapshot from your recent vacation, an important image for work, or simply sharing pictures with family and friends, the iPhone makes it incredibly easy to attach photos to your emails. This guide will walk you through the simple steps to attach photos, videos, and even documents to your emails using your iPhone, ensuring you can share whatever you need, whenever you need to.
Attaching Photos, Videos, and Documents to Emails on iPhone
The Mail app on your iPhone is designed to seamlessly integrate with other apps and features, making attaching files a breeze. Here’s how you can attach photos, videos, and documents to your email messages:
-
Open the Mail App: Start by launching the Mail app on your iPhone. This is where you manage your emails and compose new messages.
-
Compose a New Email or Reply: Tap the compose button to start a new email, or open an existing email and tap reply if you’re responding to a message.
-
Position the Cursor and Access Attachment Options: In the body of your email, tap where you want to insert the attachment. Above the keyboard, you’ll see a toolbar. If it’s collapsed, tap the Expand Toolbar button (usually an arrow pointing upwards) to reveal more options. Then, tap the Attachment button (it looks like a paperclip).
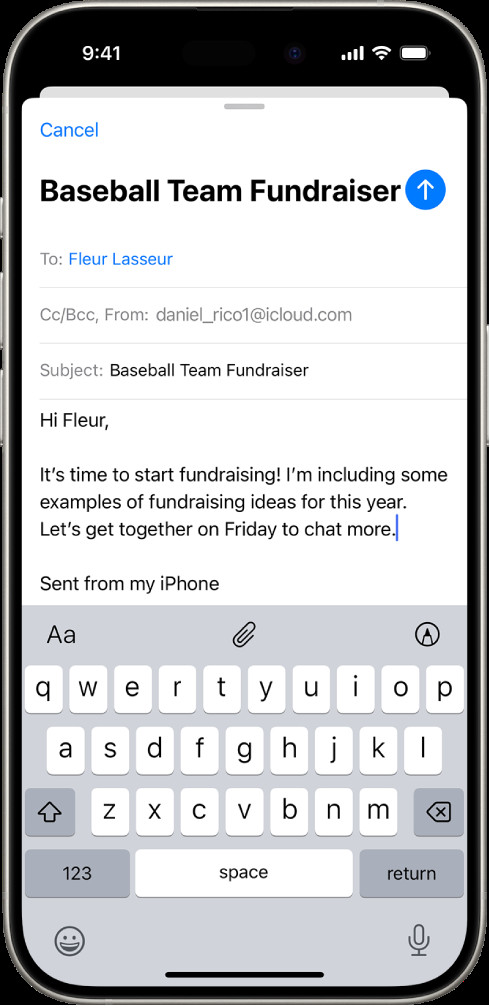 Expand Toolbar button and Attachment button in iPhone Mail app
 -
Choose Your Attachment Type: You’ll be presented with different options to select what you want to attach:
-
Attach a Document from Files: Tap the Attach File button (looks like a file icon). This will open the Files app, where you can browse through your saved documents. Navigate through locations like “Recent,” “Shared,” or “Browse” to find the file you wish to attach.
Alt text: The Attach File icon is displayed in the iPhone Mail app’s toolbar, used for attaching documents from the Files application.
-
Attach a Photo or Video from your Library: Tap the Photo or Video button (it’s usually a photo icon). This will give you access to your Photos library. Select the photo or video you want to attach. You can select multiple items if needed. Once you’ve made your selections, tap Done to return to your email, and the chosen media will be attached.
-
Take a New Photo or Video: If you need to take a picture or video right then and there, tap the Take Photo or Video button (camera icon). This will open your camera. Capture your photo or video. You can then tap Use Photo or Use Video to attach it to your email, or Retake if you are not satisfied and want to try again.
Alt text: The Take Photo or Video icon within the iPhone Mail app toolbar, allowing users to capture media directly for email attachments.
-
-
Send Your Email: Once your photo, video, or document is attached, you can finish composing your email and tap the send button. Your recipient will receive the email with the attachments ready to download.
Scanning and Attaching Documents as PDFs
Need to send a hard copy document? Your iPhone can scan documents and attach them as PDFs directly to your email:
-
Open Mail and Start a New Email: As before, open the Mail app and begin composing or replying to an email.
-
Access Scan Document Feature: Tap in the email body where you want to insert the scan. Expand the toolbar above the keyboard and tap the Attachment button. Then, tap the Scan Document button (icon looks like a document with a camera).
Alt text: The Scan Document icon in the iPhone Mail app toolbar, used to initiate document scanning for email attachments.
-
Scan Your Document: Position your iPhone over the document you want to scan. The iPhone will automatically detect the document edges and capture the page. You can also manually capture the scan by tapping the shutter button or pressing a volume button. If needed, tap the Flash Settings button to control the flash.
Alt text: The Flash Settings icon in the iPhone scan interface, allowing users to toggle flash on or off during document scanning.
-
Review and Save Scan: After scanning, you can tap Retake if you need to rescan the page or Keep Scan if you are satisfied. For multi-page documents, scan each page and then tap Save when you’re finished.
-
Edit Your Scan (Optional): If you need to make adjustments to your saved scan, tap on the scanned document in your email draft. You will see options to:
-
Crop: Tap the Crop button to adjust the borders of your scan.
-
Apply Filters: Tap the Filters button to change the look of your scan (e.g., grayscale, black and white).
Alt text: The Filters button in the iPhone scan editing interface, enabling users to apply different filters to their scanned documents.
-
Rotate: Tap the Rotate button to rotate the image if it’s not oriented correctly.
-
Delete: If you’re not happy with the scan, tap the Delete Scan button to remove it.
Alt text: The Delete Scan button in the iPhone scan editing interface, used to remove a scanned document page.
-
-
Attach and Send: Once you’re satisfied with your scanned document, it will be attached to your email as a PDF. You can then send your email as usual.
Creating and Attaching Drawings to Emails
For times when words aren’t enough, you can even create a quick drawing to illustrate your point and attach it to your email:
-
Go to Mail and Start Email: Open the Mail app and begin your email as needed.
-
Access Markup Toolbar: Tap in the body of your email where you want to insert your drawing. Expand the toolbar above the keyboard and tap the Attachment button. Then, tap the Markup button to bring up the drawing tools.
-
Create Your Drawing: Use the Markup toolbar to draw directly in your email. Choose from different drawing tools and colors to create your illustration.
-
Insert Drawing: Once you’ve finished your drawing, tap Done, and then Insert Drawing. Your drawing will be attached to your email.
Attaching photos and other files to emails on your iPhone is a straightforward process that enhances your communication capabilities. By following these steps, you can easily share visuals, documents, and even hand-drawn sketches directly from your iPhone’s Mail app.
See also:
Download email attachments in Mail on iPhone
Annotate email attachments on iPhone