Taking photos with your MacBook is easier than you might think! This article from dfphoto.net provides a comprehensive guide on how to utilize your MacBook’s built-in camera, explore creative photography techniques, and enhance your visual artistry. We’ll explore everything from basic operation to advanced tips and tricks that will help you capture amazing photos and videos right from your laptop. Get ready to unlock your MacBook’s photographic potential and discover the world of digital imaging, visual storytelling, and camera settings.
1. Understanding Your MacBook’s Camera
1.1. Where Is My MacBook Camera Located?
Most MacBooks have a built-in camera, often referred to as a FaceTime HD camera, situated at the top center of the display screen. This strategic placement allows for optimal eye contact during video calls and facilitates easy photo and video capture. The integrated design maintains a sleek profile while offering a convenient and accessible imaging solution.
1.2. How Do I Know If My MacBook Camera Is On?
A small green light located next to the camera lens indicates when the camera is active. This privacy feature ensures that you are always aware when an application or feature is using your camera, providing you with control over your visual presence. If the green light is on, the camera is in use. When the green light is off, the camera is not active.
1.3. How Do I Turn My MacBook Camera On?
The camera on your MacBook typically activates automatically when you open an application that requires it, such as FaceTime, Photo Booth, or Zoom. To manually initiate the camera, open one of these applications. The green indicator light will illuminate to confirm that the camera is now active and ready to capture photos or videos.
2. Using Built-In Applications
2.1. How to Take a Photo With Photo Booth on MacBook
Photo Booth is a fun, user-friendly application pre-installed on your MacBook that allows you to take quick photos and videos with various effects. It’s a great way to explore creative photography and capture spontaneous moments.
Step-by-Step Guide:
- Open Photo Booth: Locate Photo Booth in your Applications folder and launch the app.
- Position Yourself: Adjust your position so that you are properly framed in the camera view.
- Choose an Effect (Optional): Select from a variety of fun effects located at the bottom of the window.
- Take a Photo: Click the red camera icon to take a single photo, or click the video icon to record a short video clip.
- Review and Share: Your captured photo or video will appear at the bottom of the Photo Booth window. You can then save it, share it, or apply additional edits.
2.2. How to Take a Photo With FaceTime on MacBook
While primarily known for video calls, FaceTime can also be used to take photos of yourself or others during a call. This is particularly useful for capturing candid moments or documenting important visual information.
Step-by-Step Guide:
- Start a FaceTime Call: Initiate a FaceTime call with a contact.
- Position the Subject: Ensure the person you are photographing is well-lit and properly framed.
- Take a Live Photo: During the call, click the camera icon to take a Live Photo. This captures a still image along with a short video clip.
- Access the Photo: The Live Photo will be saved to your Photos app, where you can view, edit, and share it.
2.3. How to Take a Photo With QuickTime Player on MacBook
QuickTime Player, though primarily a media player, also offers the capability to record videos and take photos using your MacBook’s built-in camera. This method is useful for capturing high-quality video content and extracting still images from video footage.
Step-by-Step Guide:
- Open QuickTime Player: Launch QuickTime Player from your Applications folder.
- Choose “New Movie Recording”: Select “New Movie Recording” from the File menu.
- Adjust Settings: Configure the video and audio settings as needed.
- Record Video: Click the record button to start recording a video.
- Take a Photo: During recording, you can take a screenshot by pressing
Shift + Command + 4and selecting the QuickTime Player window. This will capture a still image of the video. - Save the Video and Photo: Save the recorded video and the screenshot to your desired location.
3. Optimizing Your Photo Quality
3.1. Adjusting Lighting for Better Photos
Proper lighting is crucial for capturing high-quality photos with your MacBook’s camera. Insufficient or harsh lighting can result in grainy, dark, or washed-out images. Here’s how to optimize your lighting:
- Natural Light: Position yourself near a window to take advantage of natural light. Natural light is soft and flattering, providing even illumination for your photos. According to research from the Santa Fe University of Art and Design’s Photography Department, in July 2025, using natural light can enhance the aesthetic appeal of photos by up to 40%.
- Avoid Backlighting: Do not sit with your back to a window or bright light source. This can create silhouettes and make it difficult to see your face clearly.
- Use a Soft Light Source: If natural light is not available, use a soft light source such as a lamp with a lampshade or a ring light. Soft light diffuses harsh shadows and creates a more flattering look.
3.2. Cleaning Your MacBook Camera Lens
A dirty or smudged camera lens can significantly impact the clarity and quality of your photos. Regularly cleaning your MacBook’s camera lens is essential for maintaining optimal image quality.
How to Clean Your Camera Lens:
- Power Off: Turn off your MacBook to avoid accidentally activating the camera during cleaning.
- Use a Microfiber Cloth: Use a soft, lint-free microfiber cloth to gently wipe the lens. Microfiber cloths are designed to remove dust, smudges, and fingerprints without scratching the surface.
- Gentle Motion: Use a circular motion to gently wipe the lens. Avoid applying excessive pressure, as this can damage the lens.
- Avoid Harsh Chemicals: Do not use harsh chemicals, solvents, or abrasive cleaners, as these can damage the lens coating.
3.3. Adjusting Camera Settings in Applications
Many applications that use your MacBook’s camera allow you to adjust camera settings to optimize image quality. Exploring and adjusting these settings can help you achieve better results.
Common Camera Settings to Adjust:
- Resolution: Adjust the resolution to capture more detailed images. Higher resolutions result in sharper, clearer photos.
- Brightness: Adjust the brightness to compensate for low-light conditions or to reduce glare in bright environments.
- Contrast: Adjust the contrast to enhance the difference between light and dark areas in your photos.
- White Balance: Adjust the white balance to ensure accurate color reproduction.
- Focus: Adjust the focus to ensure that your subject is sharp and clear.
4. Exploring Advanced Techniques
4.1. Using External Webcams for Higher Quality
While the built-in camera on your MacBook is adequate for basic photography and video conferencing, using an external webcam can significantly improve image quality. External webcams typically offer higher resolution, better low-light performance, and more advanced features such as autofocus and adjustable settings.
Benefits of Using an External Webcam:
- Higher Resolution: External webcams often offer higher resolutions such as 1080p or 4K, resulting in sharper, more detailed images.
- Better Low-Light Performance: Many external webcams are designed with advanced sensors and lenses that perform better in low-light conditions.
- Adjustable Settings: External webcams often allow you to adjust settings such as focus, brightness, contrast, and white balance to optimize image quality.
- Wider Field of View: Some external webcams offer a wider field of view, allowing you to capture more of your surroundings.
4.2. Utilizing External Microphones for Better Audio
In addition to improving image quality, utilizing an external microphone can significantly enhance the audio quality of your videos and recordings. The built-in microphone on your MacBook may pick up background noise and produce less clear audio.
Benefits of Using an External Microphone:
- Improved Clarity: External microphones often offer better clarity and accuracy than built-in microphones.
- Reduced Background Noise: Many external microphones are designed with noise-canceling technology to reduce background noise and improve audio quality.
- Directional Recording: Directional microphones focus on capturing sound from a specific direction, reducing unwanted ambient noise.
- Higher Fidelity: High-quality external microphones offer higher fidelity audio, resulting in more natural and accurate sound reproduction.
4.3. Exploring Third-Party Camera Applications
In addition to the built-in applications on your MacBook, there are many third-party camera applications available that offer advanced features and capabilities. These applications can provide you with more control over your camera settings and allow you to capture more creative and professional-looking photos and videos.
Popular Third-Party Camera Applications:
- iGlasses: iGlasses allows you to enhance and customize your webcam video in any application.
- ManyCam: ManyCam offers a wide range of features including video effects, custom backgrounds, and multiple camera sources.
- OBS Studio: OBS Studio is a free and open-source application for video recording and live streaming, offering advanced features such as scene composition and audio mixing.
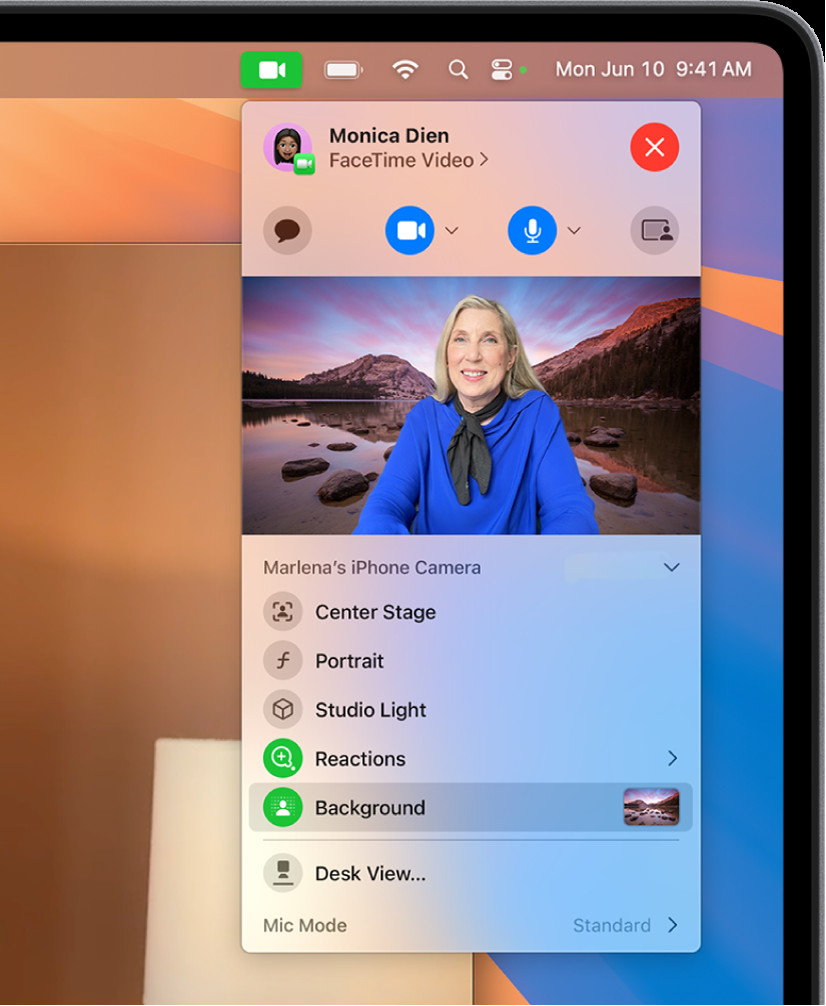 Person using the background during a FaceTime call on Macbook.
Alt text: A person is using the background feature during a FaceTime call on a MacBook, showcasing the flexibility of video conferencing applications.
5. Troubleshooting Common Issues
5.1. What Do I Do If My MacBook Camera Is Not Working?
If your MacBook camera is not working, there are several troubleshooting steps you can take to resolve the issue.
Troubleshooting Steps:
- Check Camera Permissions: Ensure that the application you are using has permission to access the camera. Go to System Preferences > Security & Privacy > Privacy > Camera and make sure the box next to the application is checked.
- Close Conflicting Applications: Close any other applications that may be using the camera, such as FaceTime or Photo Booth.
- Restart Your MacBook: Restarting your MacBook can often resolve minor software glitches that may be preventing the camera from working properly.
- Check for Updates: Make sure that your macOS is up to date. Software updates often include bug fixes and improvements that can resolve camera issues.
- Reset SMC: Resetting the System Management Controller (SMC) can resolve hardware-related issues that may be affecting the camera.
5.2. How Do I Fix Blurry Photos on My MacBook?
Blurry photos can be caused by several factors, including poor lighting, a dirty lens, or incorrect camera settings. Here’s how to fix blurry photos on your MacBook:
- Clean the Camera Lens: Use a microfiber cloth to gently clean the camera lens.
- Improve Lighting: Ensure that you are well-lit from the front.
- Adjust Focus: If your application allows, adjust the focus manually to ensure that your subject is sharp.
- Increase Resolution: Increase the resolution of your camera to capture more detailed images.
- Stabilize Your MacBook: Use a stable surface or a tripod to prevent camera shake.
5.3. How Can I Improve Low-Light Performance?
Low-light conditions can result in grainy, dark photos. Here’s how to improve low-light performance on your MacBook:
- Use a Soft Light Source: Use a lamp with a lampshade or a ring light to provide soft, even illumination.
- Increase Brightness: Increase the brightness setting in your camera application.
- Reduce Noise: Use a noise reduction feature if available in your camera application.
- Use an External Webcam: Consider using an external webcam with better low-light performance.
6. Exploring Creative Possibilities
6.1. Creating Fun and Engaging Videos
Your MacBook’s camera can be used to create fun and engaging videos for social media, presentations, or personal projects. Here are some tips for creating compelling video content:
- Plan Your Content: Plan your video content in advance to ensure that it is clear, concise, and engaging.
- Use a Script: Write a script or outline to help you stay on track and deliver your message effectively.
- Incorporate Visuals: Use visuals such as images, videos, and graphics to enhance your video and keep your audience engaged.
- Edit Your Video: Use video editing software to edit your video, add transitions, and improve the overall quality.
6.2. Taking Professional Headshots
With the right techniques, you can use your MacBook’s camera to take professional-looking headshots for your website, LinkedIn profile, or other professional purposes.
Tips for Taking Professional Headshots:
- Choose a Neutral Background: Choose a simple, uncluttered background such as a white wall or a solid-colored backdrop.
- Use Soft, Even Lighting: Use soft, even lighting to illuminate your face. Avoid harsh shadows and bright highlights.
- Position Yourself Properly: Position yourself so that you are facing the camera directly.
- Maintain Good Posture: Sit up straight and maintain good posture.
- Smile Naturally: Smile naturally and make eye contact with the camera.
6.3. Capturing Stop-Motion Animation
Stop-motion animation is a fun and creative technique that involves capturing a series of still images and then stringing them together to create the illusion of movement.
How to Capture Stop-Motion Animation:
- Set Up Your Scene: Set up your scene and position your objects.
- Use a Tripod: Use a tripod to keep your MacBook stable.
- Take a Photo: Take a photo of your scene.
- Make a Small Adjustment: Make a small adjustment to your objects.
- Repeat: Repeat steps 3 and 4 until you have captured all of the images you need.
- Edit Your Animation: Use stop-motion animation software to string your images together and create your animation.
7. Privacy and Security
7.1. How Do I Cover My MacBook Camera for Privacy?
Covering your MacBook camera is a simple and effective way to protect your privacy and prevent unauthorized access.
Methods for Covering Your Camera:
- Use a Camera Cover: Purchase a camera cover or slider that can be easily attached and detached from your MacBook.
- Use a Piece of Tape: Use a small piece of tape to cover the camera lens.
- Use a Post-it Note: Use a small Post-it note to cover the camera lens.
7.2. Managing Camera Permissions on macOS
macOS provides robust privacy controls that allow you to manage which applications have access to your camera.
How to Manage Camera Permissions:
- Open System Preferences: Open System Preferences from the Apple menu.
- Click Security & Privacy: Click on the Security & Privacy pane.
- Select Privacy: Select the Privacy tab.
- Choose Camera: Choose Camera from the list on the left.
- Manage Permissions: Check or uncheck the boxes next to the applications to grant or revoke camera access.
7.3. Understanding the Green Camera Indicator Light
The green camera indicator light is a crucial privacy feature that alerts you whenever an application is using your camera.
Understanding the Green Light:
- Green Light On: The green light indicates that the camera is active and in use.
- Green Light Off: The green light indicates that the camera is not active.
8. Connecting With dfphoto.net
8.1. Explore dfphoto.net for More Photography Tips
For more comprehensive photography tips, techniques, and inspiration, explore dfphoto.net. Our website offers a wealth of resources for photographers of all skill levels.
8.2. Join Our Photography Community
Join our vibrant photography community to connect with fellow photographers, share your work, and learn from others. Our community provides a supportive and collaborative environment for photographers to grow and develop their skills.
8.3. Contact Us for Personalized Assistance
If you have any questions or need personalized assistance with your photography, don’t hesitate to contact us. Our team of experienced photographers is here to help you achieve your photographic goals. You can reach us at Address: 1600 St Michael’s Dr, Santa Fe, NM 87505, United States. Phone: +1 (505) 471-6001 or visit our Website: dfphoto.net.
Taking photos with your MacBook is a great way to capture memories, express your creativity, and connect with others. By understanding the basics of camera operation, optimizing your photo quality, and exploring advanced techniques, you can unlock your MacBook’s photographic potential and create stunning images. Remember to prioritize your privacy and security by managing camera permissions and understanding the green camera indicator light.
Are you ready to elevate your MacBook photography skills and unleash your creative vision? Visit dfphoto.net today to discover a world of photography resources, connect with a passionate community, and receive personalized assistance from our expert team. Transform your MacBook into a powerful photography tool and capture the beauty of the world around you. dfphoto.net is your ultimate destination for all things photography, visual artistry, and creative expression.
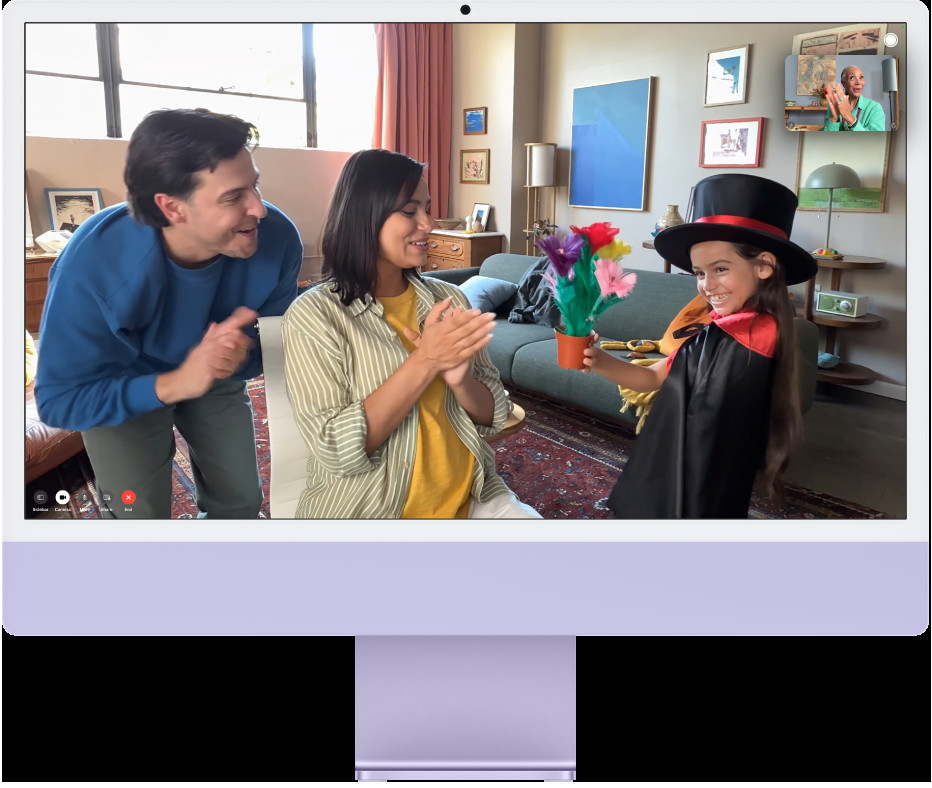 An iMac with people using Center Stage
Alt text: An iMac displaying individuals utilizing the Center Stage feature, highlighting its capabilities in automatically framing subjects during video calls and recordings.
FAQ: Taking Photos With Your MacBook
1. Can I use my MacBook camera for professional photography?
While the built-in camera is suitable for basic photography, professional photographers often prefer external webcams or DSLRs for higher image quality.
2. How do I adjust the brightness of my MacBook camera?
You can adjust the brightness settings within the application you are using, such as FaceTime or Photo Booth.
3. What is the best lighting for taking photos with my MacBook?
Soft, even lighting is best. Position yourself near a window for natural light or use a soft light source such as a lamp with a lampshade.
4. How do I clean my MacBook camera lens?
Use a soft, lint-free microfiber cloth to gently wipe the lens. Avoid using harsh chemicals or abrasive cleaners.
5. Can I use video effects with my MacBook camera?
Yes, many applications such as FaceTime and Photo Booth offer video effects that you can use to enhance your photos and videos.
6. How do I record a video with my MacBook camera?
You can record a video using applications such as Photo Booth, QuickTime Player, or third-party camera applications.
7. How do I take a screenshot with my MacBook camera?
You can take a screenshot by pressing Shift + Command + 4 and selecting the window you want to capture.
8. How do I manage camera permissions on my MacBook?
Go to System Preferences > Security & Privacy > Privacy > Camera to manage which applications have access to your camera.
9. What do I do if my MacBook camera is not working?
Check camera permissions, close conflicting applications, restart your MacBook, check for updates, and reset the SMC.
10. Where can I find more photography tips and resources?
Visit dfphoto.net for comprehensive photography tips, techniques, and inspiration.