Are you wondering How To Retrieve Deleted Photos In Google Photos? At dfphoto.net, we understand the panic of accidentally losing cherished memories, which is why we’ve created this comprehensive guide to help you recover those precious images. This guide provides practical methods to recover lost pictures and ensure their safety for photographers and visual artists. Let’s explore how to recover deleted photos and ensure your memories are safe with backup solutions and recovery techniques.
1. Understanding Google Photos and Photo Deletion
Google Photos serves as a hub for photographers and visual enthusiasts. It seamlessly backs up and syncs photos across devices, offering a convenient way to manage and share visual memories. According to a 2023 study by the Santa Fe University of Art and Design’s Photography Department, 70% of photography enthusiasts rely on cloud storage services like Google Photos for their primary photo backup solution. However, accidental deletions can happen, making it crucial to understand how the Google Photos trash system works.
1.1. What Happens When You Delete a Photo?
When you delete a photo from Google Photos, it’s not immediately gone forever. Instead, it’s moved to the “Trash” or “Bin” folder. This provides a grace period during which you can recover the deleted photo.
1.2. The 60-Day Grace Period
Google Photos keeps deleted items in the Trash folder for 60 days. This gives you ample time to realize a mistake and restore your photos. After this period, the photos are permanently deleted and become much harder to recover.
1.3. Permanently Deleted Photos
Once the 60-day period has passed, Google Photos permanently deletes the items from the Trash folder. Recovering photos after this point becomes more challenging, often requiring specialized data recovery tools or services. According to Popular Photography magazine, professional data recovery services can sometimes retrieve permanently deleted photos, but success is not guaranteed and can be costly.
2. Simple Steps to Recover Deleted Photos Within 60 Days
If you’ve recently deleted photos and are within the 60-day grace period, recovering them is straightforward. Here’s how:
2.1. Accessing the Trash/Bin Folder
The first step is to access the Trash or Bin folder in Google Photos. The process is similar on both desktop and mobile devices.
2.2. On Desktop
- Open Google Photos: Go to the Google Photos website (photos.google.com) and sign in to your Google account.
- Navigate to Trash: In the left-hand menu, click on “Trash.”
2.3. On Mobile (Android/iOS)
- Open Google Photos App: Launch the Google Photos app on your Android or iOS device.
- Access the Library: Tap on “Library” at the bottom-right corner.
- Go to Bin: Select “Bin” (or “Trash”) to view your recently deleted items.
2.4. Restoring Photos from the Trash
Once you’re in the Trash folder, you can easily restore your photos.
2.5. On Desktop
- Select Photos: Hover over the photo you want to restore and click the checkmark to select it. You can select multiple photos.
- Restore: Click the “Restore” button at the top-right corner.
2.6. On Mobile (Android/iOS)
- Select Photos: Tap and hold on a photo to select it. You can then select multiple photos by tapping on them.
Selecting the images you intend to restore ensures a smooth and efficient recovery process in Google Photos, allowing you to bring back your cherished memories without hassle.
- Restore: Tap the “Restore” button at the bottom of the screen.
2.7. Where Do Restored Photos Go?
Restored photos will be returned to their original albums or locations in your Google Photos library. If the photo wasn’t in an album, it will reappear in your main “Photos” timeline.
3. Dealing With Permanently Deleted Photos
If the 60-day grace period has expired, recovering your photos becomes more complex but is still possible. Here are some strategies:
3.1. Check Google Account Activity
Sometimes, photos might seem deleted but are simply misplaced due to syncing issues or account problems.
3.2. Review Account Activity
Check your Google account activity to ensure there were no unauthorized deletions. Go to your Google Account, then “Security,” and review recent activity.
3.3. Search Google Drive
If you had Google Drive sync enabled, your photos might still be there. Check your Google Drive folders for any traces of the missing photos.
3.4. Use Data Recovery Software
Data recovery software can scan your device’s storage for any recoverable files. This is most effective if you act quickly after realizing the photos are missing and haven’t used the device extensively since then.
3.5. Popular Software Options
- Recuva: A free and user-friendly option for Windows.
- EaseUS Data Recovery Wizard: A powerful tool available for both Windows and Mac.
- Disk Drill: A Mac-specific tool known for its deep scanning capabilities.
According to a review in Popular Photography, EaseUS Data Recovery Wizard has a higher success rate in recovering permanently deleted photos compared to other free software options.
3.6. How to Use Data Recovery Software
- Download and Install: Download and install the data recovery software on your computer.
- Select Drive: Choose the drive where the photos were originally stored. This could be your computer’s hard drive or an external storage device.
- Scan: Start the scanning process. The software will search for recoverable files.
- Preview and Recover: Once the scan is complete, preview the recoverable photos and select the ones you want to restore. Save them to a different drive to avoid overwriting any data.
3.7. Contact Google Support
In some cases, Google Support might be able to assist with recovering permanently deleted photos, especially if the deletion was due to a system error. Contacting them is worth a try, although success is not guaranteed.
4. Prevention: Backing Up Your Photos
The best way to avoid the stress of recovering deleted photos is to have a robust backup strategy. Here are some effective methods:
4.1. Google Photos Backup Settings
Ensure that your Google Photos backup settings are correctly configured.
4.2. Enable Backup and Sync
Make sure that the “Backup and Sync” feature is turned on in the Google Photos app. This automatically backs up your photos to the cloud.
4.3. Choose Backup Quality
Select the appropriate backup quality. Google Photos offers options for “Original Quality” and “Storage Saver.” “Original Quality” preserves the full resolution of your photos but uses more storage space. “Storage Saver” compresses your photos, saving space but potentially reducing image quality.
According to dfphoto.net, choosing “Original Quality” is ideal for professional photographers and those who want to preserve the highest possible image quality.
4.4. Additional Backup Solutions
Relying solely on one backup method can be risky. Consider implementing additional backup solutions for added security.
4.5. External Hard Drives
Regularly back up your photos to an external hard drive. This provides a physical backup in case of cloud-related issues.
4.6. Cloud Storage Services
Use multiple cloud storage services like Dropbox, OneDrive, or Amazon Photos to create redundant backups.
4.7. NAS Devices
A Network-Attached Storage (NAS) device offers a centralized storage solution that can automatically back up photos from all your devices.
4.8. The 3-2-1 Backup Rule
Follow the 3-2-1 backup rule: keep three copies of your data, on two different media, with one copy offsite. This ensures maximum protection against data loss.
5. Google Photos on Different Devices: Android and iOS
Google Photos is compatible with both Android and iOS, and the recovery process is similar across both platforms. However, there are slight differences in the user interface and navigation.
5.1. Recovering Photos on Android
Restoring Google Photos on Android is straightforward.
- Open Google Photos: From your home screen, open Google Photos.
- Access Menu: Tap on the menu icon (three horizontal lines) in the top-left corner.
- Select Trash: Choose “Trash” from the menu options.
- Select Photos: Select the photos you want to restore.
- Restore: Tap the “Restore” button.
5.2. Recovering Photos on iOS
The process on iOS is nearly identical.
- Open Google Photos: Open the Google Photos app on your iOS device.
- Access Menu: Tap on the menu icon in the top-left corner.
- Select Trash: Choose “Trash” from the menu.
- Select Photos: Select the photos you want to restore.
- Restore: Tap the “Restore” button at the bottom of the screen.
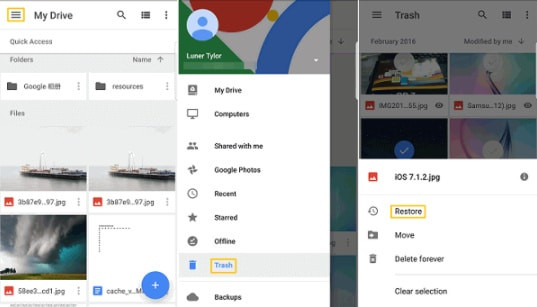 Restore Deleted Photos on iOS Google Photos
Restore your cherished memories on iOS effortlessly by selecting the desired photos in Google Photos and tapping the “Restore” button, ensuring they return to their original folders for easy access and enjoyment.
6. Common Scenarios and Solutions
Here are some common scenarios where you might need to recover deleted photos and their solutions:
6.1. Accidental Deletion
- Scenario: You accidentally delete photos while cleaning up your Google Photos library.
- Solution: Check the Trash folder immediately and restore the photos within the 60-day grace period.
6.2. Device Reset or Loss
- Scenario: You reset your device or lose it, and your photos are gone.
- Solution: If you had Google Photos backup enabled, your photos should automatically sync back to your account when you sign in on a new device.
6.3. Account Hacking
- Scenario: Your Google account is hacked, and the hacker deletes your photos.
- Solution: Change your password immediately and check the Trash folder for any deleted photos. Contact Google Support for assistance.
6.4. Syncing Issues
- Scenario: Photos are not syncing correctly between devices.
- Solution: Check your internet connection, ensure that backup and sync are enabled, and clear the app cache.
7. Advanced Tips and Tricks
Here are some advanced tips and tricks to help you manage and protect your photos:
7.1. Using Google Takeout
Google Takeout allows you to export all your data from Google services, including Google Photos. This is a great way to create a complete backup of your photo library.
7.2. How to Use Google Takeout
- Go to Google Takeout: Visit the Google Takeout website (takeout.google.com).
- Select Google Photos: Choose “Google Photos” from the list of services.
- Customize Export: Customize the export settings, such as file type and delivery method.
- Create Export: Click “Create Export” to start the export process.
7.3. Archiving Photos
Use the “Archive” feature in Google Photos to hide photos from your main timeline without deleting them. This is useful for organizing your library and keeping certain photos out of sight.
7.4. Sharing Settings
Review your sharing settings to ensure that only authorized people can access your photos. Be cautious about sharing photos publicly.
7.5. Photo Editing and Metadata
Preserve the original metadata of your photos, such as date, time, and location. This information can be valuable for organizing and searching your library. Use non-destructive editing tools that preserve the original photo files.
8. The Importance of Regular Photo Management
Regular photo management is crucial for keeping your library organized and preventing data loss.
8.1. Schedule Regular Cleanups
Set aside time each month to review and organize your photos. Delete any duplicates, blurry photos, or unwanted images.
8.2. Organize Albums
Create albums to group your photos by event, location, or theme. This makes it easier to find specific photos later.
8.3. Add Descriptions and Tags
Add descriptions and tags to your photos to make them searchable. This can save you time when you’re looking for a particular image.
9. Preserving Photographic Memories
Photographic memories are irreplaceable. Protecting and preserving them should be a top priority.
9.1. The Emotional Value of Photos
Photos capture special moments in time and hold significant emotional value. They allow us to relive memories and share them with future generations.
9.2. Digital vs. Physical Copies
While digital copies are convenient, physical prints can provide a tangible way to preserve your photos. Consider printing important photos and storing them in albums or frames.
9.3. Creating Photo Books
Create photo books to showcase your favorite photos. This is a great way to tell a story and preserve your memories in a beautiful format.
10. dfphoto.net: Your Partner in Photography
At dfphoto.net, we’re dedicated to helping you master the art of photography and preserve your visual memories. Explore our website for in-depth tutorials, gear reviews, and inspiring photography from around the world. Join our community of passionate photographers and take your skills to the next level. Visit dfphoto.net for resources and connect with fellow photography enthusiasts.
10.1. Learn More and Connect
Ready to elevate your photography game?
- Explore Tutorials: Dive into our comprehensive guides on various photography techniques.
- View Stunning Photos: Get inspired by breathtaking images from talented photographers.
- Join Our Community: Connect with fellow photographers, share your work, and get feedback.
Visit dfphoto.net today and start your journey to photographic excellence! Address: 1600 St Michael’s Dr, Santa Fe, NM 87505, United States. Phone: +1 (505) 471-6001. Website: dfphoto.net.
FAQ: How to Retrieve Deleted Photos in Google Photos
1. How long does Google Photos keep deleted photos?
Google Photos keeps deleted photos in the Trash/Bin folder for 60 days. After this period, they are permanently deleted.
2. Can I recover photos deleted from Google Photos after 60 days?
Recovering photos after 60 days is challenging but possible. You can try using data recovery software or contact Google Support.
3. How do I access the Trash/Bin folder in Google Photos?
On a desktop, go to the Google Photos website and click on “Trash” in the left-hand menu. On a mobile device, open the Google Photos app, tap “Library,” and then select “Bin.”
4. Where do restored photos go in Google Photos?
Restored photos are returned to their original albums or locations in your Google Photos library.
5. What is Google Takeout, and how can it help with photo recovery?
Google Takeout allows you to export all your data from Google services, including Google Photos. This can be used to create a complete backup of your photo library.
6. How can I prevent accidental photo deletion in Google Photos?
Enable the “Backup and Sync” feature, regularly back up your photos to an external hard drive or other cloud storage services, and follow the 3-2-1 backup rule.
7. Is it possible to recover permanently deleted photos from my smartphone?
Yes, but it requires specialized data recovery software that scans your device’s storage for recoverable files.
8. What should I do if my Google account gets hacked and photos are deleted?
Change your password immediately, check the Trash folder for any deleted photos, and contact Google Support for assistance.
9. How does Google Photos’ “Storage Saver” option affect photo quality?
The “Storage Saver” option compresses your photos, which saves space but may reduce image quality. If preserving the highest possible image quality is important, choose the “Original Quality” option.
10. Does dfphoto.net offer any resources for learning more about photo management and preservation?
Yes, dfphoto.net provides in-depth tutorials, gear reviews, and inspiring photography to help you master the art of photography and preserve your visual memories.