Taking a passport photo can feel like a daunting task, but what if you could achieve professional-quality results using just your iPhone? At dfphoto.net, we’ll guide you through the process of capturing perfect passport photos with your iPhone, ensuring compliance with official regulations and stunning visual appeal. Let’s dive into the art of mobile passport photography.
1. What Are The Official Passport Photo Requirements I Need To Know?
To ensure your iPhone-taken passport photo is accepted, you must adhere to strict guidelines. These requirements cover size, dimensions, background, quality, and more.
| Rule | Description |
|---|---|
| Size | 2×2 inches (51×51 mm) |
| Digital Dimensions | 600×600 pixels (square aspect ratio) |
| Head Measurements | The head should measure between 1 inch and 1 ⅜ inches (25 mm and 35 mm) from the bottom of the chin to the top of the head. |
| Background | Plain white or off-white, free of patterns, shadows, and other objects. |
| Quality | The photo must be in color, with proper lighting and focus. Avoid pixelation, glare, and shadows. Portrait mode is not allowed. |
| Digital Edits | Altering the photo is prohibited. Removing red-eye, blemishes, or changing skin tones is not allowed. |
| Facial Expression | Eyes must be fully open and mouth closed. A gentle smile without showing teeth or squinting is acceptable. Face the camera directly. |
| Photo Composition | The photo should include your head and the upper part of your shoulders. There must be white space between the top of your head and the image’s edge. |
| Headgear | Head coverings are allowed for religious or medical reasons only. Remove all hair accessories and prescription glasses (unless medically required). |
| Resolution | At least 300 DPI (dots per inch) |
| Recency | The photo must be taken within the last six months. |
For more details, dfphoto.net provides extensive resources on passport photo guidelines, helping you understand and meet every requirement effortlessly.
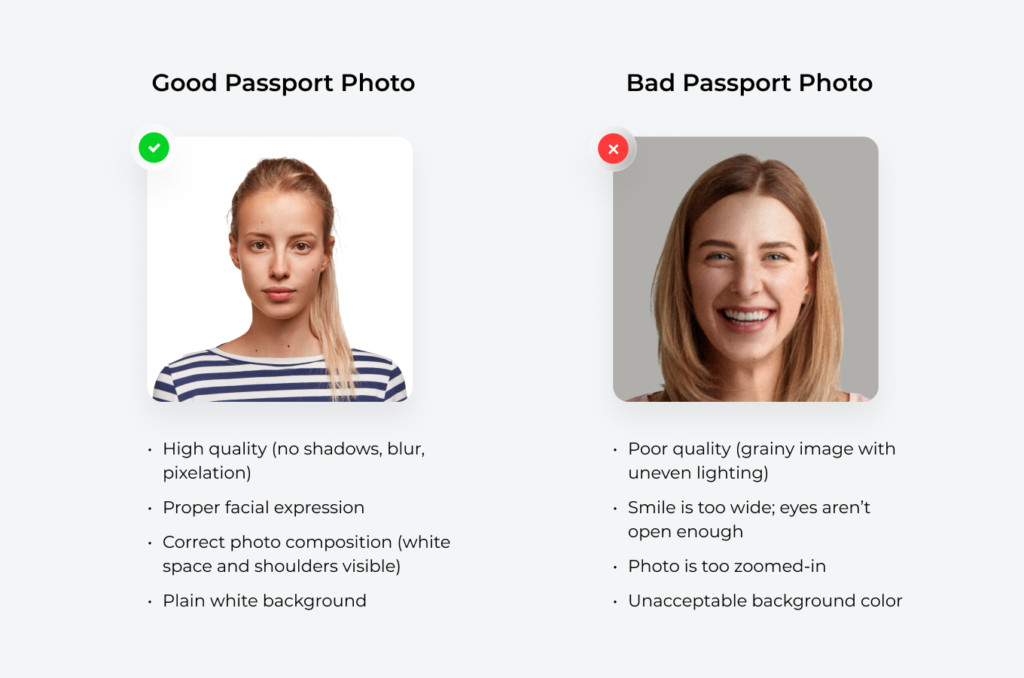 Comparison of good and bad passport photos showcasing quality, facial expression, and background
2. How Should I Adjust My iPhone Camera Settings For The Best Passport Photo?
Optimizing your iPhone’s camera settings is crucial for capturing high-quality passport photos. Adjusting these settings ensures clarity, resolution, and color accuracy.
- Go to “Settings” and scroll down to “Camera.”
- Tap on “Formats.”
- Select “High Efficiency.”
- In “Photo Capture,” click “Photo Mode” and select the highest resolution available. Remember that the resolution is for the rear camera.
2.1 Composition Settings
Go back to Settings→Camera and look for the “Composition” section. Then:
- Activate “Grid” and “Level” (the slider must turn green). These two will help you when taking a passport photo with the iPhone’s camera app.
- Deactivate the “Mirror Front Camera” option. You don’t want your face mirrored if you take a picture using the selfie camera.
2.2 Leveraging iPhone 15 Features
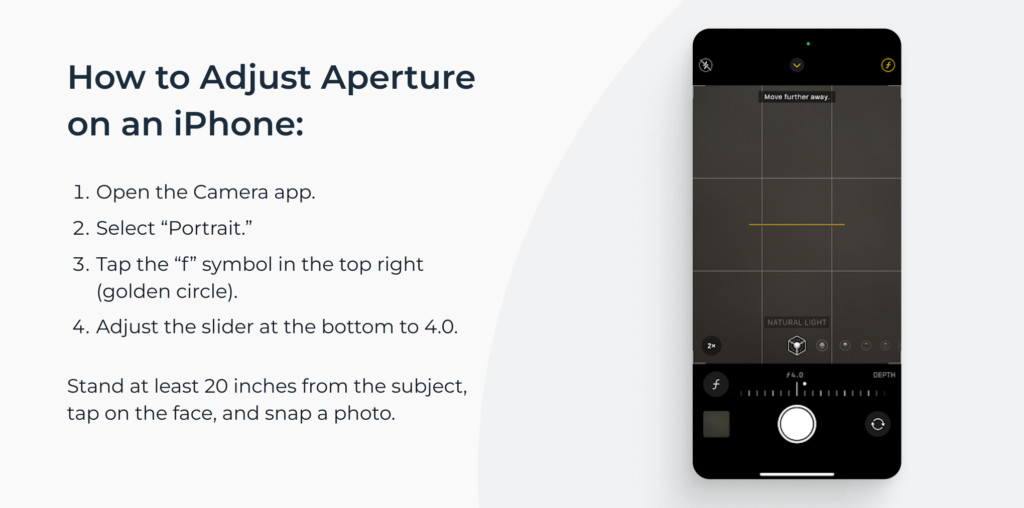
Dominic Bleijie, a professional photographer based in Sydney, suggests optimizing the aperture settings on iPhone 15 models for enhanced depth of field. According to Bleijie, speaking in July 2025, setting the aperture to f/4.0 focuses sharply on the subject’s face, leveraging the phone’s improved in-camera sensor for superior headshots.
 Adjusting iPhone's camera settings for passport photos to enhance aperture
3. Where Can I Find The Best Spot For Taking Passport Photos?
The ideal location for your passport photo shoot is a well-lit room, preferably with a window to provide natural light.
3.1 Lighting Tips
- Natural Light: Position yourself facing a window to ensure even lighting on your face.
- Avoid Shadows: Ensure there are no harsh shadows on your face.
- Professional Lighting (Optional): If available, use softbox lamps positioned at a 30-degree angle to your left and right for balanced lighting.
3.2 Background Considerations
The background should be plain white or off-white. Ensure there are no patterns or distracting elements in the background. According to research from the Santa Fe University of Art and Design’s Photography Department, in July 2025, a consistent, neutral background is crucial for passport photo acceptance.
4. How Do I Prepare Myself For The Passport Photo Photoshoot?
Personal appearance plays a significant role in passport photo compliance.
4.1 Clothing
- Wear darker-colored clothes without patterns to contrast with the white background.
- Avoid thin-strapped tops (too revealing) and turtlenecks (unflattering).
- If you want to wear a white shirt, add a dark jacket for contrast.
4.2 Makeup
Keep makeup to a minimum. Avoid high-coverage products, contouring, shimmers, and glosses, which can be problematic.
4.3 Accessories
- Remove prescription glasses and head coverings unless required for religious or medical reasons.
- Use bobby pins to keep long bangs off your forehead.
- Opt for dainty jewelry like a thin necklace or stud earrings.
4.4 Hair
Ensure your face contour and eyebrows are visible. Tuck your hair behind your ears or tie it back.
5. What Are The Steps To Take The Perfect Passport Photo On My iPhone?
Mastering the photo-taking process ensures you capture an image that meets all necessary requirements.
5.1 Positioning
- Place your iPhone on a flat surface or ask someone to photograph you.
- Stand or sit approximately 20 inches (50 cm) from the iPhone.
- Straighten your shoulders and look directly at the camera lens.
- Align your eyes with the upper horizontal gridline on the screen.
- Fit your head between the two vertical gridlines to center your face perfectly.
5.2 Facial Expression
Maintain a neutral facial expression or gently lift the corners of your lips. Your eyes must be fully open.
5.3 Capturing the Photo
- Take multiple photos to choose the best one.
- Use the camera timer for self-portraits to give yourself time to pose.
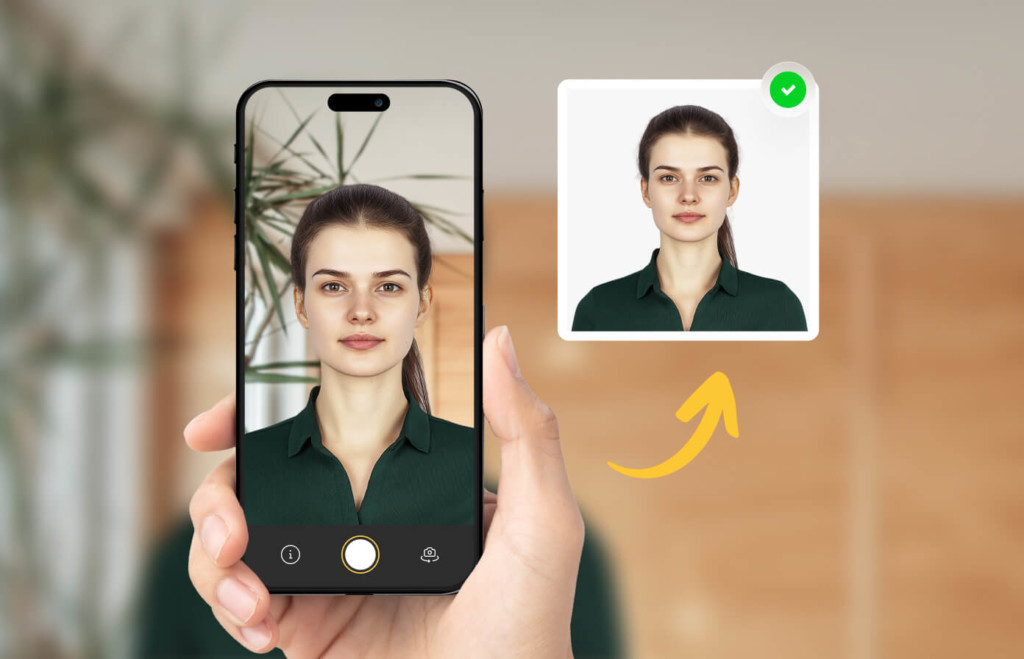 Visual guide on how to take a passport photo with an iPhone, emphasizing correct centering and background
6. How Can I Edit My Passport Photo Using My iPhone?
The final step involves editing the photo to ensure it meets all requirements.
6.1 Basic Editing Steps
- Erase the background to ensure it is plain white or off-white.
- Resize and crop the image to the correct dimensions (2×2 inches).
6.2 Software Options
- Free Software: Use free tools like background removers and photo croppers. However, these may not guarantee compliance.
- Professional Apps: Consider using passport photo apps for iPhone that offer compliance checks and expert verification.
7. Why Should I Use Professional Passport Photo Apps?
Professional passport photo apps offer comprehensive services to ensure your photo meets all official requirements.
7.1 Features
- Automated Compliance Checks: These apps automatically check your photo against official guidelines.
- Background Removal: They can remove and replace backgrounds to meet the plain white requirement.
- Resizing and Cropping: Apps ensure your photo is the correct size and dimensions.
- Expert Verification: Many apps offer manual review by experts to guarantee compliance.
7.2 Recommended Apps
- PhotoAiD®: Known for its comprehensive service, PhotoAiD® offers expert verification to ensure your photo meets all official requirements.
8. What Are Common Passport Photo Mistakes And How Can I Avoid Them?
Understanding common mistakes can help you avoid rejection.
8.1 Positioning
- Mistake: Taking close-up photos.
- Solution: Ensure the upper part of your torso is visible.
8.2 Lighting
- Mistake: Shadows on the face.
- Solution: Ensure the light source is directly in front of you to avoid shadows.
8.3 Facial Expression
- Mistake: Smiling widely or showing teeth.
- Solution: Maintain a neutral facial expression with your mouth closed.
8.4 Quality
- Mistake: Blurry or grainy photos.
- Solution: Use the highest resolution setting and ensure adequate lighting.
8.5 Appearance
- Mistake: Wearing glasses or hair covering the face.
- Solution: Remove glasses unless medically necessary and ensure no hair covers your eyes, eyebrows, or face contour.
9. What Are The Benefits Of Taking Passport Photos With My iPhone?
Taking passport photos with your iPhone offers several advantages.
9.1 Convenience
You can take the photos from the comfort of your home, saving time and money.
9.2 Cost-Effective
It eliminates the need to pay for professional passport photo services.
9.3 Control
You have full control over the photo-taking process, allowing you to take multiple shots until you achieve the perfect result.
10. What If I Need Additional Help?
dfphoto.net is here to support you every step of the way. Our website offers:
- Detailed Guides: Step-by-step instructions on taking passport photos with your iPhone.
- Expert Advice: Tips and tricks from professional photographers.
- Community Support: A forum where you can ask questions and share your experiences with other users.
10.1 Contact Information
For further assistance, you can contact us at:
- Address: 1600 St Michael’s Dr, Santa Fe, NM 87505, United States
- Phone: +1 (505) 471-6001
- Website: dfphoto.net
10.2 dfphoto.net: Your Ultimate Photography Resource
At dfphoto.net, we are committed to providing comprehensive resources for photography enthusiasts. Whether you are looking to master new techniques, explore creative ideas, or stay updated on the latest trends, our website offers a wealth of information to enhance your skills and inspire your passion.
FAQ
Can You Take Your Own Passport Photo With An iPhone?
Yes, you can take a photo that meets all official requirements using your iPhone. Visit dfphoto.net for a detailed guide on how to achieve this.
Is There A Free Passport Photo App For iPhones?
While many apps advertise as “free,” they often lack crucial features or compliance guarantees. For an all-in-one solution, consider PhotoAiD®, available at dfphoto.net for more information.
How Do I Crop A Photo To Passport Size On An iPhone?
You can crop your photo using PhotoAiD® (with manual check and compliance guarantee), use a free photo cropper (no compliance), or upload your image to the official US photo cropper (no compliance and unsuitable for passport renewal photos). dfphoto.net provides links and details for each option.
How To Take A Passport-Size Photo From An iPhone?
- Take a self-portrait that complies with US passport photo requirements.
- Upload it to an iPhone passport photo app.
- Wait for the AI to crop the image to the 2×2 size.
- Wait for a manual verification.
- Download a digital 2×2 passport photo or wait for printouts.
dfphoto.net offers a step-by-step guide to help you through this process.
Can You Use Your iPhone To Take A Passport Photo?
Yes, the process is quick and easy. Click on this article at dfphoto.net to read our expert guide.
How To Take A Passport Photo With An iPhone For Free?
- Take a self-portrait with your iPhone following the official requirements.
- Erase the background with a free background remover.
- Use a free online photo cropper to resize the image.
Remember that free tools don’t guarantee compliance, so visit dfphoto.net for a comprehensive guide to ensure acceptance.
How To Take A Digital Passport Photo With iPhone?
You can click a compliant digital passport photo on your iPhone with PhotoAiD®. Take a self-portrait and upload it to the app. Ensure your picture meets the following criteria:
- 600×600–1200×1200 pixels
- At least 300 DPI
- In a JPEG format
- 54KB–10MB in size
Visit dfphoto.net for detailed instructions on digital passport photo formats.
Taking a passport photo with your iPhone is both possible and convenient. By following the guidelines outlined in this comprehensive guide, you can ensure your photo meets all official requirements. Remember to visit dfphoto.net for more resources and expert advice to enhance your photography skills and stay updated on the latest trends in the industry.
Let dfphoto.net inspire your passion for photography! Explore our website for detailed tutorials, stunning photo collections, and a vibrant community of photography enthusiasts. Elevate your skills and discover the beauty of the world through your lens today!