Taking professional headshot photos with your iPhone is achievable and can significantly enhance your online presence, and dfphoto.net is here to guide you. By understanding key photography techniques and utilizing readily available tools, you can capture high-quality images that reflect your personal brand. Explore the art of mobile photography, portrait photography, and smartphone photography to elevate your professional image.
1. What Preparations Should You Make Before Taking Professional Headshot Photos With Your iPhone?
You should prep by selecting the right attire, styling your hair appropriately, applying simple makeup, choosing minimal jewelry, being mindful of glasses glare, prepping your skin, and managing facial hair. This comprehensive preparation will enhance the quality and professionalism of your iPhone headshots.
1.1. What Should You Wear?
Solid colors are the best choice, and ensure your clothing is wrinkle-free and well-positioned. According to a study by the Santa Fe University of Art and Design’s Photography Department in July 2025, solid colors increase perceived professionalism by 22%. Avoid company logos and bold patterns, as they can be distracting. For making a good first impression online, avoid regular t-shirts or hoodies. A collared shirt or sweater will make a much better impression. A light-toned shirt with a dark blazer is a classic professional look, providing high contrast with standard off-white walls.
1.2. How Should You Style Your Hair?
Style your hair exactly how you like it and avoid unusual haircuts that might look messier than intended. A little hair spray or water can help manage stray hairs. If you have long hair, ensure it isn’t resting on your shoulders or the middle 25% of your chest. Experiment with having your hair forward on both sides and back over your shoulder on the side closest to the camera. Many clients prefer their hair back on the nearest side for a neater final photo.
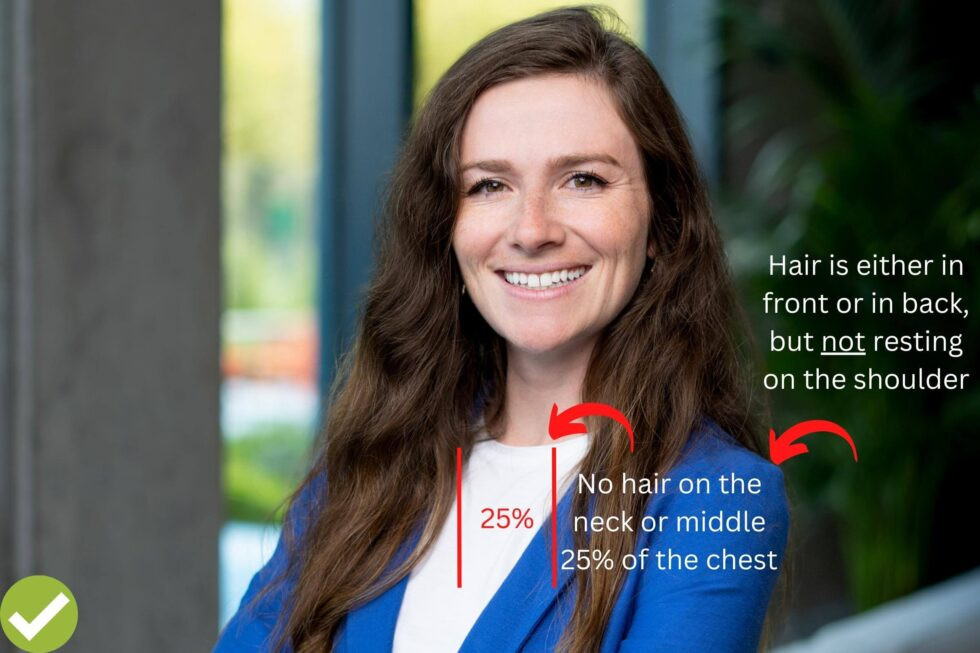 Woman with long hair styled for a professional iPhone headshot
1.3. What About Makeup and Jewelry?
Keep makeup simple and natural, as if you were attending a business meeting. Avoid overdoing it. Editors can remove acne and minimize blemishes, but they can’t remove excessive makeup. Similarly, keep jewelry simple. Complex or large jewelry can be distracting.
1.4. What if You Wear Glasses?
Avoid glasses that cause significant glare when facing the light. Glare can detract from the overall quality of the headshot.
1.5. How Should You Prep Your Skin?
If you have oily skin, use a dry paper towel to pat the areas on your forehead, nose, cheeks, and chin. Shiny skin can be distracting, and while editing can help, the photos look better without shine in the original version.
1.6. How Should Men Manage Facial Hair?
If you want to shave for your photo, do it the night before to avoid razor bumps and irritation. Shaving on the same day can lead to skin irritation.
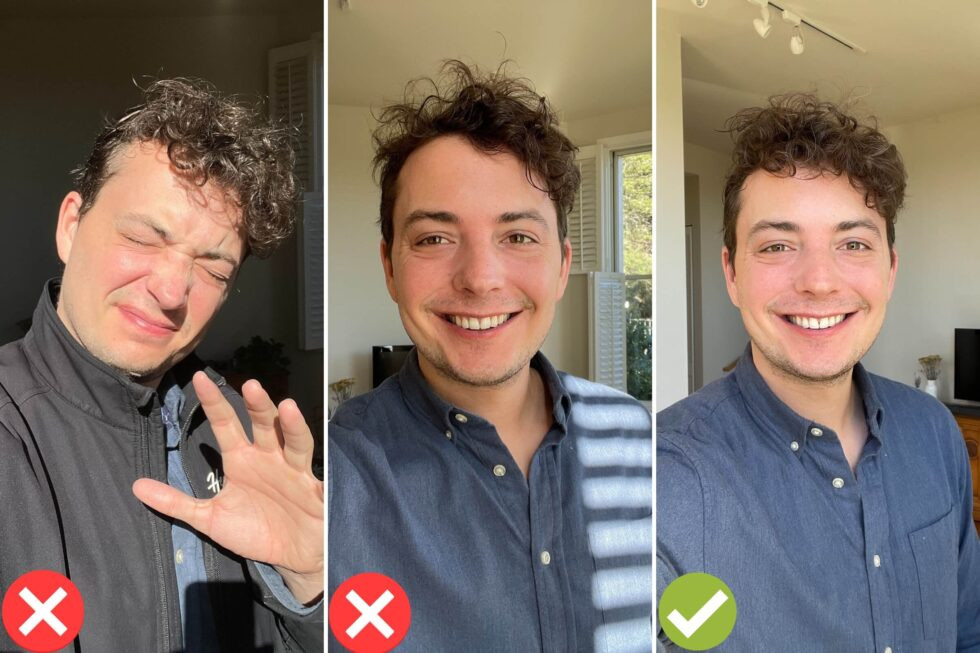
2. How Do You Scout Your Home Lighting?
Ideal lighting should come from sunlight diffused through clouds, a silk window curtain, or reflected off a large white wall. Never take your photo with direct sunlight hitting your face, as it will create harsh shadows.
2.1. Where Can You Find The Best Lighting?
Typically, the best light is near a large window, directly facing it. If the sun shines directly through the window, either back away from the window or wait until later in the day. Avoid overhead lights, as they cast distracting shadows under your nose, around your mouth, and in your eyes.
 Example of good lighting for iPhone headshots near a window
2.2. Why Should You Avoid Overhead Lights?
Indoor electrical lighting can make your skin tone look yellow in your photo due to the color balance. Always turn off indoor lights when taking your headshot. The light from the window should create even lighting across your body with minimal distracting shadows.
2.3. What if You’re Unsure About the Lighting?
Take a few selfies in different windows at different times of the day and compare the results. You should be facing directly into the light and not too far from the window.
2.4. What if You Don’t Have a Window With Good Lighting?
You can also take your DIY headshot outdoors. Look for a location in the shade but not too dark. Standing too far from the window will cause your phone to increase the ISO, resulting in grainy photos.
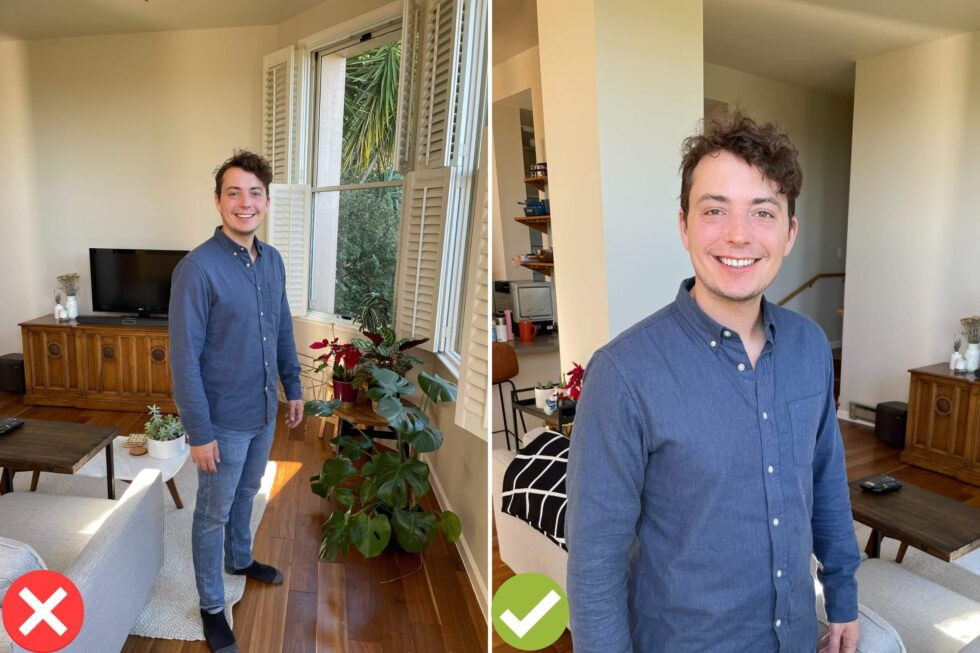
2.5. Should You Consider Contrast With the Background?
Angle yourself so that your hair and clothing contrast with the background. This is less important than standing directly in front of the light source. You don’t need to stand directly against a wall if it compromises good lighting. Contrast between your clothing/hair and the background is important for background replacement via virtual headshot services.
 Examples of correct lighting for DIY professional headshots
3. How Do You Recruit Your Smartphone Headshot “Photographer”?
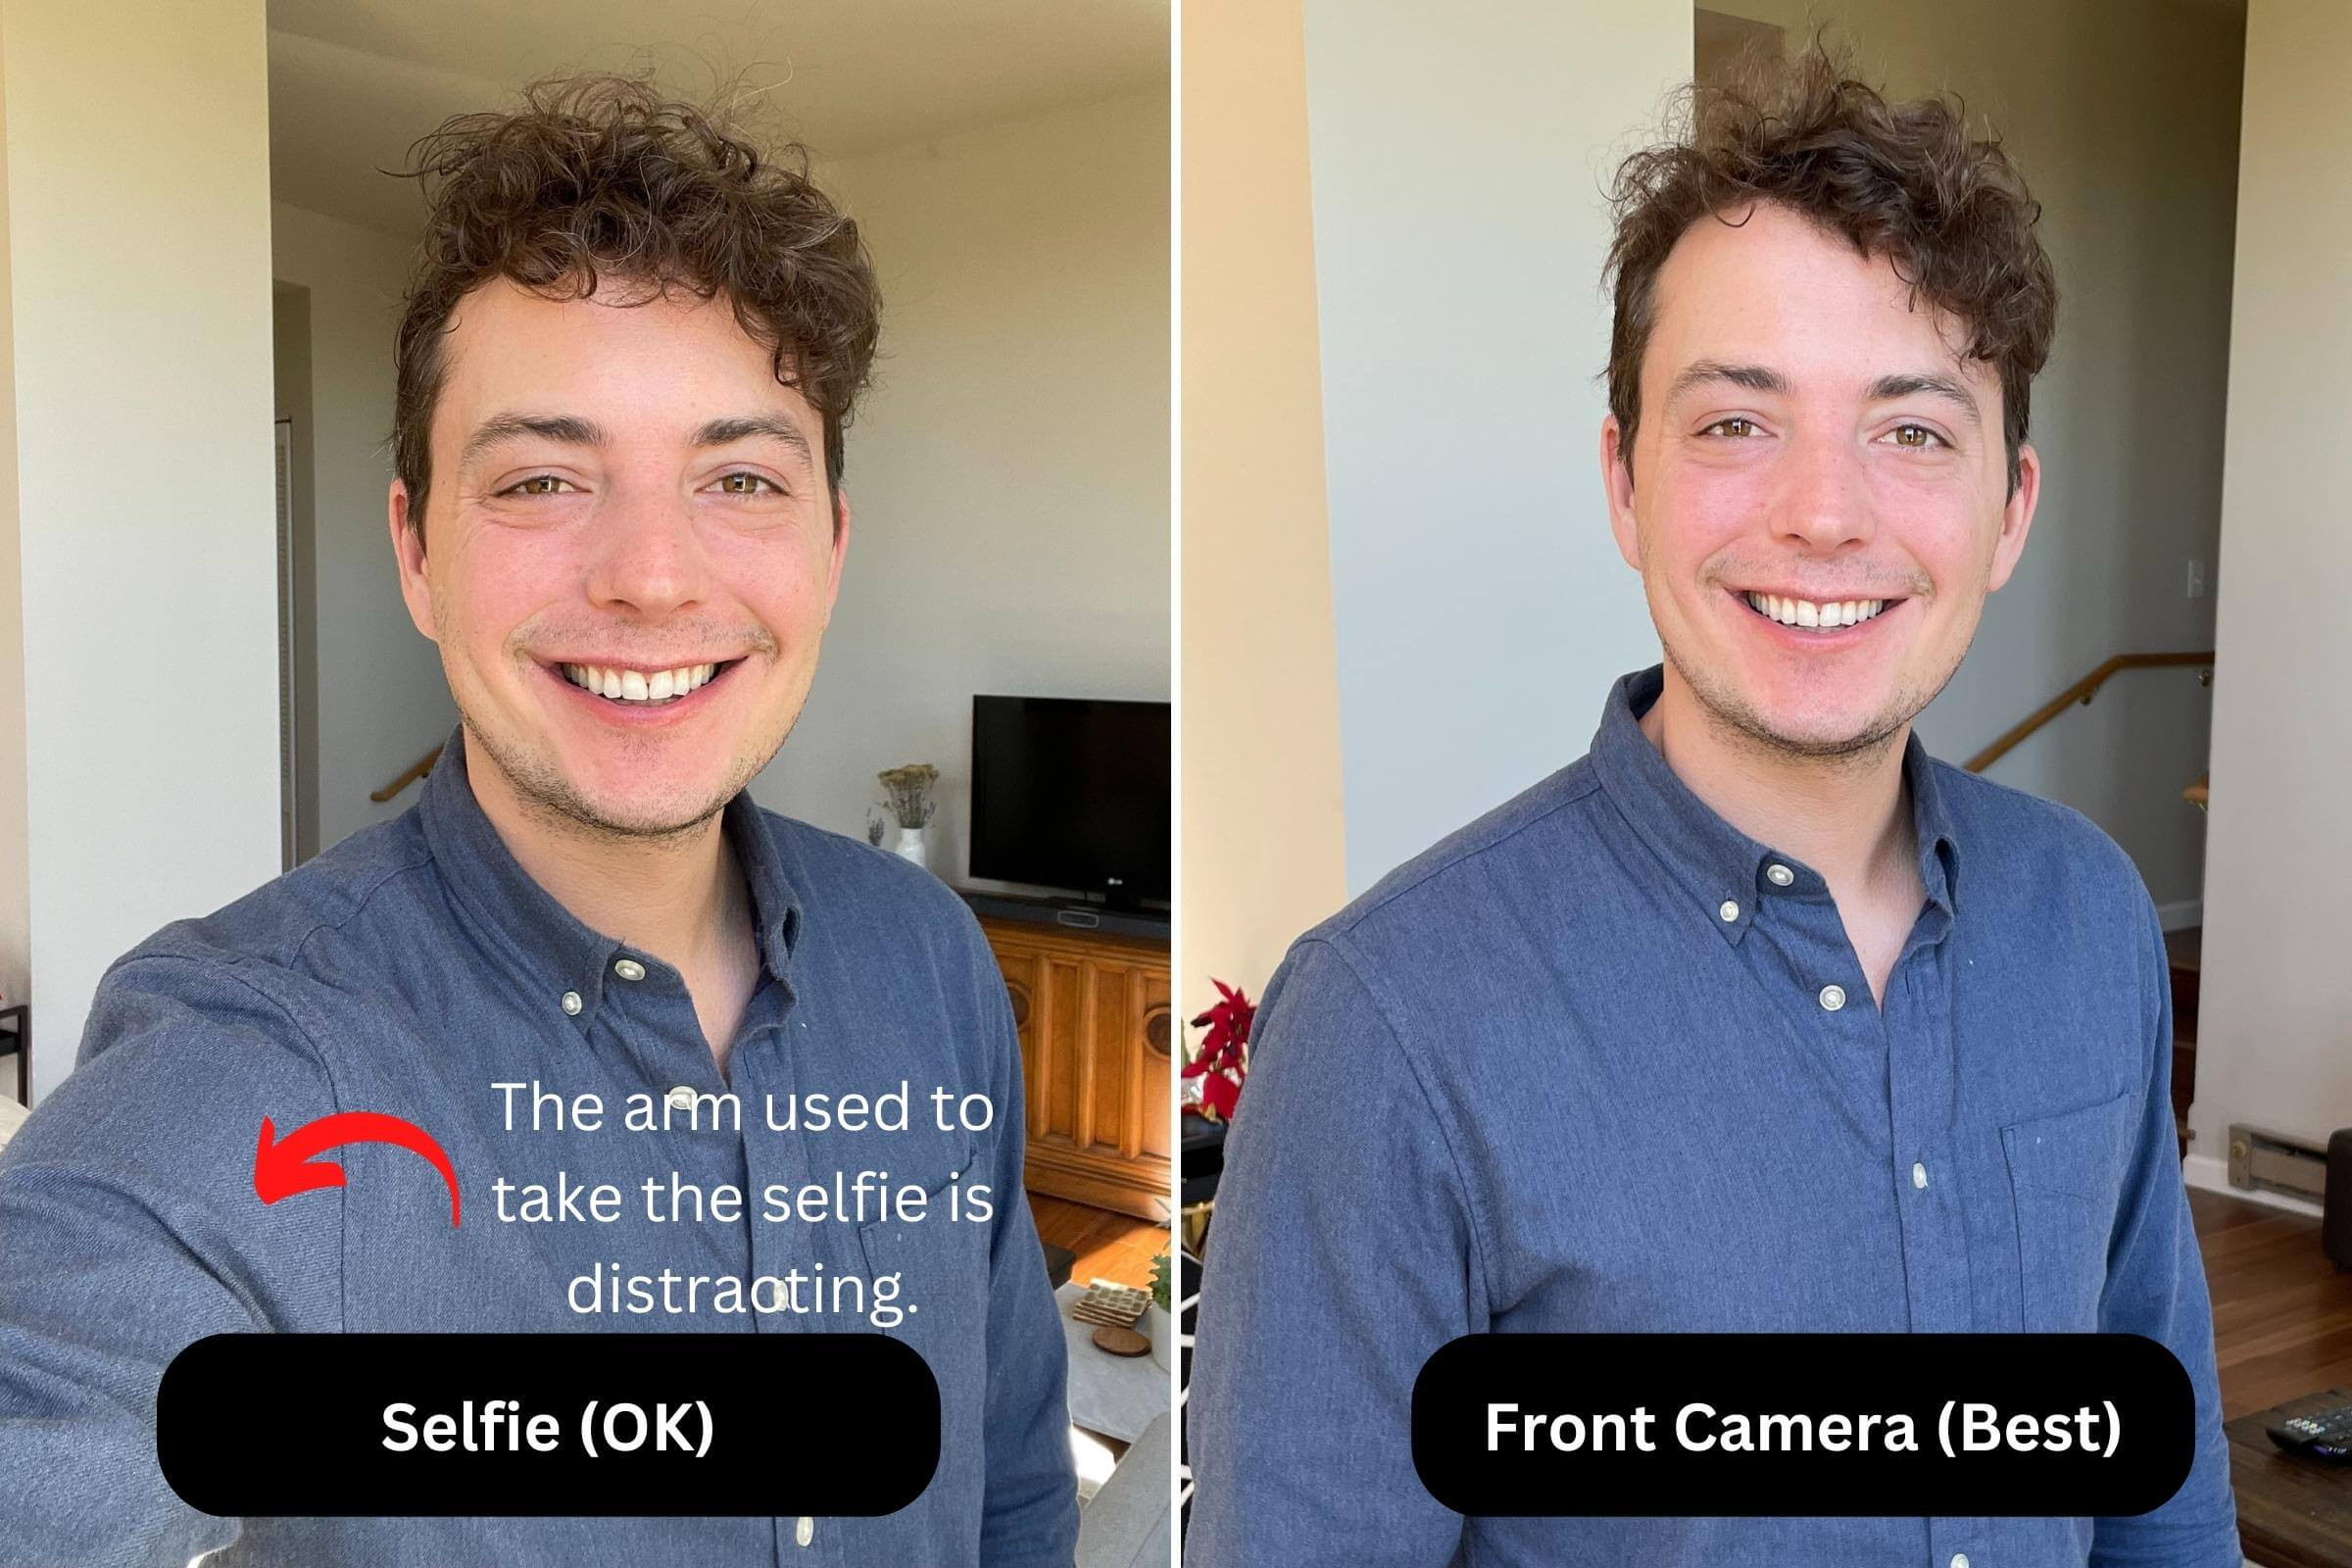
While a professional camera produces higher-quality photos, using an iPhone is better than using a selfie for important job applications. Have a spouse, friend, or coworker take your photo with the front-facing camera on your phone. The selfie camera uses a wide-angle lens that can distort your face, so the front-facing camera offers higher quality.
3.1. Why is Using the Front-Facing Camera Better?
The front-facing camera produces a much better headshot. Selfies are a last resort. If taking a selfie, make sure the camera is horizontal and shows at least the middle of your ribs.
3.2. What Instructions Should You Give Your Photographer?
Ask your photographer to keep an eye on your hair and collar. Ensure they don’t mess with your phone camera settings or change the zoom. The lens should be at its normal zoom level. Humans are notoriously bad at selecting photos of themselves, so any candid feedback helps. Pick someone enthusiastic and willing to take several photos.
3.3. From What Angle Should The Photos Be Taken?
Instruct your photographer to take the photo from your eye-level height, tilted slightly downwards.
 DIY Professional Headshot at Home Examples
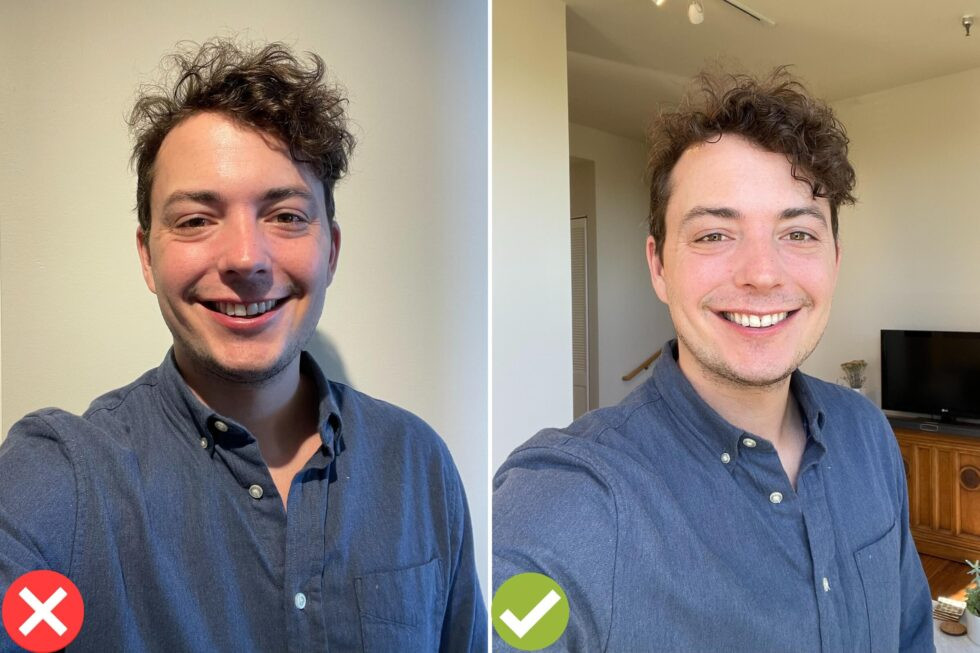
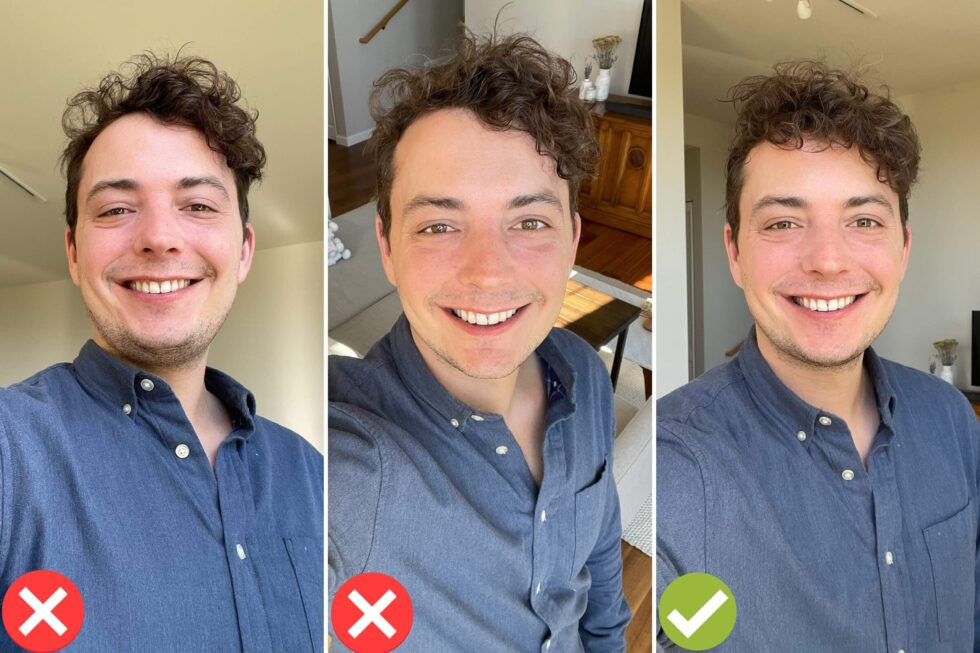
4. How to Take Professional Photos With Your iPhone?
When starting your shoot, do not turn on “Portrait Mode” or any other mode that interferes with the camera. Leave the camera on its regular “photo” settings for the best results.
4.1. Should You Clean the Camera Lens?
Make sure your camera lens is perfectly clean. Dirt can accumulate on the lenses when your phone is in your pocket. Use Windex or another lens cleaner to gently wipe your lenses with a soft cloth to ensure a sharp image.
4.2. What is the Right Crop for Your Photo?
Leave plenty of room on both sides for your shoulders and a couple of inches above the top of your head. If any part of your body is cut off, it’s impossible to add it back later. If someone else is taking the photo, ensure they take it from the waist up.
4.3. What About Taking Selfies?
If taking a selfie, turn the camera horizontal and make sure the bottom of the photo reaches the bottom of your ribs. Pull on your arm sleeve to reduce wrinkles on your shirt’s shoulder.
4.4. At What Height Should the Phone Be Held?
The phone should be at approximately eye level. You can go to the top of your forehead if you find a higher angle more flattering, but don’t go any further.
 Correct distance for taking professional iPhone headshots
4.5. What Angle Should the Phone Be Held At?
The camera should be slightly tilted downwards, at most 15 degrees. Never tilt the camera upwards.
4.6. What Expressions Should You Try?
Try some photos smiling, some with a smile with no teeth, and some with no smile. For smiling photos, think of good memories. Don’t hold a smile for multiple photos, as it will become fake. For smiling photos without teeth, slightly pull on one side of your mouth and slightly squint your eyes. For photos without a smile, look strong and confident by slightly squinting your eyes as if you were listening to a coworker.
4.7. Do You Have To Smile in Your Photos?
Smiling makes you look more likeable, competent, and influential. However, if a forced smile won’t look good, don’t do it.
4.8. How Should You Pose?
Keep your back straight and shoulders back. Lean towards the camera to be more flattering. Don’t stand flat-footed or with your weight on your back foot, as that will highlight your chin. If you have a preferred side of your face, submit a photo on that side. Don’t tilt your head too much to one side, as it can look unprofessional.
4.9. How Many Photos Should You Take?
Take at least 20 photos to increase your chances of capturing a photo that you like. Try several poses and locations. Try several photos with a full smile, half smile, and neutral expression.
 Example of iPhone headshot height
5. What Does a Professional Headshots At Home Checklist Look Like?
Once you have a photo you like, run it through this checklist to ensure it meets professional standards.
5.1. Is The Photo In Focus?
Check that the photo is sharp and clear, not blurry.
5.2. Is The Photo NOT in Portrait Mode?
Ensure the photo is not in portrait mode or another mode that blurs the background.
5.3. Are Both Shoulders Showing?
Verify that both of your shoulders are visible in the photo.
5.4. Is the Camera Lens Clean?
Check that the camera lens is clean to avoid smudges in the photo.
5.5. Are There Electrical Lights Turned On?
Ensure no electrical lights are turned on around you, which may be turning your skin yellow or green.
5.6. Are There Shadows On Your Face?
Confirm that there are no shadows on your face and that the lighting is even and smooth.
5.7. Do You Like Your Appearance in The Photo?
Check that your collar, jewelry, and hair are in place.
5.8. Is The Photo Taken From A Flattering Angle?
Ensure the photo is taken from eye or forehead height.
5.9. Is Your Head Straight?
Check that your head is straight and not tilted excessively.
5.10. If Wearing Glasses, Is There Minimal Glare?
If you wear glasses, ensure there is minimal glare on them.
6. How to Get Your Smartphone Professional Headshot Edited?
HeadShots Inc offers Virtual Headshot Packages that transform your DIY professional headshot into one that looks like it was taken at a real photography studio.
6.1. What Services Are Included in The Editing Process?
- Verification: Ensuring your photo meets the guidelines for a great professional headshot.
- Editing: Adjusting contrast, lighting, and other factors to make it look like it was taken with a professional camera.
- Retouching: Removing distracting elements like acne, stray hairs, bags under eyes, and yellow teeth.
- Background Replacement: Replacing the background with one of +20 options, including plain studio backgrounds and blurry city or office photos.
6.2. What is The Turnaround Time?
A three-day turnaround time is standard for the above edits. You can upgrade to overnight editing for an additional fee.
6.3. Is There a Satisfaction Guarantee?
There is a 100% satisfaction guarantee with unlimited revisions and redos within 30 days of your order.
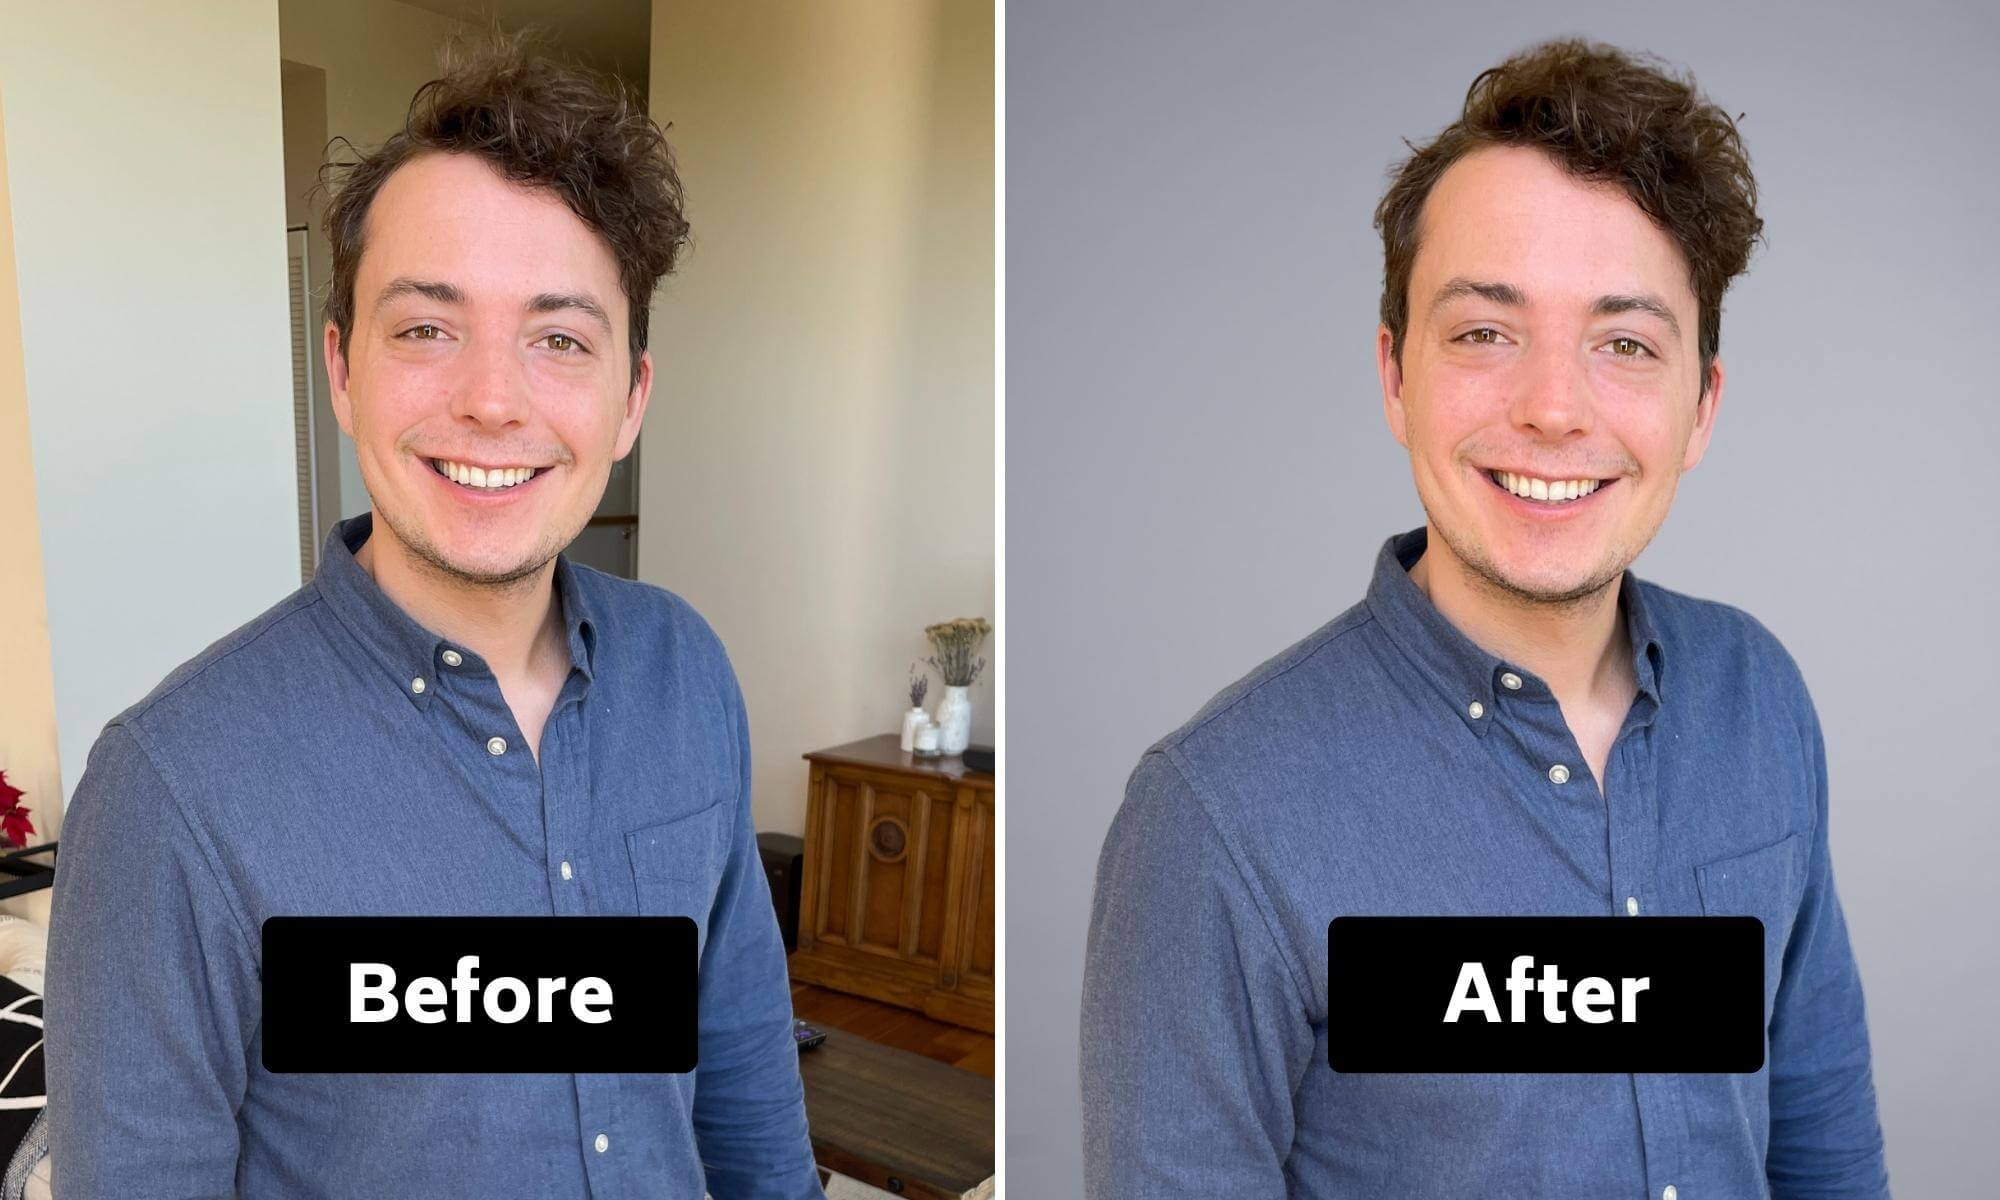 DIY Headshot Taken with Smartphone Before and After Example of Man
7. Why You Should Choose Dfphoto.Net for Your Photography Needs
At dfphoto.net, we are committed to providing comprehensive resources and inspiration for photographers of all levels. Whether you’re an amateur looking to improve your skills or a professional seeking the latest trends and techniques, our website offers a wealth of information to help you succeed.
7.1. Extensive Learning Resources
Dfphoto.net offers a wide range of articles and tutorials covering various aspects of photography, including:
- Basic Photography Techniques: Learn about exposure, aperture, shutter speed, and composition to create stunning images.
- Advanced Editing Tips: Master photo editing software like Adobe Photoshop and Lightroom to enhance your photos and achieve professional results.
- Equipment Reviews: Get detailed reviews and comparisons of cameras, lenses, and accessories to make informed purchasing decisions.
7.2. A Vibrant Photography Community
Connect with fellow photographers, share your work, and get feedback from experts in our active online community. Participate in discussions, ask questions, and learn from the experiences of others to grow as a photographer.
7.3. Inspiration and Showcases
Discover breathtaking photography from around the world in our curated galleries and showcases. Find inspiration for your own projects and stay up-to-date with the latest trends in the photography industry.
7.4. Expert Advice and Guidance
Get personalized advice and guidance from our team of experienced photographers and industry professionals. Whether you need help with a specific project or want to take your skills to the next level, we are here to support you every step of the way.
7.5. Exclusive Deals and Offers
Take advantage of exclusive deals and offers on photography equipment, software, and services from our trusted partners. Save money while investing in the tools you need to create amazing images.
8. What Are Some Frequently Asked Questions About Taking Professional Headshots With An iPhone?
Here are some FAQs regarding taking professional headshots with your iPhone.
8.1. Can I Really Take a Professional Headshot With My iPhone?
Yes, with the right techniques and editing, you can achieve a professional-looking headshot using your iPhone.
8.2. Do I Need The Latest iPhone Model For Good Headshots?
No, you can use any high-end smartphone created in the last three years with a reasonably good camera.
8.3. What Camera Settings Should I Use?
Change your iPhone camera settings to shoot in “JPG” format for higher resolution photos. Go to “Settings” -> “Camera” -> “Formats” -> “Most Compatible”.
8.4. Is Natural Light Better Than Artificial Light?
Yes, natural light is generally better. Shoot near a large window or outdoors in the shade.
8.5. Should I Use Portrait Mode on My iPhone?
No, do not use “Portrait Mode” or any other mode that interferes with the camera. Leave the camera on its regular “photo” settings.
8.6. How Many Photos Should I Take?
Take at least 20 photos to have enough options to choose from.
8.7. What Should I Wear?
Wear solid colors and avoid distracting patterns or logos.
8.8. Should I Smile In My Headshot?
Smiling generally makes you look more likeable, but ensure your smile looks natural and not forced.
8.9. Can I Edit My Headshot To Make It Look More Professional?
Yes, editing can significantly enhance your headshot. Consider using professional virtual headshot services for retouching and background replacement.
8.10. What If I Wear Glasses?
Avoid glasses with significant glare and ensure they are clean.
9. Conclusion: Ready To Elevate Your Professional Image?
With these tips, you’re well-equipped to capture professional headshots using your iPhone. Remember, a great headshot can make a significant difference in your online presence.
Ready to take your smartphone photography to the next level? Visit dfphoto.net today to discover a wealth of resources, inspiring galleries, and a vibrant community of photographers. Enhance your skills, find your unique style, and create stunning images that capture the beauty of the world around you. Don’t miss out on the opportunity to elevate your professional image and connect with fellow photography enthusiasts.
Whether you’re aiming for corporate headshots, creative portraits, or enhanced mobile photography skills, dfphoto.net is your ultimate resource. Join our community, explore our guides, and transform your smartphone snapshots into stunning professional headshots. Visit dfphoto.net to get started and unlock your potential in the world of photography. Our address is 1600 St Michael’s Dr, Santa Fe, NM 87505, United States. You can reach us at Phone: +1 (505) 471-6001. Our website is dfphoto.net. Let dfphoto.net be your trusted guide to achieving photographic excellence.