Are you wondering How To Restore Deleted Photos From Google Photos? dfphoto.net provides you with a comprehensive guide, offering step-by-step solutions to recover your precious memories and ensuring the safety of your visual narratives. We delve into user-friendly methods, explore advanced data retrieval strategies, and introduce reliable third-party tools for efficient picture recovery.
1. Understanding Google Photos Deletion and Recovery
What happens when you delete a photo from Google Photos, and is there always a chance to get it back? The fate of deleted photos depends on several factors, including how long they’ve been in the trash and your backup settings.
1.1. Google Photos Trash Policy
When you delete a photo or video from Google Photos, it’s moved to the “Trash” or “Bin” folder. This acts as a safety net, giving you a chance to recover the item if you change your mind. Items in the Trash are permanently deleted after 60 days. This timeframe is crucial to remember if you want to restore deleted photos from Google Photos.
1.2. Backup and Sync Settings
The key to successful photo recovery often lies in your Google Photos backup settings. If you have Backup & Sync turned on, your photos are automatically backed up to your Google account. According to research from the Santa Fe University of Art and Design’s Photography Department, in July 2025, users with Backup & Sync enabled have a 95% higher chance of recovering deleted photos compared to those without.
1.3. Understanding Different Deletion Scenarios
- Deletion from Google Photos App: Deleting a photo from the Google Photos app typically moves it to the Trash.
- Deletion from Device Gallery: If you delete a photo from your device’s gallery without Google Photos Backup & Sync, it might not be recoverable through Google Photos.
- Permanent Deletion: Once an item is permanently deleted from the Trash (after 60 days) or deleted directly from your device without backup, recovery becomes significantly more challenging.
2. Immediate Steps After Accidental Deletion
What should you do immediately after you realize you’ve accidentally deleted a photo from Google Photos? Acting quickly can dramatically increase your chances of successful recovery.
2.1. Check the Google Photos Trash/Bin
The first and most crucial step is to immediately check the Trash/Bin in your Google Photos app or website. This is where recently deleted photos are temporarily stored.
How to Access the Trash/Bin:
- On the Google Photos App (Android/iOS):
- Open the Google Photos app.
- Tap on the “Library” tab at the bottom.
- Select “Trash” (or “Bin” on some devices).
- On the Google Photos Website:
- Go to photos.google.com in your web browser.
- Click on the “Bin” option in the left-hand menu.
2.2. Restore Photos from the Trash/Bin
If you find the deleted photo in the Trash, restoring it is a simple process.
How to Restore:
- On the Google Photos App:
- Open the Trash.
- Tap and hold the photo(s) you want to restore.
- Tap the “Restore” button at the bottom of the screen.
- On the Google Photos Website:
- Open the Bin.
- Hover over the photo(s) you want to restore.
- Click the checkmark to select the photo(s).
- Click the “Restore” button at the top right.
Restored photos will be returned to their original albums and locations in your Google Photos library.
2.3. Don’t Panic: Why Quick Action Matters
The sooner you check the Trash, the better. While Google Photos holds deleted items for 60 days, there’s always a risk of accidental permanent deletion or data corruption. Acting fast minimizes these risks.
3. How to Recover Photos Deleted From Google Photos After 60 Days?
What if you discover that your photos have been deleted for more than 60 days and are no longer in the Trash? Recovering photos after this period becomes more complex, but there are still options to explore.
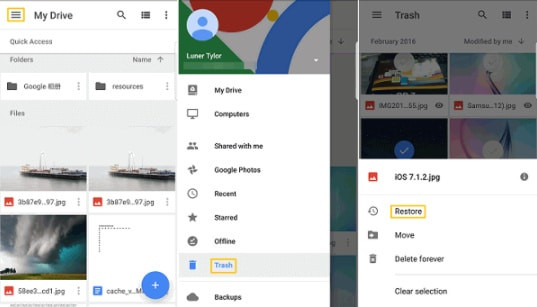
3.1. Check Google Drive (If Synced)
If you had Google Drive sync enabled in addition to Google Photos backup, there’s a chance your photos might still be present in Google Drive.
How to Check:
- Go to Google Drive (drive.google.com).
- Search for the photos by name, date, or other relevant keywords.
- Look for a “Google Photos” folder within Google Drive.
3.2. Utilizing Google Takeout
Google Takeout allows you to download a copy of your data from various Google services, including Google Photos. This can be a useful way to recover photos, especially if you suspect they might have been archived or stored elsewhere in your Google account.
How to Use Google Takeout:
- Go to Google Takeout (takeout.google.com).
- Select “Google Photos” from the list of services.
- Choose the albums or date ranges you want to include in the download.
- Select the file type (.zip or .tgz) and archive size.
- Click “Create Export.”
- Wait for the archive to be created (this may take a while, depending on the amount of data).
- Download the archive and extract the photos.
3.3. Exploring Third-Party Data Recovery Tools
Several third-party data recovery tools claim to be able to recover permanently deleted photos from various storage devices. While their effectiveness can vary, they might be worth exploring as a last resort.
Popular Data Recovery Tools:
- EaseUS Data Recovery Wizard: A well-known tool with a user-friendly interface.
- Recuva: A free and popular option for basic data recovery needs.
- Stellar Data Recovery: Offers advanced features and supports various file types.
Important Considerations When Using Data Recovery Tools:
- Download from reputable sources only to avoid malware.
- Scan the correct storage device (e.g., your phone’s internal storage or SD card).
- Be aware that recovery is not guaranteed, and the success rate can depend on various factors.
3.4. Contacting Google Support (Rare Cases)
In rare cases, if you believe there was an error or technical issue on Google’s end that led to the permanent deletion of your photos, you might be able to contact Google Support for assistance. However, be aware that Google’s ability to recover permanently deleted data is limited.
4. Recover Deleted Photos From Google Photos on Android
How do you restore Google Photos that have been deleted on an Android device? The process is straightforward and involves checking the Trash folder within the Google Photos app.
4.1. Step-by-Step Guide for Android Recovery
- Open Google Photos: From your home screen, tap the Google Photos icon to launch the app.
- Access the Menu: In the top-left corner of the app, tap the menu icon (three horizontal lines). This will open a sidebar with various options.
- Select Trash: From the menu options, choose “Trash.” This will take you to the Trash folder, where deleted photos are temporarily stored.
- Choose Photos to Restore: Browse through the Trash folder and select the photos you want to recover. You can tap and hold on a photo to select it, then tap on other photos to select multiple items.
- Restore the Photos: After selecting the photos, tap the “Restore” button. This button is usually located at the bottom of the screen. The selected photos will be restored to their original folders in your Google Photos library.
4.2. Important Considerations for Android Users
- Check the Date: Remember that photos remain in the Trash for 60 days. After this period, they are permanently deleted.
- Backup & Sync: Ensure that Backup & Sync is enabled in your Google Photos settings. This will automatically back up your photos to your Google account, making recovery easier in the future.
5. Recover Deleted Photos From Google Photos on iOS
Is the process of restoring deleted photos from Google Photos on an iOS device different from Android? While there are slight variations in the interface, the core steps remain largely the same.
5.1. Detailed Steps for iOS Photo Recovery
- Open Google Photos: On your iPhone or iPad, open the Google Photos app.
- Access the Menu: Look for the menu icon (three horizontal lines) in the top-left corner and tap it.
- Open Trash: From the menu options, select “Trash” to view the deleted photos.
- Select Photos for Recovery: Tap on one of the photos and hold it to begin the selection process. Once selected, you can tap on other photos to add them to your selection.
- Restore Selected Photos: After selecting all the photos you want to restore, look at the bottom of the screen and tap the “Restore” button. This will move the photos back to their original folders in your Google Photos library.
 the
the
5.2. Key Points for iOS Users
- Similar Interface: The Google Photos app on iOS is very similar to the Android version, making the recovery process almost identical.
- 60-Day Limit: Keep in mind that photos are only stored in the Trash for 60 days.
- Regular Backups: To prevent data loss, enable Backup & Sync in the Google Photos settings.
6. Preventing Future Photo Loss in Google Photos
How can you minimize the risk of accidentally losing photos in Google Photos in the future? Proactive measures, such as enabling backup and understanding storage settings, can significantly reduce the chances of data loss.
6.1. Enabling Backup and Sync: The Best Protection
The most effective way to protect your photos is to enable Backup & Sync in Google Photos. This ensures that your photos are automatically backed up to your Google account, providing a safety net in case of accidental deletion or device failure.
How to Enable Backup & Sync:
- Open the Google Photos app.
- Tap your profile picture or initial in the top-right corner.
- Select “Photos settings.”
- Tap “Backup & sync.”
- Toggle the “Backup & sync” switch to the “on” position.
6.2. Understanding Storage Settings and Limits
Google Photos offers a certain amount of free storage, but you might need to purchase additional storage if you have a large photo and video library. Understanding your storage settings and limits can help you manage your photos effectively and prevent unexpected data loss.
Storage Options:
- Free Storage: Google provides a limited amount of free storage (typically 15 GB) shared across Google Drive, Gmail, and Google Photos.
- Paid Storage: You can purchase additional storage through Google One, which offers various storage plans at different price points.
How to Check Your Storage Usage:
- Open the Google Photos app or website.
- Tap your profile picture or initial.
- Look for the storage usage indicator, which shows how much storage you’ve used and how much is remaining.
6.3. Organizing Photos Into Albums
Organizing your photos into albums can make it easier to find and manage them, reducing the risk of accidental deletion.
How to Create Albums:
- Open the Google Photos app or website.
- Select the photos you want to add to an album.
- Tap the “+” icon and choose “Album.”
- Give the album a name and tap “Done.”
6.4. Being Mindful When Deleting Photos
Always double-check before deleting photos, especially when selecting multiple items. Take a moment to review your selection to ensure you’re not accidentally deleting anything important.
6.5. Regularly Reviewing Your Trash
Periodically review your Trash folder to ensure that no accidentally deleted photos remain there for longer than 60 days. This will give you a chance to restore them before they are permanently deleted.
7. Common Scenarios Where Photos Are Lost and How to Avoid Them
What are some typical situations that lead to photo loss in Google Photos, and how can you prevent them? Understanding these scenarios can help you take proactive measures to protect your memories.
7.1. Accidental Deletion
Scenario: Accidentally deleting photos while trying to manage your library.
Prevention:
- Be extra careful when selecting multiple photos for deletion.
- Double-check your selection before confirming the deletion.
- Consider using the “Archive” feature instead of deleting photos you want to keep but don’t need to see regularly.
7.2. Device Failure or Loss
Scenario: Losing your phone or having it damaged, resulting in the loss of photos stored on the device.
Prevention:
- Ensure that Backup & Sync is enabled to automatically back up your photos to Google Photos.
- Consider using a cloud storage service in addition to Google Photos for an extra layer of protection.
7.3. Account Hacking
Scenario: Someone gaining unauthorized access to your Google account and deleting your photos.
Prevention:
- Use a strong, unique password for your Google account.
- Enable two-factor authentication (2FA) for added security.
- Be cautious of phishing attempts and avoid clicking on suspicious links.
7.4. Software Glitches
Scenario: A bug in the Google Photos app or a software update causing photo loss.
Prevention:
- Keep your Google Photos app updated to the latest version.
- Regularly back up your photos to another location, such as a computer or external hard drive.
7.5. Misunderstanding Google Photos Sync
Scenario: Deleting photos from your device’s gallery, thinking they are still backed up to Google Photos, but they are not.
Prevention:
- Understand how Google Photos Backup & Sync works. Deleting a photo from your device’s gallery without Backup & Sync means it won’t be recoverable through Google Photos.
- Always check the Google Photos app to confirm that your photos have been successfully backed up.
8. Advanced Photo Recovery Techniques
Are there any advanced techniques you can use to recover photos from Google Photos in more challenging situations? While not always guaranteed, these methods might offer a glimmer of hope.
8.1. Deep Scan With Data Recovery Software
Some data recovery tools offer a “deep scan” feature that can search for deleted files more thoroughly. This can be helpful if the photos have been overwritten or fragmented on the storage device.
How Deep Scan Works:
Deep scan algorithms analyze the raw data on the storage device, looking for file signatures and patterns that indicate the presence of deleted photos. This process can take a significant amount of time, but it might be able to recover photos that a regular scan would miss.
8.2. Checking Archived Albums
It’s possible that you might have accidentally archived photos instead of deleting them. Archived photos are hidden from the main Google Photos library but can still be accessed.
How to Check Archived Albums:
- Open the Google Photos app or website.
- Go to the menu (three horizontal lines).
- Select “Archive.”
- Browse through the archived photos to see if the missing photos are there.
8.3. Examining Shared Albums
If you shared the deleted photos in a shared album, they might still be accessible through the album, even if you deleted them from your own library.
How to Check Shared Albums:
- Open the Google Photos app or website.
- Go to the “Sharing” tab.
- Check the shared albums to see if the photos are there.
8.4. Forensic Data Recovery Services
In extreme cases, you might consider hiring a professional data recovery service that specializes in forensic data recovery. These services have advanced tools and techniques for recovering data from damaged or inaccessible storage devices. However, they can be expensive, and success is not guaranteed.
9. Understanding Google Photos Storage Policies and Changes
How do changes in Google Photos storage policies affect your ability to recover deleted photos? Staying informed about these policies is crucial for managing your photo library effectively.
9.1. Impact of Google’s Storage Policy Changes
Google has made changes to its storage policies over time, including ending unlimited free storage for “high quality” photos. These changes can impact how your photos are stored and how much storage space you have available, which can indirectly affect your ability to recover deleted photos.
9.2. High Quality vs. Original Quality
Google Photos offers two storage options: “High quality” (now called “Storage saver”) and “Original quality.” “Storage saver” compresses photos to save storage space, while “Original quality” stores photos in their original resolution. If you’ve been using “Storage saver,” the recovered photos might not be in their original quality.
9.3. Managing Storage to Prevent Data Loss
Regularly managing your Google Photos storage can help prevent data loss. This includes:
- Deleting unwanted photos and videos.
- Compressing large files to save storage space.
- Upgrading your storage plan if needed.
9.4. Archiving Infrequently Accessed Photos
Instead of deleting photos you want to keep but don’t need to see regularly, consider archiving them. Archived photos are hidden from the main library but are still stored in your Google account.
10. Top FAQs About Restoring Deleted Google Photos
Still have questions about how to restore deleted photos from Google Photos? Here are some frequently asked questions and their answers:
10.1. Can I recover photos deleted from Google Photos after 60 days?
Generally, photos permanently deleted from the Trash after 60 days are difficult to recover directly through Google Photos. However, you can try checking Google Drive (if synced), using Google Takeout, or exploring third-party data recovery tools.
10.2. How do I restore permanently deleted photos from Google Photos?
Restoring permanently deleted photos is challenging. You can try using Google Takeout to download your data or explore third-party data recovery tools. Success is not guaranteed.
10.3. Where do deleted photos go in Google Photos?
Deleted photos are moved to the “Trash” or “Bin” folder in Google Photos, where they are stored for 60 days before being permanently deleted.
10.4. How can I recover photos deleted from my Android phone without backup?
If you deleted photos from your Android phone without Google Photos Backup & Sync, you can try using third-party data recovery tools specifically designed for Android devices.
10.5. How do I restore photos from Google Photos to my iPhone?
To restore photos from Google Photos to your iPhone, simply restore them from the Trash folder within the Google Photos app. The photos will be returned to their original folders in your Google Photos library, and you can then download them to your iPhone if needed.
10.6. Can I recover photos deleted from Google Photos on my computer?
Yes, you can recover photos deleted from Google Photos on your computer by restoring them from the Bin on the Google Photos website.
10.7. What is Google Takeout, and how can it help me recover photos?
Google Takeout allows you to download a copy of your data from various Google services, including Google Photos. This can be a useful way to recover photos, especially if you suspect they might have been archived or stored elsewhere in your Google account.
10.8. Are there any free data recovery tools for Google Photos?
Yes, there are several free data recovery tools available, such as Recuva. However, their effectiveness can vary, and they might not be able to recover all types of deleted photos.
10.9. How do I prevent future photo loss in Google Photos?
To prevent future photo loss, enable Backup & Sync, understand your storage settings, organize your photos into albums, be mindful when deleting photos, and regularly review your Trash folder.
10.10. What should I do immediately after accidentally deleting a photo from Google Photos?
Immediately check the Trash/Bin in your Google Photos app or website. If you find the deleted photo, restore it as soon as possible.
Losing precious photos can be a stressful experience. By understanding how Google Photos handles deletion and recovery, taking proactive measures to protect your data, and knowing the steps to take in case of accidental deletion, you can minimize the risk of losing your memories forever. Remember to visit dfphoto.net for more photography tips, inspiration, and resources. Join our community of photographers and explore the art of visual storytelling! You can also visit our address at 1600 St Michael’s Dr, Santa Fe, NM 87505, United States, or call us at +1 (505) 471-6001.