How To Stand In Photos is a key skill for anyone wanting to look their best. In this guide, dfphoto.net provides practical tips and techniques to help you master posing, ensuring you always capture flattering and confident images. Whether you’re aiming for a professional headshot or a casual snapshot, understanding body language, posture, and angles can significantly enhance your photographic appeal. Explore how to leverage these simple adjustments to radiate confidence and charm in every shot, transforming your approach to portrait photography, visual storytelling, and self-representation through still images.
1. Understanding the Importance of Posing in Photography
Is mastering posing techniques essential for better photos? Absolutely! How you stand in photos can dramatically change the final result, influencing how photogenic you appear. According to research from the Santa Fe University of Art and Design’s Photography Department, in July 2025, correct posture and posing can enhance your natural features and create a more appealing image. Posing is not just about aesthetics, it’s about communicating confidence, personality, and style. It’s about understanding how different stances and angles interact with light and shadow to sculpt your appearance in two dimensions.
1.1 Why Posing Matters
Posing matters because it allows you to control how you are perceived in a photograph. A well-executed pose can:
- Enhance Body Shape: By understanding how to angle your body and distribute your weight, you can create a more flattering silhouette.
- Boost Confidence: Knowing you look good in a photo can increase your confidence, which naturally shines through in the image.
- Add Personality: Different poses can reflect different aspects of your personality, from playful and energetic to poised and professional.
- Create Visual Interest: A dynamic pose can add depth and interest to an otherwise static image.
- Tell a Story: In storytelling photography, poses can help convey emotions and narratives more effectively.
1.2 Common Posing Mistakes to Avoid
Many people make common mistakes when posing, which can detract from their appearance. Avoid these pitfalls:
- Standing Squarely to the Camera: This can make you look wider than you are.
- Tensing Up: Stiffness translates poorly on camera. Relaxed, natural poses look better.
- Hunching Over: Poor posture can make you look shorter and less confident.
- Keeping Arms Glued to Your Sides: This can make your arms look larger.
- Forcing a Smile: A genuine smile is always more appealing than a forced one.
By avoiding these common mistakes and focusing on purposeful, flattering poses, you can significantly improve your photos.
2. Key Elements of a Flattering Pose
What are the key elements that contribute to a flattering pose? The main ingredients are posture, weight distribution, angles, and arm placement. Mastering these elements will help you look your best in every photo. These elements work together to create a visually appealing image that enhances your natural features and projects confidence. Each aspect requires attention and practice to achieve the most flattering results.
2.1 Posture: Stand Tall and Confident
Good posture is the foundation of a great pose. Stand tall with your shoulders back and down, engaging your core muscles. Imagine a string pulling you up from the crown of your head, elongating your spine. According to “Popular Photography” magazine, maintaining good posture not only makes you look taller and slimmer but also exudes confidence and poise. Proper posture improves your body alignment, leading to a more aesthetically pleasing photograph.
Exercises for Better Posture
- Wall Stands: Stand with your back against a wall, ensuring your head, shoulders, and hips touch the surface. Hold for 30 seconds, repeating several times daily.
- Shoulder Rolls: Roll your shoulders forward, then up, then back and down to improve shoulder alignment.
- Core Workouts: Strengthening your core muscles helps support good posture throughout the day.
2.2 Weight Distribution: Shift for an “S Curve”
How does shifting your weight affect your pose? Shifting your weight can create a flattering “S curve” in your body. Place the majority of your weight on your back leg, which will naturally create a subtle curve from your shoulders to your hips. This stance adds dimension and shape to your figure, making you look more dynamic and less stiff. By shifting your weight, you redistribute the focus and create a more visually appealing silhouette.
Tips for Weight Shifting
- Experiment: Try shifting your weight from one leg to the other to see which stance feels and looks most natural.
- Avoid Leaning: Be careful not to lean too far back or away from the camera, which can look awkward.
- Maintain Balance: Ensure you feel stable and balanced in your stance.
2.3 Angles: Turn Your Body for a Slimmer Look
Why are angles so important in posing? Turning your body at a 45-degree angle to the camera is incredibly slimming and adds visual interest. Facing the camera straight on can make you look wider, while an angle creates depth and dimension. Angles can also highlight your best features and downplay any areas you may be less confident about. Using angles effectively is a core technique in professional photography.
How to Find Your Best Angle
- Experiment with Turns: Rotate your body slightly to the left or right and see which angle you prefer.
- Consider Your Features: Think about which side of your face you like best and position it towards the camera.
- Use Mirrors: Practice in front of a mirror to get a better sense of how different angles look.
2.4 Arm Placement: Create Space and Shape
What is the best way to position your arms in photos? Avoid pressing your arms flat against your torso, as this can make them look larger. Instead, create space by lifting your arm slightly, placing a hand on your hip, or resting it in your pocket. Creating distance between your arm and body adds definition and prevents your arm from looking squished. Arm placement can greatly influence the overall appearance of your pose.
Creative Arm Poses
- Hand on Hip: This classic pose creates a flattering curve at your waist.
- Hand in Pocket: A relaxed and casual pose that adds a touch of nonchalance.
- Holding an Object: Using a prop can give your hands something to do and add interest to the photo.
- Interacting with Others: When posing with others, rest your hand on their shoulder or back for a natural, connected look.
3. Advanced Posing Techniques
How can you elevate your posing skills beyond the basics? Explore advanced techniques like leaning forward from the waist, adjusting your chin, and incorporating movement to create dynamic and engaging photos. These techniques build upon the foundational elements, allowing you to refine your poses and add a personal touch. Mastering these advanced techniques will set your photos apart.
3.1 Lean Forward from the Waist: A Subtle Slimming Trick
Why does leaning forward from the waist make you look slimmer? A slight lean from the waist toward the camera can instantly slim your body. This movement elongates your torso and creates a more streamlined silhouette. Additionally, leaning forward helps position your chin in a way that minimizes the appearance of a double chin. It’s a subtle adjustment that can make a significant difference.
Tips for Leaning Forward
- Keep it Natural: Avoid leaning too far, which can look unnatural.
- Engage Your Core: Use your core muscles to maintain balance and control.
- Combine with Weight Shift: Try leaning forward while shifting your weight to create a dynamic pose.
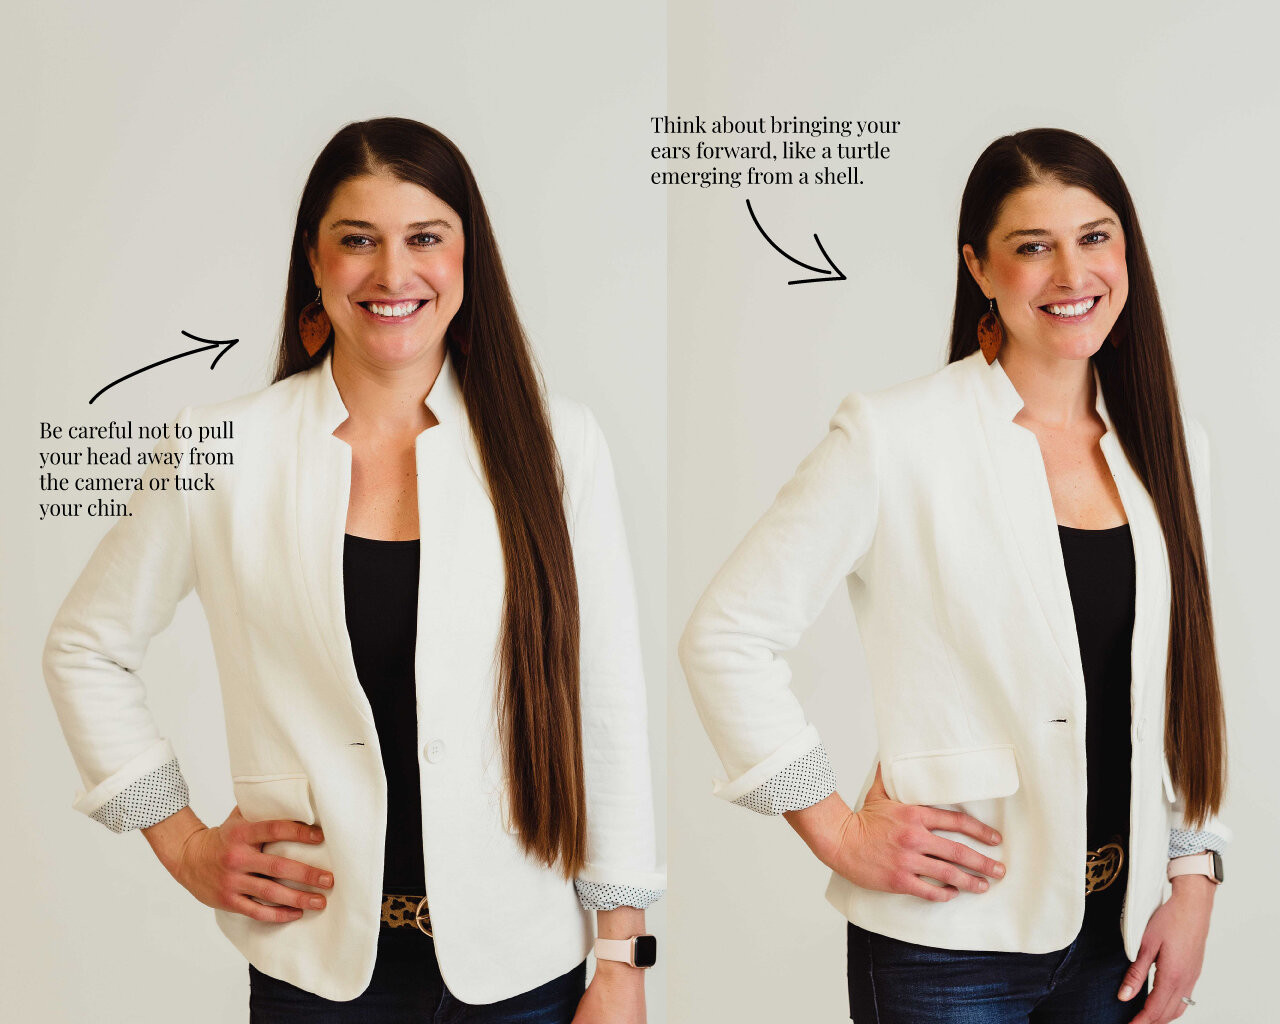
3.2 Bring Your Ears Forward: Eliminate the Double Chin
How can you eliminate a double chin in photos? The key is to bring your ears forward. Often, people unconsciously pull their head back or tuck their chin down, creating a double chin. Instead, imagine you are a turtle emerging from its shell and gently push your ears forward towards the camera. This subtle movement will tighten your jawline and create a smoother, more defined profile.
Exercises for Chin Placement
- Practice in a Mirror: Practice the movement in front of a mirror to see how it affects your jawline.
- Use a Verbal Cue: Have a photographer remind you to “bring your ears forward” during a shoot.
- Combine with Good Posture: Ensure you are also standing tall with your shoulders back and down.
 how to avoid double chin in photos, how to get rid of double chin in photos
3.3 Incorporate Movement: Create Dynamic Photos
Why is movement important in posing? Incorporating movement into your poses can add energy and dynamism to your photos. Instead of staying static, try walking, twirling, or swaying gently. Movement creates a sense of spontaneity and can help you relax and feel more comfortable in front of the camera. Candid shots often capture the best moments of movement.
Ideas for Incorporating Movement
- Walk Towards the Camera: Walking towards the camera can create a sense of approachability and engagement.
- Twirl or Sway: Gentle twirling or swaying adds a touch of whimsy and femininity.
- Interact with Props: Using props like scarves or hats can add movement and interest to your photos.
4. Posing for Different Body Types
Do posing techniques vary for different body types? Yes, understanding how to pose for your specific body type can help you highlight your best features and create the most flattering images. Different body types benefit from different posing techniques, so it’s important to tailor your approach. What works well for one person may not work as well for another.
4.1 Posing for Plus-Size Figures
What are some effective posing tips for plus-size figures?
- Avoid Standing Straight On: Angling your body to the camera is crucial for creating a slimming effect.
- Create Definition at the Waist: Use your arms to create a waistline by placing your hands on your hips or holding an object at your waist.
- Wear Flattering Clothing: Choose clothing that fits well and accentuates your shape.
- Embrace Confidence: Confidence is the most important element of any pose.
4.2 Posing for Petite Figures
What posing techniques work best for petite figures?
- Stand Tall: Elongate your body by standing tall and engaging your core muscles.
- Wear Heels: Heels can add height and elongate your legs.
- Avoid Overwhelming Clothing: Choose clothing that fits well and doesn’t overwhelm your frame.
- Use Vertical Lines: Vertical lines in your clothing can create the illusion of height.
4.3 Posing for Tall Figures
What are some flattering poses for tall figures?
- Break Up Your Height: Avoid standing too rigidly, which can emphasize your height.
- Bend Your Limbs: Bending your arms or legs can create a more relaxed and approachable look.
- Use Diagonal Lines: Diagonal lines in your pose can add visual interest and break up your height.
- Embrace Your Height: Own your height and project confidence.
5. Posing in Different Scenarios
How does posing change in different scenarios? Posing techniques may need to be adjusted depending on the situation, such as individual portraits, group photos, or event photography. The environment and purpose of the photo shoot should influence your posing choices. Adapting your posing to the context will result in more effective and visually appealing images.
5.1 Individual Portraits: Focus on Personality
What is the key to a great individual portrait? Individual portraits are all about capturing your personality and essence. Focus on expressing yourself through your pose, whether it’s through a confident stance, a relaxed smile, or a thoughtful gaze. The goal is to create an image that reflects who you are.
Tips for Individual Portraits
- Relax and Be Yourself: The more relaxed you are, the more natural your pose will look.
- Connect with the Camera: Make eye contact with the camera to create a connection with the viewer.
- Experiment with Different Poses: Try different poses to see what works best for you.
- Communicate with the Photographer: Let the photographer know what you’re comfortable with and what you’re trying to convey.
5.2 Group Photos: Coordinate and Connect
How can you ensure everyone looks good in a group photo? Group photos require coordination and connection. Ensure everyone is positioned in a way that is flattering and that there is a sense of unity and connection among the subjects. The goal is to create a cohesive and visually appealing image that captures the group’s dynamic.
Tips for Group Photos
- Vary Heights: Arrange people at different heights to create visual interest.
- Encourage Interaction: Encourage people to interact with each other to create a natural and relaxed atmosphere.
- Be Mindful of Limbs: Avoid hiding people behind others or cutting off limbs.
- Ensure Everyone is Visible: Make sure everyone’s face is visible and that no one is obscured.
5.3 Event Photography: Capture Authentic Moments
What is the goal of posing in event photography? Event photography is about capturing authentic moments and emotions. Instead of overly posed shots, focus on capturing candid moments and natural interactions. The goal is to document the event in a way that feels genuine and true to life.
Tips for Event Photography
- Be Observant: Pay attention to the action and anticipate key moments.
- Capture Candids: Focus on capturing candid shots of people interacting and enjoying themselves.
- Be Discreet: Avoid being too intrusive or disruptive.
- Use Natural Light: Utilize natural light whenever possible to create flattering images.
6. The Role of Confidence and Comfort
How do confidence and comfort affect your posing? Confidence and comfort are essential elements of any great pose. If you feel confident and comfortable in your pose, it will naturally shine through in the photos. Conversely, if you feel self-conscious or awkward, it will be evident in your expression and body language. Cultivating confidence and comfort is key to looking your best.
6.1 Building Confidence in Front of the Camera
What are some ways to build confidence in front of the camera?
- Practice Posing: Practice posing in front of a mirror to become more comfortable with different stances and angles.
- Focus on Your Strengths: Focus on highlighting your best features and downplaying any areas you may be less confident about.
- Wear Comfortable Clothing: Choose clothing that makes you feel good and fits well.
- Work with a Good Photographer: A skilled photographer can help you feel more relaxed and confident in front of the camera.
6.2 Finding Your Comfort Zone
How can you find your comfort zone when posing? Experiment with different poses and find the ones that feel most natural and comfortable for you. Avoid trying to force yourself into poses that feel awkward or unnatural. The more comfortable you are, the more genuine and authentic your photos will look.
Tips for Finding Your Comfort Zone
- Start Simple: Begin with basic poses and gradually work your way up to more complex ones.
- Listen to Your Body: Pay attention to how your body feels and avoid any poses that cause discomfort.
- Don’t Compare Yourself to Others: Focus on finding poses that work for you, rather than trying to emulate someone else.
- Have Fun: Remember that posing should be enjoyable, so relax and have fun with it.
7. Posing with Props
Can props enhance your poses? Absolutely! Incorporating props into your poses can add interest, personality, and context to your photos. Props can give your hands something to do, add visual elements to the composition, and help tell a story. The key is to choose props that are relevant to the theme or setting of the photo shoot.
7.1 Selecting the Right Props
How do you choose the right props for your photos?
- Consider the Theme: Choose props that align with the theme or concept of the photo shoot.
- Keep it Simple: Avoid using too many props, which can clutter the image.
- Choose Props That Reflect Your Personality: Select props that reflect your interests and personality.
- Think About Color and Texture: Consider how the color and texture of the props will complement your outfit and the overall composition.
7.2 Incorporating Props into Your Pose
How can you seamlessly integrate props into your poses?
- Hold the Prop Naturally: Avoid holding the prop too rigidly or awkwardly.
- Interact with the Prop: Use the prop to create movement or add interest to your pose.
- Use the Prop to Frame Your Face: Hold the prop in a way that frames your face and draws attention to your eyes.
- Don’t Let the Prop Distract: Ensure the prop enhances the photo rather than distracting from it.
8. Mastering Facial Expressions
How important are facial expressions in posing? Facial expressions are just as important as body posture when it comes to posing. Your facial expression can convey a wide range of emotions and add depth and personality to your photos. Mastering facial expressions is key to creating compelling and engaging images.
8.1 Achieving a Natural Smile
What are some tips for achieving a natural smile in photos?
- Think Happy Thoughts: Think about something that makes you happy to help elicit a genuine smile.
- Relax Your Face: Relax your facial muscles to avoid a forced or strained smile.
- Engage Your Eyes: A genuine smile involves your eyes as well as your mouth.
- Practice in a Mirror: Practice smiling in front of a mirror to see what looks most natural.
8.2 Exploring Different Expressions
How can you explore different expressions to add variety to your photos?
- Experiment with Emotions: Try conveying different emotions through your facial expressions, such as happiness, sadness, or surprise.
- Use Subtle Variations: Even subtle variations in your expression can make a big difference.
- Be Authentic: Avoid trying to force an expression that doesn’t feel genuine.
- Take Direction from the Photographer: A good photographer can help guide you in exploring different expressions.
9. The Influence of Lighting on Posing
How does lighting affect your poses? Lighting plays a crucial role in how your poses look in photos. Understanding how light interacts with your body and face can help you make informed decisions about your posing. Different lighting conditions require different posing techniques to achieve the most flattering results.
9.1 Posing in Natural Light
What are some tips for posing in natural light?
- Face the Light: Position yourself so that the light is falling on your face.
- Avoid Harsh Sunlight: Harsh sunlight can create harsh shadows and unflattering highlights.
- Use a Reflector: A reflector can help bounce light back onto your face and fill in shadows.
- Pay Attention to the Time of Day: The quality of natural light changes throughout the day, so plan your photo shoot accordingly.
9.2 Posing in Artificial Light
How should you adjust your posing when using artificial light?
- Be Aware of Shadows: Pay attention to where the shadows are falling and adjust your pose accordingly.
- Use Multiple Light Sources: Using multiple light sources can help eliminate harsh shadows and create a more balanced look.
- Experiment with Different Angles: Experiment with different angles to see how the light interacts with your face and body.
- Use a Light Meter: A light meter can help you accurately measure the light and adjust your settings accordingly.
10. Posing for Self-Portraits
What unique considerations apply when posing for self-portraits? Posing for self-portraits requires a different approach than posing for someone else. You have to be both the subject and the photographer, which can be challenging. However, with practice and patience, you can create stunning self-portraits that capture your personality and style.
10.1 Setting Up Your Shot
How do you set up a great self-portrait shot?
- Use a Tripod: A tripod is essential for keeping your camera stable and ensuring sharp images.
- Use a Remote Shutter Release: A remote shutter release allows you to trigger the camera without having to physically press the shutter button.
- Frame Your Shot: Carefully frame your shot and consider the composition.
- Set Your Focus: Set your focus manually or use autofocus to ensure your image is sharp.
10.2 Posing Techniques for Selfies
What are some effective posing techniques for selfies?
- Hold the Camera at Arm’s Length: Holding the camera at arm’s length can help create a more flattering angle.
- Turn Your Head Slightly: Turning your head slightly to one side can help slim your face.
- Experiment with Different Expressions: Try different expressions to see what looks best.
- Use Natural Light: Utilize natural light whenever possible to create flattering images.
Frequently Asked Questions (FAQs) About How to Stand in Photos
1. Why do I look awkward in photos?
You might look awkward due to tension, unnatural poses, or being caught off guard. Practicing poses, relaxing, and knowing your angles can help.
2. What is the best angle to stand for photos?
The best angle is typically 45 degrees to the camera. It slims the body and adds visual interest.
3. How can I avoid looking stiff in photos?
Avoid stiffness by incorporating movement, taking deep breaths, and focusing on natural expressions.
4. What is the ideal posture for taking photos?
Ideal posture involves standing tall with shoulders back, core engaged, and head aligned.
5. How can I make my arms look slimmer in photos?
Create space between your arms and torso. Place your hands on your hips or slightly away from your body.
6. What should I do with my hands when posing?
Give your hands something to do: hold a prop, place them in your pockets, or gently rest them on your leg.
7. How can I improve my smile in photos?
Think of something that makes you happy, relax your face, and let your eyes light up.
8. How does weight distribution affect posing?
Shifting your weight to one leg creates a natural S-curve, making your pose more dynamic and flattering.
9. Can clothing affect how I look in photos?
Yes, choose well-fitted clothing that flatters your body type and avoid overly baggy or tight garments.
10. How can I practice posing at home?
Use a mirror or your phone to practice different poses and expressions. Experiment to find what works best for you.
Elevate your photography skills by mastering the art of posing. Visit dfphoto.net for comprehensive guides, inspiring galleries, and a vibrant community of photographers. Discover techniques to capture stunning images and connect with fellow enthusiasts. Join us today and unlock your creative potential. Address: 1600 St Michael’s Dr, Santa Fe, NM 87505, United States. Phone: +1 (505) 471-6001. Website: dfphoto.net.
