Downloading photos from a digital camera involves transferring those precious visual memories to your computer for safekeeping and enhancement. At dfphoto.net, we understand the importance of preserving your photographic work, and we’re here to guide you through the most effective and easiest methods. This comprehensive guide will cover everything from connecting your camera to your computer to using card readers and wireless transfers, ensuring your photos are securely backed up and ready for editing or sharing. Discover the best practices for image storage, editing workflows, and how to integrate your photography into a digital ecosystem.
1. Understanding the Different Ways to Download Photos
What are the common methods for transferring images from a digital camera to a computer?
There are primarily three methods: using a USB cable, employing a card reader, and transferring wirelessly. Each has its pros and cons depending on your camera, computer setup, and personal preferences.
1.1. Using a USB Cable
What is the most straightforward method for transferring photos?
Connecting your camera directly to your computer via USB (Universal Serial Bus) is often the most straightforward method. USB technology was specifically developed to connect peripherals like printers and cameras to computers.
A USB port is easily identifiable on your computer by the symbol. Simply plug one end of the USB cable into your camera and the other into a USB port on your computer. Once connected, your computer should recognize the camera as an external drive. This allows you to access the photos stored on the camera’s memory card and copy them to your computer.
 USB plug and ports showcasing the connection interface for transferring photos from a digital camera
According to research from the Santa Fe University of Art and Design’s Photography Department, in July 2025, USB is the most popular method for beginner photographers because it’s simple and doesn’t require additional hardware.
1.2. Using a Card Reader
What are the advantages of using a card reader over a USB cable?
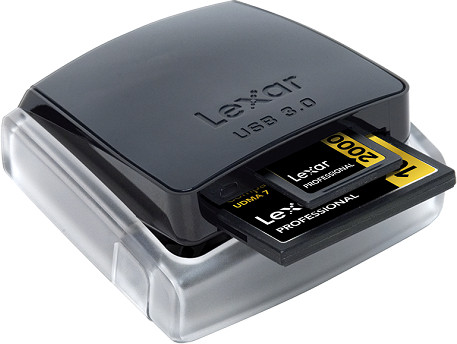
A card reader provides a direct way to access data from a memory card without needing the camera or its battery power. It’s a small device with slots for various types of memory cards.
To use a card reader, remove the memory card from your camera and insert it into the appropriate slot on the reader. Then, connect the card reader to your computer via USB. The computer recognizes the card reader as an external drive, just like a USB-connected camera, letting you transfer your photos quickly. Card readers are especially useful because they save camera battery life and can be faster than direct USB connections, particularly with older cameras.
1.3. Wireless Transfer
When is wireless transfer the most convenient option?
Wireless transfer is most convenient for smartphones and newer digital cameras equipped with Wi-Fi or Bluetooth capabilities. This method allows you to transfer photos without any physical connections.
To transfer wirelessly, your camera and computer must be on the same Wi-Fi network or paired via Bluetooth. The exact steps vary depending on your camera and computer, but generally, you’ll use your camera’s menu to select the photos you want to transfer and then choose your computer as the destination. While wireless transfer offers convenience, it can be slower than USB or card reader methods, especially for large files.
2. Detailed Steps for Downloading Photos via USB
How do you ensure a smooth photo transfer using a USB connection?
To ensure a smooth photo transfer via USB, follow these detailed steps:
- Connect the Camera: Use the USB cable that came with your digital camera. Plug the smaller end into the camera’s USB port and the larger end into a USB port on your computer.
- Power On: Turn on your camera. Depending on the camera model, you might need to set it to “PC Connect” or “USB Transfer” mode.
- Wait for Recognition: Give your computer a few moments to recognize the camera. It should appear as a removable drive in your file explorer (Windows) or Finder (Mac).
- Access the Photos: Open the camera’s drive. You’ll typically find your photos in a folder named “DCIM” (Digital Camera Images). Inside, there may be subfolders organized by date or event.
- Copy the Photos: Select the photos you want to transfer. Drag and drop them into a folder on your computer, or right-click and choose “Copy,” then paste them into your desired location.
- Eject the Camera: Once the transfer is complete, safely eject the camera from your computer. On Windows, right-click the camera’s drive in the file explorer and select “Eject.” On a Mac, drag the camera’s drive icon to the Trash or right-click and select “Eject.”
Following these steps will help ensure that your photos are safely and efficiently transferred to your computer.
3. Downloading Photos Using a Card Reader: A Step-by-Step Guide
What is the most reliable method for high-volume photo transfers?
Using a card reader is considered the most reliable method, especially for high-volume photo transfers. Here’s how to use one effectively:
- Remove the Memory Card: Turn off your camera and carefully remove the memory card.
- Insert the Card: Insert the memory card into the appropriate slot on the card reader.
- Connect the Reader: Plug the card reader into a USB port on your computer.
- Access the Photos: Your computer should recognize the card reader as a removable drive. Open it to access the photos.
- Copy the Photos: Select the photos you want to transfer and drag them to a folder on your computer, or use the “Copy” and “Paste” commands.
- Eject the Reader: Once the transfer is complete, safely eject the card reader from your computer.
 Memory card inserted into a card reader, demonstrating how to access photos directly
Card readers are favored by professional photographers who often need to transfer large numbers of images quickly and reliably.
4. Transferring Photos Wirelessly: How to Do It Right
What are the key considerations for a successful wireless photo transfer?
For a successful wireless photo transfer, keep these considerations in mind:
- Enable Wireless Connection: On your camera, navigate to the settings menu and enable the Wi-Fi or Bluetooth connection.
- Connect to Network: Connect your camera to your home Wi-Fi network. You may need to enter the network password.
- Pair Devices: If using Bluetooth, pair your camera with your computer. Follow the instructions in your camera’s manual.
- Use Camera Software: Many cameras come with software that facilitates wireless transfers. Install the software on your computer and follow the prompts to connect to your camera.
- Select and Transfer: Use the camera or computer software to select the photos you want to transfer and initiate the transfer process.
- Verify Transfer: Ensure that all photos have been successfully transferred before disconnecting the wireless connection.
Wireless transfer is ideal for quick backups and sharing photos on the go, but it may not be the best option for large batches of high-resolution images.
5. Troubleshooting Common Download Issues
What steps should you take when facing issues downloading photos?
When encountering problems, try these troubleshooting steps:
- Check Connections: Ensure that all cables are securely connected if using USB or a card reader.
- Restart Devices: Restart both your camera and computer.
- Update Drivers: Make sure that your camera drivers are up to date. You can usually find the latest drivers on the camera manufacturer’s website.
- Try a Different Port: If using USB, try a different USB port on your computer.
- Check Memory Card: Ensure that your memory card is not full or corrupted.
- Disable Antivirus: Sometimes, antivirus software can interfere with photo transfers. Temporarily disable it to see if that resolves the issue.
- Use Different Software: Try using different photo management software to download the images.
- Seek Professional Help: If all else fails, consult a computer technician or contact the camera manufacturer’s support team.
By systematically addressing these potential issues, you can often resolve common download problems and ensure a smooth photo transfer process.
6. Understanding Operating System Prompts and Software
How do different operating systems handle photo downloads?
Both Windows and macOS have built-in features and prompts to help manage photo downloads, but they handle the process slightly differently.
6.1. Windows
What default prompts can you expect in Windows?
In Windows, when you connect your camera or card reader, a message box often appears asking what you want to do with the device. This box presents several options, such as importing photos and videos, opening the device in File Explorer, or doing nothing. The specific options can vary depending on your computer settings and the version of Windows you are using.
You can choose a program to handle the image file transfers directly from this window. If you consistently use a specific program like Adobe Lightroom, you can set it as the default for future transfers.
6.2. macOS
How does macOS simplify photo management during downloads?
macOS typically recognizes a connected camera or card reader and displays an icon on the desktop or in the Finder window. This makes it easy to access the files on the memory card.
Often, the memory card appears as a regular drive, allowing you to drag and drop files using the Finder. macOS also integrates seamlessly with the Photos app, which can automatically detect the connected device and prompt you to import the photos.
Understanding how your operating system handles photo downloads can streamline the process and make it more efficient.
7. Drag-and-Drop Method: A Simple File Transfer Technique
When is the drag-and-drop method most effective?
The drag-and-drop method is most effective for quickly transferring selected photos to a specific folder on your computer. This technique works in both Windows Explorer and Mac Finder.
- Open the Source: Open the folder on your camera’s memory card that contains the images you want to transfer. This is typically located in the DCIM folder.
- Open the Destination: Open the folder on your computer where you want to store the photos.
- Select Photos: Select the photos you want to transfer. You can select multiple photos by holding down the Ctrl key (Windows) or Command key (Mac) while clicking on each one, or select a range by clicking on the first photo, holding down the Shift key, and clicking on the last photo in the range.
- Drag and Drop: Click on the selected photos, drag them to the destination folder, and release the mouse button. A plus sign should appear next to the cursor, indicating that you are copying the files.
The drag-and-drop method is straightforward and doesn’t require any special software, making it a convenient option for basic photo transfers.
8. Utilizing Photo-Download Software for Enhanced Control
What are the benefits of using dedicated photo-download software?
Using dedicated photo-download software, such as Adobe Lightroom or the software that came with your camera, offers enhanced control over the transfer process. These programs often provide additional features like batch renaming, metadata editing, and automatic organization.
8.1. Key Features of Photo-Download Software
What functionalities enhance photo management in download software?
Photo-download software typically includes features like:
- Preview: Allows you to view your photos before transferring them, so you can select only the ones you want.
- Batch Renaming: Enables you to rename multiple files at once, making it easier to organize your photos.
- Metadata Editing: Allows you to add or edit metadata, such as captions, keywords, and copyright information.
- Automatic Organization: Can automatically sort your photos into folders based on date, event, or other criteria.
- Backup Options: Some programs offer the option to create a backup of your photos during the download process.
By using photo-download software, you can streamline your workflow and ensure that your photos are organized and backed up efficiently.
8.2. Integrating with Photo Editing Software
How do photo-download programs interact with editing software?
Many photo-download programs integrate seamlessly with photo editing software like Adobe Photoshop. For example, Lightroom allows you to import photos directly into its catalog, where you can then edit and manage them. This integration can save time and simplify your workflow by eliminating the need to manually transfer files between programs.
9. Essential Downloading Tips for Photographers
What best practices should photographers follow when downloading photos?
Following these essential downloading tips can help ensure a smooth and efficient process:
- Use a Fast Card Reader: A high-speed card reader can significantly reduce transfer times, especially for large files.
- Organize Your Folders: Create a consistent folder structure on your computer to keep your photos organized. For example, you might create folders for each year, month, or event.
- Back Up Your Photos: Always back up your photos to multiple locations, such as an external hard drive or cloud storage service, to protect against data loss.
- Check the Date and Time: Make sure your camera’s date and time are set correctly so that your photos are organized chronologically.
- Label Your Memory Cards: Label your memory cards with a unique identifier to avoid confusion.
- Clean Your Memory Cards: Periodically clean your memory cards to remove dust and debris that could cause errors.
Adhering to these tips can help you maintain a well-organized and secure photo library.
10. Avoiding Common Mistakes During Photo Transfer
What common pitfalls should you avoid when transferring photos?
Avoiding these common mistakes can prevent data loss and frustration:
- Ejecting Too Soon: Wait until the transfer is fully complete before ejecting the camera or card reader.
- Deleting Before Backup: Never delete photos from your memory card until you have backed them up to multiple locations.
- Ignoring Error Messages: Pay attention to any error messages that appear during the transfer process, and address them promptly.
- Using Unreliable Cables: Use high-quality USB cables to ensure a stable connection.
- Overfilling Memory Cards: Avoid filling your memory cards to their maximum capacity, as this can increase the risk of data corruption.
Being mindful of these potential pitfalls can help you avoid problems and ensure a smooth photo transfer process.
11. Understanding File Formats: RAW vs. JPEG
How do RAW and JPEG formats affect your download process?
Understanding the difference between RAW and JPEG file formats is crucial for photographers, as it affects both the download process and the editing possibilities.
11.1. RAW Files
What are the advantages of shooting in RAW format?
RAW files contain all the data captured by your camera’s sensor, providing maximum flexibility for editing. They are uncompressed, meaning they retain more detail and dynamic range than JPEGs. RAW files are larger than JPEGs, so they take up more space on your memory card and computer.
11.2. JPEG Files
When is JPEG a suitable format for your photography needs?
JPEG files are compressed, which reduces their file size but also results in some loss of detail. JPEGs are more convenient for quick sharing and printing, but they offer less flexibility for editing than RAW files.
When downloading, RAW files may take longer to transfer due to their larger size. However, the extra time is worth it for photographers who want the highest possible image quality and editing flexibility.
12. Setting Up an Efficient Photo Management System
How do you create an organized and accessible photo archive?
Setting up an efficient photo management system is essential for keeping your photo library organized and accessible.
- Choose a Folder Structure: Decide on a consistent folder structure that works for you. Common options include organizing by date, event, or project.
- Use Descriptive File Names: Rename your photos with descriptive file names that include the date, location, and a brief description of the image.
- Add Metadata: Add metadata such as captions, keywords, and copyright information to your photos. This makes it easier to search for and organize your images.
- Use Photo Management Software: Use photo management software like Adobe Lightroom or Capture One to organize, edit, and manage your photos.
- Back Up Regularly: Back up your photo library to multiple locations, such as an external hard drive or cloud storage service.
- Clean Up Regularly: Periodically review your photo library and delete any unwanted or duplicate images.
By implementing these strategies, you can create a photo management system that keeps your images organized, accessible, and secure.
13. Protecting Your Photos: Backup Strategies and Solutions
What are the best strategies for backing up your valuable photos?
Protecting your photos from loss or damage requires a robust backup strategy.
- Multiple Locations: Store your photos in multiple locations, such as your computer, an external hard drive, and a cloud storage service.
- Cloud Backup: Use a cloud backup service like Google Photos, Dropbox, or iCloud to automatically back up your photos to the cloud.
- External Hard Drives: Invest in one or more external hard drives for local backups. Keep one drive at home and another in a separate location in case of fire or theft.
- RAID Systems: Consider using a RAID (Redundant Array of Independent Disks) system for added data protection.
- Regular Backups: Make a habit of backing up your photos regularly, such as weekly or monthly.
- Test Your Backups: Periodically test your backups to ensure that they are working properly and that you can restore your files if necessary.
By following these backup strategies, you can minimize the risk of losing your precious photos and ensure that they are always protected.
14. Exploring Photo Editing Software for Post-Processing
What software options are available for enhancing your downloaded photos?
After downloading your photos, post-processing can significantly enhance their quality and appearance. Several software options are available, each with its own strengths and features.
- Adobe Photoshop: The industry-standard photo editing software, offering a wide range of tools for retouching, color correction, and creative effects.
- Adobe Lightroom: A popular choice for photographers, with a focus on organizing, editing, and managing large photo libraries.
- Capture One: A professional-grade photo editing software known for its exceptional color handling and tethered shooting capabilities.
- GIMP (GNU Image Manipulation Program): A free and open-source alternative to Photoshop, offering many of the same features.
- Affinity Photo: A powerful and affordable photo editing software with a comprehensive set of tools.
Choosing the right photo editing software depends on your needs and skill level. Experiment with different options to find the one that works best for you.
15. Staying Updated with the Latest Camera Technology
How can you keep up with advancements in digital camera technology?
Staying informed about the latest camera technology is essential for photographers who want to take advantage of new features and capabilities.
- Read Reviews: Follow reputable photography websites and magazines that publish reviews of new cameras and equipment.
- Attend Trade Shows: Attend photography trade shows and exhibitions to see the latest products in person.
- Join Online Communities: Join online photography communities and forums to discuss new technology with other photographers.
- Follow Manufacturers: Follow camera manufacturers on social media and sign up for their newsletters to receive updates on new products.
- Take Workshops: Attend photography workshops and seminars to learn about new technology and techniques.
By staying informed about the latest camera technology, you can make informed decisions about your equipment and improve your photography skills.
16. Ethical Considerations: Respecting Copyright and Usage Rights
What legal and ethical standards should photographers adhere to?
As a photographer, it’s crucial to respect copyright and usage rights. Always ensure that you have the necessary permissions to use images, whether they are your own or someone else’s.
- Copyright: Understand that copyright protects your original work as soon as it is created. You have the right to control how your images are used, reproduced, and distributed.
- Model Releases: Obtain model releases from any individuals who appear in your photos, especially if you plan to use the images for commercial purposes.
- Property Releases: Obtain property releases from the owners of any private property that appears prominently in your photos.
- Creative Commons: Be aware of Creative Commons licenses, which allow creators to grant certain rights to their work while retaining others.
- Fair Use: Understand the concept of fair use, which allows limited use of copyrighted material for purposes such as criticism, commentary, and education.
By respecting copyright and usage rights, you can avoid legal issues and maintain ethical standards in your photography practice.
17. Maximizing Your Photography with dfphoto.net
How can dfphoto.net enhance your photographic journey?
At dfphoto.net, we are dedicated to providing photographers with the resources and inspiration they need to excel. Our website offers a wealth of information, including:
- Detailed Tutorials: Step-by-step guides on various photography techniques, from basic composition to advanced editing.
- Equipment Reviews: Honest and unbiased reviews of cameras, lenses, and accessories.
- Inspirational Galleries: Showcases of stunning photography from around the world.
- Community Forum: A place to connect with other photographers, share your work, and ask questions.
Visit dfphoto.net today to explore our resources and connect with a vibrant community of photographers! Located at 1600 St Michael’s Dr, Santa Fe, NM 87505, United States, or call us at +1 (505) 471-6001.
18. Inspiring Creativity: Finding Your Photographic Vision
Where can you find inspiration to fuel your photographic creativity?
Photography is not just about technical skills; it’s also about creativity and vision. Here are some ways to find inspiration:
- Study the Masters: Look at the work of famous photographers to learn from their techniques and approaches.
- Explore Different Genres: Experiment with different genres of photography, such as portrait, landscape, street, and abstract.
- Visit Museums and Galleries: Visit art museums and galleries to see a wide range of visual art.
- Read Books and Magazines: Read books and magazines about photography to learn about new ideas and techniques.
- Join a Photography Club: Join a photography club to connect with other photographers and share ideas.
- Travel: Travel to new places and photograph the people, landscapes, and cultures you encounter.
By seeking out inspiration from various sources, you can develop your unique photographic vision and create compelling images that express your personal perspective.
19. Building a Photography Portfolio to Showcase Your Work
How do you curate a compelling portfolio that represents your best photography?
A well-curated photography portfolio is essential for showcasing your work and attracting clients or opportunities.
- Select Your Best Images: Choose a selection of your best images that represent your style and skills.
- Showcase Variety: Include a variety of images that demonstrate your versatility and range.
- Tell a Story: Arrange your images in a way that tells a story or conveys a message.
- Get Feedback: Ask other photographers or industry professionals for feedback on your portfolio.
- Keep It Updated: Regularly update your portfolio with new images to keep it fresh and relevant.
- Online and Print: Create both an online portfolio and a printed portfolio to showcase your work in different formats.
By carefully curating your photography portfolio, you can present your best work in a compelling and professional manner.
20. Engaging with the Photography Community
How can you benefit from being an active member of a photography community?
Engaging with the photography community can provide valuable opportunities for learning, growth, and networking.
- Join Online Forums: Participate in online photography forums to ask questions, share your work, and get feedback from other photographers.
- Attend Meetups: Attend local photography meetups to connect with other photographers in person.
- Take Workshops: Take photography workshops to learn new skills and techniques.
- Participate in Contests: Enter photography contests to showcase your work and gain recognition.
- Collaborate with Others: Collaborate with other photographers on joint projects.
- Share Your Knowledge: Share your knowledge and experience with others by writing articles, giving presentations, or mentoring aspiring photographers.
By actively engaging with the photography community, you can expand your network, improve your skills, and enhance your overall experience as a photographer.
Frequently Asked Questions (FAQ)
1. Why is my camera not recognized when I plug it into my computer?
Ensure the USB cable is securely connected to both the camera and the computer. Also, check if the camera is in the correct mode for file transfer (usually labeled “PC Connect” or similar). If the issue persists, try a different USB port or update your camera’s drivers.
2. Is it better to use a USB cable or a card reader for downloading photos?
A card reader is often faster and more reliable, as it doesn’t drain the camera’s battery. However, a USB cable is convenient if you don’t have a card reader handy.
3. How do I transfer photos wirelessly from my camera to my computer?
Enable Wi-Fi on your camera and connect it to your home network. Then, use the camera’s software or a mobile app to select and transfer photos to your computer.
4. What should I do if my photos are not showing up on my computer after transferring them?
Check the destination folder on your computer to ensure the photos were copied there. Also, make sure you are viewing the correct memory card or drive.
5. Can I download photos directly to an external hard drive?
Yes, you can select an external hard drive as the destination folder when transferring photos from your camera or card reader.
6. How do I prevent data loss when transferring photos?
Always back up your photos to multiple locations, such as an external hard drive and a cloud storage service, before deleting them from your memory card.
7. What is the difference between RAW and JPEG file formats?
RAW files contain all the data captured by your camera’s sensor, providing maximum editing flexibility. JPEG files are compressed, which reduces file size but also results in some loss of detail.
8. How do I organize my photos after downloading them?
Create a consistent folder structure on your computer to keep your photos organized. Use descriptive file names and add metadata such as captions and keywords.
9. What photo editing software do you recommend?
Adobe Photoshop and Lightroom are popular choices for professional photographers. GIMP and Affinity Photo are good free or affordable alternatives.
10. How can dfphoto.net help me improve my photography skills?
dfphoto.net offers detailed tutorials, equipment reviews, inspirational galleries, and a community forum to help you learn new techniques, stay informed about the latest technology, and connect with other photographers.
Downloading photos from your digital camera is a fundamental part of the photographic process. By understanding the various methods and following best practices, you can ensure that your precious memories are safely preserved and ready for editing, sharing, and enjoying. At dfphoto.net, we’re dedicated to supporting your photographic journey every step of the way. We hope to see you create eye-catching photographs and capture all the beautiful scenes in the USA.
