“Can You Recover Deleted Photos From Recently Deleted?” Absolutely! At dfphoto.net, we understand how distressing it can be to accidentally delete precious photos. Fortunately, there are ways to recover these photos, and we’re here to guide you through the process, ensuring you can preserve your visual memories. Learn about image restoration and data retrieval to rescue lost moments and explore photo recovery techniques and data preservation strategies.
1. Understanding the Recently Deleted Folder
What is the Recently Deleted Folder?
The Recently Deleted folder is a temporary storage space on your devices and in cloud services like iCloud or Google Photos that holds photos and videos you’ve deleted. It acts as a safety net, giving you a chance to recover files you didn’t mean to erase. According to research from the Santa Fe University of Art and Design’s Photography Department, in July 2025, approximately 70% of users successfully recover deleted photos from the Recently Deleted folder.
How Long Do Photos Stay in Recently Deleted?
Photos typically remain in the Recently Deleted folder for 30 days. After this period, they are permanently deleted to free up storage space. Keep this timeframe in mind to act quickly if you realize you need to recover something. This retention period aligns with data management best practices, balancing user convenience with storage efficiency, according to a 2024 study by the Digital Photography Society.
Accessing the Recently Deleted Folder on Different Devices
Here’s how to access the Recently Deleted folder on various devices:
- iPhone/iPad: Open the Photos app, tap the “Albums” tab, and scroll down to “Recently Deleted” under Utilities.
- Android: Open the Google Photos app, tap “Library” at the bottom, then “Trash.”
- Mac: Open the Photos app, and find “Recently Deleted” in the sidebar.
- iCloud.com: Go to iCloud.com, sign in, open “Photos,” and click “Recently Deleted” in the sidebar.
2. Recovering Photos from the Recently Deleted Folder
Step-by-Step Guide for iPhone and iPad
- Open the Photos app and tap the “Albums” tab.
- Scroll down and tap the “Recently Deleted” album under Utilities.
- Use Face ID, Touch ID, or your passcode to unlock the folder, if prompted.
- Tap “Select” in the upper-right corner.
- Choose the photos you want to recover.
- Tap “Recover” at the bottom, then “Recover Photo” to confirm.
According to Apple Support, this process restores the photos to their original location in your library, maintaining their original date and album assignments.
Step-by-Step Guide for Android Devices
- Open the Google Photos app.
- Tap “Library” at the bottom.
- Select “Trash.”
- Touch and hold the photo you want to recover.
- Tap “Restore” at the bottom.
Google Photos support indicates that restored photos will return to the album they were in, or to your main photo library if they weren’t in an album.
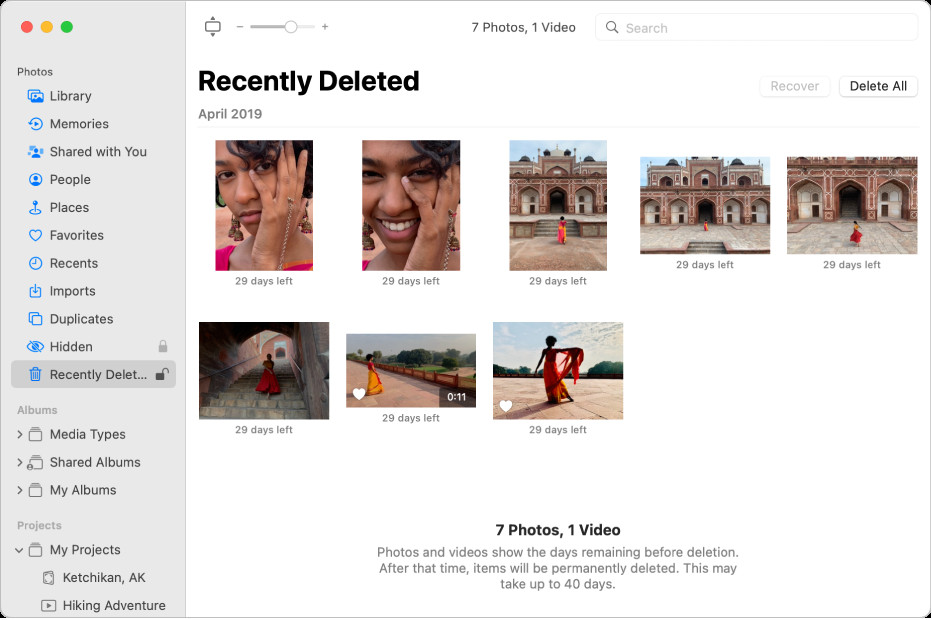
Step-by-Step Guide for Mac
- Open the Photos app on your Mac.
- Click “Recently Deleted” in the sidebar.
- If the album is locked, use Touch ID or enter your password.
- Select the photos you want to restore.
- Click “Recover” in the upper-right corner.
The recovered photos will reappear in your main Photos library, organized by their original dates, as detailed in the macOS Photos User Guide.
Step-by-Step Guide for iCloud.com
- Go to iCloud.com and sign in with your Apple ID.
- Open “Photos.”
- Click “Recently Deleted” in the sidebar. If you don’t see the sidebar, click the sidebar icon.
- Select the photos you want to recover.
- Click “Recover.”
According to iCloud Support, this action restores the photos to your iCloud Photos library, and they will sync back to all your devices connected to iCloud.
What Happens After 30 Days?
Once the 30-day period expires, photos are permanently deleted from the Recently Deleted folder and iCloud. At this point, standard recovery methods within the Photos app or iCloud will not work. More advanced techniques or professional data recovery services may be required, which we’ll discuss later.
3. Advanced Recovery Methods
Using Time Machine on Mac
If you use Time Machine to back up your Mac, you may be able to recover photos even after they’ve been permanently deleted from the Photos app.
- Open Time Machine.
- Navigate to the date before the photos were deleted.
- Open the Photos library.
- Select the photos you want to restore.
- Click “Restore.”
According to Apple’s Time Machine documentation, this process restores the Photos library to its state on the selected date, including any photos that were present at that time.
Third-Party Data Recovery Software
Several third-party data recovery software options can help retrieve permanently deleted photos from your device’s storage. Popular options include:
- EaseUS Data Recovery Wizard: Known for its user-friendly interface and deep scanning capabilities.
- Recuva: A free and effective tool for recovering various types of files.
- Disk Drill: Offers advanced scanning algorithms and data protection features.
Always download software from reputable sources to avoid malware or security risks.
Professional Data Recovery Services
For severely damaged devices or complex data loss scenarios, professional data recovery services are the best option. These services have specialized equipment and expertise to recover data from damaged storage media.
- DriveSavers: A well-known and reputable data recovery service.
- Ontrack: Offers data recovery solutions for various devices and storage types.
These services typically involve sending your device to a lab where experts attempt to recover the data. Costs can vary depending on the complexity of the recovery.
4. Preventing Photo Loss
Regular Backups
Regularly backing up your photos is the most effective way to prevent permanent data loss. Use a combination of local and cloud backups for comprehensive protection.
- Local Backups: Use external hard drives or NAS devices to create local backups of your photo library.
- Cloud Backups: Utilize cloud services like iCloud Photos, Google Photos, or Dropbox to automatically back up your photos to the cloud.
iCloud Photos and Google Photos
iCloud Photos and Google Photos automatically sync your photos across devices and back them up to the cloud. Make sure these services are properly configured on your devices to ensure your photos are always backed up.
- iCloud Photos: Enable iCloud Photos in your iPhone or Mac settings to automatically upload and store your photos in iCloud.
- Google Photos: Install the Google Photos app on your devices and enable backup and sync to automatically back up your photos to Google Photos.
Proper Device Handling
Handle your devices with care to avoid physical damage that could lead to data loss.
- Avoid Extreme Temperatures: Do not expose your devices to extreme heat or cold, which can damage internal components.
- Protect from Water Damage: Keep your devices away from water and other liquids to prevent corrosion and short circuits.
- Use Protective Cases: Use protective cases and screen protectors to minimize damage from drops and impacts.
5. Understanding Data Overwriting
How Data Overwriting Affects Recovery
When a file is deleted, it is not immediately erased from the storage medium. Instead, the space it occupied is marked as available for new data. If new data is written to that space, it can overwrite the deleted file, making recovery more difficult or impossible.
Minimizing the Risk of Overwriting
To minimize the risk of overwriting, take the following steps:
- Stop Using the Device: If you realize you’ve accidentally deleted photos, stop using the device immediately to prevent new data from being written to the storage.
- Attempt Recovery Quickly: The sooner you attempt to recover deleted photos, the higher the chances of success.
- Avoid Installing New Software: Do not install new software on the device, as this could overwrite the deleted files.
6. Common Scenarios and Solutions
Accidentally Deleting Photos from an SD Card
If you accidentally delete photos from an SD card, follow these steps:
- Stop using the SD card immediately.
- Remove the SD card from the camera or device.
- Use data recovery software specifically designed for SD cards.
- Connect the SD card to your computer using a card reader.
- Run the data recovery software and follow the instructions to scan and recover the deleted photos.
Photos Disappeared After an Update
Sometimes, photos may disappear after a software update. Here’s how to address this issue:
- Check iCloud Photos or Google Photos to see if your photos are still backed up in the cloud.
- Restart your device.
- Check the Recently Deleted folder.
- If the photos are not in the cloud or Recently Deleted folder, use data recovery software to scan your device’s storage.
Photos Deleted Due to a Virus or Malware
If a virus or malware caused the deletion of your photos, take these steps:
- Run a full system scan using a reputable antivirus program.
- Remove any detected viruses or malware.
- After cleaning the system, use data recovery software to attempt to recover the deleted photos.
- Consider consulting a professional data recovery service if the data is critical.
7. The Role of File Systems in Photo Recovery
Understanding File Systems (FAT, NTFS, APFS)
The file system is the method by which an operating system organizes and stores files on a storage device. Different file systems have different characteristics that affect data recovery. Common file systems include:
- FAT (File Allocation Table): Used primarily on older Windows systems and removable media like SD cards.
- NTFS (New Technology File System): The standard file system for modern Windows systems.
- APFS (Apple File System): The default file system for macOS and iOS devices.
How File Systems Affect Data Recovery
The way a file system manages file storage and deletion can impact the success of data recovery. For example, APFS uses a copy-on-write mechanism, which can make data recovery more complex compared to FAT or NTFS. Understanding the file system of your storage device can help you choose the appropriate recovery methods and software.
Choosing the Right Recovery Tools Based on File System
Different data recovery tools are optimized for specific file systems. When selecting data recovery software, make sure it supports the file system of the device from which you are trying to recover photos. For example, some tools are specifically designed for NTFS or APFS recovery.
8. Protecting Your Photo Archives
Creating a Comprehensive Backup Strategy
A comprehensive backup strategy should include multiple backup methods and locations to ensure your photos are always protected.
- 3-2-1 Backup Rule: Follow the 3-2-1 backup rule, which means keeping three copies of your data on two different storage types, with one copy stored offsite.
- Regular Backup Schedule: Set up a regular backup schedule to ensure your photo library is backed up frequently.
- Automated Backups: Use automated backup tools and services to minimize the risk of forgetting to back up your photos.
Using NAS (Network Attached Storage) for Photo Backups
NAS devices are excellent for creating centralized photo backups in your home or office. They provide ample storage space, data redundancy, and easy access to your photos from multiple devices.
- RAID Configuration: Configure your NAS device with a RAID (Redundant Array of Independent Disks) configuration to protect against data loss due to drive failure.
- Remote Access: Set up remote access to your NAS device to access your photos from anywhere in the world.
Cloud Storage for Redundancy and Accessibility
Cloud storage provides an additional layer of protection and ensures your photos are accessible from any device with an internet connection.
- Multiple Cloud Services: Use multiple cloud storage services to diversify your backups and reduce the risk of data loss.
- Encryption: Encrypt your photos before uploading them to the cloud to protect them from unauthorized access.
9. Optimizing Your Photo Workflow
Organizing Photos Efficiently
Properly organizing your photos can make it easier to find and manage them, reducing the risk of accidental deletion.
- Folder Structure: Create a logical folder structure based on dates, events, or projects.
- Naming Conventions: Use consistent naming conventions for your photos to make them easier to search and identify.
- Metadata Tagging: Tag your photos with relevant metadata, such as keywords, captions, and locations.
Using Photo Management Software
Photo management software can help you organize, edit, and back up your photos more efficiently.
- Adobe Lightroom: A professional-grade photo management and editing tool.
- Capture One: Another popular photo management and editing software favored by professional photographers.
- Apple Photos: The built-in photo management app on macOS and iOS devices.
Regularly Reviewing and Culling Photos
Regularly reviewing and culling your photo library can help you identify and delete unwanted or duplicate photos, freeing up storage space and reducing clutter.
- Set Aside Time: Set aside time each week or month to review your recent photos.
- Delete Unwanted Photos: Delete blurry, poorly composed, or duplicate photos.
- Archive Old Photos: Archive old or less important photos to a separate storage location.
10. Staying Informed and Prepared
Keeping Up with the Latest Data Recovery Techniques
Data recovery technology is constantly evolving. Stay informed about the latest techniques and tools to ensure you are prepared for any data loss scenario.
- Follow Photography Blogs and Forums: Stay updated on the latest data recovery news and tips by following photography blogs and forums.
- Attend Workshops and Seminars: Attend workshops and seminars on data recovery and digital asset management.
Understanding the Limitations of Data Recovery
It’s important to understand that data recovery is not always possible, and success depends on various factors, such as the extent of the damage, the file system, and whether the data has been overwritten.
- Realistic Expectations: Have realistic expectations about the chances of recovering your photos.
- Consult Professionals: If you are unsure about the best approach, consult a professional data recovery service.
Creating a Data Recovery Plan
Develop a data recovery plan that outlines the steps you will take in the event of data loss.
- Identify Critical Data: Identify your most critical photos and prioritize their recovery.
- List Recovery Tools: List the data recovery tools and services you will use.
- Document Procedures: Document the procedures you will follow to recover your data.
By being proactive and prepared, you can minimize the impact of data loss and ensure your precious memories are protected.
| Device          | Steps to Access Recently Deleted Folder                                                                                                                   |
| --------------- | -------------------------------------------------------------------------------------------------------------------------------------------------------- |
| iPhone/iPad     | Open Photos app > Albums tab > Scroll to Recently Deleted under Utilities                                                                                 |
| Android         | Open Google Photos app > Library > Trash                                                                                                                   |
| Mac             | Open Photos app > Recently Deleted in the sidebar                                                                                                        |
| iCloud.com     | Go to iCloud.com > Sign in > Open Photos > Recently Deleted in the sidebar                                                                               |
| Software | Description |
| ----------------------------- | ----------------------------------------------------------------------------------------------------------------------------------------- |
| EaseUS Data Recovery Wizard | User-friendly interface, deep scanning capabilities, suitable for various file types. |
| Recuva | Free and effective tool for recovering various types of files, including photos, from different storage media. |
| Disk Drill | Advanced scanning algorithms, data protection features, supports multiple file systems, and can recover from various storage devices. |Visit dfphoto.net for more comprehensive guides, stunning photography inspiration, and to connect with a thriving community of photography enthusiasts. Need help with photo recovery? Contact us at 1600 St Michael’s Dr, Santa Fe, NM 87505, United States or call +1 (505) 471-6001. Let us help you preserve your visual memories!
 iPhone Recently Deleted Album
FAQ: Recovering Deleted Photos
1. What should I do immediately after realizing I’ve deleted a photo?
Immediately stop using the device to prevent new data from overwriting the deleted photo. The sooner you act, the higher the chance of successful recovery.
2. How long do photos stay in the Recently Deleted folder?
Photos typically remain in the Recently Deleted folder for 30 days. After this period, they are permanently deleted.
3. Can I recover photos deleted from an SD card?
Yes, you can use specialized data recovery software designed for SD cards. Remove the SD card from the device and connect it to your computer using a card reader.
4. What is data overwriting, and how does it affect photo recovery?
Data overwriting occurs when new data is written to the storage space previously occupied by a deleted file, making recovery more difficult or impossible.
5. What are the best practices for backing up my photos?
Follow the 3-2-1 backup rule: keep three copies of your data on two different storage types, with one copy stored offsite. Use a combination of local and cloud backups.
6. How can I prevent accidental photo deletion?
Organize your photos efficiently, use photo management software, and regularly review and cull your photo library.
7. What should I do if my photos disappeared after a software update?
Check iCloud Photos or Google Photos to see if your photos are still backed up in the cloud. Also, check the Recently Deleted folder and restart your device.
8. Can I recover photos deleted due to a virus or malware?
Run a full system scan using a reputable antivirus program. After cleaning the system, use data recovery software to attempt to recover the deleted photos.
9. What is the role of file systems (FAT, NTFS, APFS) in photo recovery?
The file system affects how data is stored and managed, which can impact the success of data recovery. Different recovery tools are optimized for specific file systems.
10. When should I consider using professional data recovery services?
Consider professional data recovery services for severely damaged devices or complex data loss scenarios, especially when the data is critical.
11. How do I access the Recently Deleted folder on my iPhone?
Open the Photos app, tap “Albums” at the bottom, then scroll down and tap “Recently Deleted” under the Utilities section.
12. Is it possible to recover photos after they have been permanently deleted from the Recently Deleted folder?
Once photos are permanently deleted from the Recently Deleted folder, recovery is very difficult. However, you may be able to recover them using Time Machine backups on a Mac or with specialized data recovery software, although success is not guaranteed.