Fixing the resolution of a photo to enhance its quality is a common need for photographers and visual artists. On dfphoto.net, we understand the importance of image resolution in creating stunning visuals. Whether you’re aiming to print a large format photograph, improve the clarity of a digital image, or simply make your photos look their best, understanding how to adjust resolution is key. By exploring various techniques and tools, you can enhance your images and achieve the desired outcome, maximizing visual fidelity and overall image quality. Let’s dive into the world of image resolution, pixel dimensions, and upscaling techniques to help you get the most out of your photographs.
1. What is Resolution and Why Does It Matter?
Understanding resolution is the first step to mastering image quality. Image resolution is the detail an image holds, determining how much information is captured and displayed. A photo’s resolution significantly impacts its clarity, sharpness, and suitability for various uses, especially concerning the output size and viewing distance.
1.1 Defining Image Resolution: Pixels, DPI, and PPI
Image resolution involves several key concepts:
- Pixels: The smallest units in an image. More pixels mean more detail.
- DPI (Dots Per Inch): Used for printing, indicating the number of ink dots per inch.
- PPI (Pixels Per Inch): Used for screens, showing pixel density.
Higher pixel dimensions in images lead to better quality and allow for larger prints without pixelation.
1.2 The Impact of Resolution on Image Quality and Usage
Resolution impacts image quality significantly, affecting how clear and detailed the image appears. Higher resolutions are essential for printing, especially for large formats, ensuring images remain sharp and detailed. For digital use, adequate resolution prevents pixelation and ensures images look crisp on screens.
2. Common Scenarios Where You Need to Fix Photo Resolution
There are several situations where you might need to adjust the resolution of a photo to meet specific requirements.
2.1 Upscaling Low-Resolution Images for Printing
One of the most common scenarios is when you have a low-resolution image and need to print it in a larger format. Upscaling involves increasing the pixel dimensions of the image to make it suitable for printing without appearing pixelated.
2.2 Improving Image Quality for Digital Displays
Sometimes, images may appear blurry or pixelated on high-resolution displays due to insufficient resolution. In such cases, increasing the resolution can improve the image quality and make it look sharper on digital screens.
2.3 Preparing Images for Web Use
When preparing images for web use, it’s essential to strike a balance between image quality and file size. Optimizing the resolution ensures that images load quickly on websites without sacrificing visual quality.
2.4 Enhancing Old or Scanned Photos
Old or scanned photos often have low resolution and may suffer from various imperfections. Fixing the resolution and enhancing these images can help restore their original clarity and detail.
3. Basic Methods to Adjust Photo Resolution
Several basic methods can be used to adjust photo resolution, depending on the desired outcome and available tools.
3.1 Using Image Editing Software (e.g., Adobe Photoshop, GIMP)
Image editing software like Adobe Photoshop and GIMP offer powerful tools for adjusting photo resolution. These programs allow you to change the pixel dimensions, DPI, and PPI of an image while providing options for resampling and interpolation to maintain image quality.
3.1.1 Step-by-Step Guide to Resizing Images in Photoshop
- Open Image: Open your image in Adobe Photoshop.
- Navigate to Image Size: Go to
Image > Image Size. - Adjust Dimensions: Enter the desired width and height in pixels.
- Resampling Options: Choose a resampling method (e.g., Bicubic Automatic, Preserve Details 2.0).
- Save Image: Save the image, preferably as a new file to preserve the original.
3.1.2 Using GIMP for Resolution Adjustment
- Open Image: Open your image in GIMP.
- Navigate to Scale Image: Go to
Image > Scale Image. - Set New Size: Input the new width and height.
- Interpolation: Select an interpolation method (e.g., Lanczos).
- Scale: Click the “Scale” button.
- Export Image: Export the image to save the changes.
3.2 Online Image Resizers
Online image resizers are convenient tools for quick resolution adjustments without the need for software installation. These tools typically offer basic resizing options and are suitable for simple tasks.
3.2.1 Overview of Popular Online Tools
- Resizemyimg.com: A user-friendly online tool for resizing images quickly.
- BIRME (Bulk Image Resizing Made Easy): Great for batch resizing multiple images at once.
- iLoveIMG: Offers various image editing tools, including resizing, compression, and conversion.
- PicResize: Provides a straightforward interface for resizing images with preset options.
3.2.2 Pros and Cons of Using Online Resizers
Pros:
- Convenient and accessible from any device with an internet connection.
- No software installation required.
- Often free or offer basic features for free.
Cons:
- Limited advanced features compared to dedicated image editing software.
- Potential privacy concerns when uploading sensitive images.
- Dependence on internet connectivity.
3.3 Mobile Apps for Quick Fixes
Mobile apps offer a convenient way to adjust photo resolution on the go. These apps are available for both iOS and Android devices and provide basic resizing and editing capabilities.
3.3.1 Top Mobile Apps for Resolution Adjustment (iOS and Android)
- Adobe Photoshop Express (iOS & Android): A free mobile app with basic resizing and editing tools.
- Photo Resizer (Android): Specifically designed for resizing images quickly and easily.
- Image Size (iOS): Allows precise control over image dimensions and file size.
- Resize Me! (Android): Offers batch resizing and custom size options.
3.3.2 Benefits and Limitations of Mobile Apps
Benefits:
- Convenient for quick edits on mobile devices.
- User-friendly interfaces.
- Often free or offer affordable premium features.
Limitations:
- Limited advanced features compared to desktop software.
- Smaller screen size for editing.
- Potential storage limitations on mobile devices.
4. Advanced Techniques for Enhancing Resolution
For more demanding tasks, advanced techniques can significantly improve the quality of upscaled images.
4.1 Understanding Upscaling Algorithms (Bilinear, Bicubic, Lanczos)
Upscaling algorithms determine how new pixels are added to an image when increasing its resolution. Common algorithms include:
- Bilinear: Averages the colors of neighboring pixels, resulting in smooth but sometimes blurry results.
- Bicubic: Considers a larger neighborhood of pixels, producing sharper and more detailed results than bilinear.
- Lanczos: Uses a more complex mathematical function to interpolate pixels, often yielding the best results with minimal artifacts.
4.2 Utilizing AI-Powered Upscaling Tools
AI-powered upscaling tools use machine learning algorithms to analyze and enhance images, producing high-quality results with minimal loss of detail. These tools can often outperform traditional upscaling methods.
4.2.1 Overview of AI Upscaling Software (e.g., Topaz Photo AI, Gigapixel AI)
- Topaz Photo AI: Combines several AI-based tools to enhance image quality, including upscaling, noise reduction, and sharpening.
- Gigapixel AI: Specifically designed for upscaling images, using advanced algorithms to preserve detail and clarity.
- Let’s Enhance: An online AI upscaling tool that offers various enhancement options.
4.2.2 How AI Enhances Image Details and Reduces Artifacts
AI-powered tools analyze images and predict the content of missing pixels based on patterns and textures. This helps to restore detail, reduce artifacts, and produce more natural-looking results.
4.3 Frequency Separation for Sharpening and Detail Enhancement
Frequency separation is a technique that separates an image into high-frequency (details) and low-frequency (tones and colors) layers. This allows you to selectively sharpen details without affecting the overall smoothness of the image.
4.3.1 Step-by-Step Guide to Frequency Separation in Photoshop
- Duplicate Layer: Duplicate the background layer twice.
- High-Frequency Layer: Apply a high-pass filter to the top layer to isolate details.
- Low-Frequency Layer: Apply a Gaussian blur to the middle layer to smooth out tones.
- Blending: Adjust the blending modes and opacity of the layers to achieve the desired effect.
4.3.2 Applying Sharpening Techniques to High-Frequency Layers
By applying sharpening techniques such as unsharp mask or smart sharpen to the high-frequency layer, you can enhance the details in the image without introducing unwanted artifacts.
5. Best Practices for Maintaining Image Quality
Maintaining image quality throughout the resolution adjustment process is crucial for achieving the best results.
5.1 Starting with the Highest Quality Original Image
Always start with the highest quality original image possible. This provides more data for upscaling algorithms to work with, resulting in better quality output.
5.2 Choosing the Right File Format (JPEG, PNG, TIFF)
Choosing the right file format is essential for preserving image quality:
- JPEG: Suitable for photographs with complex colors and gradients, but uses lossy compression, which can reduce image quality.
- PNG: Ideal for images with sharp lines, text, and graphics, as it uses lossless compression, preserving image quality.
- TIFF: A lossless format that preserves all image data, making it suitable for archival purposes and high-quality printing.
5.3 Avoiding Excessive Upscaling
Excessive upscaling can lead to noticeable artifacts and loss of detail. It’s generally recommended to avoid upscaling images by more than 200-300%, as the results may be unsatisfactory.
5.4 Sharpening Images Appropriately
Sharpening can enhance the perceived sharpness of an image, but excessive sharpening can introduce unwanted artifacts and noise. Use sharpening techniques sparingly and adjust the settings to achieve a balanced result.
5.5 Regular Calibration for Consistent Results
Regularly calibrating your monitor ensures accurate color representation and consistent results when adjusting image resolution and making other edits.
6. Troubleshooting Common Resolution Issues
Even with the best techniques, you may encounter some common resolution issues.
6.1 Dealing with Pixelation
Pixelation occurs when an image is enlarged beyond its original resolution, resulting in visible pixels. To minimize pixelation, use appropriate upscaling algorithms and avoid excessive enlargement.
6.2 Addressing Blurriness
Blurriness can result from various factors, including low resolution, camera shake, or improper focus. Sharpening techniques and deblurring filters can help improve the sharpness of blurry images.
6.3 Reducing Noise and Artifacts
Noise and artifacts can degrade image quality, especially in low-light conditions or when using aggressive sharpening. Noise reduction tools and filters can help minimize these imperfections.
6.4 Correcting Color Issues
Color issues such as color casts or inaccurate colors can affect the overall appearance of an image. Color correction tools and techniques can help restore accurate and pleasing colors.
7. Real-World Examples and Case Studies
To illustrate the practical application of resolution adjustment techniques, let’s look at some real-world examples and case studies.
7.1 Restoring Old Family Photos
Imagine you have an old family photo that’s faded and has low resolution. By scanning the photo at a high resolution and using AI-powered upscaling tools, you can restore its original clarity and detail, preserving precious memories for future generations.
7.2 Enhancing Product Images for E-Commerce
High-quality product images are essential for attracting customers and driving sales in e-commerce. By adjusting the resolution and enhancing the details of product images, you can make them more appealing and informative, leading to increased conversions.
7.3 Preparing Photos for Large Format Printing
If you want to print a photo in a large format, such as a poster or canvas print, you need to ensure that it has sufficient resolution to maintain sharpness and detail. By upscaling the image and using appropriate sharpening techniques, you can achieve stunning results that showcase your photography skills.
8. The Future of Image Resolution Technology
Image resolution technology is constantly evolving, with new advancements promising even better results in the future.
8.1 Advancements in AI and Machine Learning
AI and machine learning are revolutionizing image resolution technology, enabling more intelligent and adaptive upscaling algorithms that can produce stunning results with minimal loss of detail.
8.2 High-Resolution Displays and Devices
The increasing availability of high-resolution displays and devices is driving the demand for higher resolution images, pushing the boundaries of what’s possible in terms of image quality and detail.
8.3 Potential Applications in Various Industries
Image resolution technology has potential applications in various industries, including photography, graphic design, e-commerce, medical imaging, and more, enabling new possibilities for visual communication and innovation.
9. Conclusion: Mastering Photo Resolution for Stunning Visuals
Mastering photo resolution is essential for achieving stunning visuals and unlocking the full potential of your images. By understanding the principles of resolution, using appropriate techniques and tools, and following best practices, you can enhance your photos and create captivating visuals that impress and inspire.
We at dfphoto.net are dedicated to providing you with the resources and knowledge you need to excel in photography. We encourage you to explore our website for more tutorials, tips, and inspiration to elevate your skills and creativity.
10. Frequently Asked Questions (FAQs)
10.1 What is the best DPI for printing photos?
The ideal DPI for printing photos is typically 300 DPI. This resolution ensures that the printed image will have sufficient detail and sharpness. Lower DPI values may result in pixelated or blurry prints.
10.2 How can I increase the resolution of an image without losing quality?
To increase the resolution of an image without significant quality loss, use advanced upscaling algorithms such as Bicubic or Lanczos in image editing software like Photoshop or GIMP. Additionally, consider using AI-powered upscaling tools like Topaz Photo AI or Gigapixel AI, which use machine learning to enhance image details and reduce artifacts.
10.3 Is it possible to turn a low-resolution photo into a high-resolution one?
Yes, it is possible to turn a low-resolution photo into a high-resolution one, but the results may vary depending on the quality of the original image and the upscaling techniques used. AI-powered upscaling tools can often produce impressive results, but it’s essential to manage expectations and avoid excessive upscaling.
10.4 What file format is best for preserving image resolution?
TIFF (Tagged Image File Format) is generally the best file format for preserving image resolution, as it uses lossless compression and retains all image data. PNG (Portable Network Graphics) is another good option for images with sharp lines, text, and graphics. JPEG (Joint Photographic Experts Group) is suitable for photographs with complex colors and gradients, but it uses lossy compression, which can reduce image quality.
10.5 Can online image resizers really improve photo resolution?
Online image resizers can be convenient for quick resolution adjustments, but their capabilities may be limited compared to dedicated image editing software. While some online tools offer advanced upscaling algorithms, they may not always produce the best results. Evaluate the output carefully and consider using more powerful software for critical tasks.
10.6 How does frequency separation help in enhancing image resolution?
Frequency separation is a technique that separates an image into high-frequency (details) and low-frequency (tones and colors) layers, allowing you to selectively sharpen details without affecting the overall smoothness of the image. By applying sharpening techniques to the high-frequency layer, you can enhance the perceived sharpness of an image without introducing unwanted artifacts.
10.7 What are the limitations of upscaling an image?
The main limitation of upscaling an image is that you cannot add detail that was not originally present. Upscaling algorithms can only interpolate or predict the content of missing pixels based on existing data, which may result in a loss of sharpness and the introduction of artifacts. Avoid excessive upscaling and use appropriate techniques to minimize these limitations.
10.8 How important is monitor calibration for image resolution adjustment?
Monitor calibration is crucial for ensuring accurate color representation and consistent results when adjusting image resolution and making other edits. A calibrated monitor displays colors accurately, allowing you to make informed decisions about image adjustments and avoid unexpected results when printing or viewing images on other devices.
10.9 Can mobile apps effectively fix photo resolution?
Mobile apps can be useful for quick and simple resolution adjustments on the go, but their capabilities may be limited compared to desktop software. While some mobile apps offer basic resizing and editing tools, they may not provide the same level of control and precision as dedicated image editing software.
10.10 What are the ethical considerations when upscaling images?
When upscaling images, especially for commercial or journalistic purposes, it’s important to be transparent about the changes made and avoid misrepresenting the original content. Avoid using upscaling techniques to create misleading or deceptive images, and always respect the integrity of the original photograph.
 Close-up of a camera lens focusing on a subject, showcasing depth of field and clarity.
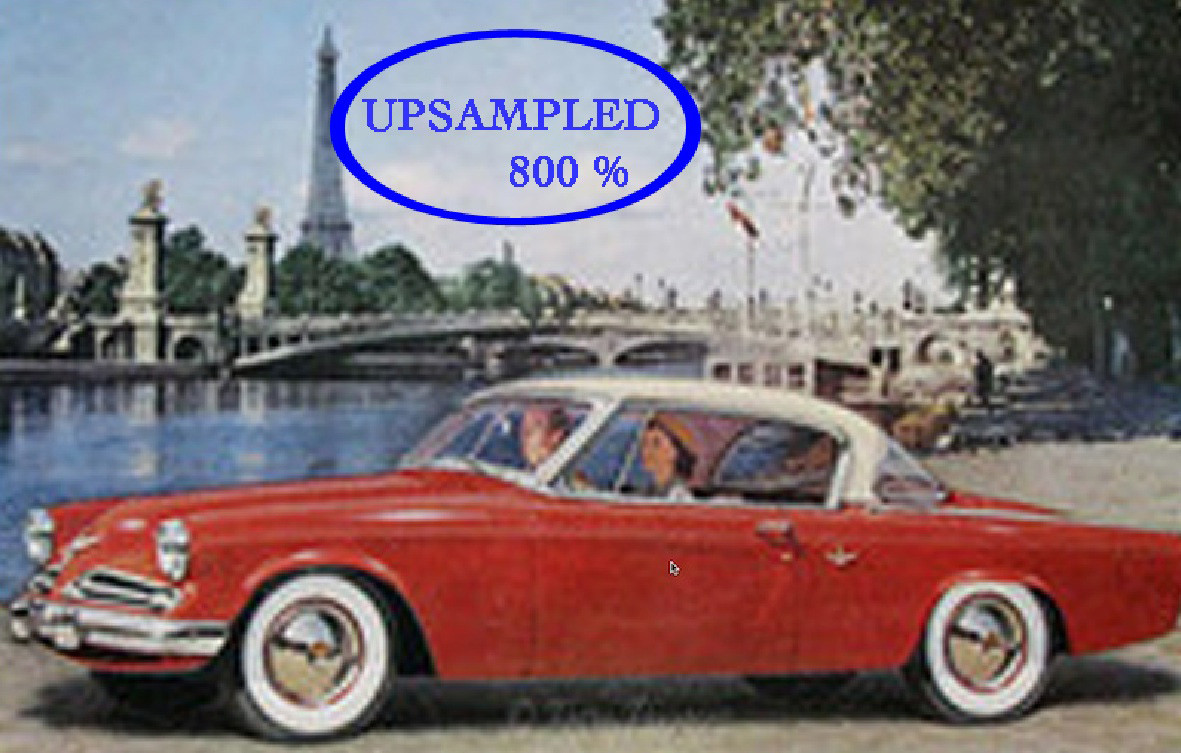 A side-by-side comparison of a low-resolution image and an upscaled image, demonstrating the improvement in detail and clarity.
 A close-up of an original photo showing pixelation and lack of detail.
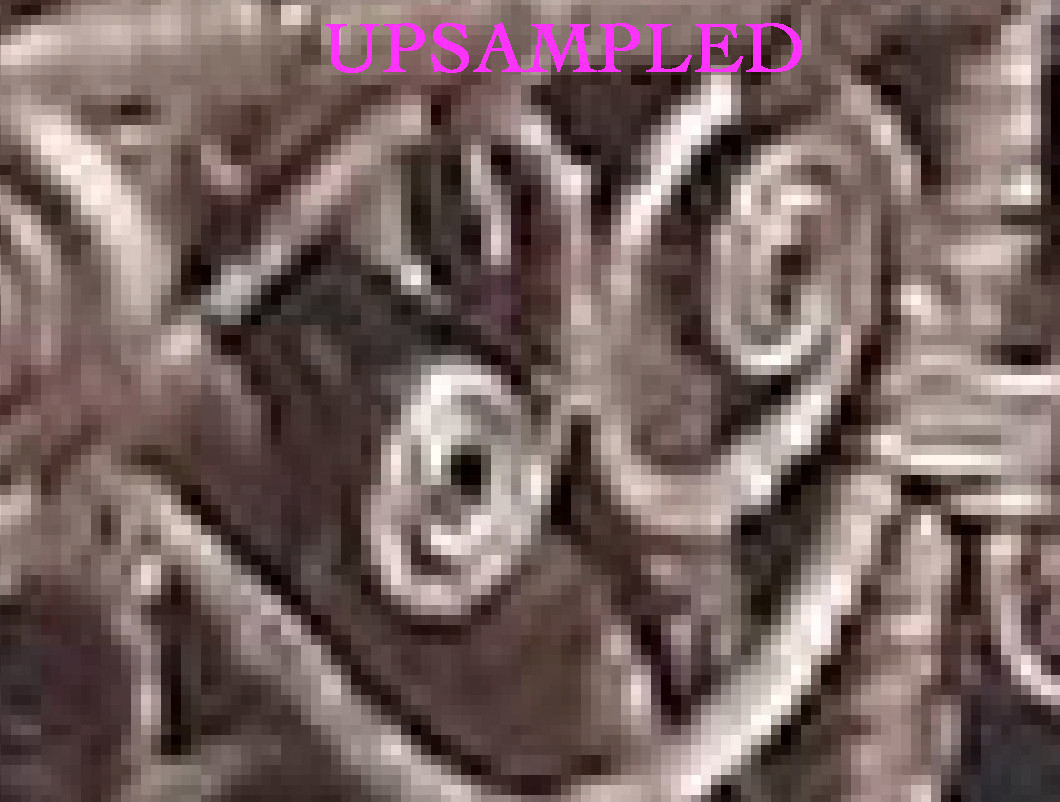 A close-up of an upsampled photo showing increased smoothness and detail compared to the original.
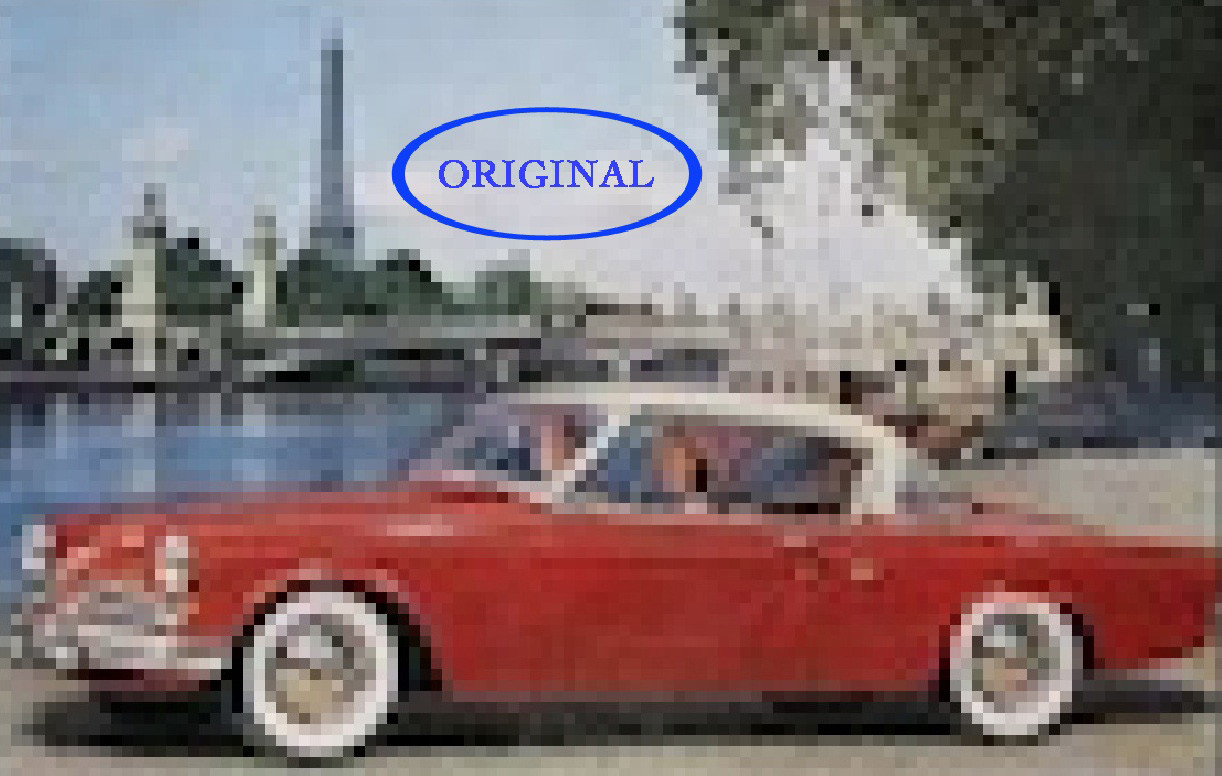
 A vintage Studebaker advertisement with low resolution, showcasing pixelation.
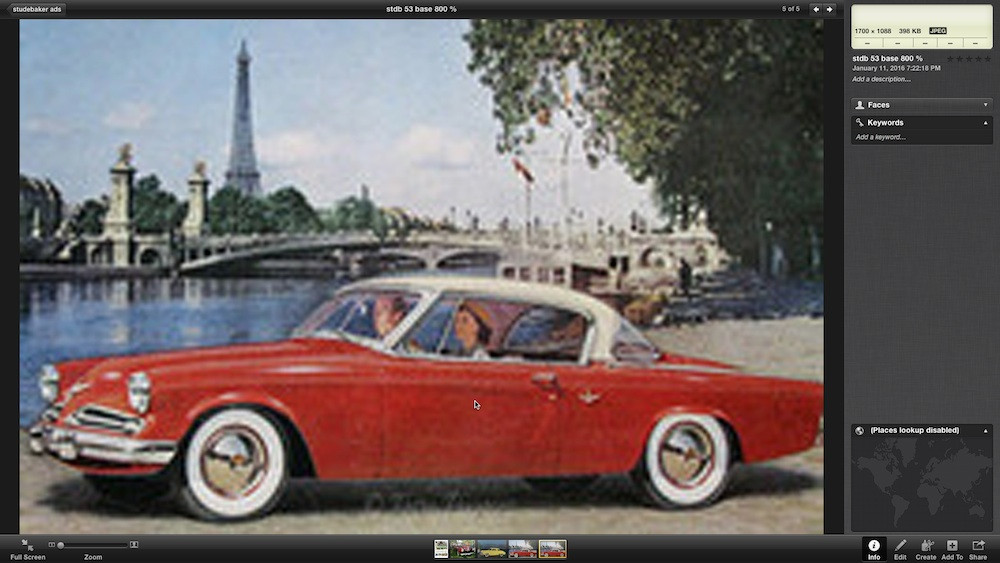 An upscaled vintage Studebaker advertisement with improved clarity and detail.
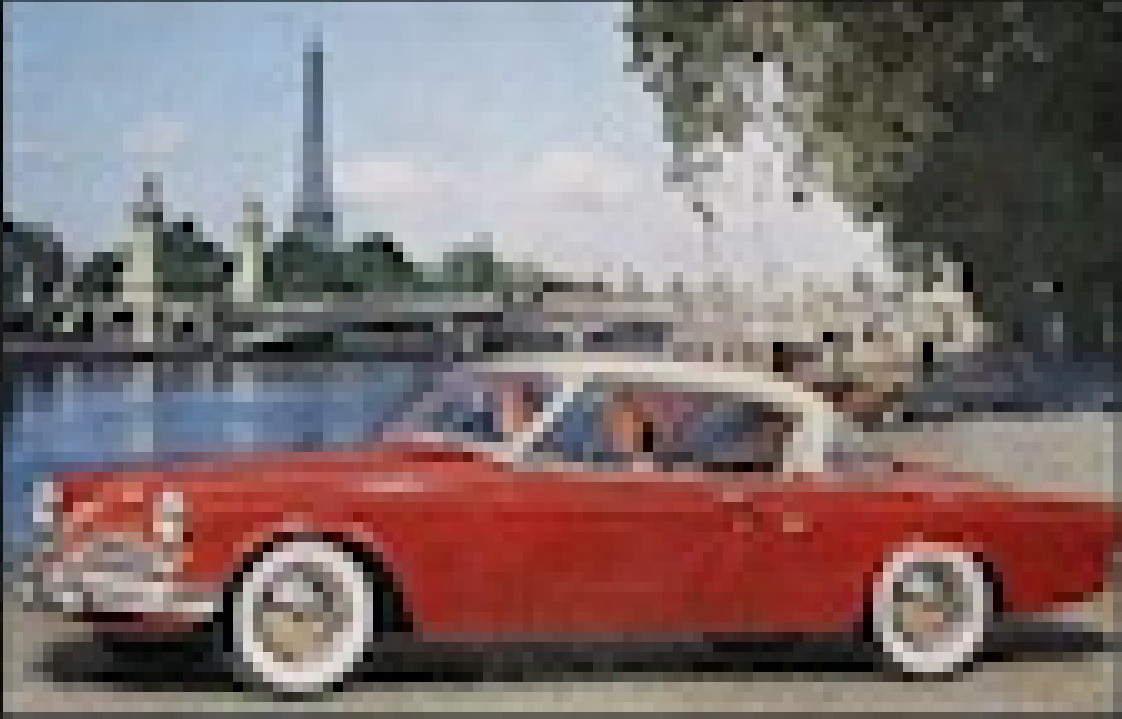 A zoomed-in vintage Studebaker advertisement showing pixelation due to zooming without upscaling.
Visit dfphoto.net today to explore more photography tips, view stunning photo galleries, and connect with a vibrant community of photographers in the USA. Located at 1600 St Michael’s Dr, Santa Fe, NM 87505, United States, or give us a call at +1 (505) 471-6001. Let’s create amazing visuals together!
