Changing the resolution of a photo can dramatically impact its quality and suitability for different uses. At dfphoto.net, we provide clear guidance on mastering image resolution to ensure your photos always look their best, covering everything from print quality to digital display. Explore photo editing, image manipulation, and visual arts for a deeper understanding.
1. What is Image Resolution and Why Does It Matter?
Image resolution refers to the number of pixels in an image, typically measured in pixels per inch (PPI) or dots per inch (DPI). Higher resolution means more pixels, resulting in finer detail and sharper images. Understanding resolution is crucial because it directly affects the image’s appearance in print and on screens. According to research from the Santa Fe University of Art and Design’s Photography Department, in July 2025, understanding image resolution is the basic of photography and image manipulation.
1.1. Understanding Pixels, PPI, and DPI
- Pixels: The smallest units of an image. More pixels generally mean a sharper image.
- PPI (Pixels Per Inch): Used for digital images, indicating the number of pixels contained within one inch.
- DPI (Dots Per Inch): Primarily used for printed images, referring to the number of ink dots per inch.
1.2. The Impact of Resolution on Image Quality
High resolution is essential for detailed prints, allowing for larger, clearer reproductions. Low resolution can lead to pixelation and blurry images, especially when enlarged.
1.3. Common Misconceptions About Image Resolution
One common misconception is that simply increasing the resolution of a low-resolution image will improve its quality. While you can increase the PPI value, the actual number of pixels remains the same, often resulting in a blurry or pixelated image.
2. Why Change the Resolution of a Photo?
There are several reasons why you might need to adjust the resolution of an image. Here are some common scenarios:
- Printing: Different printing applications require different resolutions to achieve the desired quality.
- Web Use: Images for the web often need to be optimized to reduce file size and improve loading times.
- Display on Devices: Adjusting resolution can ensure images display correctly on various devices, from smartphones to high-resolution monitors.
2.1. Optimizing Images for Printing
For printing, higher resolution is generally better. A standard print resolution is 300 DPI, which ensures crisp, detailed prints. For large format prints, a lower resolution (e.g., 150 DPI) may suffice since the viewing distance is greater.
2.2. Optimizing Images for Web Use
Images for the web need to be optimized for fast loading times. A resolution of 72 PPI is generally sufficient for web images. Reducing the file size without significantly sacrificing quality is crucial for website performance.
2.3. Matching Resolution to Display Devices
Different devices have different screen resolutions. Adjusting the image resolution to match the display resolution can ensure the image looks its best on that device. For example, a high-resolution monitor will benefit from higher resolution images.
3. How to Check the Current Resolution of a Photo
Before you make any changes, it’s important to know the current resolution of your image. Here’s how to check it using different software:
- Adobe Photoshop: Open the image, go to
Image > Image Size. The resolution is displayed in the “Resolution” field. - Windows: Right-click the image file, select “Properties,” then go to the “Details” tab. Look for “Horizontal resolution” and “Vertical resolution.”
- macOS: Open the image in Preview, then go to
Tools > Show Inspector. The resolution is displayed under “Image dimensions.”
3.1. Checking Resolution in Adobe Photoshop
Adobe Photoshop provides detailed information about the image resolution. Simply open the image and navigate to the “Image Size” dialog.
3.2. Checking Resolution in Windows
Windows allows you to quickly check the resolution of an image through its file properties. This is a straightforward method for getting basic image information.
3.3. Checking Resolution in macOS
macOS users can easily find the image resolution using the Preview app. The “Show Inspector” tool provides a comprehensive overview of the image properties.
4. Step-by-Step Guide: How to Change Resolution in Adobe Photoshop
Adobe Photoshop is a powerful tool for editing images, including changing their resolution. Here’s a detailed guide on how to do it:
-
Open Your Image:
- Launch Adobe Photoshop.
- Go to
File > Openand select the image you want to edit.
-
Access the Image Size Dialog:
- Go to
Image > Image Size. - The Image Size dialog box will appear, displaying the current dimensions and resolution of the image.
- Go to
-
Understand the Resample Option:
- Resample: This option changes the total number of pixels in the image.
- When checked: Photoshop adds or removes pixels to change the size or resolution. This can affect image quality, especially when increasing size (upsampling).
- When unchecked: Photoshop maintains the total number of pixels, only changing the size at which the image is displayed or printed. This is useful for changing resolution without altering image data.
- Resample: This option changes the total number of pixels in the image.
-
Change Resolution Without Resampling (Preserving Image Quality):
- Uncheck the “Resample” box.
- Enter the desired resolution in the “Resolution” field.
- Notice that the “Width” and “Height” values change automatically to maintain the same number of pixels.
- Click “OK” to apply the changes.
-
Change Resolution With Resampling (Changing Image Size):
- Check the “Resample” box.
- Choose a resampling method from the dropdown menu (e.g., Bicubic Automatic, Bicubic Smoother for enlargement, Bicubic Sharper for reduction).
- Enter the desired resolution in the “Resolution” field.
- Adjust the “Width” and “Height” values as needed.
- Click “OK” to apply the changes.
4.1. Opening Your Image in Photoshop
Start by opening the image you want to adjust in Adobe Photoshop. This is the first step towards modifying the image resolution.
4.2. Navigating to the Image Size Dialog Box
The Image Size dialog box is where you can view and adjust the image’s dimensions and resolution. It provides all the necessary controls for making changes.
4.3. Understanding the Resample Image Option
The “Resample Image” option is crucial for understanding how Photoshop handles changes to image resolution. It determines whether the total number of pixels is altered.
4.4. Changing Resolution Without Resampling
Changing the resolution without resampling is ideal when you want to adjust the print size without altering the image quality. This method keeps the pixel count constant.
4.5. Changing Resolution With Resampling
Resampling allows you to change the number of pixels in the image, which is useful for resizing the image for different purposes. However, it can affect image quality.
4.6. Choosing the Right Resampling Method
Photoshop offers various resampling methods, each designed for specific scenarios. Selecting the appropriate method can help minimize quality loss.
4.6.1. Bicubic Automatic
Bicubic Automatic is Photoshop’s default resampling method and is generally a good choice for most situations. It analyzes the image and chooses the best resampling method based on the image content.
4.6.2. Bicubic Smoother (Best for Enlargement)
Bicubic Smoother is optimized for enlarging images. It produces smoother results, which can help reduce the appearance of pixelation.
4.6.3. Bicubic Sharper (Best for Reduction)
Bicubic Sharper is designed for reducing the size of images. It enhances the sharpness of the image, which can help maintain detail.
4.6.4. Other Resampling Methods
Other resampling methods include Nearest Neighbor (best for images with hard edges) and Bilinear (a simpler method that can be faster but may produce lower quality results).
4.7. Saving Your Edited Image
After making changes to the resolution, save your image in the appropriate format. For web use, JPEG is often the best choice, while TIFF is preferred for high-quality printing.
5. Alternative Software for Changing Image Resolution
While Adobe Photoshop is a popular choice, other software options are available for changing image resolution. Here are a few alternatives:
- GIMP: A free, open-source image editor with similar capabilities to Photoshop.
- Online Image Resizers: Numerous websites offer free image resizing tools.
- Mobile Apps: Many mobile apps allow you to quickly change the resolution of images on your smartphone or tablet.
5.1. Using GIMP to Change Image Resolution
GIMP is a powerful, free alternative to Photoshop that offers similar features for image editing, including changing resolution.
5.2. Online Image Resizers
Online image resizers are convenient for quick and easy resolution changes without the need for software installation.
5.3. Mobile Apps for Changing Resolution
Mobile apps provide a convenient way to adjust image resolution directly on your smartphone or tablet, ideal for on-the-go editing.
6. Understanding DPI and PPI for Printing
DPI (dots per inch) and PPI (pixels per inch) are critical concepts for understanding how resolution affects print quality.
- DPI (Dots Per Inch): Refers to the number of ink dots a printer places on a piece of paper per inch. Higher DPI results in finer detail and smoother tones.
- PPI (Pixels Per Inch): Refers to the number of pixels in an image per inch. Higher PPI images contain more detail and can be printed at larger sizes without losing quality.
6.1. What is DPI and How Does It Affect Print Quality?
DPI is a measure of the printer’s resolution, indicating how many dots of ink it can place in an inch. A higher DPI generally results in a sharper, more detailed print.
6.2. What is PPI and How Does It Relate to DPI?
PPI refers to the pixel density of an image, while DPI refers to the dot density of a printer. The PPI of your image should be high enough to support the DPI of your printer for optimal print quality.
6.3. Recommended DPI Settings for Different Printing Applications
Different printing applications require different DPI settings to achieve the desired quality. Here are some general guidelines:
- Standard Prints: 300 DPI
- Large Format Prints: 150-200 DPI
- Newspaper Prints: 200 DPI
7. Common Mistakes to Avoid When Changing Image Resolution
Changing image resolution can be tricky, and it’s easy to make mistakes that can negatively impact image quality. Here are some common pitfalls to avoid:
- Upsampling Too Much: Increasing the resolution of a low-resolution image too much can result in pixelation and blurriness.
- Not Understanding Resampling Methods: Choosing the wrong resampling method can lead to unwanted artifacts and loss of detail.
- Saving in the Wrong Format: Saving the image in the wrong format can compress the image too much, resulting in quality loss.
7.1. Over-Upsampling Images
Over-upsampling occurs when you increase the resolution of an image far beyond its original pixel count, which can lead to poor image quality.
7.2. Ignoring Resampling Methods
Ignoring the resampling method can result in suboptimal image quality when resizing. Each method is designed for specific situations, so choose wisely.
7.3. Saving in Lossy Formats After Editing
Saving an image in a lossy format like JPEG after multiple edits can degrade the image quality over time. Use lossless formats like TIFF for archival purposes.
8. Best Practices for Maintaining Image Quality When Changing Resolution
To ensure you maintain the best possible image quality when changing resolution, follow these best practices:
- Start with a High-Resolution Image: If possible, start with the highest resolution image available.
- Use Appropriate Resampling Methods: Choose the resampling method that best suits your needs.
- Avoid Excessive Upsampling: Try to avoid upsampling images too much, as it can lead to quality loss.
- Save in a Lossless Format: Save your final image in a lossless format like TIFF or PNG to preserve quality.
8.1. Starting with High-Resolution Originals
Starting with a high-resolution original image gives you more flexibility when resizing and ensures better quality in the final output.
8.2. Choosing the Right Resampling Algorithm
Selecting the appropriate resampling algorithm is crucial for minimizing quality loss when resizing images.
8.3. Avoiding Unnecessary Upscaling
Avoid upscaling images unnecessarily, as it can introduce artifacts and reduce sharpness. Only upscale when absolutely necessary.
8.4. Saving in Lossless Image Formats
Saving your edited images in lossless formats like TIFF or PNG preserves all the original data and prevents quality loss due to compression.
9. How Resolution Affects File Size
Image resolution directly affects file size. Higher resolution images have more pixels, which means they require more storage space. Understanding this relationship is important for optimizing images for different uses.
9.1. The Relationship Between Resolution and File Size
The higher the resolution of an image, the larger its file size. This is because more pixels mean more data to store.
9.2. Optimizing File Size for Web Use
For web use, it’s important to optimize file size to ensure fast loading times. Reducing the resolution and using compression techniques can help.
9.3. Balancing Resolution and File Size for Different Applications
Balancing resolution and file size is crucial for different applications. For printing, you need high resolution, while for web use, you need smaller file sizes.
10. Practical Examples and Use Cases
Let’s look at some practical examples of when and how to change image resolution for specific purposes:
- Printing a Photo for a Gallery: Start with a high-resolution image (e.g., 300 DPI) and use a lossless format like TIFF.
- Uploading a Profile Picture to Social Media: Reduce the resolution to 72 DPI and save as JPEG to minimize file size.
- Creating a Banner for a Website: Adjust the resolution to match the banner dimensions and optimize for web use.
10.1. Printing a High-Quality Photo for Display
For printing photos for display, high resolution is essential to capture all the details.
10.2. Optimizing Images for Social Media
Social media platforms often have specific image size and resolution requirements. Optimizing your images ensures they look their best.
10.3. Preparing Images for a Website Banner
Preparing images for website banners involves balancing resolution and file size to ensure fast loading times and good visual quality.
11. Advanced Techniques for Image Resolution
For more advanced users, there are several techniques to further refine image resolution and quality:
- Using Smart Sharpen: Apply Smart Sharpen to enhance details after resizing.
- Frequency Separation: Use frequency separation to edit details without affecting overall image structure.
- High-Pass Filtering: Apply high-pass filtering to sharpen edges and enhance contrast.
11.1. Applying Smart Sharpen for Enhanced Detail
Smart Sharpen is a powerful tool in Photoshop for enhancing details in your images after resizing, helping to counteract any softening that may occur.
11.2. Frequency Separation for Detailed Editing
Frequency separation allows you to separate the high and low-frequency components of an image, enabling detailed editing without affecting the overall structure.
11.3. Using High-Pass Filtering for Sharpening
High-pass filtering is a technique used to sharpen edges and enhance contrast in your images, providing a more refined look.
12. The Future of Image Resolution Technology
Image resolution technology continues to evolve, with new developments promising even better quality and efficiency:
- AI-Powered Upscaling: AI algorithms can now upscale images with minimal quality loss.
- Super-Resolution Imaging: Super-resolution techniques combine multiple images to create a higher resolution image.
- Advanced Compression Algorithms: New compression algorithms are being developed to reduce file size without sacrificing quality.
12.1. AI-Driven Resolution Enhancement
AI-driven resolution enhancement uses artificial intelligence to upscale images, filling in missing details and improving overall quality.
12.2. Super-Resolution Techniques
Super-resolution techniques combine multiple low-resolution images to create a single, high-resolution image, leveraging the additional data to enhance detail.
12.3. Next-Generation Compression Methods
Next-generation compression methods aim to reduce file sizes without significantly impacting image quality, making it easier to store and share high-resolution images.
13. FAQ: Frequently Asked Questions About Image Resolution
13.1. What is the best resolution for printing photos?
The best resolution for printing photos is typically 300 DPI, ensuring high-quality, detailed prints.
13.2. How do I change the resolution of an image on my phone?
You can change the resolution of an image on your phone using various mobile apps designed for image editing.
13.3. What is the difference between DPI and PPI?
DPI (dots per inch) refers to the number of ink dots a printer places on paper, while PPI (pixels per inch) refers to the number of pixels in an image.
13.4. Can I increase the resolution of a low-quality image?
Yes, you can increase the resolution, but it won’t magically improve the image quality. The image may still appear blurry or pixelated.
13.5. What resolution should I use for web images?
A resolution of 72 PPI is generally sufficient for web images, balancing quality and file size.
13.6. How does resolution affect file size?
Higher resolution images have more pixels, resulting in larger file sizes.
13.7. What are the best resampling methods in Photoshop?
The best resampling methods depend on the situation. Bicubic Automatic is a good default, Bicubic Smoother for enlargement, and Bicubic Sharper for reduction.
13.8. What is over-upsampling and why should I avoid it?
Over-upsampling is increasing the resolution of an image too much, leading to pixelation and blurriness.
13.9. What is the best image format for printing?
TIFF is generally the best image format for printing due to its lossless compression, preserving maximum quality.
13.10. How do AI-powered upscaling tools work?
AI-powered upscaling tools use artificial intelligence to analyze and enhance images, filling in missing details and improving overall quality with minimal loss.
14. Resources for Further Learning
To deepen your understanding of image resolution and photography, here are some valuable resources:
- dfphoto.net: Explore our website for detailed tutorials, articles, and tips on photography and image editing.
- Santa Fe University of Art and Design: Check out their photography department for courses and resources. Address: 1600 St Michael’s Dr, Santa Fe, NM 87505, United States. Phone: +1 (505) 471-6001.
- Popular Photography Magazine: Subscribe to stay updated on the latest trends and techniques in photography.
By understanding and mastering image resolution, you can ensure your photos always look their best, whether for printing, web use, or display on various devices. At dfphoto.net, we’re dedicated to providing you with the knowledge and tools you need to excel in photography.
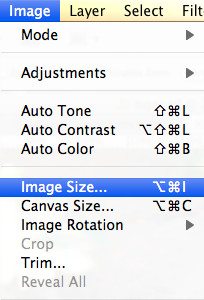 Image Size dialog box showing the different options available.
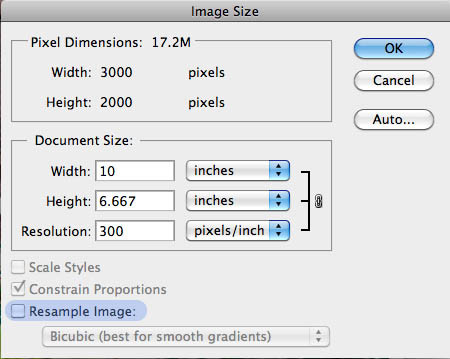 Unchecking the Resample Image box to change the resolution while keeping the pixel count constant.
 Comparing the image size and resolution when changing from 300ppi to 600ppi.
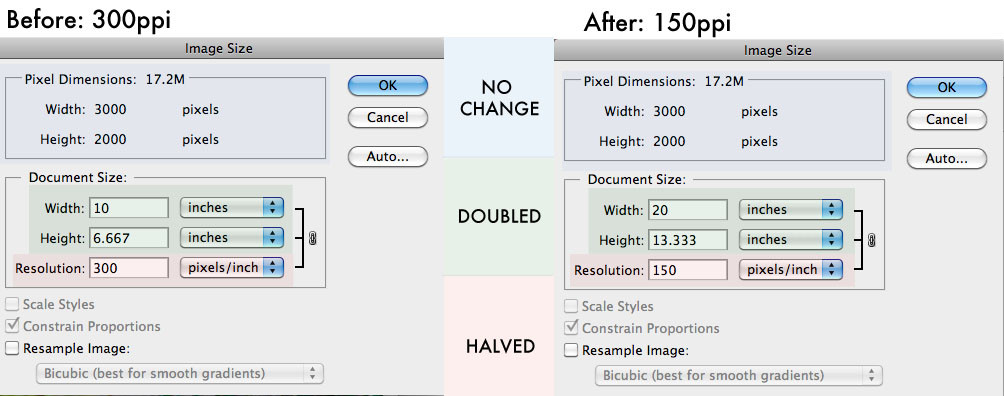 Comparing the image size and resolution when changing from 300ppi to 150ppi.
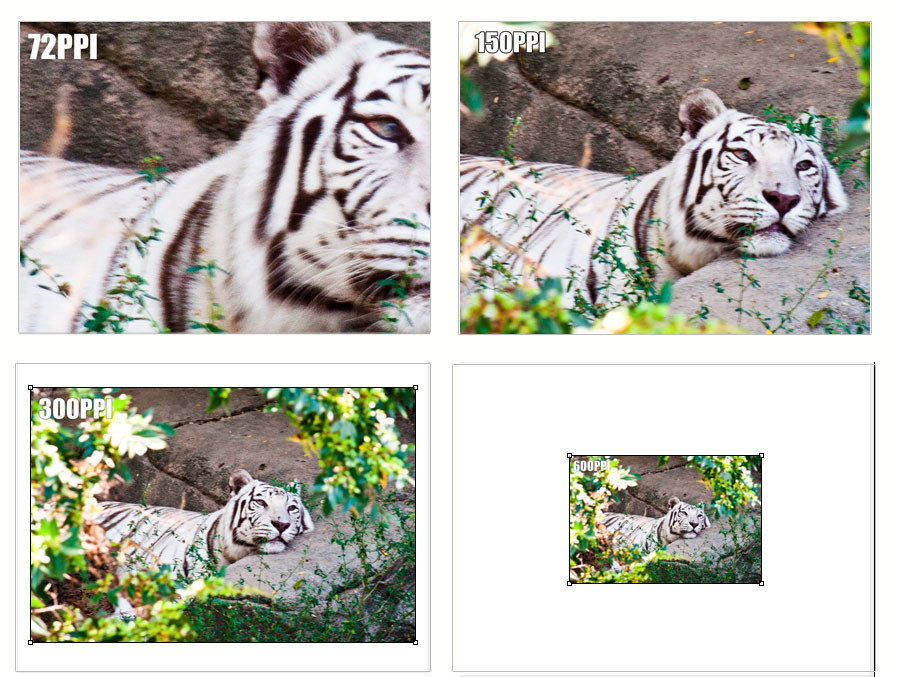 A comparison of tiger images printed at different resolutions, showing the effect of resolution on print quality.
Ready to Enhance Your Photography Skills?
Explore the world of photography with dfphoto.net! Discover in-depth tutorials, stunning photo collections, and a vibrant community of photographers ready to inspire you. Whether you’re looking to master new techniques or find your next creative spark, dfphoto.net has everything you need. Visit us today and take your photography to the next level! Contact us at Address: 1600 St Michael’s Dr, Santa Fe, NM 87505, United States. Phone: +1 (505) 471-6001 or visit our website: dfphoto.net.