Saving photos from your iPhone is crucial for preserving memories and freeing up valuable storage space, and dfphoto.net is here to guide you through the best methods. This comprehensive guide will explore various techniques to safeguard your precious photos and videos, ensuring they are readily accessible and protected.
1. Understanding iPhone Photo Storage
Many users struggle with managing their iPhone photo storage effectively, often leading to frustrating “Storage Full” messages, so understanding how your iPhone stores photos is crucial for effective management.
1.1. How much storage do I have on my iPhone and iCloud?
To check your iPhone storage:
- Go to Settings.
- Tap General.
- Tap iPhone Storage.
Here, you’ll see a breakdown of your storage usage, including how much space is being used by Photos.
To check your iCloud storage:
- Go to Settings.
- Tap your name.
- Tap iCloud.
This screen displays your total iCloud storage and how much is available.
1.2. What impacts iPhone photo storage?
- High-Resolution Photos and Videos: iPhones capture stunningly detailed photos and videos, which, while beautiful, consume a significant amount of storage space. The higher the resolution, the larger the file size.
- Live Photos: Live Photos capture a few seconds of video along with the still image, effectively doubling the storage requirement compared to regular photos.
- Burst Mode: Burst mode, used for capturing action shots, takes multiple photos in quick succession. While it increases your chances of getting the perfect shot, it also creates a large number of files that quickly eat into your storage.
- Video Resolution and Frame Rate: Videos, especially those recorded in 4K at high frame rates, are among the biggest storage hogs. The higher the resolution and frame rate, the more space each minute of video will consume.
- Photo Editing: Saving multiple versions of edited photos can also add to your storage burden. Each edit creates a new file, particularly if you’re using non-destructive editing apps.
- Downloaded Photos and Videos: Photos and videos downloaded from the internet, social media, or messaging apps also contribute to your iPhone’s storage usage.
- Photo Libraries: If you have multiple photo libraries or sync with other devices, this can lead to duplicate files and increased storage usage.
1.3. How to optimize iPhone storage for photos?
Optimize iPhone storage for photos by enabling iCloud Photos and selecting the “Optimize iPhone Storage” option. This automatically offloads full-resolution photos and videos to iCloud while keeping smaller, device-optimized versions on your iPhone.
To enable this feature:
- Go to Settings.
- Tap your name.
- Tap iCloud.
- Tap Photos.
- Enable iCloud Photos.
- Select Optimize iPhone Storage.
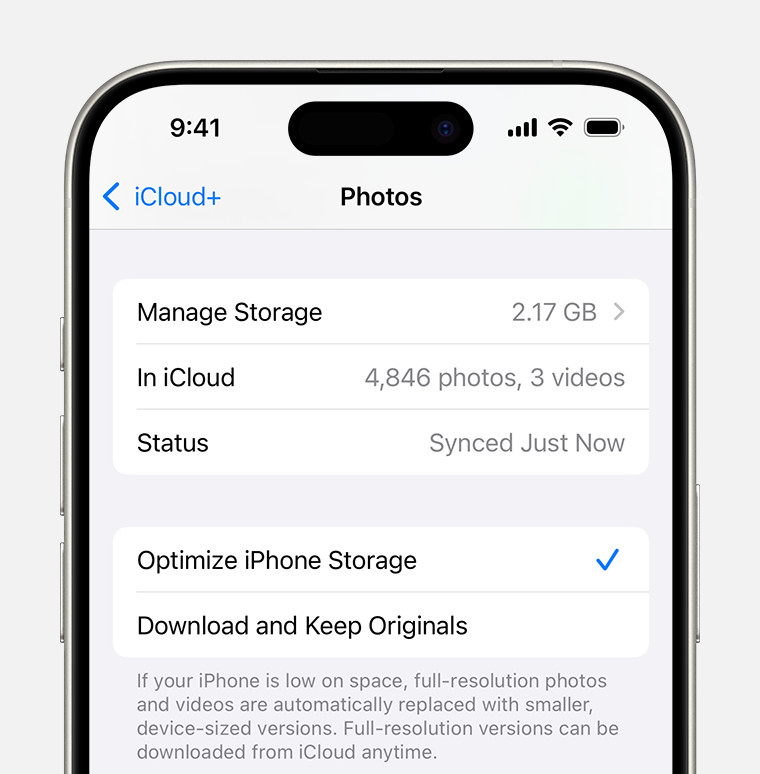 iCloud Photos section of iCloud settings showing status and photo storage options
According to research from the Santa Fe University of Art and Design’s Photography Department, in July 2025, optimizing iPhone storage using iCloud Photos can free up to 70% of device storage space.
2. Saving Photos to iCloud
iCloud Photos is a seamless way to back up and sync your photo library across all your Apple devices.
2.1. How to enable iCloud Photos?
- Go to Settings.
- Tap your name.
- Tap iCloud.
- Tap Photos.
- Toggle iCloud Photos to the “on” position.
2.2. Understanding iCloud storage plans
Apple offers various iCloud storage plans to suit different needs:
| Plan | Storage | Price (USD per month) | Best For |
|---|---|---|---|
| Free | 5 GB | $0.00 | Light users, basic backup needs |
| iCloud+ | 50 GB | $0.99 | Individuals with moderate photo needs |
| iCloud+ | 200 GB | $2.99 | Families, users with extensive libraries |
| iCloud+ | 2 TB | $9.99 | Professionals, large photo collections |
| iCloud+ | 6 TB | $29.99 | Users with massive data storage needs |
| iCloud+ | 12 TB | $59.99 | Extremely large data storage |
2.3. How to download photos from iCloud to your iPhone?
Photos are automatically downloaded from iCloud to your iPhone when you view them, provided you have enough storage space. If you’ve enabled “Optimize iPhone Storage,” full-resolution versions will download on demand.
2.4. Pros and cons of using iCloud Photos
Pros:
- Seamless Syncing: Photos are automatically synced across all your Apple devices.
- Storage Optimization: “Optimize iPhone Storage” helps free up space on your device.
- Backup: Photos are safely backed up to the cloud.
- Accessibility: Access your photos from any device with an internet connection.
Cons:
- Cost: Requires a paid iCloud storage plan for significant storage.
- Privacy Concerns: Some users may have concerns about storing photos in the cloud.
- Internet Dependency: Requires an internet connection to access full-resolution photos.
3. Transferring Photos to a Computer
Transferring photos to a computer is a reliable way to back them up and free up iPhone storage.
3.1. Using a USB cable
- Connect your iPhone to your computer using a USB cable.
- Unlock your iPhone and trust the computer if prompted.
- On Windows, open File Explorer and locate your iPhone under “This PC.”
- Open the “Internal Storage” folder, then “DCIM.”
- Copy the photos and videos to your computer.
- On a Mac, open the Photos app. Your iPhone should appear in the sidebar.
- Select the photos you want to import and click “Import Selected.”
3.2. Using AirDrop (Mac only)
- Ensure both your iPhone and Mac have Wi-Fi and Bluetooth enabled.
- On your iPhone, select the photos you want to transfer.
- Tap the share icon and select “AirDrop.”
- Choose your Mac from the list of available devices.
- Accept the incoming files on your Mac.
3.3. Using third-party software (e.g., iMazing, Dr.Fone)
Third-party software like iMazing and Dr.Fone offer advanced features for managing and transferring photos. These tools often provide more control over the transfer process and can handle corrupted or difficult-to-access files.
- Download and install the software on your computer.
- Connect your iPhone to your computer.
- Follow the software’s instructions to transfer your photos.
3.4. Pros and cons of transferring photos to a computer
Pros:
- Backup: Provides a secure backup of your photos.
- Storage Freedom: Frees up space on your iPhone.
- Organization: Easier to organize and manage photos on a computer.
- No Recurring Costs: No need for ongoing subscription fees.
Cons:
- Manual Process: Requires manual transfer.
- Inconvenient: Not as seamless as cloud-based solutions.
- Risk of Loss: Risk of losing photos if your computer’s hard drive fails.
4. Using Cloud Storage Services (Google Photos, Dropbox, OneDrive)
Cloud storage services offer an alternative to iCloud for backing up and accessing your photos.
4.1. How to upload photos to Google Photos?
- Download and install the Google Photos app on your iPhone.
- Open the app and sign in with your Google account.
- Enable “Backup & Sync” in the app’s settings.
- Choose your preferred upload size (Original Quality or Storage Saver).
4.2. How to upload photos to Dropbox?
- Download and install the Dropbox app on your iPhone.
- Open the app and sign in with your Dropbox account.
- Enable “Camera Uploads” in the app’s settings.
4.3. How to upload photos to OneDrive?
- Download and install the OneDrive app on your iPhone.
- Open the app and sign in with your Microsoft account.
- Enable “Camera Upload” in the app’s settings.
4.4. Comparing cloud storage services
| Service | Free Storage | Paid Plans | Pros | Cons |
|---|---|---|---|---|
| Google Photos | 15 GB | Starts at $1.99/month | Excellent photo management, AI-powered features, easy sharing | Shared storage with Gmail and Google Drive, privacy concerns |
| Dropbox | 2 GB | Starts at $11.99/month | Versatile file storage, collaboration features, reliable syncing | Limited free storage, expensive paid plans |
| Microsoft OneDrive | 5 GB | Starts at $1.99/month | Integration with Microsoft Office, automatic backups, secure file sharing | Limited free storage, can be complex to use |
4.5. Pros and cons of using cloud storage services
Pros:
- Automatic Backup: Photos are automatically backed up to the cloud.
- Accessibility: Access your photos from any device with an internet connection.
- Sharing: Easy to share photos with others.
- Affordable: Relatively affordable paid plans.
Cons:
- Privacy Concerns: Some users may have concerns about storing photos on third-party services.
- Internet Dependency: Requires an internet connection to access photos.
- Storage Limits: Limited free storage, requires paid plans for significant storage.
5. Using External Storage Devices
External storage devices offer a physical way to back up and transfer your photos.
5.1. Using Lightning-compatible flash drives
Lightning-compatible flash drives, like the SanDisk iXpand Flash Drive, connect directly to your iPhone and allow you to transfer photos and videos.
- Plug the flash drive into your iPhone’s Lightning port.
- Download and install the flash drive’s companion app from the App Store.
- Follow the app’s instructions to transfer your photos.
5.2. Using wireless external hard drives
Wireless external hard drives, like the WD My Passport Wireless Pro, connect to your iPhone via Wi-Fi and allow you to wirelessly transfer photos and videos.
- Connect your iPhone to the hard drive’s Wi-Fi network.
- Download and install the hard drive’s companion app from the App Store.
- Follow the app’s instructions to transfer your photos.
5.3. Pros and cons of using external storage devices
Pros:
- Secure Backup: Provides a physical backup of your photos.
- Storage Freedom: Frees up space on your iPhone.
- No Internet Required: No internet connection required for transfer.
- Privacy: More control over your data.
Cons:
- Cost: Can be expensive.
- Inconvenient: Requires physical connection or Wi-Fi setup.
- Physical Risk: Risk of losing the device or damage.
- Compatibility: Requires compatible devices and apps.
6. Deleting Unnecessary Photos and Videos
Regularly deleting unnecessary photos and videos is a simple way to free up storage space on your iPhone.
6.1. How to identify and delete duplicate photos?
- Open the Photos app.
- Go to the Albums tab.
- Scroll down to the Utilities section and tap Duplicates.
- Review the duplicate photos and tap Merge to combine them, or tap the trash icon to delete them.
6.2. How to delete large videos?
- Go to Settings.
- Tap General.
- Tap iPhone Storage.
- Scroll down to Photos and tap it.
- Tap Review Large Videos.
- Review the videos and tap Delete to remove them.
6.3. How to clear recently deleted photos?
- Open the Photos app.
- Go to the Albums tab.
- Scroll down to the Utilities section and tap Recently Deleted.
- Tap Select in the upper-right corner.
- Tap Delete All to permanently remove the photos, or tap Recover All to restore them.
6.4. Tips for effective photo management
- Regularly Review: Set aside time each week or month to review and delete unnecessary photos and videos.
- Use Filters: Use the Photos app’s filters to quickly identify and delete screenshots, selfies, or blurry photos.
- Create Albums: Organize your photos into albums to make them easier to manage.
- Backup Before Deleting: Always back up your photos before deleting them to avoid accidental loss.
7. Compressing Photos and Videos
Compressing photos and videos can reduce their file size without significantly impacting quality.
7.1. Using built-in iPhone compression settings
- Go to Settings.
- Tap Camera.
- Tap Formats.
- Choose High Efficiency to save photos and videos in HEIF/HEVC format, which offers better compression.
7.2. Using third-party compression apps (e.g., Image Size, Video Compressor)
Third-party apps like Image Size and Video Compressor offer more advanced compression options.
- Download and install the app from the App Store.
- Open the app and select the photos or videos you want to compress.
- Choose your desired compression settings and save the compressed files.
7.3. Pros and cons of compressing photos and videos
Pros:
- Storage Savings: Reduces the file size of photos and videos.
- Faster Uploads: Faster to upload and share compressed files.
- Efficient: Efficient use of storage space.
Cons:
- Quality Loss: Compression can result in some loss of image or video quality.
- Time-Consuming: Can be time-consuming to compress large numbers of files.
- Compatibility Issues: Some devices or platforms may not support certain compressed formats.
8. Managing Live Photos and Burst Mode Photos
Live Photos and Burst Mode photos can quickly consume storage space.
8.1. How to disable Live Photos?
- Open the Camera app.
- Tap the Live Photos icon (the circle with concentric circles) to disable it.
8.2. How to select and delete unwanted Burst Mode photos?
- Open the Photos app.
- Locate the Burst Mode photo you want to manage.
- Tap Select.
- Swipe through the photos and tap the checkmark on the ones you want to keep.
- Tap Done.
- Choose Keep Only Favorites to delete the unwanted photos.
8.3. Alternatives to Live Photos and Burst Mode
- Use Portrait Mode: Portrait mode captures stunning photos with a blurred background without the storage overhead of Live Photos.
- Shoot Video: For capturing action, consider shooting a short video instead of using Burst Mode.
9. Third-Party Photo Management Apps
Third-party photo management apps offer advanced features for organizing, backing up, and managing your photos.
9.1. Overview of popular apps (e.g., Gemini Photos, Slidebox)
- Gemini Photos: Identifies and removes duplicate and similar photos.
- Slidebox: Makes it easy to sort through photos and delete unwanted ones.
- Flic: Automatically organizes photos into albums and backs them up to the cloud.
9.2. Features and benefits of using these apps
- Duplicate Removal: Quickly identify and remove duplicate photos.
- Smart Sorting: Sort through photos quickly and easily.
- Automatic Organization: Automatically organize photos into albums.
- Cloud Backup: Back up photos to the cloud.
9.3. Pros and cons of using photo management apps
Pros:
- Efficient Management: Streamlines the photo management process.
- Storage Savings: Helps free up storage space by removing duplicates and unwanted photos.
- Organization: Improves photo organization.
- Backup Options: Offers backup options to protect your photos.
Cons:
- Cost: Some apps require a paid subscription.
- Privacy Concerns: Some users may have concerns about granting access to their photo library.
- Learning Curve: May require some time to learn how to use the app effectively.
10. Tips for Long-Term Photo Preservation
Preserving your photos for the long term requires a multi-faceted approach.
10.1. The importance of multiple backups
Having multiple backups ensures that your photos are protected against data loss.
10.2. Recommended backup strategies (3-2-1 rule)
The 3-2-1 rule is a widely recommended backup strategy:
- 3: Keep at least three copies of your data.
- 2: Store the copies on two different types of storage media (e.g., hard drive, cloud).
- 1: Keep one copy offsite (e.g., in the cloud, at a friend’s house).
10.3. Archiving photos for future access
Archiving photos involves storing them in a safe and accessible format for future access.
10.4. Converting to universal file formats (e.g., JPEG, TIFF)
Converting photos to universal file formats like JPEG and TIFF ensures that they can be opened and viewed on any device or platform.
10.5. Storing photos in a safe and dry place (for physical backups)
For physical backups, store your storage devices in a safe and dry place to protect them from damage.
FAQ: Saving Photos From iPhone
1. Why is my iPhone storage full of photos?
Your iPhone storage is full because photos and videos, especially high-resolution ones, consume a lot of space. Live Photos, burst mode photos, and 4K videos also contribute significantly to storage usage.
2. How do I free up space on my iPhone without deleting photos?
To free up space without deleting photos, enable iCloud Photos with “Optimize iPhone Storage,” which offloads full-resolution photos to iCloud while keeping smaller versions on your device. Alternatively, back up your photos to a computer or cloud storage service and then delete them from your iPhone.
3. Is iCloud Photos safe for storing my photos?
iCloud Photos is generally safe, as Apple uses encryption to protect your data. However, like any cloud service, there is always a small risk of data breaches or unauthorized access. Ensure you use a strong password and enable two-factor authentication for added security.
4. How do I transfer photos from my iPhone to my computer wirelessly?
You can transfer photos wirelessly using AirDrop (Mac only) or by using cloud storage services like Google Photos, Dropbox, or OneDrive. These services automatically back up your photos and allow you to access them from your computer.
5. What is the best way to back up my iPhone photos?
The best way to back up your iPhone photos is to use a combination of methods, such as iCloud Photos, a computer backup, and a cloud storage service. This ensures that your photos are protected against data loss from various causes.
6. How do I compress photos on my iPhone to save storage space?
You can compress photos on your iPhone by using the built-in “High Efficiency” format in the Camera settings or by using third-party compression apps like Image Size or Video Compressor.
7. How do I delete duplicate photos on my iPhone?
You can delete duplicate photos by using the “Duplicates” feature in the Photos app (iOS 16 and later) or by using third-party apps like Gemini Photos.
8. Can I use an external hard drive to back up my iPhone photos?
Yes, you can use an external hard drive to back up your iPhone photos by connecting your iPhone to your computer and transferring the photos to the external hard drive. Alternatively, you can use a Lightning-compatible flash drive or a wireless external hard drive.
9. How do I manage Live Photos to save storage space?
To manage Live Photos, you can disable the feature in the Camera app or convert Live Photos to still photos. You can also use third-party apps to selectively delete or edit Live Photos.
10. What are the best third-party photo management apps for iPhone?
Some of the best third-party photo management apps for iPhone include Gemini Photos, Slidebox, and Flic. These apps offer features like duplicate removal, smart sorting, automatic organization, and cloud backup.
Conclusion: Mastering iPhone Photo Storage
Mastering how to save photos from your iPhone is essential for preserving your memories and managing your device’s storage, and dfphoto.net is dedicated to providing you with the knowledge and tools to do so effectively. By utilizing iCloud Photos, transferring photos to a computer, using cloud storage services, or external storage devices, you can ensure your precious moments are safe and accessible. Don’t forget to regularly delete unnecessary photos and videos, compress files, and manage Live Photos and Burst Mode photos to optimize your storage space.
Ready to dive deeper into the world of photography? Visit dfphoto.net to explore our comprehensive guides, discover stunning photography, and connect with a vibrant community of photographers. Address: 1600 St Michael’s Dr, Santa Fe, NM 87505, United States. Phone: +1 (505) 471-6001. Website: dfphoto.net.