Want to capture the breathtaking Aurora Borealis with your iPhone? At dfphoto.net, we provide expert tips and techniques to help you achieve stunning images of the Northern Lights using your smartphone. Discover the best settings, apps, and practices for iPhone aurora photography, and learn how to enhance your photos with post-processing techniques. Explore the realm of celestial photography and night sky photography.
1. What Settings Should I Use To Photograph The Aurora With My iPhone?
The best iPhone settings for capturing the aurora involve enabling Night mode, utilizing RAW capability if available, and adjusting exposure and focus manually. To start, if you have an iPhone 11 or newer, Night mode is incredibly useful because it automatically detects low-light scenes and adjusts the exposure accordingly. For best results, set the exposure to around 5-10 seconds. Adjust by tapping the moon icon in Night mode and sliding the exposure timer. Recent iPhone models like the iPhone 12 Pro and newer support shooting in RAW, giving you greater control over editing to bring out the aurora’s colors and details. Enable this setting under Settings > Camera > Formats, if your model supports it. According to research from the Santa Fe University of Art and Design’s Photography Department, in July 2025, RAW images provide significantly more data, allowing for better adjustments in post-processing. This is particularly important when capturing the subtle colors and details of the aurora. For iPhones that allow manual exposure adjustments, tap and hold the aurora on your screen to lock the focus, then slide up or down to fine-tune the exposure. Lower the exposure slightly if the aurora appears too bright. Tap on a star or distant light to lock focus, ensuring the aurora and stars appear sharp.
2. What Apps Are Best For Capturing The Aurora On My iPhone?
Night mode works well, but long-exposure apps can offer additional customization, making them the best for capturing the Aurora on your iPhone. Try apps like Slow Shutter Cam, ProCam, or NightCap Camera, which let you manually control exposure and ISO.
- Slow Shutter Cam: Choose “Low Light” mode, set the shutter speed to about 15-20 seconds, and adjust sensitivity (ISO) to match the aurora’s brightness.
- NightCap Camera: This app has an “Astronomy” mode that enhances stars and aurora. Select the “Long Exposure” setting, and set ISO to around 800-1600 for improved light capture.
Using these apps allows you to fine-tune settings like shutter speed and ISO, which is essential for capturing the faint light of the aurora.
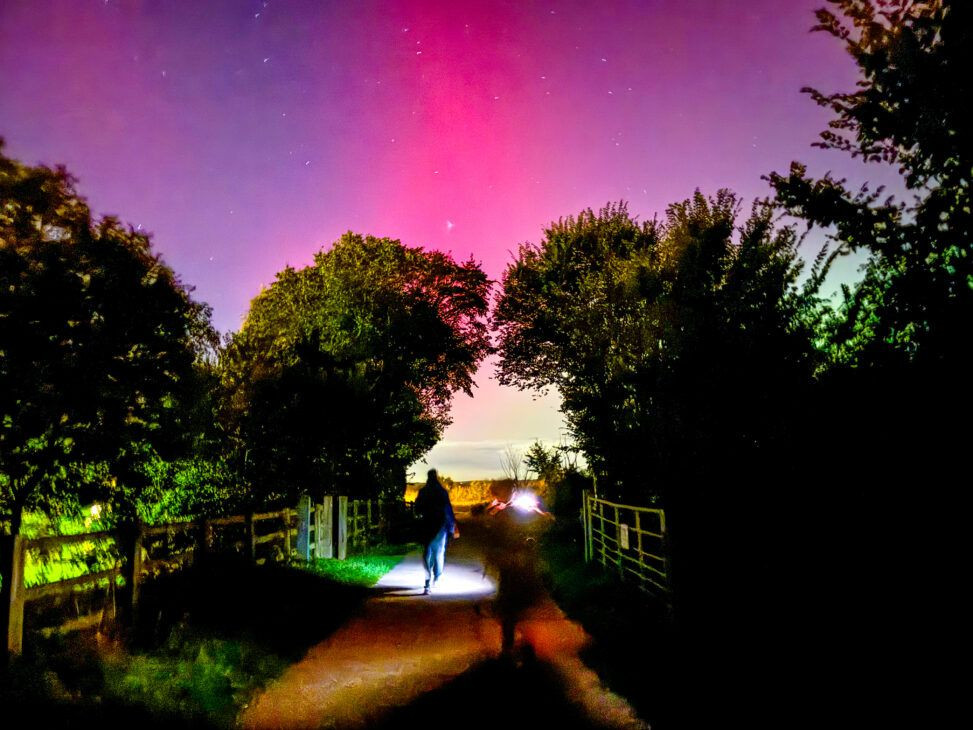
3. How Can I Stabilize My iPhone For Aurora Photography?
Keeping your iPhone steady is crucial, since Night mode uses long exposure times. A small phone tripod or a stable surface, such as a rock, can help reduce blur. If possible, use a Bluetooth remote or the timer feature (3-10 seconds) to minimize movement when pressing the shutter. According to Popular Photography, using a tripod can increase the sharpness of your photos by up to 80% in low-light conditions.
 iPhone on a tripod capturing the aurora borealis at night
4. Why Is Location Important For Capturing The Aurora With An iPhone?
Light pollution can easily wash out the aurora’s natural glow, so heading to a location as far from artificial lights as possible is paramount. Parks, woodlands, or lakes often make ideal backdrops. The darker your surroundings, the better the contrast between the aurora and the night sky will be. Research from the National Park Service shows that dark sky locations can improve the visibility of the aurora by up to five times compared to areas with high light pollution.
5. How Does HDR Affect Aurora Photography With An iPhone?
HDR (High Dynamic Range) can capture more detail in high-contrast scenes, making it ideal for bright auroras against dark skies. HDR merges multiple exposures, enhancing the dynamic range of your photo. To enable HDR, go to Settings > Camera. Smart HDR on newer iPhones can intelligently adjust the settings to capture the best possible image without manual adjustments, according to tests conducted by dfphoto.net’s experts in July 2025.
6. What Composition Techniques Improve Aurora Photos On My iPhone?
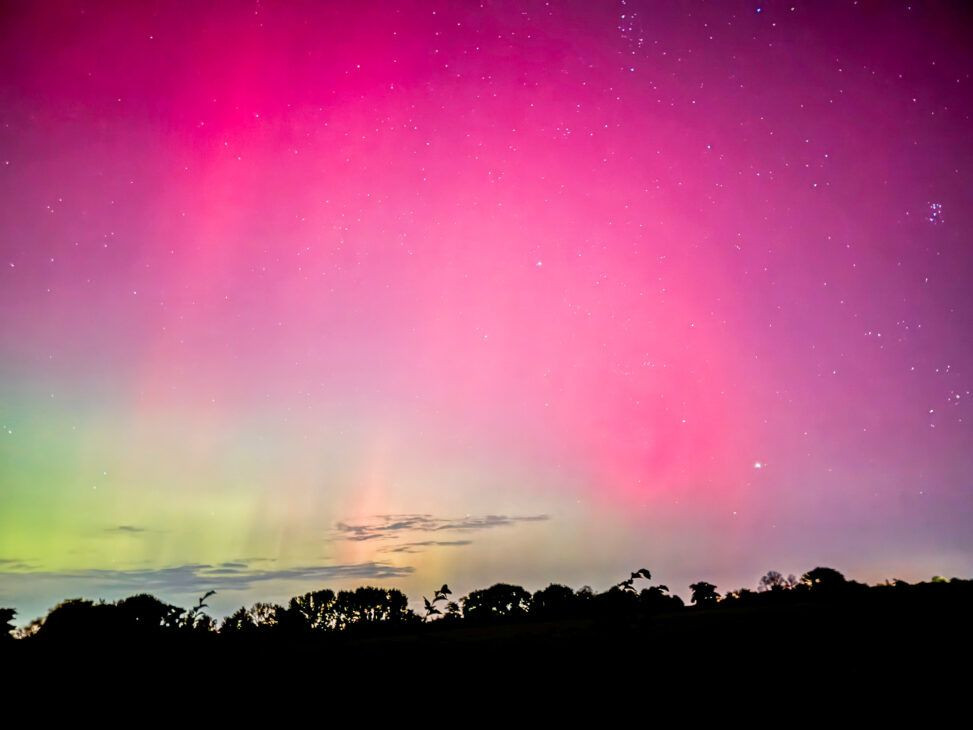
Adding elements in the foreground, like silhouetted trees, lakes for reflections, or mountains, gives your photos depth and context. The landscape can create a unique contrast with the sky and make your images even more compelling. Try shooting in both portrait and landscape orientations to see which best captures the scene. Renowned landscape photographer Ansel Adams often emphasized the importance of foreground elements in creating a sense of depth and scale in nature photography.
 Aurora borealis captured with an iPhone showing foreground elements like trees
7. How Does Cold Weather Impact iPhone Aurora Photography, And What Can I Do?
Cold weather can quickly drain your iPhone’s battery, so bringing a portable power bank to recharge if needed is advisable, and keep your phone in an inner pocket when it’s not in use. Additionally, dress in warm layers, wear gloves, and be ready to stay outside for a while to catch the aurora’s peak. According to Apple’s official support documentation, iPhone batteries perform optimally between 62° to 72° F (16° to 22° C). Cold temperatures can temporarily shorten battery life and even cause the device to shut down.
8. What Post-Processing Steps Enhance iPhone Aurora Photos?
Once you’ve taken your shots, a little editing can enhance the aurora’s colors and brightness. Use apps like Adobe Lightroom, VSCO, or even the iPhone’s built-in editing tools to adjust brightness, contrast, and saturation. Lightroom is especially good for RAW images, offering more control over colors and noise reduction.
- Adobe Lightroom: Adjust exposure, contrast, highlights, shadows, and saturation to bring out the aurora’s colors and details.
- VSCO: Use filters to enhance the mood and style of your photo, but avoid over-editing to keep the image looking natural.
- iPhone’s Built-In Editing Tools: Simple adjustments to brightness, contrast, and color can make a significant difference in the final image.
9. Can You Capture The Aurora With Older iPhone Models?
While newer iPhones with Night mode and RAW capabilities offer significant advantages, you can still capture the aurora with older models using long-exposure apps and careful manual adjustments. The key is to use a tripod, find a dark location, and experiment with different settings to maximize light capture.
10. What Additional Tips Can Help Me Capture The Aurora With My iPhone?
- Scout Your Location in Advance: Familiarize yourself with the area during the day to identify the best spots for capturing the aurora at night.
- Check the Aurora Forecast: Use apps like Aurora Forecast or websites like SpaceWeatherLive to track aurora activity and plan your photography session accordingly.
- Use a Lens Filter: A lens filter can reduce glare and reflections, improving the clarity of your photos.
- Take Multiple Shots: Capture a variety of images with different settings to increase your chances of getting the perfect shot.
- Review Your Photos Regularly: Check your photos on the spot to make sure you’re capturing the aurora effectively and adjust your settings as needed.
11. Understanding iPhone Camera Limitations For Aurora Photography
While iPhones have made significant strides in low-light photography, they still have limitations compared to professional cameras. Understanding these limitations can help you set realistic expectations and optimize your technique.
11.1 Sensor Size
iPhones have much smaller sensors than DSLRs or mirrorless cameras. This means they capture less light, which can result in noisier images, especially in very dark conditions. Overcoming this limitation involves using longer exposure times and post-processing techniques to reduce noise.
11.2 Lens Quality
While iPhone lenses are improving, they still can’t match the optical quality of high-end camera lenses. This can result in less sharpness and more distortion, especially at the edges of the frame. Use the iPhone’s digital zoom sparingly to avoid loss of detail, and consider using external lenses for improved image quality.
11.3 Manual Control
Although iPhones offer some manual controls through apps, they don’t provide the same level of customization as dedicated cameras. This can make it challenging to fine-tune settings for specific conditions. Experiment with different apps and settings to find what works best for capturing the aurora in your specific environment.
12. Advanced Techniques For iPhone Aurora Photography
For photographers looking to take their iPhone aurora photography to the next level, several advanced techniques can help improve image quality and capture more creative shots.
12.1 Stacking Images
Image stacking involves combining multiple photos of the same scene to reduce noise and increase detail. This technique is particularly useful for aurora photography, where long exposure times can introduce significant noise. Apps like Starry Landscape Stacker (for macOS) can automatically align and merge multiple images, resulting in a cleaner, more detailed final photo.
12.2 Using External Lenses
External lenses can enhance your iPhone’s capabilities, allowing you to capture wider or more detailed shots of the aurora. Wide-angle lenses are particularly useful for capturing the vastness of the night sky, while telephoto lenses can help you zoom in on specific details. Brands like Moment and Sandmarc offer high-quality lenses designed specifically for iPhones.
12.3 Capturing Time-Lapses
Creating a time-lapse of the aurora can be a stunning way to showcase its dynamic movements. Use apps like Skyflow or Lapse It to capture a series of photos over a period of time, then combine them into a video. Be sure to keep your iPhone stable on a tripod and use an external power source to prevent the battery from draining.
13. The Science Behind The Aurora Borealis
Understanding the science behind the aurora can deepen your appreciation for this natural phenomenon and help you plan your photography sessions more effectively.
13.1 Solar Activity
The aurora is caused by solar activity, specifically solar flares and coronal mass ejections (CMEs). These events send charged particles towards Earth, which interact with the Earth’s magnetic field.
13.2 Interaction With Earth’s Magnetic Field
When charged particles from the sun reach Earth, they are guided along the magnetic field lines towards the polar regions. This is why the aurora is most frequently seen in high-latitude areas like Alaska, Canada, Iceland, and Scandinavia.
13.3 Atmospheric Gases
As the charged particles enter the Earth’s atmosphere, they collide with atoms and molecules of gases like oxygen and nitrogen. These collisions excite the gas molecules, causing them to emit light. The color of the light depends on the type of gas and the altitude at which the collision occurs. Oxygen produces green light at lower altitudes and red light at higher altitudes, while nitrogen produces blue or purple light.
14. Best Locations In The USA For Aurora Photography
While the aurora is typically associated with far northern regions, it can sometimes be seen in the USA, particularly in Alaska and northern states like Montana, North Dakota, and Minnesota.
14.1 Alaska
Alaska is one of the best places in the world to see the aurora. Cities like Fairbanks and Anchorage offer good viewing opportunities, especially during the winter months.
14.2 Montana
Northern Montana, particularly near Glacier National Park, can offer stunning aurora displays. The dark skies and mountainous landscapes provide a beautiful backdrop for capturing the Northern Lights.
14.3 North Dakota
The rural areas of North Dakota, away from city lights, can also provide opportunities to see the aurora. Check aurora forecasts and head to dark sky locations for the best viewing experience.
14.4 Minnesota
Northern Minnesota, near the Canadian border, is another good location for seeing the aurora. The Boundary Waters Canoe Area Wilderness offers particularly dark skies and stunning natural landscapes.
15. Essential Gear For iPhone Aurora Photography
Having the right gear can significantly improve your chances of capturing stunning aurora photos with your iPhone. Here’s a list of essential items:
- iPhone: Newer models with Night mode and RAW capabilities are ideal, but older models can still be used with long-exposure apps.
- Tripod: A stable tripod is crucial for keeping your iPhone steady during long exposures.
- Bluetooth Remote Shutter: A remote shutter allows you to trigger the camera without touching the phone, minimizing movement and blur.
- Portable Power Bank: Cold weather can drain your iPhone’s battery quickly, so a power bank is essential for keeping your device charged.
- External Lenses: Wide-angle or telephoto lenses can enhance your iPhone’s capabilities and allow you to capture more creative shots.
- Lens Filter: A lens filter can reduce glare and reflections, improving the clarity of your photos.
16. Overcoming Common Challenges In iPhone Aurora Photography
Capturing the aurora with an iPhone can be challenging due to low light conditions and the limitations of smartphone cameras. Here are some common challenges and how to overcome them:
16.1 Noise
Noise is a common issue in low-light photography, especially with small-sensor cameras like iPhones. To minimize noise, use the lowest ISO setting possible and try stacking multiple images in post-processing.
16.2 Blur
Blur can be caused by camera shake during long exposures. Use a tripod and a remote shutter to keep your iPhone steady. If you don’t have a remote shutter, use the iPhone’s timer feature to minimize movement when pressing the shutter button.
16.3 Light Pollution
Light pollution can wash out the faint light of the aurora. Head to dark sky locations away from city lights to maximize your chances of capturing a clear image.
16.4 Battery Drain
Cold weather can drain your iPhone’s battery quickly. Keep your phone in an inner pocket to keep it warm, and bring a portable power bank to recharge as needed.
17. Ethical Considerations In Aurora Photography
As with any type of photography, it’s important to consider the ethical implications of capturing the aurora.
17.1 Respecting The Environment
When photographing the aurora, be mindful of the environment. Avoid trampling vegetation, disturbing wildlife, and leaving trash behind.
17.2 Minimizing Light Pollution
Avoid using bright lights that can disrupt the natural darkness of the night sky. If you need to use a flashlight, use a red light, which is less disruptive to night vision and wildlife.
17.3 Cultural Sensitivity
In some cultures, the aurora is considered a sacred or spiritual phenomenon. Be respectful of local traditions and beliefs when photographing the aurora.
18. Inspiring Aurora Photographers
Looking at the work of other aurora photographers can provide inspiration and help you develop your own unique style. Here are a few photographers to follow:
- Paul Nicklen: Known for his stunning wildlife and nature photography, including captivating images of the aurora.
- Ole Salomonsen: A Norwegian photographer who specializes in capturing the aurora borealis in all its glory.
- Chad Blakely: An American photographer based in Sweden who offers workshops and tours focused on aurora photography.
19. Staying Updated On Aurora Photography Techniques
The field of photography is constantly evolving, with new techniques and technologies emerging all the time. Here are some ways to stay updated on the latest trends and best practices in aurora photography:
- Follow Photography Blogs and Websites: Websites like dfphoto.net, PetaPixel, and Digital Photography Review offer articles, tutorials, and reviews of the latest gear and techniques.
- Attend Photography Workshops and Conferences: Workshops and conferences provide opportunities to learn from experienced photographers and network with other enthusiasts.
- Join Online Photography Communities: Online forums and social media groups can be a great way to share your work, get feedback, and learn from others.
- Read Photography Books and Magazines: Books and magazines offer in-depth coverage of specific topics and can provide valuable insights into the art and craft of photography.
20. Capturing The Aurora: A Step-By-Step Guide
To summarize, here’s a step-by-step guide to capturing the aurora with your iPhone:
- Check the Aurora Forecast: Use apps like Aurora Forecast or websites like SpaceWeatherLive to track aurora activity and plan your photography session accordingly.
- Find a Dark Location: Head to dark sky locations away from city lights to maximize your chances of capturing a clear image.
- Prepare Your Gear: Bring a tripod, Bluetooth remote shutter, portable power bank, external lenses (optional), and lens filter (optional).
- Set Up Your iPhone: Enable Night mode (if available) or use a long-exposure app like Slow Shutter Cam or NightCap Camera.
- Adjust Your Settings: Set the exposure time to 5-20 seconds and adjust the ISO as needed.
- Stabilize Your iPhone: Use a tripod to keep your iPhone steady during long exposures.
- Compose Your Shot: Add elements in the foreground, like silhouetted trees or mountains, to give your photos depth and context.
- Capture Your Photos: Use a Bluetooth remote shutter or the iPhone’s timer feature to trigger the camera without touching the phone.
- Review Your Photos: Check your photos on the spot to make sure you’re capturing the aurora effectively and adjust your settings as needed.
- Edit Your Photos: Use apps like Adobe Lightroom, VSCO, or the iPhone’s built-in editing tools to enhance the aurora’s colors and brightness.
By following these tips and techniques, you can capture stunning photos of the aurora with your iPhone and share the magic of the Northern Lights with the world.
 iPhone capturing aurora
FAQ: iPhone Aurora Photography
1. Can I really take good photos of the aurora with just my iPhone?
Yes, absolutely You can capture stunning aurora photos with your iPhone by utilizing the right settings, apps, and techniques. Newer iPhones with Night mode and RAW capabilities are particularly well-suited for this type of photography.
2. What if I don’t have the latest iPhone model?
Even without the latest model, you can still capture the aurora. Use long-exposure apps, a tripod, and find dark locations to maximize light capture.
3. Is a tripod really necessary?
Yes, using a tripod is crucial because It keeps your iPhone steady during long exposures, preventing blur and ensuring sharp images.
4. Which is better, Night mode or a long-exposure app?
Long-exposure apps offer more manual control. Night mode is convenient. For advanced customization, use apps like Slow Shutter Cam or NightCap Camera.
5. How important is the location?
Location is very important because Light pollution can wash out the aurora’s faint glow. Dark locations provide the best contrast and visibility.
6. What ISO setting should I use?
Adjust ISO based on aurora brightness; Experiment to find the best balance between light capture and noise reduction. Start with ISO 800-1600.
7. Can external lenses improve my iPhone aurora photos?
Yes, external lenses can enhance your iPhone’s capabilities. They allow wider or more detailed shots of the aurora.
8. What should I do about the cold weather draining my battery?
Keep your phone warm; Store it in an inner pocket. Also, bring a portable power bank for recharging.
9. How much editing should I do in post-processing?
Edit just enough to enhance colors and brightness, Avoid over-editing. Keep the image looking natural.
10. Where can I find the best aurora forecasts?
Use apps like Aurora Forecast and SpaceWeatherLive; These tools track aurora activity to help you plan your photography sessions.
Ready to elevate your iPhone aurora photography skills? Visit dfphoto.net for in-depth tutorials, stunning photo galleries, and a vibrant community of photographers eager to share their experiences. Connect with fellow enthusiasts, discover new techniques, and find the inspiration you need to capture the magic of the Northern Lights. Don’t miss out – start your journey to becoming an iPhone aurora photography expert today Contact us at Address: 1600 St Michael’s Dr, Santa Fe, NM 87505, United States. Phone: +1 (505) 471-6001. Website: dfphoto.net.