Creating a photo album in Facebook is a simple way to organize and share your photos with friends and family. This guide, brought to you by dfphoto.net, will walk you through the steps of creating a beautiful and engaging photo album, complete with photography tips and visual arts inspiration. You’ll also discover how to make your album stand out with unique designs and personalized touches using digital images.
1. What are the Steps to Create a Photo Album on Facebook?
Creating a photo album on Facebook involves several simple steps: Navigate to your profile, select the “Photos” tab, click “+ Add Album”, upload your photos, add descriptions, and set the album’s privacy. Now, let’s dive into the details of each step.
- Navigate to Your Profile: Start by logging into your Facebook account. Then, go to your profile page by clicking on your name or profile picture in the top left corner.
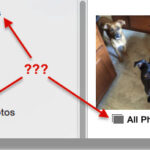
- Select the “Photos” Tab: Once on your profile, look for the “Photos” tab. It’s usually located under your cover photo, along with other tabs like “Posts,” “About,” and “Friends.”
- Click “+ Add Album”: On the “Photos” page, you’ll see options like “Photos of You,” “Albums,” and “Upload.” Click on the “Albums” tab, and then click the “+ Add Album” button. This will open a new window where you can create your album.
- Upload Your Photos: In the new album window, you can drag and drop photos from your computer or click the “Add Photos/Videos” button to select files. Facebook supports various image formats like JPEG, PNG, and TIFF.
- Add Descriptions: After uploading your photos, you can add descriptions to each one. Click on a photo to open it, and then add a caption in the “Say something about this photo” field. Adding descriptions makes your album more engaging and provides context for your viewers.
- Set the Album’s Privacy: Before publishing your album, set its privacy settings. You can choose who can see your album: “Public,” “Friends,” “Only Me,” or a custom list. This ensures that your photos are shared with the right audience.
2. Why Should I Use Photo Albums on Facebook?
Using photo albums on Facebook helps organize your photos, share memories with friends and family, control privacy settings, and create visually appealing collections. Here’s a more detailed look at the benefits:
- Organization: Albums allow you to group photos by event, theme, or date. This makes it easier for you and your friends to find specific photos. Instead of having a jumbled mess of images, your photos are neatly categorized.
- Sharing Memories: Photo albums are a great way to share memories with friends and family. Whether it’s a vacation, a birthday party, or a special event, albums make it easy for others to relive those moments with you.
- Privacy Control: You have complete control over who can see your albums. Facebook’s privacy settings allow you to share albums with the public, only your friends, or a custom list of people.
- Visually Appealing Collections: Well-organized albums are more visually appealing than individual photos scattered across your timeline. The cover photo and arrangement of images can create a cohesive and attractive collection.
- Engagement: Adding captions and descriptions to your photos encourages engagement from your friends and family. They can comment on specific photos, share their memories, and connect with you over shared experiences.
- Easy to Find: Albums are easy to find on your profile. Visitors can quickly browse through your albums to see your favorite memories and moments. This makes it simple for them to engage with your content and stay connected with you.
3. What Makes a Good Facebook Photo Album?
A good Facebook photo album has high-quality photos, engaging descriptions, a clear theme, thoughtful organization, and appropriate privacy settings. Let’s break down each of these components:
- High-Quality Photos: Start with the best photos you have. Ensure they are clear, well-lit, and visually appealing. Avoid blurry or poorly framed images.
- Engaging Descriptions: Write detailed and interesting captions for each photo. Include names, dates, locations, and any relevant stories or anecdotes.
- Clear Theme: Give your album a specific theme or focus. This could be a vacation, a wedding, a birthday party, or any other event. A clear theme makes the album more cohesive and engaging.
- Thoughtful Organization: Arrange the photos in a logical order. This could be chronological, thematic, or based on the flow of events. A well-organized album tells a story and keeps viewers interested.
- Appropriate Privacy Settings: Choose the right privacy settings for your album. Consider who you want to share the photos with and adjust the settings accordingly.
- Cover Photo: Select an eye-catching cover photo that represents the album’s theme. The cover photo is the first thing people will see, so make it count.
- Consistent Style: Maintain a consistent style throughout the album. This could include editing photos with similar filters or using a consistent tone in your captions.
- Interaction: Encourage your friends and family to interact with the album. Ask questions in your captions, invite comments, and respond to feedback.
- Regular Updates: Keep your album fresh by adding new photos and updating descriptions as needed. This keeps your audience engaged and encourages them to revisit the album.
- Mobile-Friendly: Ensure your album looks good on mobile devices. Most people will view your album on their phones, so optimize it for mobile viewing.
4. What are Some Creative Ideas for Facebook Photo Albums?
Creative ideas for Facebook photo albums include themed collections, before-and-after transformations, seasonal albums, travel diaries, and milestone celebrations. Explore these ideas to make your albums stand out:
- Themed Collections: Create albums based on specific themes, such as “Sunsets,” “Flowers,” or “Black and White Photos.” This allows you to showcase your best work in a particular genre.
- Before-and-After Transformations: Document a transformation, such as a home renovation, a weight loss journey, or a garden makeover. These albums can be both inspiring and visually engaging.
- Seasonal Albums: Capture the beauty of each season with dedicated albums. Include photos of fall foliage, winter snowscapes, spring blooms, and summer adventures.
- Travel Diaries: Create albums that document your travels. Include photos of landmarks, local cuisine, and cultural experiences. Add detailed captions to share your adventures with others.
- Milestone Celebrations: Celebrate important milestones, such as birthdays, anniversaries, and graduations, with dedicated albums. Include photos from the event and heartfelt captions.
- Pet Adventures: Showcase your furry friends with albums dedicated to their adventures. Include photos of them playing, exploring, and generally being adorable.
- Food Photography: If you’re a foodie, create albums of your culinary creations. Include photos of dishes you’ve cooked, restaurants you’ve visited, and food-related events you’ve attended.
- Throwback Albums: Share nostalgic memories with throwback albums. Include photos from your childhood, old vacations, and past events.
- Artistic Projects: Document your artistic projects, such as painting, drawing, sculpting, or photography. Share your progress and final results with your audience.
- Daily Life: Create albums that capture the beauty of everyday life. Include photos of your morning coffee, your commute, your neighborhood, and other simple moments.
5. How Can I Make My Facebook Photo Album More Engaging?
To make your Facebook photo album more engaging, add detailed captions, ask questions, tag friends, use high-quality photos, and share interesting stories. Here’s how to implement these strategies effectively:
- Detailed Captions: Write captions that provide context and tell a story. Include names, dates, locations, and any relevant details. The more information you provide, the more engaged your audience will be.
- Ask Questions: Encourage interaction by asking questions in your captions. For example, “What’s your favorite memory from this trip?” or “What do you think of this photo?”
- Tag Friends: Tag friends who are in the photos or who were part of the event. This notifies them of the album and encourages them to view and comment on it.
- High-Quality Photos: Use clear, well-lit, and visually appealing photos. Avoid blurry or poorly framed images. High-quality photos are more likely to capture attention and generate interest.
- Interesting Stories: Share interesting stories or anecdotes related to the photos. This adds a personal touch and makes the album more engaging.
- Consistent Theme: Choose a specific theme or focus for your album. This makes the album more cohesive and engaging.
- Logical Organization: Arrange the photos in a logical order. This could be chronological, thematic, or based on the flow of events. A well-organized album tells a story and keeps viewers interested.
- Cover Photo: Select an eye-catching cover photo that represents the album’s theme. The cover photo is the first thing people will see, so make it count.
- Regular Updates: Keep your album fresh by adding new photos and updating descriptions as needed. This keeps your audience engaged and encourages them to revisit the album.
- Respond to Comments: Respond to comments and questions from your friends and family. This shows that you’re engaged and encourages further interaction.
6. What are the Best Privacy Settings for My Facebook Photo Album?
The best privacy settings for your Facebook photo album depend on your comfort level. Options include “Public,” “Friends,” “Only Me,” or custom lists. To make the right choice, consider the following:
- Public: This setting allows anyone on Facebook to view your album. It’s a good option if you want to share your photos with a wide audience.
- Friends: This setting allows only your Facebook friends to view your album. It’s a good option if you want to share your photos with a more limited audience.
- Only Me: This setting allows only you to view your album. It’s a good option if you want to keep your photos private.
- Custom Lists: This setting allows you to create a custom list of people who can view your album. It’s a good option if you want to share your photos with a specific group of people.
- Friends of Friends: This setting allows your friends and their friends to view your album. It’s a good option if you want to expand your audience beyond your immediate friends.
- Specific Friends: This setting allows you to share your album with specific friends. It’s a good option if you want to share your photos with a select group of people.
- Exclude Friends: This setting allows you to exclude specific friends from viewing your album. It’s a good option if you want to keep your photos private from certain people.
- Location-Based: This setting allows you to share your album with people in a specific location. It’s a good option if you want to share your photos with people who live in a particular area.
- Age-Based: This setting allows you to share your album with people of a certain age. It’s a good option if you want to share your photos with people who are old enough to appreciate them.
- Interest-Based: This setting allows you to share your album with people who have certain interests. It’s a good option if you want to share your photos with people who share your passions.
7. How Do I Edit a Facebook Photo Album After Creating It?
To edit a Facebook photo album after creating it, navigate to the album, click the three dots in the top right corner, select “Edit Album,” and then make your changes. Here’s a step-by-step guide:
- Navigate to the Album: Go to your profile page and click on the “Photos” tab. Then, click on the “Albums” tab to see a list of your albums. Select the album you want to edit.
- Click the Three Dots: In the top right corner of the album, you’ll see three dots. Click on these dots to open a dropdown menu.
- Select “Edit Album”: In the dropdown menu, select the “Edit Album” option. This will open the album in edit mode.
- Make Your Changes: In edit mode, you can make various changes to your album:
- Change the Album Name: Click on the album name to edit it.
- Change the Album Description: Click on the album description to edit it.
- Add Photos: Click the “Add Photos” button to upload new photos to the album.
- Rearrange Photos: Drag and drop photos to rearrange their order in the album.
- Edit Photo Captions: Click on a photo to edit its caption.
- Delete Photos: Click on a photo and select the “Delete” option to remove it from the album.
- Change the Cover Photo: Click on a photo and select the “Make Cover Photo” option to set it as the album’s cover photo.
- Change Privacy Settings: Click on the privacy settings dropdown menu to change who can see the album.
- Save Your Changes: Once you’ve made all your changes, click the “Save” button to save them. Your album will now reflect the changes you’ve made.
8. What Are Common Mistakes to Avoid When Creating a Facebook Photo Album?
Common mistakes to avoid when creating a Facebook photo album include using low-quality photos, neglecting captions, ignoring privacy settings, and failing to organize the album. To ensure your album is a success, avoid these pitfalls:
- Low-Quality Photos: Avoid using blurry, poorly lit, or pixelated photos. These images detract from the overall quality of the album. Always use high-resolution photos that are clear and visually appealing.
- Neglecting Captions: Don’t skip writing captions for your photos. Captions provide context, tell a story, and engage your audience. Without captions, your photos may not be as meaningful or interesting.
- Ignoring Privacy Settings: Pay attention to your privacy settings. Make sure you’re sharing your album with the right audience. If you’re not careful, you could be sharing your photos with people you don’t want to see them.
- Failing to Organize the Album: Organize your photos in a logical order. This could be chronological, thematic, or based on the flow of events. A disorganized album can be confusing and less engaging.
- Using Too Many Photos: Don’t overload your album with too many photos. It’s better to have a smaller album with high-quality, relevant photos than a large album with lots of mediocre ones.
- Not Choosing a Cover Photo: Select an eye-catching cover photo that represents the album’s theme. The cover photo is the first thing people will see, so make it count.
- Ignoring Feedback: Pay attention to feedback from your friends and family. If they have suggestions for improving your album, take them into consideration.
- Not Updating the Album: Keep your album fresh by adding new photos and updating descriptions as needed. This keeps your audience engaged and encourages them to revisit the album.
- Forgetting to Tag Friends: Tag friends who are in the photos or who were part of the event. This notifies them of the album and encourages them to view and comment on it.
- Not Responding to Comments: Respond to comments and questions from your friends and family. This shows that you’re engaged and encourages further interaction.
9. How Do I Download Photos From a Facebook Photo Album?
To download photos from a Facebook photo album, open the album, click on a photo, click the three dots in the bottom right corner, and select “Download.” Here’s a detailed guide:
- Open the Album: Go to the album you want to download photos from. You can find albums on your profile page or on the profiles of your friends and family.
- Click on a Photo: Click on the photo you want to download. This will open the photo in a larger view.
- Click the Three Dots: In the bottom right corner of the photo, you’ll see three dots. Click on these dots to open a dropdown menu.
- Select “Download”: In the dropdown menu, select the “Download” option. This will download the photo to your computer or mobile device.
- Download Multiple Photos: To download multiple photos at once, you can use a third-party browser extension or app. These tools allow you to select multiple photos and download them in a batch.
- Download an Entire Album: To download an entire album, you can use Facebook’s built-in download feature. Go to the album and click the three dots in the top right corner. Select “Download Album” to download all the photos in the album as a ZIP file.
- Mobile Devices: On mobile devices, the process is similar. Open the photo, tap the three dots, and select “Download.” The photo will be saved to your device’s photo gallery.
- Privacy Considerations: Keep in mind that you can only download photos from albums that are shared with you. If an album is set to “Only Me” or “Friends,” you may not be able to download the photos.
- Copyright Issues: Be aware of copyright issues when downloading photos from Facebook. Make sure you have permission to use the photos before downloading them.
- Storage Space: Make sure you have enough storage space on your device before downloading photos from Facebook. High-resolution photos can take up a lot of space.
10. What are Some Advanced Tips for Managing Facebook Photo Albums?
Advanced tips for managing Facebook photo albums include using third-party apps, creating collaborative albums, archiving old albums, and optimizing photos for Facebook. To enhance your album management skills, consider these strategies:
- Third-Party Apps: Use third-party apps to enhance your album management capabilities. These apps can help you organize, edit, and share your photos more effectively.
- Collaborative Albums: Create collaborative albums with your friends and family. This allows everyone to contribute photos and share their memories.
- Archiving Old Albums: Archive old albums to keep your profile organized. This removes them from your main photo collection but keeps them accessible for future viewing.
- Optimizing Photos for Facebook: Optimize your photos for Facebook to ensure they look their best. This includes resizing, compressing, and adjusting the colors of your photos.
- Using Facebook’s Photo Editing Tools: Use Facebook’s built-in photo editing tools to enhance your photos. You can adjust the brightness, contrast, and colors of your photos, as well as add filters and stickers.
- Creating Highlighted Albums: Create highlighted albums to showcase your best work. These albums will appear prominently on your profile and attract more attention.
- Using Facebook’s Slideshow Feature: Use Facebook’s slideshow feature to create engaging presentations of your photos. This is a great way to tell a story and keep your audience interested.
- Tagging Locations: Tag locations in your photos to provide context and share your travel experiences. This allows your friends and family to see where you’ve been and what you’ve been doing.
- Creating Events: Create events to share your albums with a wider audience. This is a great way to promote your photos and attract new followers.
- Using Facebook’s Photo Maps: Use Facebook’s photo maps to visualize your travel experiences. This allows you to see where you’ve taken photos and share your adventures with others.
Creating a Facebook photo album is a wonderful way to share your visual stories, preserve memories, and connect with your friends and family. By following these tips, you can create albums that are engaging, visually appealing, and meaningful. Remember to visit dfphoto.net for more photography tips, visual arts inspiration, and resources for enhancing your digital images. Explore our tutorials, discover stunning photo collections, and join a vibrant community of photography enthusiasts.
Do you want to elevate your photography skills and create captivating visual stories? Visit dfphoto.net today to explore our extensive collection of tutorials, stunning photo galleries, and a vibrant community of photography enthusiasts. Discover new techniques, find inspiration for your next project, and connect with like-minded individuals who share your passion for photography. Let dfphoto.net be your guide in the world of photography.
FAQ: Creating Photo Albums on Facebook
-
How do I start a photo album on Facebook?
To begin, go to your profile, click “Photos,” then “Albums,” and select “+ Create Album.” Upload your photos and add descriptions.
-
Can I change the privacy of my Facebook photo album after it’s created?
Yes, you can. Edit the album, and in the settings, you can adjust who can see it: Public, Friends, or Only Me.
-
What kind of photos should I include in my Facebook photo album?
Include high-quality, clear, and visually appealing photos that tell a story or have a specific theme.
-
How can I make my Facebook photo album more interactive?
Add detailed captions, ask questions, tag friends, and share interesting stories related to the photos.
-
What are some creative ideas for Facebook photo albums?
Try themed collections, before-and-after transformations, seasonal albums, travel diaries, or milestone celebrations.
-
How do I download a photo from a Facebook album?
Open the photo, click the three dots in the bottom right corner, and select “Download.”
-
Is it possible to download an entire Facebook photo album at once?
Yes, go to the album, click the three dots in the top right corner, and select “Download Album” to download all photos in a ZIP file.
-
Can I create a collaborative photo album with friends on Facebook?
Facebook doesn’t directly offer collaborative albums, but you can create a group and have everyone upload photos there.
-
What should I do if someone steals my photos from a Facebook album?
Report the infringement to Facebook and consider adding a watermark to your photos to protect your copyright.
-
How do I organize photos within a Facebook album?
You can drag and drop photos to rearrange their order, ensuring the album tells a cohesive story.