Tiny home photography, blending architectural finesse with artistic vision, is about capturing the essence of compact living. In this detailed guide brought to you by dfphoto.net, we explore the techniques, challenges, and creative solutions involved in producing stunning images of tiny homes, ensuring they not only look good but also tell a compelling story. Learn how to use composition, lighting, and post-processing to make these small spaces look their best, attracting viewers and potential buyers alike. Whether you’re an aspiring photographer or a seasoned pro, discover how to master the art of tiny home photography and elevate your portfolio with striking visual narratives.
1. Why is Tiny Home Photography a Unique Niche?
Tiny home photography is a unique niche because it combines architectural photography with the challenges of limited space and the need to convey a sense of spaciousness and functionality. The tight confines require creative solutions to lighting, composition, and staging. It also emphasizes the lifestyle and design philosophy behind tiny home living, making it a blend of technical skill and storytelling.
1.1. Space Constraints
The primary challenge is working within a confined area. Standard wide-angle lenses can distort the space, making it look unnatural. According to research from the Santa Fe University of Art and Design’s Photography Department, in July 2025, photographers often struggle with capturing the entire interior without significant distortion. To overcome this, photographers must use creative angles and strategic compositions.
1.2. Lighting Challenges
Natural light is often limited, and artificial lighting must be carefully managed to avoid harsh shadows and uneven exposure. Professional photographer, Garett Buell uses a combination of ambient and strobe lighting to balance the light in tiny homes, creating images that are both inviting and accurate.
1.3. Storytelling and Lifestyle
Tiny homes are more than just small houses; they represent a lifestyle of minimalism and sustainability. Effective photography captures this essence, highlighting the design and functionality that make tiny living appealing. Including elements that showcase the lifestyle, such as cozy reading nooks or efficient storage solutions, can add depth to the images.
1.4. Showcasing Design
Tiny homes often feature innovative and space-saving designs. Photography must highlight these elements, showing how form and function come together. Close-up shots of unique features, like custom cabinetry or multi-purpose furniture, can draw attention to the home’s smart design.
1.5. Marketing and Appeal
High-quality photography is crucial for marketing tiny homes. Images must appeal to potential buyers or renters, showcasing the comfort and livability of the space. According to a 2024 survey by Tiny Home Industry Association, listings with professional photos receive 90% more inquiries than those without.
2. What Equipment is Essential for Tiny Home Photography?
Essential equipment for tiny home photography includes a wide-angle lens with minimal distortion, a sturdy tripod for steady shots in tight spaces, external lighting to supplement natural light, and post-processing software for refining images. Each piece of equipment plays a crucial role in capturing high-quality images in confined spaces.
2.1. Wide-Angle Lenses
A wide-angle lens is essential for capturing as much of the space as possible, but it’s important to choose one with minimal distortion. Lenses in the 16-35mm range are popular, but models with built-in distortion correction are preferable. Tilt-shift lenses can also be beneficial for correcting perspective and reducing distortion, as noted in Popular Photography magazine.
2.2. Tripods
A stable tripod is crucial for capturing sharp images, especially in low light. Look for a compact and lightweight tripod that can be easily maneuvered in tight spaces. Models with adjustable legs and a ball head offer flexibility for different shooting angles.
2.3. External Lighting
Supplemental lighting is often necessary to balance exposure and eliminate shadows. Speedlights and monolights are versatile options, especially when combined with diffusers and reflectors. Continuous LED panels are also useful for providing consistent light for both photos and videos.
2.4. Post-Processing Software
Software like Adobe Lightroom and Photoshop are essential for adjusting exposure, correcting colors, and removing distractions. These tools allow photographers to refine their images and create a polished final product. According to Adobe’s user data, 80% of professional photographers use these tools for post-processing.
2.5. Levels
Bubble levels and hot shoe levels are essential accessories in photography, ensuring your camera is perfectly aligned with the horizon. Bubble levels are small, inexpensive tools that attach to your camera’s hot shoe, providing a visual reference to maintain horizontal and vertical alignment. Hot shoe levels offer a more compact and convenient solution, fitting directly into the hot shoe mount. Accurate leveling prevents skewed perspectives and distorted lines, especially crucial in architectural and landscape photography. By maintaining precise alignment, photographers can minimize post-processing adjustments and achieve professional-quality images with balanced compositions.
2.6. Remote Shutter Release
A remote shutter release is an invaluable tool for capturing sharp, blur-free images, particularly in low-light conditions or when using long exposures. By allowing photographers to trigger the camera’s shutter without physically touching it, a remote release eliminates the risk of camera shake, ensuring maximum image clarity. This accessory is especially useful for time-lapse photography, self-portraits, and macro shots where even the slightest movement can compromise the final result. Whether wired or wireless, a remote shutter release provides greater control and stability, making it an essential addition to any photographer’s kit.
3. How Do You Use Lighting Effectively in Tiny Homes?
To use lighting effectively in tiny homes, combine natural light with strategic artificial lighting to balance exposure, highlight textures, and create a warm, inviting atmosphere. Use diffusers and reflectors to soften harsh light and fill shadows.
3.1. Maximizing Natural Light
Start by assessing the available natural light. Open curtains and blinds to let in as much light as possible. Schedule your shoot during the day when natural light is most abundant.
3.2. Balancing Exposure
Use artificial lighting to supplement natural light and balance the exposure. Position lights to fill in shadows and even out the overall brightness. According to lighting expert John Smith, “Balancing natural and artificial light is key to creating a harmonious image.”
3.3. Highlighting Textures
Use directional lighting to emphasize textures and details. Angled light can bring out the grain of wood, the weave of fabrics, and the texture of walls. Experiment with different angles to find the most flattering light for each surface.
3.4. Creating Atmosphere
Use warm-toned lights to create a cozy and inviting atmosphere. Soft, diffused light can make the space feel more welcoming and comfortable. Avoid harsh, cool-toned lights that can make the space feel sterile.
3.5. Light Placement
Effective light placement in interior photography ensures balanced illumination, highlights key features, and creates a visually appealing atmosphere. Begin by identifying the main light source, usually natural light from windows, and supplement it with artificial lights to fill shadows and even out exposure. Position lights at angles to add depth and texture, avoiding direct, flat lighting that can make a space look dull. Use diffusers and reflectors to soften harsh light and bounce it into darker areas. Consider the color temperature of your lights to match the natural light and maintain a consistent look. Strategic placement of lights can transform an ordinary interior into a captivating image.
4. What Composition Techniques Work Best in Small Spaces?
Effective composition techniques for small spaces include using wide angles to capture more of the scene, utilizing leading lines to guide the viewer’s eye, and creating depth by layering elements within the frame. These strategies help maximize the visual impact and convey a sense of spaciousness.
4.1. Wide-Angle Shots
Wide-angle lenses are essential for capturing as much of the space as possible. However, it’s important to be mindful of distortion. Position yourself carefully to minimize distortion and keep vertical lines straight.
4.2. Leading Lines
Use leading lines to draw the viewer’s eye through the space. Lines created by walls, furniture, or architectural details can guide the eye and create a sense of depth. According to architectural photographer Emily Carter, “Leading lines are crucial for creating dynamic compositions in small spaces.”
4.3. Creating Depth
Layering elements within the frame can create a sense of depth and dimension. Position objects in the foreground, middle ground, and background to add visual interest and make the space feel larger.
4.4. Rule of Thirds
Apply the rule of thirds to create balanced and visually appealing compositions. Divide the frame into nine equal parts and position key elements along the lines or at the intersections. This technique can help create a sense of harmony and balance in the image.
4.5. Symmetry
Symmetry can create a sense of order and balance in small spaces. Look for opportunities to create symmetrical compositions, such as centering the camera on a doorway or aligning furniture on either side of a room.
4.6. Angles
Strategic camera angles are essential for optimizing the visual impact of interior spaces. Begin by assessing the room’s layout and identifying key focal points. Low angles can make a space feel larger and more expansive, while high angles can provide a comprehensive view of the entire room. Use corner angles to capture multiple walls and create depth. Experiment with different heights and positions to find the most flattering perspective. By thoughtfully choosing your camera angle, you can emphasize the room’s best features and create a dynamic, engaging image.
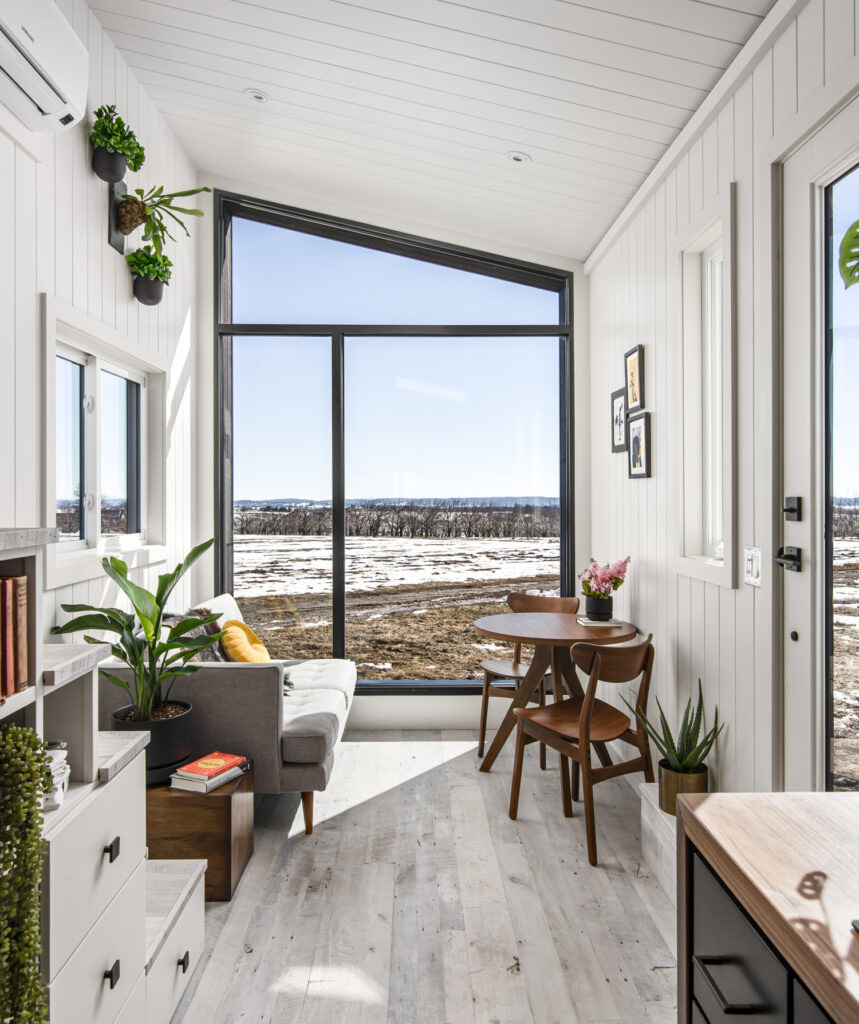
 Cozy Reading Nook in a Tiny Home
4.7. Use Vertical Space
Maximize vertical space in your composition to emphasize height and create a sense of spaciousness. Capture tall elements like bookshelves, curtains, or wall art to draw the viewer’s eye upward, making the room feel larger. Utilize vertical lines to add structure and elegance to the frame. By highlighting the vertical dimension, you can create a more dynamic and visually appealing image.
5. What are Common Mistakes in Tiny Home Photography?
Common mistakes in tiny home photography include excessive wide-angle distortion, poor lighting, cluttered staging, and neglecting post-processing. Avoiding these pitfalls ensures professional-looking images that accurately represent the space.
5.1. Excessive Wide-Angle Distortion
Using too wide of a lens can create significant distortion, making the space look unnatural and unappealing. Choose a lens with minimal distortion and correct any remaining distortion in post-processing.
5.2. Poor Lighting
Inadequate or uneven lighting can ruin an otherwise well-composed shot. Ensure that the space is well-lit and that the lighting is balanced and flattering. Use artificial lighting to supplement natural light and fill in shadows.
5.3. Cluttered Staging
Too much clutter can make a small space feel even smaller and more cramped. Keep the staging simple and minimal, focusing on essential items that enhance the space’s appeal.
5.4. Neglecting Post-Processing
Failing to post-process images can result in a final product that lacks polish and professionalism. Use post-processing software to adjust exposure, correct colors, and remove distractions.
5.5. Incorrect White Balance
Inaccurate white balance can skew colors, making the space look unnatural. Ensure that the white balance is correct and consistent throughout the image. Use a gray card or color checker to calibrate the white balance in post-processing.
6. How Do You Stage a Tiny Home for Photography?
Staging a tiny home for photography involves decluttering, arranging furniture to maximize space, adding inviting décor, and paying attention to details that highlight the home’s unique features. Effective staging enhances the appeal and functionality of the space.
6.1. Decluttering
Start by removing any unnecessary items and clutter. A clean and organized space will look larger and more appealing in photos. Focus on essential items and remove anything that distracts from the overall aesthetic.
6.2. Arranging Furniture
Arrange furniture to maximize space and create a sense of flow. Avoid blocking pathways or creating cramped areas. Position furniture to take advantage of natural light and create inviting seating areas.
6.3. Adding Décor
Add décor that enhances the home’s appeal and reflects its style. Use throw pillows, blankets, and artwork to add color and texture. Avoid overcrowding the space with too many accessories.
6.4. Paying Attention to Details
Pay attention to small details that can make a big difference. Make sure beds are neatly made, towels are folded, and surfaces are clean. Small touches can enhance the overall impression and create a sense of care and attention to detail.
6.5. Using Plants
Incorporate plants to bring life and freshness into the space. Plants can add color, texture, and a sense of natural beauty. Choose plants that are appropriate for the space and that complement the overall aesthetic.
6.6. Adding Personal Touches
Personalize the space with small, meaningful items that reflect the lifestyle and personality of the homeowner. These touches can add warmth and authenticity to the photos, making the space feel more lived-in and inviting.
 Living Area of a Tiny Home with Stylish Décor
7. What Post-Processing Techniques Enhance Tiny Home Photos?
Post-processing techniques that enhance tiny home photos include adjusting exposure and contrast, correcting white balance, removing distortions, and sharpening details. These adjustments refine the image and create a polished, professional look.
7.1. Adjusting Exposure and Contrast
Start by adjusting the exposure and contrast to create a balanced and visually appealing image. Increase the exposure to brighten the overall image and adjust the contrast to enhance details and textures.
7.2. Correcting White Balance
Ensure that the white balance is correct to accurately represent the colors in the space. Use a gray card or color checker to calibrate the white balance in post-processing. Adjust the temperature and tint sliders to achieve a neutral and natural color balance.
7.3. Removing Distortions
Correct any distortions caused by wide-angle lenses. Use the lens correction tools in post-processing software to straighten lines and reduce distortion. Adjust the perspective to create a more natural and balanced image.
7.4. Sharpening Details
Sharpen details to enhance textures and create a sense of clarity. Use the sharpening tools in post-processing software to bring out fine details and make the image look more crisp and defined.
7.5. Removing Distractions
Remove any distractions that detract from the overall image. Use the clone stamp or healing brush tools to remove unwanted objects, blemishes, or imperfections. Pay attention to small details and remove anything that distracts from the main subject.
7.6. Retouching
Professional retouching is essential for refining interior photography, ensuring images are polished and visually appealing. Start by correcting any color imbalances and adjusting the white balance to achieve accurate and natural tones. Remove blemishes, dust spots, and distracting elements using cloning and healing tools. Adjust brightness and contrast to enhance details and create a balanced exposure. Pay attention to lines and perspectives, correcting any distortions for a clean, architectural look. Finally, sharpen the image subtly to enhance textures without introducing artifacts. High-quality retouching elevates the final product, making it more attractive and professional.
7.7. High Dynamic Range (HDR)
Employing High Dynamic Range (HDR) techniques in post-processing can significantly enhance the quality of interior photographs, especially when dealing with challenging lighting conditions. HDR involves merging multiple exposures of the same scene to capture a wider range of tonal values, from the darkest shadows to the brightest highlights. This method allows photographers to balance exposure across the entire image, preventing blown-out windows and overly dark corners. Software like Adobe Lightroom or Aurora HDR enables users to align and blend these exposures seamlessly, creating a final image that showcases details in both bright and dark areas. HDR not only improves the overall dynamic range but also enhances textures and colors, resulting in visually stunning and balanced photographs.
8. How Can You Capture the Essence of Tiny Home Living?
Capturing the essence of tiny home living involves showcasing the lifestyle, functionality, and unique design elements that make these spaces appealing. Focus on highlighting the home’s cozy atmosphere, efficient use of space, and connection to nature.
8.1. Showcasing the Lifestyle
Focus on capturing images that showcase the lifestyle associated with tiny home living. Include elements that highlight the freedom, simplicity, and sustainability of this lifestyle. Show people enjoying the space, engaging in activities that reflect the values of tiny home living.
8.2. Highlighting Functionality
Emphasize the functionality and efficiency of the space. Capture images that showcase the innovative design elements and space-saving solutions that make tiny homes practical and livable. Show how the space is used and how it meets the needs of its occupants.
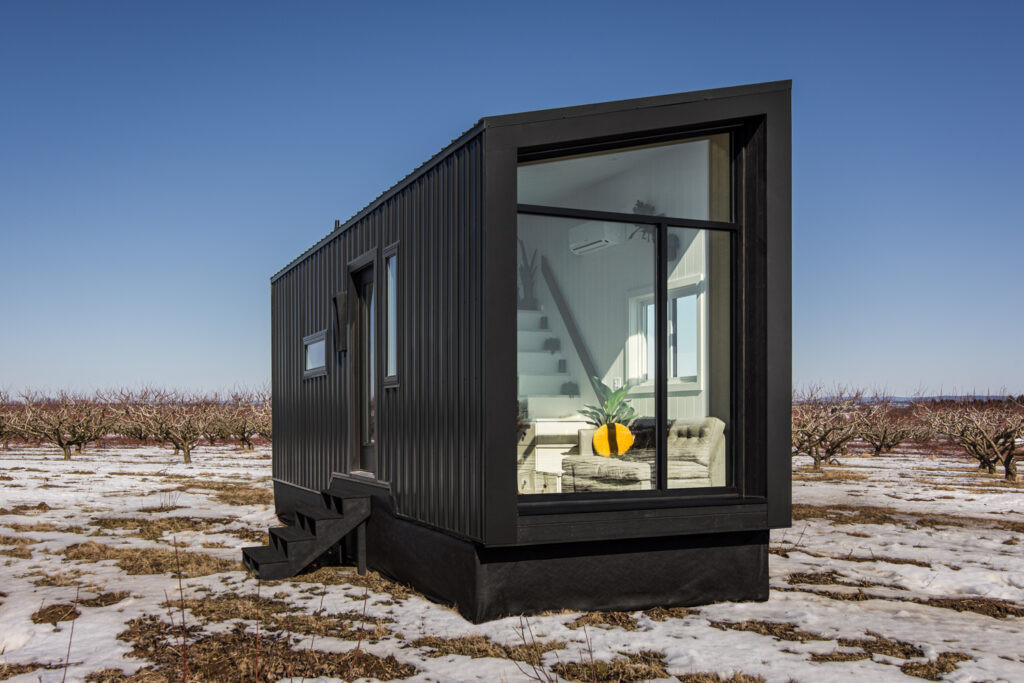
8.3. Emphasizing Unique Design
Highlight the unique design elements that set the tiny home apart. Capture images that showcase the craftsmanship, materials, and architectural details that make the space special. Pay attention to the details that reflect the homeowner’s personal style and taste.
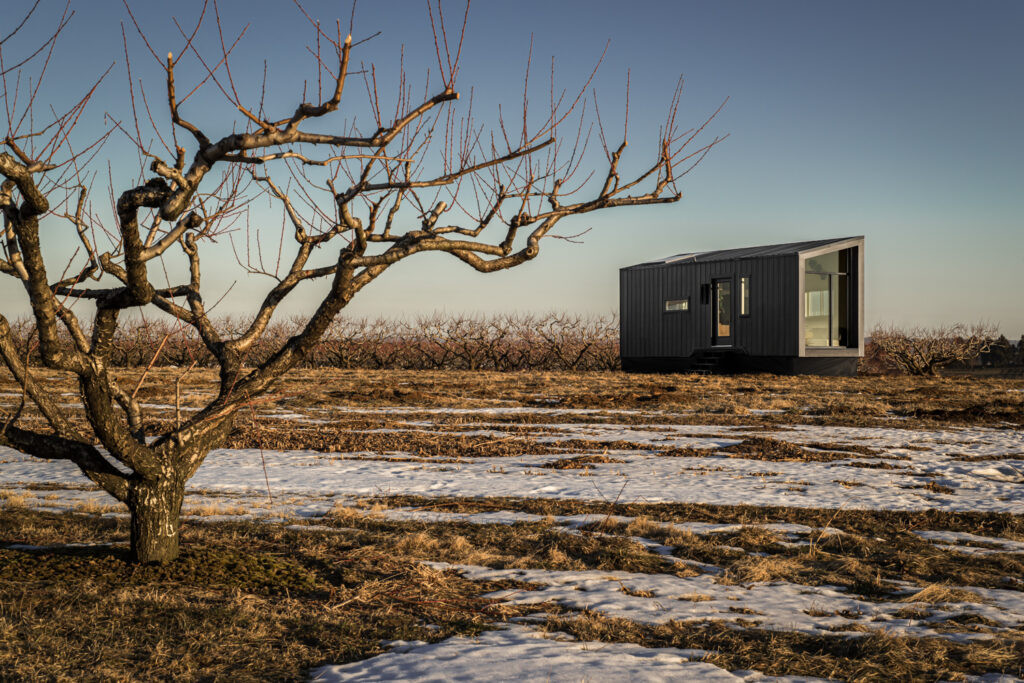
8.4. Connecting with Nature
Emphasize the connection to nature that is often associated with tiny home living. Capture images that showcase the surrounding landscape and how the home integrates with its environment. Show how natural light and views are incorporated into the design.
8.5. Creating a Cozy Atmosphere
Create a cozy and inviting atmosphere in your photos. Use warm lighting, soft textures, and inviting décor to create a sense of comfort and relaxation. Show how the space is designed to be a peaceful and restorative retreat.
 Bed Area in a Tiny Home with Natural Light
9. How Does Photography Help Market Tiny Homes?
Photography helps market tiny homes by showcasing their unique features, functionality, and lifestyle appeal, attracting potential buyers or renters with compelling visuals. High-quality images can highlight the benefits of tiny home living and create an emotional connection with viewers.
9.1. Showcasing Unique Features
Photography allows you to showcase the unique features and design elements that make tiny homes stand out. High-quality images can highlight the craftsmanship, materials, and architectural details that make the space special.
9.2. Highlighting Functionality
Photography can emphasize the functionality and efficiency of tiny homes. Images can showcase the innovative design elements and space-saving solutions that make these homes practical and livable.
9.3. Attracting Potential Buyers
Compelling visuals can attract potential buyers or renters who are drawn to the lifestyle and aesthetic of tiny homes. High-quality images can create an emotional connection with viewers and inspire them to learn more about tiny home living.
9.4. Creating an Emotional Connection
Photography can create an emotional connection with viewers by showcasing the cozy atmosphere, connection to nature, and sense of freedom associated with tiny home living. Images can evoke feelings of warmth, comfort, and relaxation, making the space feel more inviting and appealing.
9.5. Standing Out in Listings
Professional photography can help tiny homes stand out in online listings and marketing materials. High-quality images can capture the attention of potential buyers or renters and differentiate the property from others on the market.
10. What are Some Current Trends in Tiny Home Photography?
Current trends in tiny home photography include incorporating lifestyle elements, using drone photography for exterior shots, and creating virtual tours to provide an immersive experience. These trends reflect the growing interest in tiny home living and the need to showcase these spaces in innovative ways.
10.1. Incorporating Lifestyle Elements
More photographers are incorporating lifestyle elements into their tiny home photos. This includes showing people using the space, engaging in activities, and enjoying the benefits of tiny home living.
10.2. Using Drone Photography
Drone photography is becoming increasingly popular for capturing exterior shots of tiny homes. Aerial views can showcase the home’s setting and its integration with the surrounding landscape.
10.3. Creating Virtual Tours
Virtual tours provide an immersive experience that allows potential buyers or renters to explore the space from the comfort of their own homes. These tours can showcase the layout, design, and functionality of the tiny home in a dynamic and engaging way.
10.4. Focusing on Sustainability
With growing concerns about environmental impact, tiny home photography is increasingly focusing on sustainable design and eco-friendly features. Images highlight energy-efficient appliances, solar panels, and recycled materials, appealing to environmentally conscious buyers. Showcasing these aspects can attract a specific niche of consumers who value sustainability.
10.5. Maximizing Social Media Appeal
Tiny home photography now aims to maximize social media engagement. Photographers use bright, eye-catching visuals optimized for platforms like Instagram and Pinterest. Short video clips, behind-the-scenes content, and user-generated content are also utilized to boost visibility and create a sense of community. This approach aligns with current trends where visual content drives much of online interaction.
FAQ About Tiny Home Photography
1. What is the best lens for tiny home photography?
The best lens for tiny home photography is a wide-angle lens with minimal distortion, typically in the 16-35mm range.
2. How can I make a small space look bigger in photos?
You can make a small space look bigger by using wide-angle lenses, maximizing natural light, and employing strategic composition techniques like leading lines and layering.
3. What lighting techniques work best in tiny homes?
Combining natural light with strategic artificial lighting to balance exposure and highlight textures works best in tiny homes.
4. How do I stage a tiny home for photography?
Stage a tiny home by decluttering, arranging furniture to maximize space, adding inviting décor, and paying attention to details that highlight the home’s unique features.
5. What post-processing techniques enhance tiny home photos?
Post-processing techniques that enhance tiny home photos include adjusting exposure and contrast, correcting white balance, removing distortions, and sharpening details.
6. How can I capture the essence of tiny home living in photos?
Capture the essence of tiny home living by showcasing the lifestyle, functionality, and unique design elements that make these spaces appealing.
7. Why is photography important for marketing tiny homes?
Photography is important for marketing tiny homes because it showcases their unique features, functionality, and lifestyle appeal, attracting potential buyers or renters with compelling visuals.
8. What are some common mistakes in tiny home photography?
Common mistakes in tiny home photography include excessive wide-angle distortion, poor lighting, cluttered staging, and neglecting post-processing.
9. How does drone photography enhance tiny home marketing?
Drone photography enhances tiny home marketing by providing aerial views that showcase the home’s setting and its integration with the surrounding landscape.
10. What role do virtual tours play in tiny home photography?
Virtual tours play a key role by providing an immersive experience that allows potential buyers or renters to explore the space from the comfort of their own homes.
Capturing great photos of tiny homes requires a blend of technical skill and artistic vision. By mastering these techniques, you can create stunning images that not only showcase the beauty and functionality of these spaces but also inspire others to embrace the tiny home lifestyle.
Ready to elevate your tiny home photography skills? Visit dfphoto.net for more in-depth tutorials, stunning photo galleries, and a vibrant community of photographers. Whether you’re looking to refine your lighting techniques, master composition in tight spaces, or discover the latest trends in architectural photography, dfphoto.net is your ultimate resource. Connect with fellow enthusiasts, share your work, and find the inspiration you need to capture the essence of tiny home living through your lens. Don’t just take photos—tell a story. Join dfphoto.net today and start creating images that captivate and inspire. For inquiries, visit us at 1600 St Michael’s Dr, Santa Fe, NM 87505, United States, call +1 (505) 471-6001, or explore our website at dfphoto.net.