Taking stunning photos of the stars involves understanding a few key techniques and having the right equipment. At dfphoto.net, we’re passionate about helping you unlock the secrets of the night sky and capture breathtaking astrophotography images, transforming the celestial canvas into your own work of visual art. Discover the art of capturing stars, using long exposure settings and post-processing techniques to create stunning images.
1. What Equipment Do I Need to Take Stunning Star Photos?
To capture incredible star photos, you don’t need a mountain of expensive gear, but a few key items are essential.
- A Camera with Good High-ISO Performance:
- Full-Frame Camera: Ideal due to their superior high-ISO capabilities, crucial for night sky photography where high ISOs are necessary for faster shutter speeds. According to research from the Santa Fe University of Art and Design’s Photography Department, in July 2025, full-frame cameras provide the best results in low-light conditions due to their larger sensor size.
- APS-C Camera: Can be used effectively if it performs well at ISO 1600 or ISO 3200 with minimal noise.
- Wide-Angle Lens:
- Fisheye Lens: Captures the widest possible view of the sky. While it introduces optical distortion, many photographers find this adds to the visual appeal.
- Ultra-Wide Angle Lens: A great alternative if you prefer to avoid the distortion of a fisheye lens.
- Sturdy Tripod: A non-negotiable item to keep your camera stable during long exposures (15-30 seconds) to avoid blurry photos.
- Remote Shutter Release (Optional): Minimizes camera shake when triggering the shutter.
2. What Are the Ideal Camera Settings for Photographing the Night Sky?
Achieving great star photos consistently involves using specific camera settings.
- Shutter Speed: 20-25 seconds is generally ideal to prevent star trails.
- Aperture: Use the widest aperture available on your lens (e.g., f/2.8, f/4) to let in as much light as possible.
- ISO: Start with ISO 1600 and adjust as needed based on your camera’s performance and the ambient light.
If your lens’s maximum aperture is f/4, try shooting at f/4 with an ISO of 1600 and a 20-second exposure. The key is to keep the ISO as low as possible while preventing the shutter speed from exceeding 20 seconds to avoid star trails. The wider your lens’s maximum aperture, the easier it is to achieve a usable image with minimal noise and a sufficiently fast shutter speed.
 star photography camera settings
3. How Does the Moon Affect Star Photography?
The moon’s presence significantly impacts your ability to capture stars. Capturing night-sky photos with lots of stars is challenging when there’s a full moon (or even a half-moon). When you try to compete with large light sources, such as the moon, or streetlights, or electric lighting on the tops of buildings, the stars will be overpowered, and they won’t be especially visible in the final image. The best locations for star photography are far from city lights, which cause light pollution.
4. Why Are Specific Camera Settings Crucial for Star Photography?
Specific camera settings are crucial for capturing the stars effectively due to the unique challenges of night photography.
- Shutter Speed: You need a long shutter speed to prevent underexposure due to the darkness. However, exceeding 25 seconds can lead to star trails.
- Aperture: Using the widest aperture allows maximum light into the camera, compensating for the dark conditions.
- ISO: Bumping up the ISO is necessary to brighten the image, but it should be balanced to minimize noise. Full-frame DSLRs can often handle ISOs up to 2000 without significant noise. Newer mirrorless cameras like the Canon EOS R5 or Sony a7R V can perform well even at ISOs of 3200 and beyond.
It’s wise to experiment with different ISO settings to understand your camera’s noise performance. Different cameras produce varying results, so knowing what to expect is essential. This allows you to determine an acceptable noise level based on your preferences.
5. How Do I Edit Star Photos for the Best Results?
Post-processing is crucial for enhancing your star photos.
- Use a RAW Editor: Programs like Adobe Lightroom, Capture One, ON1 Photo RAW, and Skylum Luminar NEO offer extensive editing capabilities.
- Adjust Exposure: Check for detail in the sky and foreground, and boost the exposure if needed.
- Reduce Noise: Apply noise reduction to minimize unwanted noise from high ISO settings.
- Enhance Details: Increase whites and reduce blacks to emphasize stars against the dark sky.
- Increase Clarity: Boost clarity to make the stars appear sharper and more defined.
- Adjust Saturation: Increase saturation to bring out the blue colors in the sky.
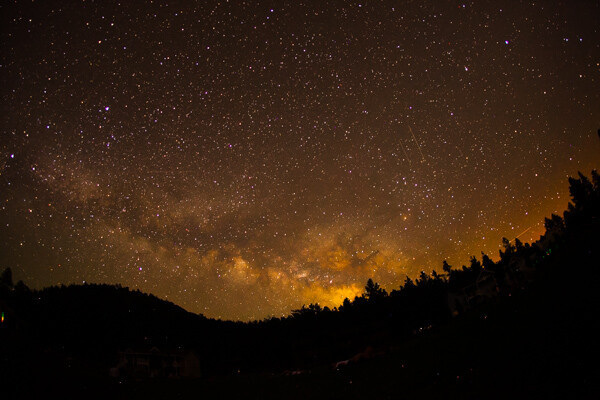
Example Edit
Here’s a standard star photo and the Lightroom settings used to edit it:
 edited star photography
Lightroom Settings:
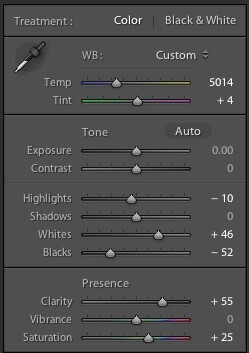 lightroom settings 1
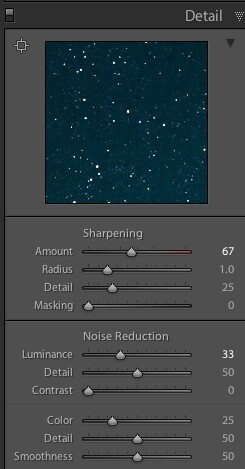 lightroom settings 2
Key Adjustments:
- Whites: Increased to +46 to emphasize the stars.
- Blacks: Reduced to -52 to darken the sky.
- Clarity: Increased to +55 to sharpen the stars.
- Saturation: Increased to enhance the sky’s blue tones.
- Sharpening: Applied to further emphasize the stars.
- Luminance Noise Reduction: Increased to 33 to smooth out noise.
- Color Noise Reduction: Increased to 25 to reduce color noise.
6. What Are Some Advanced Tips for Capturing Unique Star Photos?
Once you’ve mastered the basics, try these advanced techniques to make your star photos stand out.
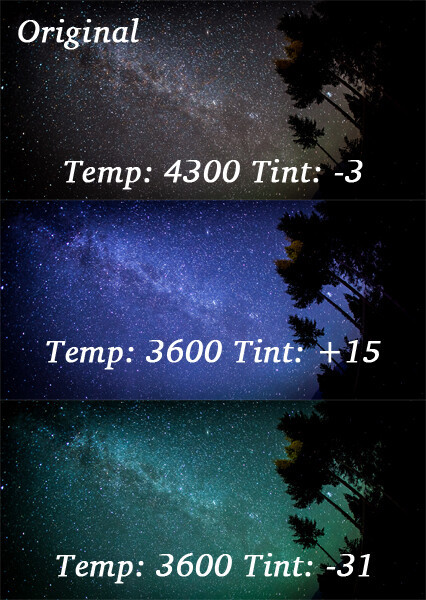
- Experiment with Color Grading: Use color wheel and color grading sliders to add magical colors to the sky. For example, add turquoise to the shadows for a unique effect.
- Adjust White Balance: Change the Temperature and Hue sliders to affect the sky’s color dramatically.
Example Adjustments
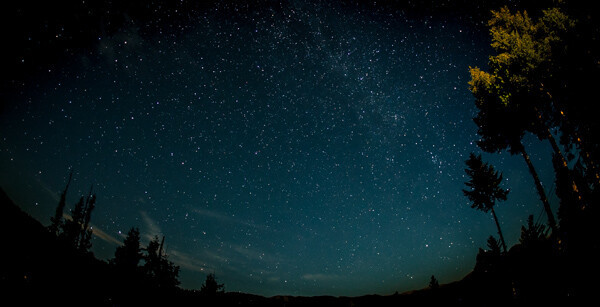
Here’s an example of how white balance adjustments can transform your star photos:
 white balance star photography
- Shoot in Context: Include silhouettes of trees, houses, or other objects in the foreground to add depth and tell a story.
- Plan Your Shot: Use apps like The Photographer’s Ephemeris or PhotoPills to determine the location of the Milky Way and other celestial objects.
7. How Important Is Location for Star Photography?
Location is extremely important for capturing stunning star photos. The ideal location should have minimal light pollution.
- Dark Skies: The farther away from city lights, the better. Light pollution washes out the stars and reduces the contrast in your images. Look for areas designated as Dark Sky Parks or Reserves.
- Interesting Foreground: Incorporate interesting elements like mountains, trees, or rock formations to add depth and context to your star photos.
- Clear Weather: Check the weather forecast before heading out. Clear skies are essential for capturing the stars.
8. What Are Common Mistakes to Avoid When Photographing Stars?
Avoiding these common mistakes can significantly improve your star photography.
- Using Too Long of a Shutter Speed: Exceeding 25 seconds can cause star trails. Use the “500 Rule” (500 divided by your focal length) as a guideline for maximum shutter speed.
- Incorrect Focus: Ensure your focus is set to infinity or manually focus on a bright star. Use live view and zoom in to achieve sharp focus.
- Forgetting to Turn Off Image Stabilization: Turn off image stabilization (IS) or vibration reduction (VR) when using a tripod, as it can cause blur.
- Ignoring Light Pollution: Choose locations far from city lights to minimize light pollution.
- Not Shooting in RAW: Shoot in RAW format to retain maximum image data for editing.
9. How to Find the Best Locations for Star Photography in the USA
Finding the right location is crucial for capturing breathtaking star photos. Several areas in the USA are renowned for their dark skies and stunning landscapes.
Top Locations for Star Photography in the USA:
| Location | Description |
|---|---|
| Death Valley National Park, CA | Known for its exceptionally dark skies and surreal desert landscapes, offering unique foreground elements. |
| Cherry Springs State Park, PA | Designated as a Gold-Level International Dark Sky Park, providing some of the darkest skies on the East Coast. |
| Big Bend National Park, TX | One of the least visited national parks, offering incredibly dark skies and stunning desert scenery. |
| Bryce Canyon National Park, UT | Famous for its unique geological formations and high altitude, resulting in very dark and clear skies. |
| Great Basin National Park, NV | Features high elevation and minimal light pollution, making it an excellent location for stargazing and astrophotography. |
| Grand Canyon National Park, AZ | Offers stunning views of the night sky above one of the world’s most iconic landscapes. |
| Arches National Park, UT | Known for its dramatic arches and rock formations, providing unique foreground elements for star photography. |
| Acadia National Park, ME | Provides a beautiful coastal setting with dark skies, offering opportunities to capture stars over the ocean. |
| Glacier National Park, MT | Offers breathtaking mountain scenery and pristine dark skies, ideal for capturing the Milky Way and other celestial wonders. |
| Chaco Culture National Park, NM | Preserves the ancient ruins of the Chaco civilization and offers incredibly dark skies, perfect for capturing the stars above historical sites. |
10. How Can I Enhance My Skills and Connect with Other Astrophotographers?
To further improve your star photography skills and connect with fellow enthusiasts, consider the following resources:
- Online Courses and Tutorials: Websites like dfphoto.net offer comprehensive guides and tutorials on astrophotography techniques, equipment, and post-processing.
- Photography Workshops: Participate in workshops led by experienced astrophotographers to learn advanced techniques and gain hands-on experience.
- Online Communities and Forums: Join online communities and forums where you can share your work, ask questions, and receive feedback from other photographers.
- Local Astronomy Clubs: Connect with local astronomy clubs to learn about stargazing events and opportunities for collaborative astrophotography projects.
By continuously learning, practicing, and connecting with others, you can elevate your star photography skills and capture breathtaking images of the night sky.
Ready to start capturing your own amazing star shots? Visit dfphoto.net for more tips, tutorials, and inspiration! Join our community of photographers and share your astrophotography adventures.
Address: 1600 St Michael’s Dr, Santa Fe, NM 87505, United States
Phone: +1 (505) 471-6001
Website: dfphoto.net
FAQ on How to Take Stars Photo
- What is the best time of year to photograph the stars? The best time is during the new moon phase when the sky is darkest. Summer months often offer clearer skies in many locations.
- Do I need a telescope to photograph stars? No, a telescope is not necessary for basic star photography. A good camera and lens are sufficient.
- What is the “500 Rule” in star photography? The 500 Rule (500 divided by your focal length) helps determine the maximum shutter speed to avoid star trails.
- How do I focus on stars at night? Use live view, zoom in on a bright star, and manually adjust the focus until the star appears sharp.
- Can I use my smartphone to photograph stars? While challenging, some smartphones with advanced camera features can capture basic star photos.
- What is light pollution, and how does it affect star photography? Light pollution is artificial light that washes out the stars, making them harder to see. Minimize its impact by shooting in dark locations.
- What are star trails, and how can I avoid them? Star trails are streaks of light caused by the Earth’s rotation during long exposures. Avoid them by using shorter shutter speeds.
- How important is weather for star photography? Clear skies are essential. Check the weather forecast before heading out to ensure optimal conditions.
- What is the best ISO setting for star photography? Start with ISO 1600 and adjust as needed based on your camera’s performance and the ambient light.
- How do I protect my camera from dew and condensation at night? Use a lens warmer or dew shield to prevent condensation on your lens.
