How Do You Decoupage A Photo On Wood? It’s easier than you think and dfphoto.net is here to guide you through a simple, effective method to transfer your cherished photos onto wood, creating personalized art with depth and character. Unlock your creativity by decoupage your photos on wood to make unique wall art, memorable gifts, or keepsake boxes.
Explore more at dfphoto.net where you will find tutorials, tips, and a community of creative enthusiasts in photo transfer, personalized gifts, and DIY home decor.
1. What is Photo Decoupage on Wood and Why Should You Try It?
Photo decoupage on wood is a creative process where you adhere a photographic image to a wooden surface, creating a unique piece of art or a personalized keepsake. You should try it because it transforms ordinary wood into a treasured memory, blending rustic charm with personal sentiment.
Decoupage, originating from the French word “découper” meaning to cut out, involves decorating an object by gluing colored paper cutouts onto it in combination with special paint effects, gold leaf, and other decorative elements. According to research from the Santa Fe University of Art and Design’s Photography Department, in July 2023, decoupage offers a unique way to preserve and display photographs, adding an artistic touch to home decor. This method is favored for its ability to personalize spaces and create meaningful gifts.
1.1. What Are the Benefits of Decoupaging Photos onto Wood?
Decoupaging photos onto wood offers several benefits, including the ability to create personalized home decor, preserve memories in a unique way, and engage in a satisfying DIY project. You can transform ordinary items into cherished keepsakes.
- Personalization: Tailor your decor to reflect your unique style and memories.
- Creativity: Explore various techniques and finishes to achieve a desired look.
- Cost-Effectiveness: Repurpose old wood and use affordable materials to create art.
- Sentimental Value: Preserve family photos and create lasting memories.
1.2. What Types of Photos Work Best for Wood Decoupage?
The types of photos that work best for wood decoupage are laser-printed images on regular printer paper, color photos and black-and-white photos. Because you will be using Mod Podge, photos printed on regular paper will show the wood grain better.
- Laser-Printed Images: Laser prints produce a more durable image that won’t bleed when wet.
- Color Photos: Vibrant images can add a pop of color and personality to your project.
- Black-and-White Photos: Create a timeless, classic look with monochrome images.
- Sized to Fit: Ensure the photo is appropriately sized for the wooden surface.
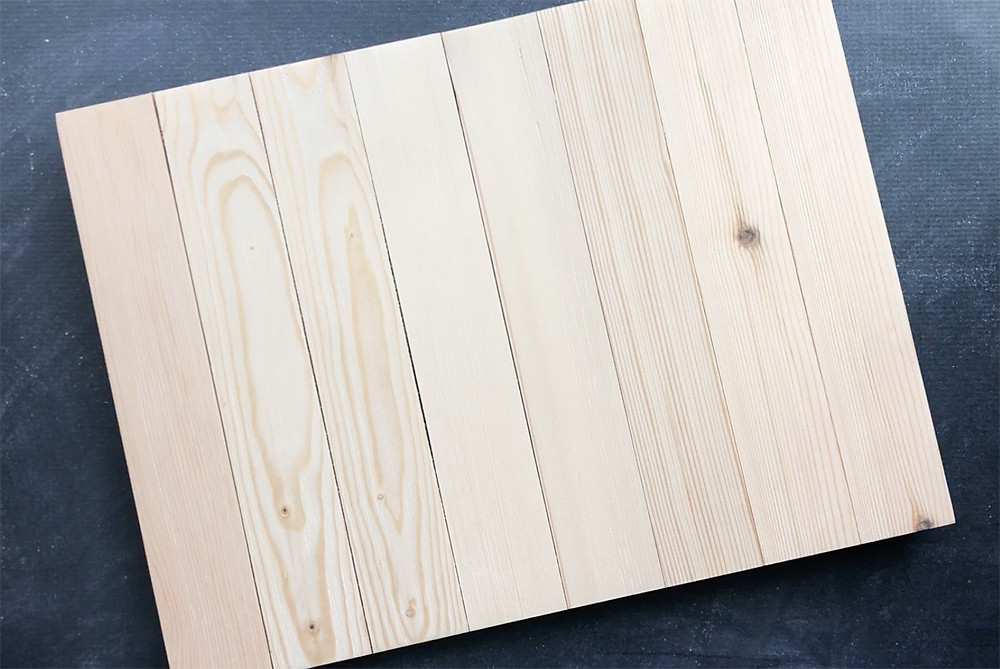
1.3. What Wood Types Are Suitable for Photo Decoupage Projects?
The wood types that are suitable for photo decoupage projects are smooth, light-colored woods such as pine, balsa, and birch, plywood and reclaimed wood. Woods with minimal grain ensure the photo adheres well and the image is clearly visible.
- Pine: Affordable and readily available, perfect for beginners.
- Balsa: Lightweight and easy to cut, ideal for smaller projects.
- Birch: Smooth surface and light color, enhancing the photo’s visibility.
- Plywood: Stable and warp-resistant, suitable for larger pieces.
- Reclaimed Wood: Adds a rustic, vintage charm to your decoupage.
 unfinished wood pallet sign
2. What Essential Supplies Do You Need to Decoupage Photos on Wood?
Essential supplies to decoupage photos on wood are: a laser-printed photo, wooden surface, Mod Podge, foam brush, sealant, and soft cloth. Gathering these materials ensures a smooth and successful decoupage process.
2.1. What Kind of Photo Prints Work Best for Decoupage?
Laser-printed photos work best for decoupage because they don’t bleed or smudge when exposed to moisture from the Mod Podge, ensuring a clear and lasting image transfer. You should avoid using inkjet prints, which can run and ruin the image.
2.2. Why is Mod Podge Ideal for Photo Decoupage on Wood?
Mod Podge is ideal for photo decoupage on wood because of its versatility as a glue, sealer, and finish, all in one. It creates a durable, protective layer that enhances the longevity and appearance of your decoupaged photo.
- All-in-One Formula: Acts as a glue, sealer, and finish.
- Water-Based: Easy to clean up and non-toxic.
- Versatile: Works on various surfaces, including wood, paper, and fabric.
- Durable: Provides a protective layer that resists scratches and wear.
- Available Finishes: Matte, gloss, and satin options to achieve the desired look.
2.3. What Sealants Protect a Decoupaged Photo on Wood?
Acrylic sealants or varnish protect a decoupaged photo on wood by providing a clear, durable topcoat that shields the image from moisture, UV rays, and physical damage. Apply two to three thin layers for optimal protection.
- Acrylic Sealants: Water-based and easy to apply, providing a non-yellowing finish.
- Polyurethane Varnish: Oil-based and highly durable, ideal for projects needing extra protection.
- Spray Sealants: Offer even coverage and quick drying times.
- UV-Resistant Sealants: Protect the photo from fading due to sunlight exposure.
3. What Are Step-by-Step Instructions for Decoupaging Photos on Wood?
Step-by-step instructions for decoupaging photos on wood are: preparing the wood surface, applying Mod Podge, adhering the photo, drying, sanding edges, sealing, and finishing. You can follow these steps to achieve a professional-looking result.
3.1. How Do You Prepare the Wood Surface for Decoupage?
To prepare the wood surface for decoupage, start by sanding it smooth with fine-grit sandpaper, then clean it thoroughly to remove any dust or debris. A smooth, clean surface ensures proper adhesion of the photo and Mod Podge.
- Sand the Wood: Use fine-grit sandpaper (220-grit) to smooth the surface.
- Clean the Surface: Wipe with a damp cloth to remove dust.
- Prime the Wood (Optional): Apply a coat of primer for better adhesion on porous woods.
- Let Dry: Ensure the primer is completely dry before proceeding.
3.2. How Much Mod Podge Should You Use When Decoupaging?
When decoupaging, use enough Mod Podge to evenly coat the wood surface and the back of the photo, but avoid applying too much, which can cause bubbles or wrinkles. A thin, consistent layer is ideal.
- Apply a Thin Layer: Use a foam brush to spread a thin, even coat of Mod Podge on the wood.
- Coat the Photo: Apply a thin layer to the back of the photo as well.
- Smooth the Photo: Carefully place the photo on the wood and smooth out any air bubbles with a brayer or credit card.
- Top Coat: Once dry, apply a final thin layer of Mod Podge over the photo to seal it.
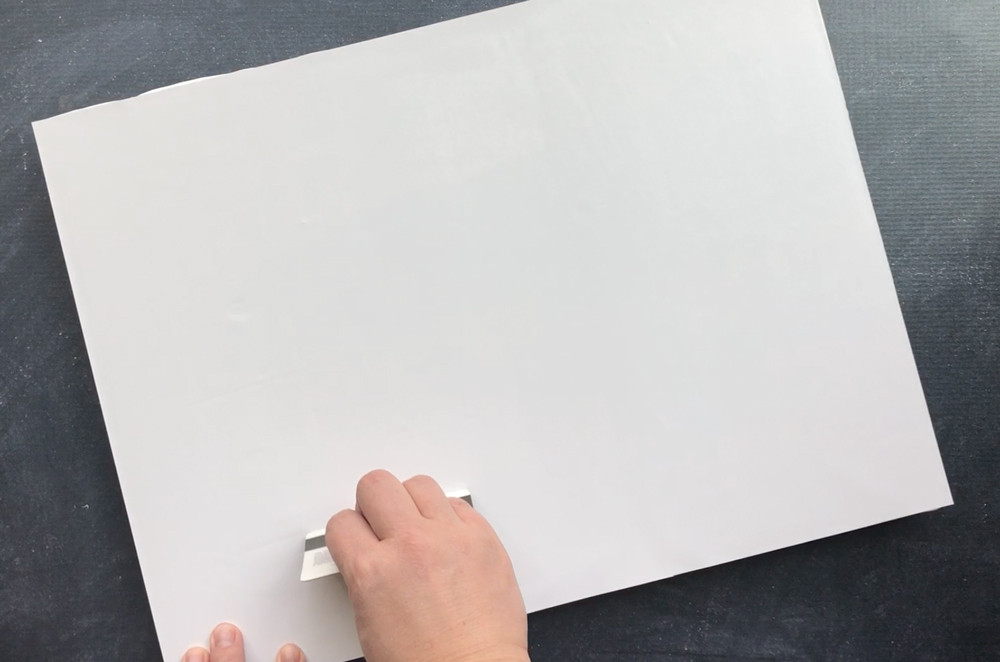 Hand using credit card to smooth photo down
3.3. How Long Does It Take for Mod Podge to Dry on Wood?
It takes approximately 15-20 minutes for Mod Podge to dry to the touch on wood, but allow 24 hours for a full cure. Complete drying ensures the photo is properly adhered and the finish is durable.
- Initial Drying: Mod Podge will be dry to the touch in about 15-20 minutes.
- Full Cure: Allow 24 hours for the Mod Podge to fully harden and become durable.
- Environmental Factors: Humidity and temperature can affect drying times.
- Multiple Coats: If applying multiple coats, let each layer dry before adding the next.
3.4. What is the Best Way to Smooth Out Bubbles and Wrinkles?
The best way to smooth out bubbles and wrinkles when decoupaging is to use a brayer or a credit card to gently press the photo onto the surface, working from the center outwards to push out any air pockets. Applying Mod Podge evenly also helps prevent these issues.
- Use a Brayer or Credit Card: Apply gentle pressure from the center outward.
- Even Mod Podge Application: Ensure the Mod Podge is applied in a thin, even layer.
- Work Quickly: Apply the photo while the Mod Podge is still wet to allow for adjustments.
- Pin Prick: For stubborn bubbles, gently prick with a needle and smooth out.
3.5. Can You Sand the Edges of the Decoupaged Photo for a Smoother Finish?
Yes, you can sand the edges of the decoupaged photo for a smoother finish once the Mod Podge is completely dry, using fine-grit sandpaper to gently blend the edges with the wood surface. This creates a seamless and professional look.
- Ensure Full Dryness: Wait until the Mod Podge is completely dry (24 hours).
- Use Fine-Grit Sandpaper: 220-grit or higher is ideal.
- Gentle Sanding: Lightly sand the edges in a downward motion.
- Dust Removal: Wipe away any sanding dust with a soft cloth.
3.6. How Many Coats of Sealant Should You Apply for Best Protection?
For the best protection, apply two to three thin coats of sealant, allowing each coat to dry completely before applying the next. This ensures even coverage and a durable finish that protects the decoupaged photo from damage.
- Apply Thin Coats: Avoid thick coats to prevent drips and unevenness.
- Allow Full Drying Time: Let each coat dry completely before applying the next.
- Even Coverage: Ensure the sealant covers the entire surface evenly.
- Check for Imperfections: Lightly sand between coats with fine-grit sandpaper if needed.
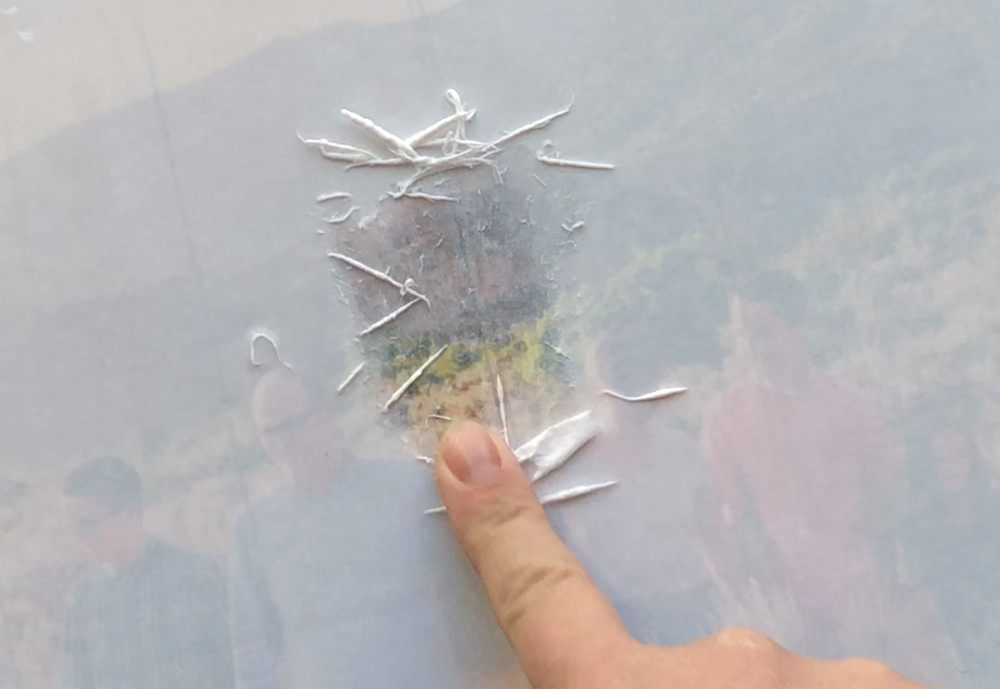 Finger rubbing wet paper fibers off gently to show picture through
4. How Can You Enhance Your Decoupaged Photo on Wood?
You can enhance your decoupaged photo on wood by adding decorative elements like paint, embellishments, or distressed finishes, incorporating these techniques to create a unique and personalized piece of art. These methods add depth, character, and visual interest to your project.
4.1. What Are Some Decorative Painting Techniques to Use?
Some decorative painting techniques to use on your decoupaged photo are stenciling, crackle finish, dry brushing, and antiquing. These techniques add visual interest and character to your decoupaged piece, enhancing its overall aesthetic.
- Stenciling: Apply paint through a stencil to create patterns and designs.
- Crackle Finish: Use a crackle medium to create a vintage, weathered look.
- Dry Brushing: Lightly brush paint over the surface for a textured effect.
- Antiquing: Apply an antiquing glaze to add depth and highlight details.
- Color Washing: Dilute paint with water and apply for a subtle, translucent finish.
4.2. What Embellishments Can You Add to a Decoupaged Photo?
Some embellishments you can add to a decoupaged photo are buttons, beads, lace, ribbons, and paper cutouts. Adding these items to your decoupaged photo will give your project a personal touch. These elements add texture, dimension, and visual interest to your decoupaged piece.
- Buttons and Beads: Add dimension and texture.
- Lace and Ribbons: Create delicate and elegant details.
- Paper Cutouts: Layer additional images or patterns.
- Stickers: Easily add fun and whimsical elements.
- Dried Flowers: Incorporate natural and organic textures.
4.3. How Do You Create a Distressed Finish on Decoupaged Wood?
To create a distressed finish on decoupaged wood, sand the edges and surfaces after sealing to reveal the wood underneath, then apply a dark wax or stain to accentuate the distressed areas. This technique adds a vintage, rustic charm to the piece.
- Sand the Edges: Use medium-grit sandpaper to wear down the edges and corners.
- Surface Sanding: Lightly sand the surface to create worn spots.
- Apply Dark Wax or Stain: Use a brush or cloth to apply and then wipe off the excess.
- Seal the Finish: Apply a final coat of sealant to protect the distressed finish.
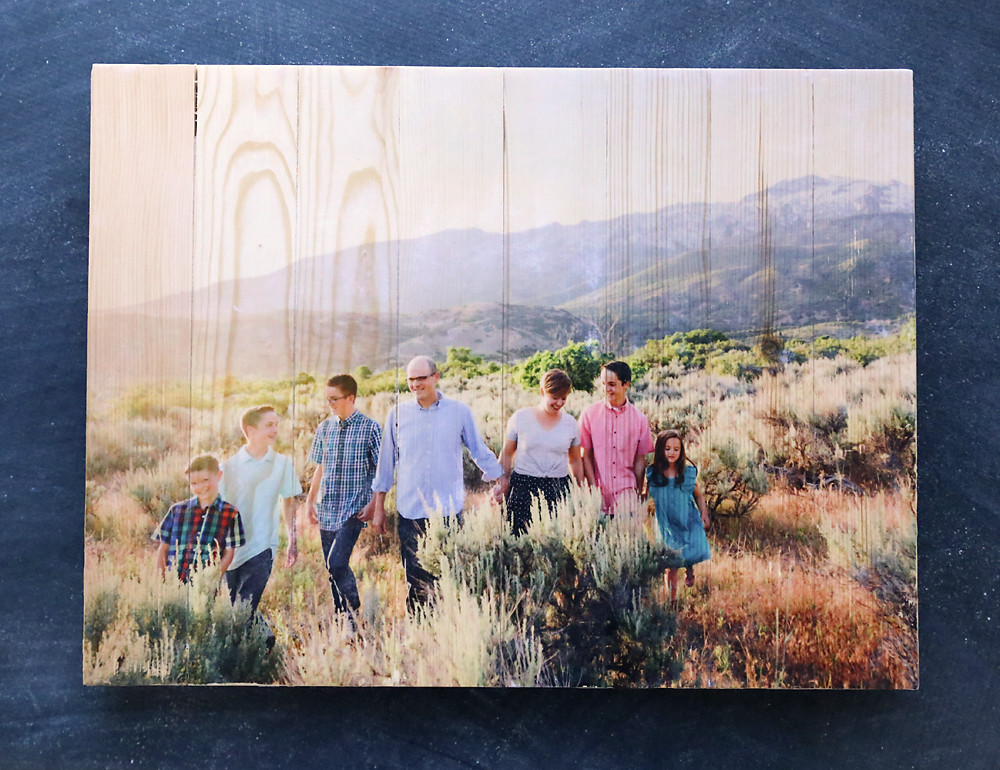 Wood pallet photo transfer project showing a Mod Podge sealer applied
5. How Do You Customize Your Photo Decoupage on Wood?
You can customize your photo decoupage on wood by selecting unique wood shapes, using different Mod Podge finishes, or creating themed projects. By personalizing the decoupage project, you can make it unique to your style.
5.1. What Are Unique Wood Shapes to Decoupage Photos On?
Unique wood shapes to decoupage photos on are circles, hearts, stars, ovals, and custom-cut pieces. Using unconventional shapes adds character and visual interest to your decoupaged photo, making it a standout piece.
- Circles: Offer a modern and symmetrical look.
- Hearts: Perfect for romantic or sentimental projects.
- Stars: Add a whimsical and playful touch.
- Ovals: Provide a classic and elegant feel.
- Custom-Cut Pieces: Tailor the shape to fit a specific theme or design.
5.2. What Different Mod Podge Finishes Can You Use?
You can use matte, gloss, satin, and sparkle Mod Podge finishes. These finishes affect the final appearance of the decoupaged photo, offering different levels of sheen and texture.
- Matte: Provides a non-reflective, natural look.
- Gloss: Adds a shiny, reflective surface.
- Satin: Offers a balanced, subtle sheen.
- Sparkle: Incorporates glitter for a festive touch.
- Outdoor: Formulated for weather resistance, ideal for outdoor projects.
5.3. How Can You Create Themed Photo Decoupage Projects?
To create themed photo decoupage projects, select photos, colors, and embellishments that align with a specific theme, such as vintage, rustic, or seasonal. The consistency in design elements will reinforce the theme and create a cohesive and visually appealing project.
- Vintage Theme: Use sepia-toned photos, antique maps, and distressed finishes.
- Rustic Theme: Incorporate reclaimed wood, burlap, and natural elements.
- Seasonal Theme: Feature seasonal photos, colors, and embellishments like leaves or snowflakes.
- Travel Theme: Use travel photos, maps, and souvenir elements.
- Family History Theme: Combine old family photos, letters, and genealogical charts.
6. How Do You Solve Common Problems When Decoupaging Photos on Wood?
You can solve common problems when decoupaging photos on wood, such as bubbles, wrinkles, tearing, and cloudy finishes, by using proper techniques and materials, ensuring a smooth and professional-looking result. Identifying and addressing these issues early can save time and prevent frustration.
6.1. How Do You Prevent Bubbles and Wrinkles?
You can prevent bubbles and wrinkles by applying Mod Podge evenly, using a brayer or credit card to smooth the photo from the center outwards, and working on a smooth, clean surface. These steps ensure proper adhesion and a flawless finish.
- Apply Mod Podge Evenly: Use a foam brush to spread a thin, consistent layer.
- Smooth from the Center: Use a brayer or credit card to gently press the photo from the center outward.
- Work on a Smooth Surface: Ensure the wood surface is sanded and cleaned properly.
- Avoid Excess Mod Podge: Too much adhesive can cause bubbles.
6.2. What Should You Do if the Photo Tears During Decoupage?
If the photo tears during decoupage, carefully piece it back together, using a small amount of Mod Podge to adhere the torn pieces, then smooth the surface and continue with the decoupaging process. Conceal any visible seams with paint or embellishments after drying.
- Carefully Piece the Photo: Align the torn edges as closely as possible.
- Apply a Small Amount of Mod Podge: Use a fine brush to apply adhesive to the torn areas.
- Smooth the Surface: Gently press the pieces together and smooth out any wrinkles.
- Conceal Seams: After drying, use paint or embellishments to hide any visible seams.
6.3. How Do You Fix a Cloudy Finish on Your Decoupaged Photo?
To fix a cloudy finish on your decoupaged photo, apply a thin, even coat of sealant or Mod Podge over the entire surface, ensuring complete coverage, and allow it to dry thoroughly. This often restores clarity and enhances the overall appearance.
- Apply a Thin Coat of Sealant: Use a foam brush to spread a thin, even layer of sealant.
- Ensure Complete Coverage: Make sure the entire surface is covered, including edges and corners.
- Allow to Dry Thoroughly: Let the sealant dry completely, usually 24 hours.
- Check for Evenness: If cloudiness persists, apply another thin coat.
7. What Are Some Creative Ideas for Photo Decoupage on Wood?
Creative ideas for photo decoupage on wood include personalized home decor, custom gifts, seasonal decorations, and memory boards. These ideas offer unique ways to showcase your photos and add a personal touch to your space.
7.1. How Can You Create Personalized Home Decor Items?
You can create personalized home decor items by decoupaging photos onto wooden coasters, trays, wall art, and decorative boxes. This allows you to incorporate cherished memories into your everyday living space, making it more personal and inviting.
- Coasters: Decoupage family photos or vacation snapshots onto wooden coasters.
- Trays: Create a personalized serving tray with favorite images.
- Wall Art: Transfer large format photos onto wooden panels for unique wall decor.
- Decorative Boxes: Decoupage keepsake boxes with meaningful photos and mementos.
- Clocks: Add photos to a wooden clock face for a custom timepiece.
7.2. What Are Some Ideas for Custom Photo Gifts?
Ideas for custom photo gifts include decoupaged photo frames, personalized wooden plaques, and custom-designed jewelry boxes. These gifts add a personal and sentimental touch, making them perfect for special occasions.
- Photo Frames: Decoupage a wooden photo frame with themed embellishments.
- Wooden Plaques: Create a personalized plaque with a meaningful photo and quote.
- Jewelry Boxes: Decoupage a wooden jewelry box with photos and decorative elements.
- Keychains: Add small decoupaged photos to wooden keychains.
- Ornaments: Create personalized photo ornaments for holidays.
7.3. How Can You Make Seasonal Photo Decorations?
You can make seasonal photo decorations by decoupaging themed photos onto wooden cutouts, ornaments, and decorative signs. This adds a festive and personal touch to your holiday decor.
- Wooden Cutouts: Decoupage wooden shapes like pumpkins, snowflakes, or stars.
- Ornaments: Create personalized photo ornaments for Christmas or other holidays.
- Decorative Signs: Design seasonal signs with decoupaged photos and festive embellishments.
- Centerpieces: Incorporate decoupaged wooden elements into holiday centerpieces.
- Garlands: Create a photo garland with seasonal images and decorative accents.
8. What Are the Safety Precautions for Working With Mod Podge?
Safety precautions for working with Mod Podge include working in a well-ventilated area, wearing gloves to protect your skin, and keeping the product away from children and pets. Following these precautions ensures a safe and enjoyable crafting experience.
8.1. Is Mod Podge Toxic or Safe to Use at Home?
Mod Podge is considered non-toxic and safe to use at home because it is water-based and doesn’t contain harsh chemicals. However, it’s always best to work in a well-ventilated area and avoid ingestion.
8.2. How Do You Properly Ventilate Your Workspace?
You can properly ventilate your workspace by opening windows and doors, using a fan to circulate air, and ensuring fresh air is flowing through the room. Proper ventilation reduces the risk of inhaling fumes and ensures a comfortable working environment.
8.3. How Should You Store Mod Podge When Not in Use?
When not in use, Mod Podge should be stored in a cool, dry place, away from direct sunlight and extreme temperatures, with the lid tightly sealed to prevent it from drying out. Proper storage ensures the product remains usable for future projects.
9. How Can You Find Inspiration and New Ideas for Photo Decoupage?
You can find inspiration and new ideas for photo decoupage by exploring online resources like Pinterest, Instagram, and DIY blogs, as well as joining crafting communities and workshops. These resources provide a wealth of creative ideas and techniques to enhance your decoupage projects.
9.1. What Online Resources Offer Photo Decoupage Ideas?
Online resources that offer photo decoupage ideas are Pinterest, Instagram, Etsy, and DIY blogs, which showcase a wide range of projects, techniques, and creative inspiration. These platforms provide visual and step-by-step guides to help you get started.
- Pinterest: Offers a vast collection of visual ideas and inspiration for decoupage projects.
- Instagram: Features photos and videos of decoupage creations from artists and crafters.
- Etsy: Showcases unique, handmade decoupage items for sale, providing inspiration for your own projects.
- DIY Blogs: Provide tutorials, tips, and project ideas for photo decoupage.
- YouTube: Features video tutorials demonstrating various decoupage techniques.
9.2. How Can You Join Crafting Communities for Support and Ideas?
To join crafting communities for support and ideas, you can participate in online forums, join local craft groups, attend workshops, and follow crafting influencers on social media. These communities provide a platform to share ideas, ask questions, and receive feedback.
- Online Forums: Engage in discussions and share projects with fellow crafters.
- Local Craft Groups: Attend meetings and workshops to connect with local artisans.
- Crafting Workshops: Learn new techniques and gain hands-on experience.
- Social Media Groups: Join Facebook or other social media groups dedicated to crafting.
9.3. What Are Some Popular DIY Blogs Featuring Photo Decoupage Tutorials?
Some popular DIY blogs featuring photo decoupage tutorials are “Mod Podge Rocks,” “Pillar Box Blue,” and “The Graphics Fairy.” These blogs offer detailed instructions, tips, and creative ideas for decoupage projects.
- Mod Podge Rocks: A comprehensive resource for all things Mod Podge, with tutorials and project ideas.
- Pillar Box Blue: Features creative upcycling and decoupage projects.
- The Graphics Fairy: Offers vintage images and decoupage tutorials.
- резать & Paste: Showcases innovative decoupage projects and techniques.
- Thistlewood Farms: Features home decor and DIY projects, including decoupage tutorials.
Want to learn more project ideas? Sign up to get dfphoto.net favorite easy crafts and recipes straight to your inbox!
10. FAQ: Your Burning Questions About Photo Decoupage on Wood Answered
Here are some frequently asked questions about photo decoupage on wood:
10.1. Can I use regular glue instead of Mod Podge?
While you can use regular glue, Mod Podge is recommended because it acts as a glue, sealant, and finish, providing better protection and durability for your project. Regular glue may not offer the same level of protection or finish quality.
10.2. How do I clean a decoupaged photo on wood?
To clean a decoupaged photo on wood, gently wipe the surface with a damp, soft cloth. Avoid using harsh chemicals or abrasive cleaners, as they can damage the finish.
10.3. Can I decoupage on painted wood?
Yes, you can decoupage on painted wood. Ensure the paint is fully dry and smooth before applying Mod Podge and your photo. Lightly sand the painted surface for better adhesion.
10.4. What if my photo is too big for the wood?
If your photo is too big for the wood, trim it to the desired size before decoupaging. Ensure the photo fits the wood surface without overlapping the edges for a clean finish.
10.5. How do I prevent the edges of the photo from lifting?
To prevent the edges of the photo from lifting, apply Mod Podge generously to the edges and smooth them down firmly. Apply additional coats of Mod Podge over the edges to seal them securely.
10.6. Can I use Mod Podge on outdoor projects?
Yes, you can use Mod Podge on outdoor projects by selecting the Outdoor Mod Podge formula, which is designed to withstand weather and moisture. Apply several coats for added protection.
10.7. How long does a decoupaged photo last?
A decoupaged photo can last for many years if properly sealed and cared for. Protect it from direct sunlight, moisture, and extreme temperatures to ensure its longevity.
10.8. Can I decoupage fabric onto wood?
Yes, you can decoupage fabric onto wood using Mod Podge. Apply Mod Podge to both the wood surface and the fabric, smooth out any wrinkles, and seal with additional coats of Mod Podge.
10.9. How do I remove Mod Podge from wood?
To remove Mod Podge from wood, soften it with a damp cloth and gently scrape it off with a plastic scraper or putty knife. Be careful not to damage the wood surface.
10.10. What is the best sandpaper grit to use for sanding decoupaged wood?
The best sandpaper grit to use for sanding decoupaged wood is fine-grit sandpaper (220-grit or higher). This ensures a smooth finish without scratching the decoupaged surface.
Ready to transform your photos into stunning wood decor? Visit dfphoto.net today for more inspiration, tutorials, and all the supplies you need to get started! Address: 1600 St Michael’s Dr, Santa Fe, NM 87505, United States. Phone: +1 (505) 471-6001.

