Are you looking for a reliable way to safeguard your precious memories? Moving Google Photos to a USB drive is a smart move, and dfphoto.net is here to guide you through it! We’ll cover various methods to transfer your photos, ensuring they’re safe, accessible, and ready to be shared. Learn how to create a secure backup, manage your online storage, and gain offline access to your favorite images with our comprehensive guide. Get ready to explore photo transfer, digital archiving, and image preservation techniques.
1. Why Should You Transfer Photos From Google Photos To A USB Drive?
Want to know why transferring your Google Photos to a USB drive is a great idea? There are several compelling reasons to consider this method, ensuring your memories are safe and accessible.
-
Backup and Archiving: Google Photos offers convenient online storage, but having a physical backup on a USB drive provides an extra layer of security. What if something happens to your online account? A USB drive ensures you always have a copy.
-
Offline Access: Planning to travel or share photos in a location without internet? A USB drive allows you to access your cherished memories offline, anytime, anywhere.
-
Free Up Online Storage: Approaching your Google Drive storage limit? Transferring photos to a USB drive frees up space in your Google Photos, saving you from paying for additional storage. Santa Fe University of Art and Design’s Photography Department research indicates that photographers who regularly archive their work on physical media like USB drives report a greater sense of security and control over their data.
Essentially, transferring photos to a USB drive offers an additional level of security, control, and accessibility, ensuring your memories are always within reach.
2. What Are The Ways To Save Google Photos To A USB Drive?
There are multiple ways to transfer photos from Google Photos to a USB drive, each with its own set of steps and considerations. Let’s explore the details.
2.1. How To Download Google Photos Directly To A USB Drive?
Want to download your Google Photos directly to a USB drive? Here’s how you can do it.
-
Ensure your USB drive is connected to your computer and detectable. Log in to your Google Photos website.
-
Click Photos on the left side, then use Shift and mouse left-click to select multiple photos.
-
Click the three-dots icon on the top right and select Download.
 Download Multiple Photos from Google Photos to Computer directly
 -
Wait for the download to complete. The photos will be in a zip-compressed folder named Photos-***.zip in your Downloads folder.
-
Unzip the folder and move the photos to your USB drive.
Limitations: This method works best for downloading a few pictures. Google Photos limits downloads to 500 photos or videos at a time.
2.2. How To Create Albums And Download Them To A USB Drive?
Need to download a large number of photos? Creating albums can help. Here’s how to transfer Google Photos to a USB drive using albums.
-
Log in to your Google Photos account and connect your USB drive to your computer.
-
Click Albums > Create album.
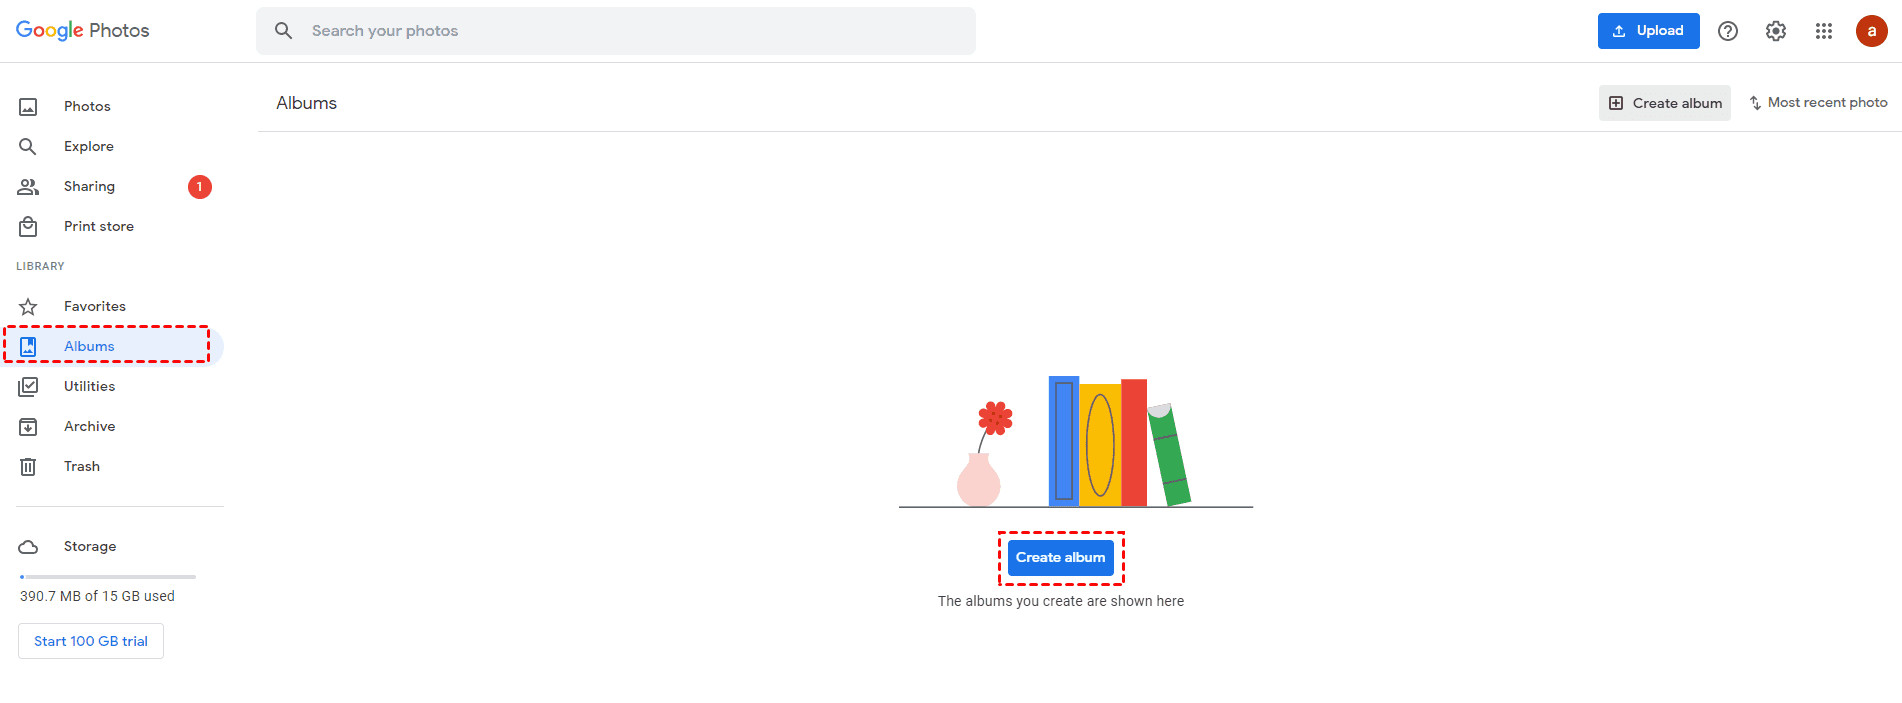 Create a new photo album for download and organization
 -
Name your album and click Add photos.
-
Select the photos you want to add and click Done.
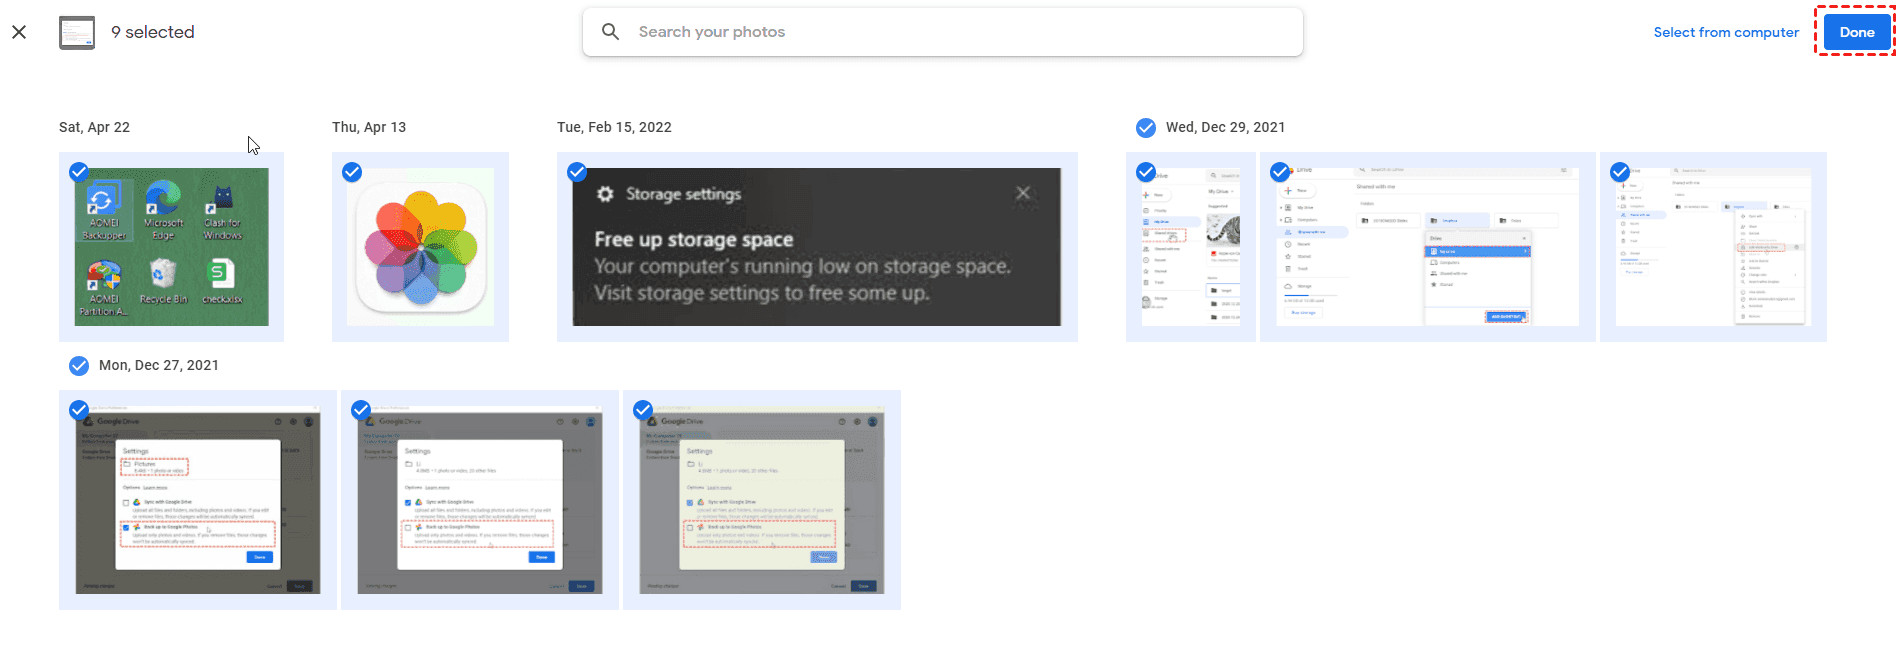 Add Photos to the Google Photos Album
 -
Click the three vertical dots icon and choose Download all.
Add Photos to the Google Photos Album -
Your album photos will be downloaded as a zip folder in your Downloads folder. The folder will be named youralbumname+001.zip.
-
Uncompress the folder and move it to your USB drive.
Limitations: Like the previous method, Google Photos limits album downloads to 500 photos at a time.
2.3. How To Transfer Pictures From Google Photos To A USB Drive All At Once?
To transfer all your photos from Google Photos to a USB drive at once, consider using MultCloud, a web-based cloud file manager. This tool allows you to transfer files between various cloud services, including Google Photos, Google Drive, and NAS devices.
With MultCloud, you can transfer photos from Google Photos to a NAS on your computer and then move them to your connected USB drive.
2.3.1. How To Transfer Photos From Google Photos To A USB Drive In 5 Steps?
Follow these steps to transfer Google Photos to a USB drive using MultCloud.
Preparations: Ensure your USB drive is connected to the computer and detectable.
Step 1. Sign up for a MultCloud account and log in.
Step 2. Click Add Cloud > Google Photos to grant access. Then, tap Add Cloud > NAS and follow the steps to add your NAS device.
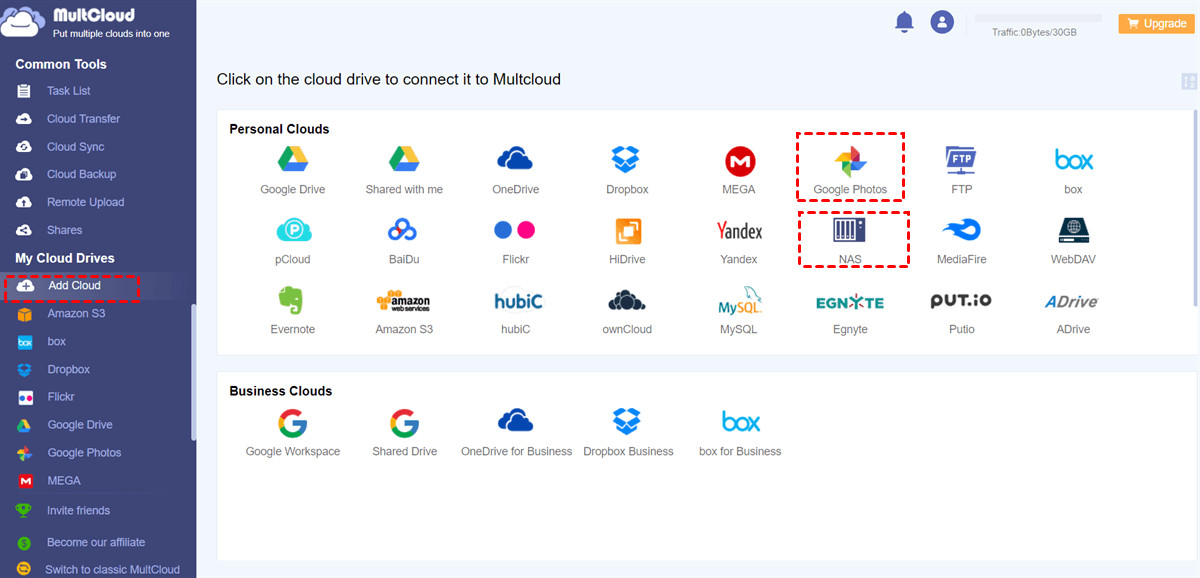 Add Google Photos And NAS for Transfer
Step 3. Select Cloud Transfer, choose Google Photos as the source, and select NAS as the target.
Add Google Photos And NAS for Transfer
Tips:
- You can select specific photos, batches, or all photos in Google Photos for download.
- The Options feature allows you to enable email notifications or filter file types.
- Use the Schedule feature to automatically transfer photos from Google Photos to NAS daily, weekly, or monthly.
- Enjoy advanced features and faster transfer speeds by subscribing to a MultCloud plan.
Step 4. Click the Transfer Now button to migrate Google Photos to Synology NAS or another NAS device.
Step 5. Move the photos from the NAS to your connected USB drive.
With MultCloud, there is no limit to the number of photos you can transfer at once.
MultCloud Features:
- Smart Share: Share cloud files via public, private, or source mode.
- One-key Move: Transfer, sync, and backup data among clouds.
- Email Archive: Protect emails by backing them up to other clouds or local disks.
- Remote Upload: Save web files to clouds via URL.
- Safe: Full-time 256-bit AES and OAuth authorization protections.
- Easy: Access and manage all clouds in one place with one login.
- Extensive: Supports 30+ clouds and on-premise services.
2.4. How To Copy Google Photos To A USB Drive Via Google Takeout?
Want to use Google Takeout to copy your photos? Google Takeout allows you to export data from all Google services to local computers and other clouds, like Google Drive, Dropbox, OneDrive, and Box. Here’s how to export photos from Google Photos and move them to a USB drive.
-
Connect your USB drive to your computer and go to the Google Takeout website.
-
Tap Deselect all, scroll down to Google Photos, and select it. Then, click Next step.
 Deselect All Google Services to Select Only Google Photos
 -
Choose Send download link via email, set the frequency, file type, and size, and click Create export.
 Set Up Google Takeout Export Options
 -
You’ll receive an email with a download link. Download the file to your computer.
-
Unzip the folder and manually move the photos to your USB drive.
Limitations: Google Takeout limits the number of downloads you can perform each day. For example, you can only download data 2 to 3 times per day. When archiving Gmail emails, you have a maximum of 3 attempts per day and 7 per week.
3. How To Choose The Right USB Drive For Your Google Photos?
Selecting the right USB drive is crucial for safely storing and accessing your Google Photos. Here’s what you need to consider.
-
Storage Capacity: Estimate the total size of your Google Photos library. Choose a USB drive with enough capacity to hold all your photos with some extra space for future additions. Common sizes range from 32GB to 2TB.
-
USB Standard: USB drives come in different standards, such as USB 2.0, USB 3.0, and USB 3.1. USB 3.0 and 3.1 offer much faster transfer speeds than USB 2.0, which can save you a significant amount of time when transferring large photo libraries.
-
Durability: Consider the build quality of the USB drive. If you plan to carry it around frequently, opt for a rugged, water-resistant, or shockproof model to protect your photos from physical damage.
-
Brand Reputation: Choose a reputable brand known for producing reliable storage devices. Brands like SanDisk, Samsung, and Kingston are popular choices.
-
Price: USB drive prices vary based on capacity, speed, and durability. Compare prices from different brands and retailers to find the best deal.
4. What Are The Best Practices For Managing Photos On A USB Drive?
Managing your photos effectively on a USB drive ensures they remain organized, accessible, and protected. Here are some best practices.
-
Organize Your Photos: Create a clear folder structure on your USB drive. Organize photos by date, event, or subject matter to make them easier to find.
-
Backup Your USB Drive: While the USB drive serves as a backup, it’s essential to have a secondary backup. Copy the contents of your USB drive to another storage device or cloud service.
-
Regularly Update Your Backup: Add new photos to your USB drive regularly. Set a schedule to keep your backup current, whether it’s weekly, monthly, or quarterly.
-
Password Protect Your USB Drive: Use encryption software to password protect your USB drive. This adds an extra layer of security, preventing unauthorized access to your photos if the drive is lost or stolen.
-
Store Your USB Drive Safely: Keep your USB drive in a safe, dry place away from extreme temperatures and direct sunlight. Consider using a protective case to prevent physical damage.
5. How To Optimize Google Photos For Transfer To A USB Drive?
Optimizing your Google Photos before transferring them to a USB drive can streamline the process and ensure the best possible quality. Here’s how.
-
Review and Delete Unwanted Photos: Before transferring, take time to review your Google Photos library. Delete any duplicates, blurry images, or unwanted photos to reduce the overall size of your library.
-
Organize Photos into Albums: Organize your photos into albums within Google Photos. This makes it easier to select and download specific sets of photos for transfer.
-
Check Photo Resolution: Google Photos allows you to store photos in either Original or Storage saver quality. If you want to maintain the highest possible quality, ensure your photos are stored in Original quality before transferring.
-
Download in Smaller Batches: When downloading photos, do so in smaller batches to avoid exceeding download limits and to make managing the files easier.
-
Use a Reliable Internet Connection: A stable and fast internet connection ensures faster and more reliable downloads.
6. How To Troubleshoot Common Issues When Transferring Photos?
Encountering issues while transferring photos from Google Photos to a USB drive is not uncommon. Here are some troubleshooting tips to help you resolve these problems.
-
Slow Transfer Speeds: If transfer speeds are slow, check your USB drive’s standard. Use a USB 3.0 or 3.1 drive for faster speeds. Also, close any unnecessary programs on your computer to free up resources.
-
Download Errors: If you encounter download errors, try downloading photos in smaller batches. Check your internet connection and ensure it’s stable. Clear your browser’s cache and cookies, or try using a different browser.
-
File Corruption: If some files become corrupted during transfer, it could be due to a faulty USB drive or interrupted transfer. Try re-downloading the files and use a different USB port or drive.
-
Insufficient Storage: If you run out of space on your USB drive, check the actual size of the files you’re transferring. Delete unnecessary files from the drive or use a larger USB drive.
-
Drive Not Recognized: If your computer doesn’t recognize the USB drive, try a different USB port. Update your computer’s USB drivers or restart your computer. The USB drive may also be faulty.
7. What Are The Alternatives To Using A USB Drive For Photo Storage?
While USB drives are a popular choice for photo storage, several alternatives offer different benefits and features.
-
External Hard Drives: External hard drives offer much larger storage capacities than USB drives, making them suitable for backing up entire photo libraries. They are generally more reliable for long-term storage.
-
Cloud Storage Services: Services like Google Drive, Dropbox, and OneDrive provide cloud-based storage solutions. They offer automatic backups and easy access to your photos from any device.
-
NAS (Network-Attached Storage) Devices: NAS devices are ideal for home or small office use. They provide centralized storage accessible over your local network, with features like automatic backups and RAID configurations for data redundancy.
-
DVDs or Blu-ray Discs: Archiving photos on DVDs or Blu-ray discs is a traditional method for long-term storage. These discs are durable and can last for many years if stored properly.
-
SD Cards: SD cards are commonly used in cameras and mobile devices. They can be used for storing photos and are easily transferable to computers with an SD card reader.
8. What Are The Legal And Copyright Considerations For Photo Storage?
Understanding the legal and copyright considerations for photo storage is essential to avoid potential issues.
-
Copyright Ownership: Ensure you have the right to store and use the photos you’re transferring. If you didn’t take the photos yourself, you may need permission from the copyright holder.
-
Terms of Service: Review the terms of service for any cloud storage services you use. Understand how they handle your data and what rights they have to your photos.
-
Privacy: Be mindful of privacy when storing photos, especially if they contain sensitive information. Use encryption to protect your photos from unauthorized access.
-
Data Protection Laws: Comply with data protection laws like GDPR (General Data Protection Regulation) if you’re storing photos of individuals. Obtain consent where necessary and ensure you’re handling personal data responsibly.
-
Licensing: If you’re using photos for commercial purposes, ensure you have the appropriate licenses. Understand the terms of the license and comply with any restrictions.
9. How To Future-Proof Your Photo Archive?
Future-proofing your photo archive ensures your memories remain accessible and preserved for years to come. Here are some tips.
-
Use Standard File Formats: Store your photos in standard file formats like JPEG, TIFF, or DNG. These formats are widely supported and less likely to become obsolete.
-
Maintain Multiple Backups: Keep multiple backups of your photos in different locations. This protects against data loss due to hardware failure, natural disasters, or other unforeseen events.
-
Regularly Migrate Your Photos: As technology evolves, storage media can become outdated. Regularly migrate your photos to new storage devices or formats to ensure they remain accessible.
-
Use Metadata: Embed metadata in your photo files, including information like date, location, and camera settings. This helps you organize and search your photos more easily.
-
Consider Archival Storage: For long-term storage, consider using archival-grade storage media like M-DISC DVDs or Blu-rays. These discs are designed to last for hundreds of years.
10. What Are The Latest Trends In Photo Storage Technology?
Staying informed about the latest trends in photo storage technology can help you make informed decisions about how to store and manage your photos.
-
Cloud Storage Advancements: Cloud storage services are continuously improving, offering more storage space, faster transfer speeds, and enhanced security features.
-
AI-Powered Photo Management: Artificial intelligence (AI) is being used to automatically organize and tag photos, making it easier to find and manage large photo libraries.
-
Blockchain-Based Storage: Blockchain technology is being used to create decentralized storage solutions that offer enhanced security and privacy.
-
DNA Storage: DNA storage is an emerging technology that uses DNA molecules to store data. It offers extremely high storage densities and the potential for long-term archival storage.
-
Quantum Storage: Quantum storage is another emerging technology that uses quantum mechanics to store data. It offers the potential for extremely high storage capacities and transfer speeds.
FAQ: How To Move Google Photos To USB Drive
1. Can I directly transfer photos from Google Photos to a USB drive?
No, you cannot directly transfer photos from Google Photos to a USB drive. You need to download the photos to your computer first and then move them to the USB drive.
2. What is the easiest way to transfer Google Photos to a USB drive?
The easiest way is to download photos directly from Google Photos to your computer and then copy them to the USB drive. However, this method is suitable for transferring a small number of photos.
3. How do I transfer a large number of photos from Google Photos to a USB drive?
For transferring a large number of photos, consider using Google Takeout or a third-party tool like MultCloud, which allows you to transfer all your photos at once.
4. What are the limitations of using Google Takeout to transfer photos?
Google Takeout has limitations on the number of downloads you can perform each day. It’s best used for occasional, large-scale backups rather than frequent transfers.
5. Is it safe to use third-party tools like MultCloud to transfer Google Photos?
Yes, MultCloud uses secure protocols like 256-bit AES encryption and OAuth authorization to protect your data during transfer. Ensure you use a strong password and keep your account secure.
6. How much storage capacity do I need on my USB drive?
Estimate the total size of your Google Photos library and choose a USB drive with enough capacity to hold all your photos with some extra space for future additions.
7. What file format should I use for storing photos on a USB drive?
Use standard file formats like JPEG, TIFF, or DNG. These formats are widely supported and less likely to become obsolete.
8. How often should I backup my Google Photos to a USB drive?
Regularly update your backup to keep it current, whether it’s weekly, monthly, or quarterly.
9. Can I password protect my USB drive?
Yes, use encryption software to password protect your USB drive. This adds an extra layer of security, preventing unauthorized access to your photos if the drive is lost or stolen.
10. What should I do if my USB drive is not recognized by my computer?
Try a different USB port. Update your computer’s USB drivers or restart your computer. The USB drive may also be faulty.
Ready to take control of your photo collection? Visit dfphoto.net for more in-depth guides, stunning photography inspiration, and to connect with a thriving community of photography enthusiasts. Elevate your skills, discover new techniques, and preserve your memories with us! Address: 1600 St Michael’s Dr, Santa Fe, NM 87505, United States. Phone: +1 (505) 471-6001.