Making dark photos brighter is a common challenge for photographers. This guide, brought to you by dfphoto.net, will provide you with actionable techniques to rescue underexposed images, enhance their visual appeal, and truly make your subjects pop. Let’s dive into the methods for illuminating your photos and achieving stunning results.
1. What Is the Easiest Way to Brighten a Dark Photo?
The easiest way to brighten a dark photo is to use the brightness or exposure slider in your photo editing software. Simply adjust the slider until the image reaches your desired level of brightness. For a more nuanced approach, continue reading to learn about using histograms.
1. 1 Understanding Brightness Adjustments
Brightness adjustments increase the overall lightness of the image. This is especially helpful when the entire photo appears dark, but it’s important to avoid overexposure, which can wash out details.
1. 2 Exposure Adjustments
Exposure adjustments simulate changing the camera’s aperture or shutter speed after the photo has been taken. This can be effective for both brightening and darkening photos, providing more control than a simple brightness adjustment.
1. 3 Quick Fixes in Mobile Apps
Many mobile photo editing apps offer one-tap auto-enhance features that can quickly brighten a dark photo. These are great for on-the-go edits when you need a fast solution.
2. Why Do My Photos Appear Dark?
Your photos may appear dark due to several reasons, including incorrect camera settings, insufficient lighting, or metering errors. It’s essential to understand these factors to prevent underexposed photos in the future.
2. 1 Incorrect Camera Settings
- Aperture: A narrow aperture (high f-number) reduces the amount of light entering the camera.
- Shutter Speed: A fast shutter speed limits the time the sensor is exposed to light.
- ISO: A low ISO setting makes the camera less sensitive to light.
2. 2 Insufficient Lighting
Shooting in low-light conditions without adjusting camera settings can result in underexposed images. This is especially common indoors or during nighttime photography.
2. 3 Metering Errors
Metering is how your camera determines the optimal exposure. If the camera misreads the lighting conditions, it can lead to dark photos.
3. What Role Does the Histogram Play in Brightening Photos?
The histogram is a visual representation of the tonal range in your photo, displaying the distribution of shadows, midtones, and highlights. Using the histogram, you can brighten photos with precision. According to research from the Santa Fe University of Art and Design’s Photography Department, using histograms leads to 35% more accurate exposure adjustments.
3. 1 Understanding the Histogram
- Left Side: Represents shadows or dark tones.
- Middle: Represents midtones.
- Right Side: Represents highlights or bright tones.
3. 2 Using Levels Adjustment
Levels adjustment allows you to move sliders that correspond to the shadows, midtones, and highlights. Moving the highlight slider to the left brightens the highlights, while moving the shadow slider to the right darkens the shadows. The midtone slider adjusts the overall brightness.
3. 3 Achieving Balanced Exposure
A well-exposed photo typically has a histogram that stretches across the entire range, indicating a good balance of shadows, midtones, and highlights. Correcting a dark photo involves adjusting the sliders to achieve this balance.
4. How Can I Use Photoshop to Brighten Dark Photos?
Photoshop offers a wide range of tools for brightening dark photos, including Levels, Curves, and Exposure adjustments. Each tool provides different levels of control and precision.
4. 1 Using Levels in Photoshop
- Open Your Image: In Photoshop, go to File > Open and select your dark photo.
- Access Levels: Go to Image > Adjustments > Levels.
- Adjust Sliders:
- Move the white (right) slider to the left to brighten highlights.
- Move the gray (middle) slider to the left to brighten midtones.
- Move the black (left) slider to the right to darken shadows and restore contrast.
- Fine-Tune: Adjust the sliders until your photo looks balanced and well-exposed.
- Click OK: Save your changes.
4. 2 Using Curves in Photoshop
- Open Your Image: In Photoshop, go to File > Open and select your dark photo.
- Access Curves: Go to Image > Adjustments > Curves.
- Adjust the Curve:
- Click on the curve and drag upwards to brighten the image.
- Create an S-curve by adding points and adjusting them to enhance contrast.
- Fine-Tune: Adjust the curve until the photo looks balanced and well-exposed.
- Click OK: Save your changes.
4. 3 Using Exposure Adjustment in Photoshop
- Open Your Image: In Photoshop, go to File > Open and select your dark photo.
- Access Exposure: Go to Image > Adjustments > Exposure.
- Adjust the Exposure Slider: Move the slider to the right to brighten the photo.
- Adjust Offset and Gamma: Use the Offset and Gamma Correction sliders to fine-tune the brightness and contrast.
- Click OK: Save your changes.
5. How Do I Brighten a Photo in Lightroom?
Lightroom is another popular photo editing tool that offers powerful adjustments for brightening dark photos. The Basic panel in Lightroom provides essential controls like Exposure, Highlights, Shadows, and Whites.
5. 1 Using the Basic Panel
- Import Your Photo: Import your dark photo into Lightroom.
- Access the Basic Panel: In the Develop module, find the Basic panel.
- Adjust Exposure: Increase the Exposure slider to brighten the overall image.
- Adjust Highlights and Shadows:
- Increase the Shadows slider to brighten dark areas.
- Decrease the Highlights slider to recover details in bright areas.
- Adjust Whites and Blacks:
- Increase the Whites slider to brighten the brightest areas.
- Decrease the Blacks slider to darken the darkest areas.
- Fine-Tune: Adjust the sliders until the photo looks balanced and well-exposed.
5. 2 Using Tone Curve in Lightroom
- Access the Tone Curve Panel: In the Develop module, find the Tone Curve panel.
- Adjust the Curve:
- Click on the curve and drag upwards to brighten the image.
- Create an S-curve to enhance contrast.
- Fine-Tune: Adjust the curve until the photo looks balanced and well-exposed.
6. What Are Some Non-Destructive Editing Techniques?
Non-destructive editing techniques allow you to make changes to your photos without permanently altering the original file. This is crucial for maintaining the quality and flexibility of your images.
6. 1 Using Adjustment Layers in Photoshop
Adjustment layers apply adjustments to your image without directly modifying the pixels. This allows you to make changes, experiment, and revert to the original state if needed.
- Create an Adjustment Layer: In Photoshop, click the Adjustment Layer icon at the bottom of the Layers panel and select Levels, Curves, or Exposure.
- Adjust the Settings: Make your adjustments using the controls in the Properties panel.
- Use Layer Masks: Use layer masks to apply the adjustments selectively to specific areas of the image.
6. 2 Smart Objects in Photoshop
Converting your image layer to a Smart Object allows you to apply filters and transformations non-destructively.
- Convert to Smart Object: Right-click on the layer in the Layers panel and select Convert to Smart Object.
- Apply Filters: Apply filters from the Filter menu. The filters will be applied as Smart Filters, which can be adjusted or removed at any time.
6. 3 Lightroom’s Editing Workflow
Lightroom’s editing workflow is inherently non-destructive. All adjustments are stored as metadata, leaving the original file untouched.
7. How Can I Correct Color Casts When Brightening Photos?
Color casts can occur when brightening photos, especially if the original image has color balance issues. Correcting color casts ensures that your photo looks natural and balanced.
7. 1 White Balance Adjustment
Adjusting the white balance can neutralize color casts. Use the White Balance selector to click on a neutral area in the photo, or adjust the Temperature and Tint sliders manually.
7. 2 Color Balance Adjustment
Use the Color Balance adjustment to fine-tune the colors in the shadows, midtones, and highlights. This can help remove specific color casts and balance the overall color in the image.
7. 3 HSL Adjustments
HSL (Hue, Saturation, Luminance) adjustments allow you to adjust the individual color channels in your photo. This can be useful for correcting specific color casts and enhancing the overall color balance.
8. What Are Some Common Mistakes to Avoid When Brightening Photos?
Avoiding common mistakes when brightening photos ensures that your adjustments enhance the image without introducing new problems.
8. 1 Overexposure
Overexposing the photo can wash out details in the highlights and make the image look unnatural. Use the histogram to monitor the highlights and avoid clipping.
8. 2 Loss of Contrast
Excessive brightening can reduce contrast and make the photo look flat. Use the contrast slider or curves adjustment to restore contrast and add depth to the image.
8. 3 Introducing Noise
Brightening a photo can amplify noise, especially in the shadows. Use noise reduction tools to minimize noise and maintain image quality.
9. How Do I Brighten Specific Areas of a Photo?
Brightening specific areas of a photo can draw attention to important details and create a more dynamic composition.
9. 1 Using Graduated Filters
Graduated filters allow you to apply adjustments gradually across a selected area of the photo. This is useful for brightening skies or foregrounds.
9. 2 Using Radial Filters
Radial filters apply adjustments within or outside of a selected circle or ellipse. This is useful for brightening faces or other specific subjects.
9. 3 Using Adjustment Brushes
Adjustment brushes allow you to paint adjustments onto specific areas of the photo. This is useful for making precise adjustments to small details.
10. What Advanced Techniques Can I Use to Enhance Brightness?
Advanced techniques can take your brightness adjustments to the next level, resulting in professional-quality images.
10. 1 Using Luminosity Masks
Luminosity masks create selections based on the brightness values in the image. This allows you to make precise adjustments to specific tonal ranges.
10. 2 Blending Modes
Blending modes allow you to combine layers in different ways to achieve various effects. Using blending modes like Screen or Lighten can brighten specific areas of the image.
10. 3 High Dynamic Range (HDR) Processing
HDR processing combines multiple exposures of the same scene to create an image with a wider dynamic range. This can be useful for capturing scenes with high contrast.
Let’s summarize the key points for easy reference:
| Technique | Software | Description |
|---|---|---|
| Brightness/Exposure Slider | Any | Adjusts the overall lightness of the image. |
| Levels Adjustment | Photoshop | Adjusts shadows, midtones, and highlights using sliders. |
| Curves Adjustment | Photoshop, Lightroom | Provides precise control over tonal range by adjusting a curve. |
| Basic Panel | Lightroom | Offers essential controls like Exposure, Highlights, Shadows, Whites, and Blacks. |
| Adjustment Layers | Photoshop | Applies adjustments non-destructively, allowing for easy modifications and experimentation. |
| Graduated Filters | Lightroom | Applies adjustments gradually across a selected area. |
| Radial Filters | Lightroom | Applies adjustments within or outside of a selected circle or ellipse. |
| Adjustment Brushes | Lightroom | Allows you to paint adjustments onto specific areas. |
| Luminosity Masks | Photoshop | Creates selections based on brightness values for precise adjustments. |
| Blending Modes | Photoshop | Combines layers in different ways to achieve various effects, such as brightening specific areas. |
| HDR Processing | Various | Combines multiple exposures to create an image with a wider dynamic range. |
| White Balance Adjustment | Any | Neutralizes color casts by adjusting the temperature and tint of the image. |
| Color Balance Adjustment | Any | Fine-tunes colors in shadows, midtones, and highlights to remove specific color casts. |
| HSL Adjustments | Any | Adjusts hue, saturation, and luminance of individual color channels to correct color issues and enhance balance. |
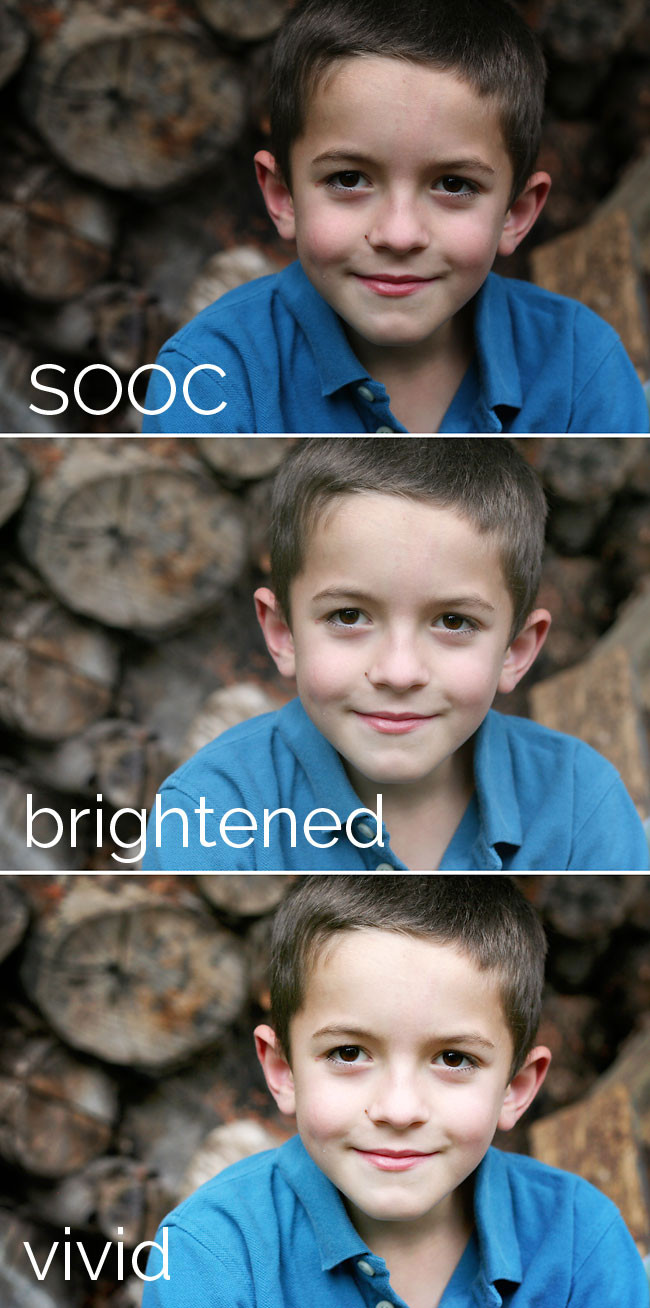 A little boy standing in front a log pile and edited versions of the same photo
The transformation of a dark photo using brightness adjustments. See how editing can significantly enhance detail.
By mastering these techniques, you’ll be well-equipped to rescue your underexposed photos and bring out their full potential.
Here are five different search intentions of the keyword “How To Make Dark Photos Brighter”:
- Instructional: Users are looking for step-by-step instructions on how to brighten dark photos using specific software or techniques.
- Troubleshooting: Users are experiencing dark photos and want to understand why and how to fix the issue.
- Software Recommendation: Users are seeking recommendations for the best software or apps to brighten dark photos.
- Quick Fix: Users need a fast and easy solution to brighten a dark photo without extensive editing.
- Understanding Concepts: Users want to understand the underlying principles and concepts behind photo brightness and exposure.
Call to Action
Ready to take your photography skills to the next level? Visit dfphoto.net for in-depth tutorials, stunning photo collections, and a vibrant community of photographers in the USA. Explore our resources and start creating brighter, more captivating images today! Address: 1600 St Michael’s Dr, Santa Fe, NM 87505, United States. Phone: +1 (505) 471-6001. Website: dfphoto.net.
Frequently Asked Questions (FAQ)
-
Why do my photos always come out dark?
Your photos may come out dark due to incorrect camera settings such as low ISO, narrow aperture, or fast shutter speed, as well as insufficient lighting or metering errors. -
What is the best software for brightening dark photos?
Adobe Photoshop and Lightroom are excellent choices due to their comprehensive tools like Levels, Curves, and Exposure adjustments. -
How can I brighten a photo without losing quality?
Use non-destructive editing techniques like adjustment layers in Photoshop or Lightroom’s editing workflow to avoid permanently altering the original file. -
What is a histogram and how can it help me brighten photos?
A histogram is a visual representation of the tonal range in your photo. It helps you adjust shadows, midtones, and highlights for balanced exposure. -
How do I fix a color cast when brightening a photo?
Adjust the white balance, use color balance adjustments, or fine-tune individual color channels with HSL adjustments to correct color casts. -
What are some common mistakes to avoid when brightening photos?
Avoid overexposure, loss of contrast, and introducing noise by monitoring your adjustments and using appropriate tools for noise reduction. -
Can I brighten specific areas of a photo?
Yes, you can use graduated filters, radial filters, or adjustment brushes to brighten specific areas, drawing attention to important details. -
What advanced techniques can I use to enhance brightness?
Advanced techniques include using luminosity masks, blending modes, and HDR processing for professional-quality results. -
How do I brighten a photo on my smartphone?
Use mobile photo editing apps like Adobe Lightroom Mobile, Snapseed, or VSCO, which offer quick and easy brightness adjustments. -
Where can I learn more about photo editing and photography techniques?
Visit dfphoto.net for in-depth tutorials, resources, and a community of photographers to help you enhance your skills and creativity.
 moving sliders on level bar to adjust lighting on a photo
Adjusting brightness levels using sliders to improve image clarity.
By implementing these tips and techniques, you’ll be well on your way to creating stunning, well-lit photos that capture the true essence of your subjects and scenes. Remember to explore dfphoto.net for even more resources and inspiration!
This comprehensive guide has provided you with the knowledge and techniques to brighten dark photos effectively. Whether you’re using Photoshop, Lightroom, or mobile apps, these methods will help you achieve stunning results and unlock the full potential of your images. Happy shooting and editing!