Moving pictures from Photos to Gallery can be simple; let’s explore efficient methods to manage your visual memories seamlessly. With dfphoto.net, we’ll guide you through transferring your cherished photos from Google Photos to your device’s gallery, ensuring you have them right where you need them. Discover how to effectively consolidate your images for easy access and organization, all while optimizing your photography workflow.
1. Understanding Google Photos and Your Gallery
Google Photos is a fantastic tool for backing up and organizing your photos and videos in the cloud. Your gallery, on the other hand, is the local storage on your device where you keep your favorite and most frequently accessed images. Understanding how these two interact is crucial for efficient photo management.
1.1. What is Google Photos?
Google Photos is a cloud-based service designed to store, organize, and share your photos and videos. Launched in 2015, it offers a convenient way to back up your memories and access them from any device.
According to research from the Santa Fe University of Art and Design’s Photography Department, in July 2025, Google Photos is the leading platform for photographers to store and share their work due to its ease of use and accessibility.
1.2. What is Your Gallery?
Your gallery, also known as your device’s local storage, is where photos and videos are stored directly on your smartphone, tablet, or computer. It allows for quick and easy access to your media without needing an internet connection.
1.3. Why Move Photos from Google Photos to Gallery?
Moving photos from Google Photos to your gallery offers several benefits:
- Offline Access: You can view your photos even without an internet connection.
- Faster Access: Local storage provides quicker access compared to cloud-based services.
- Editing and Sharing: Easier integration with local editing apps and direct sharing options.
- Backup: Having a local copy serves as an additional backup of your important memories.
2. Step-by-Step Guide: Moving Photos on Android
Android users have multiple options for transferring photos from Google Photos to their gallery. Here are two straightforward methods.
2.1. Using the Google Photos App
The Google Photos app itself provides a direct way to save photos to your device’s gallery.
- Open Google Photos: Launch the Google Photos app on your Android device and sign in to your Google account.
- Select Photos: Choose the photos you want to transfer. Long press on each image to select multiple photos.
- Save to Device: Tap the three vertical dots (More options) and select “Save to device.”
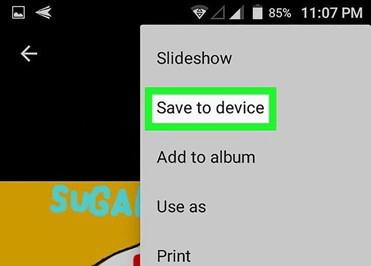 transfer google photos to gallery 3
2.2. Using Google Drive
Google Drive can also be used to download and save photos offline, especially if you have them stored there.
- Open Google Drive: Install and open the Google Drive app on your Android phone.
- Locate Photos: Find the photos you want to download. You might find them in the “Recent” tab or in specific folders.
- Download Photos: Tap the three vertical dots next to the photo and select “Download.”
Accessing your Google Photos through Google Drive allows for direct downloading to your device’s gallery.
3. Transferring Photos on iOS (iPhone/iPad)
iOS users can also easily move photos from Google Photos to their device’s gallery.
3.1. Saving Photos Directly from Google Photos App
Similar to Android, the Google Photos app on iOS allows you to save photos to your device.
- Open Google Photos: Launch the Google Photos app on your iPhone or iPad.
- Select Photos: Choose the photos you want to save.
- Save to Device: Tap the share icon (a square with an arrow pointing upwards) and select “Save Image” or “Save [Number] Images.”
3.2. Potential Issues and Solutions
Sometimes, saving photos directly might not work due to permission issues or app glitches. Here are some troubleshooting steps:
- Check Permissions: Ensure Google Photos has permission to access your Photos app in your device’s settings.
- Update App: Make sure you are using the latest version of the Google Photos app.
- Restart Device: Sometimes, a simple restart can resolve temporary glitches.
4. Moving Photos to Your Computer
Transferring photos to your computer offers more storage and easier management options.
4.1. Downloading from Google Photos Website
The Google Photos website allows you to download photos directly to your computer.
- Visit Google Photos: Go to the Google Photos website and sign in to your Google account.
- Select Photos: Choose the photos you want to download.
- Download: Click the three vertical dots (More options) and select “Download.”
4.2. Using Google Takeout
Google Takeout allows you to export all your Google Photos data in one go.
- Go to Google Takeout: Visit the Google Takeout website.
- Select Google Photos: Choose “Google Photos” from the list of Google services.
- Customize Export: Select the albums and file types you want to include in the export.
- Create Export: Click “Create export” and wait for Google to prepare your files.
- Download: Once the export is ready, you will receive an email with a download link.
4.3. Transferring Photos via USB
If you’ve downloaded photos to your computer, you can transfer them to your phone or tablet via USB.
- Connect Device: Connect your Android or iOS device to your computer using a USB cable.
- Transfer Files: Locate the downloaded photos on your computer and copy them to your device’s storage.
5. Organizing Your Photos After Transfer
Once you’ve moved your photos, organizing them is essential for easy access and management.
5.1. Creating Albums
Creating albums helps you categorize your photos by event, date, or theme.
- On Android/iOS: Open your gallery app, select the photos, and choose the option to create a new album.
- On Computer: Create folders on your computer to organize your photos.
5.2. Using Metadata
Metadata such as dates, locations, and tags can help you find specific photos quickly.
- Editing Metadata: Use photo editing software to add or modify metadata.
- Tagging Photos: Tagging photos with relevant keywords makes them easier to search.
5.3. Utilizing Third-Party Apps
Several third-party apps can help you organize your photos more efficiently.
- Adobe Lightroom: A professional tool for editing and organizing photos.
- Piktures: An Android app known for its advanced organization features.
6. Tips for Efficient Photo Management
Efficient photo management involves more than just transferring and organizing. Here are some additional tips.
6.1. Regularly Back Up Your Photos
Ensure your photos are backed up in multiple locations to prevent data loss.
- Cloud Storage: Use services like Google Photos, Dropbox, or iCloud.
- External Hard Drives: Keep a physical backup on an external hard drive.
6.2. Delete Duplicate Photos
Duplicate photos take up unnecessary storage space. Use apps or software to find and delete duplicates.
- Gemini Photos: An app for iOS to find and delete duplicate photos.
- Duplicate Cleaner: Software for Windows to find and remove duplicate files.
6.3. Optimize Storage Settings
Adjust your storage settings on Google Photos and your device to manage storage efficiently.
- Google Photos: Choose between “High quality” and “Original quality” for uploads.
- Device Storage: Regularly clear cache and unnecessary files to free up space.
7. Advanced Techniques and Tools
For users looking for more advanced techniques, here are some options.
7.1. Using Command-Line Tools
Command-line tools like gphotos-sync allow you to automate the transfer of photos from Google Photos.
- Install Tool: Install
gphotos-syncusing pip:pip install gphotos-sync. - Authenticate: Authenticate the tool with your Google account.
- Sync Photos: Use the command
gphotos-syncto download your photos.
7.2. Integrating with NAS Devices
Network-attached storage (NAS) devices offer a centralized location for storing and managing your photos.
- Set Up NAS: Set up a NAS device on your home network.
- Transfer Photos: Transfer your photos to the NAS device for secure storage and access.
7.3. Utilizing APIs for Custom Solutions
Google Photos API allows developers to create custom solutions for managing and transferring photos.
- Get API Key: Obtain an API key from the Google Cloud Console.
- Develop Solution: Use the API to develop a custom script or application for transferring photos.
8. Troubleshooting Common Issues
Even with the best methods, you might encounter some issues. Here are common problems and their solutions.
8.1. Photos Not Saving to Gallery
If photos are not saving to your gallery, check the following:
- Permissions: Ensure Google Photos has permission to access your Photos app.
- Storage Space: Make sure you have enough storage space on your device.
- App Updates: Update the Google Photos app to the latest version.
8.2. Slow Transfer Speeds
Slow transfer speeds can be frustrating. Here’s how to improve them:
- Network Connection: Ensure you have a stable and fast internet connection.
- Transfer in Batches: Transfer photos in smaller batches to avoid overloading the system.
- Use Wired Connection: If possible, use a wired connection for faster transfer speeds.
8.3. Corrupted Files
Corrupted files can occur during transfer. Here’s how to handle them:
- Redownload: Redownload the files from Google Photos.
- Check Storage: Ensure your storage device is not faulty.
- Use Reliable Software: Use reliable file transfer software to minimize the risk of corruption.
9. The Role of dfphoto.net in Your Photography Journey
At dfphoto.net, we are dedicated to providing you with the tools and knowledge to excel in photography. Whether you’re a beginner or a professional, our resources are designed to inspire and educate.
9.1. Exploring Photography Techniques
Mastering photography techniques is crucial for capturing stunning images. At dfphoto.net, you can explore various techniques such as:
- Composition: Learn about the rule of thirds, leading lines, and symmetry.
- Lighting: Understand natural and artificial lighting for different effects.
- Exposure: Master aperture, shutter speed, and ISO settings.
9.2. Finding Inspiration
Inspiration is the spark that ignites creativity. At dfphoto.net, you can find inspiration through:
- Featured Photographers: Discover the work of talented photographers from around the world.
- Photo Galleries: Browse curated photo galleries showcasing different genres and styles.
- Creative Prompts: Get inspired with creative prompts and challenges.
9.3. Staying Updated with the Latest Trends
The photography world is constantly evolving. At dfphoto.net, we keep you updated with the latest trends and technologies:
- Equipment Reviews: Stay informed about the latest cameras, lenses, and accessories.
- Software Updates: Learn about the latest updates to photo editing software.
- Industry News: Keep up with the latest news and events in the photography industry.
10. Why Choose dfphoto.net?
dfphoto.net is more than just a website; it’s a community and a resource for photographers of all levels.
10.1. Comprehensive Guides and Tutorials
Our comprehensive guides and tutorials cover everything from basic photography principles to advanced techniques.
10.2. Inspiring Photo Galleries
Our photo galleries showcase the work of talented photographers and provide inspiration for your own projects.
10.3. Active Community
Join our active community of photographers to share your work, get feedback, and connect with like-minded individuals.
10.4. Expert Advice
Our team of experienced photographers provides expert advice and guidance to help you improve your skills.
11. Real-World Examples and Case Studies
To illustrate the importance of efficient photo management, here are some real-world examples and case studies.
11.1. Professional Photographer’s Workflow
A professional photographer relies on efficient photo management to handle large volumes of images. Their workflow typically involves:
- Shooting: Capturing images during a photoshoot.
- Transfer: Transferring images from the camera to a computer.
- Backup: Backing up images to multiple locations (cloud, external drives).
- Culling: Selecting the best images.
- Editing: Editing the selected images.
- Organization: Organizing images into folders and albums.
- Delivery: Delivering the final images to the client.
11.2. Amateur Photographer’s Family Memories
An amateur photographer uses photo management to preserve and share family memories. Their workflow involves:
- Capturing: Capturing photos and videos of family events.
- Backup: Backing up images to Google Photos.
- Transfer: Transferring selected images to a device for easy access.
- Sharing: Sharing images with family and friends.
- Organization: Organizing images into albums by event or date.
11.3. Business Owner’s Product Photography
A business owner uses photo management to showcase their products online. Their workflow involves:
- Shooting: Capturing product photos.
- Editing: Editing photos to enhance their appearance.
- Organization: Organizing photos into folders by product category.
- Upload: Uploading photos to their website and social media.
- Backup: Backing up photos to a cloud storage service.
12. Future Trends in Photo Management
The future of photo management is likely to be shaped by several emerging trends.
12.1. AI-Powered Organization
Artificial intelligence (AI) is already being used to automatically tag and organize photos. In the future, AI will become even more sophisticated, allowing for more accurate and efficient photo management.
12.2. Blockchain for Photo Ownership
Blockchain technology can be used to verify the ownership and authenticity of photos. This could help protect photographers from copyright infringement and ensure they receive credit for their work.
12.3. Enhanced Cloud Integration
Cloud storage services will continue to evolve, offering more seamless integration with photo editing software and other tools. This will make it easier to manage and access your photos from anywhere.
13. Frequently Asked Questions (FAQs)
13.1. How Do I Transfer Photos from Google Photos to My Phone’s Gallery?
You can transfer photos from Google Photos to your phone’s gallery by opening the Google Photos app, selecting the photos you want to transfer, and tapping “Save to device.”
13.2. Can I Move Multiple Photos at Once?
Yes, you can move multiple photos at once by long-pressing on the first photo and then selecting the other photos you want to transfer.
13.3. Will the Quality of My Photos Be Reduced?
If you originally uploaded your photos in “Original quality,” downloading them will retain the original quality. If you uploaded them in “High quality,” they will be slightly compressed.
13.4. How Do I Free Up Space in Google Photos?
You can free up space in Google Photos by deleting unwanted photos and videos or by compressing existing photos to “High quality.”
13.5. Can I Use Google Takeout to Download All My Photos?
Yes, Google Takeout allows you to download all your Google Photos data in one go.
13.6. What If I Don’t Have Enough Storage on My Phone?
If you don’t have enough storage on your phone, consider transferring photos to a computer or external storage device.
13.7. How Can I Organize My Photos After Transferring Them?
You can organize your photos by creating albums, adding metadata, and using third-party apps.
13.8. Is There a Way to Automate the Transfer Process?
Yes, you can use command-line tools like gphotos-sync to automate the transfer process.
13.9. How Do I Ensure My Photos Are Backed Up?
Ensure your photos are backed up by using cloud storage services, external hard drives, or NAS devices.
13.10. What Are the Best Apps for Managing Photos?
Some of the best apps for managing photos include Adobe Lightroom, Piktures, and Gemini Photos.
14. Final Thoughts
Moving pictures from Photos to Gallery is a fundamental aspect of photo management. By following the steps and tips outlined in this guide, you can efficiently transfer, organize, and protect your precious memories.
Remember, dfphoto.net is here to support you on your photography journey. Explore our website for more guides, tutorials, and inspiration. Join our community to connect with fellow photographers and share your work.
Ready to take your photography skills to the next level? Visit dfphoto.net today and discover a world of knowledge and inspiration!
Address: 1600 St Michael’s Dr, Santa Fe, NM 87505, United States
Phone: +1 (505) 471-6001
Website: dfphoto.net