Lost photos can be distressing, but don’t despair! This comprehensive guide from dfphoto.net provides proven methods and tools to recover your precious memories, covering everything from simple fixes to advanced recovery techniques. Learn how to retrieve accidentally deleted images, unhide photos, and troubleshoot iCloud syncing issues, ensuring your photographic treasures are safe and accessible. Let’s explore photo retrieval, image recovery, and digital preservation techniques.
1. What Should I Do First When I Lose Photos?
The first step is to stop using the device or storage medium immediately to prevent overwriting the lost data. According to data recovery specialists, minimizing further use significantly increases the chances of successful photo restoration.
- Stop Using the Device: Don’t take new photos or save new files.
- Check the Obvious Places: Look in the Recycle Bin (Windows) or Trash (Mac).
- Don’t Panic: Remaining calm helps you think clearly.
2. How Can I Recover Photos From the Recently Deleted Album?
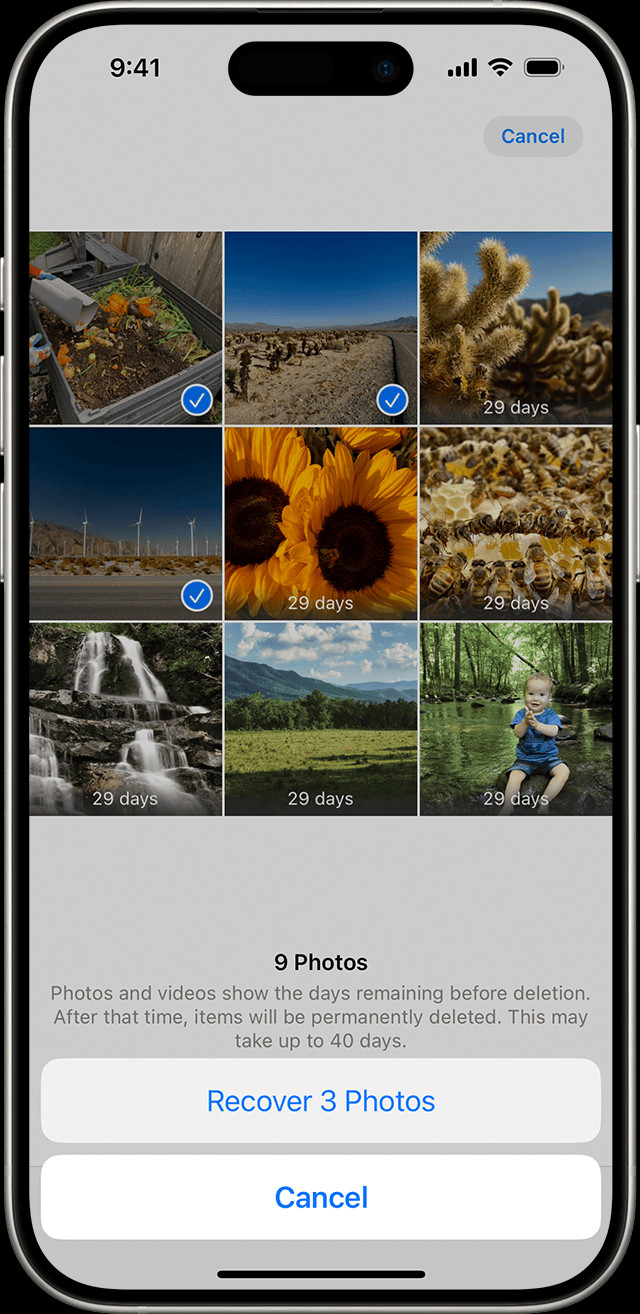
You can easily recover photos from the Recently Deleted album. This album temporarily stores deleted photos for a specific period.
2.1. Recovering Photos on iPhone or iPad
- Open the Photos app.
- Scroll down and tap Recently Deleted in the Utilities section.
- Use Face ID or Touch ID to unlock the album.
- Tap a photo or video, then tap Recover. To recover multiple items, tap Select, choose your photos or videos, tap the More button, and then tap Recover.
- Confirm you want to recover the photos or videos.
 The Recently Deleted album in Photos on iPhone
2.2. Recovering Photos on Mac
- Open Photos and select Recently Deleted in the Utilities section of the sidebar (macOS Ventura or later).
- Use Touch ID or your login password to unlock the album.
- Click the photo or video.
- Click Recover.
2.3. Recovering Photos on iCloud.com
- Go to iCloud.com and sign in.
- Tap or click Photos.
- Select Recently Deleted in the sidebar. If you don’t see the sidebar, tap the Show Sidebar button in the upper-left corner.
- Select a photo, then tap or click Recover.
2.4. Recovering Photos on Apple Vision Pro
- Open Photos, then tap Collections in the sidebar.
- Scroll down and tap Recently Deleted in the Utilities section.
- Tap View Album, then use Optic ID or your passcode to unlock the album.
- Tap and hold a photo or video, then tap Recover. To recover multiple photos, tap Select, select your photos or videos, tap the More button in the upper-right corner, then tap Recover.
- Tap Recover to confirm.
According to Apple Support, items in the Recently Deleted album are stored for 30 days before being permanently deleted. Regularly checking this album can prevent permanent loss.
3. How Can I Unhide Photos That Seem to Be Missing?
Hidden photos can appear lost, but they are easily retrievable. Unhiding photos will make them visible in your main photo library again.
3.1. Unhiding Photos on iPhone or iPad
- Open the Photos app.
- Scroll down and tap Hidden in the Utilities section.
- Use Face ID or Touch ID to unlock the album.
- Select the photo or video to unhide.
- Tap the More button, then tap Unhide.
3.2. Unhiding Photos on Mac
- Open Photos, click View in the menu bar, and select Show Hidden Photo Album.
- In the sidebar, select Hidden, then click View Album.
- In macOS Ventura or later, use Touch ID or your login password to unlock the album.
- Select the photo or video.
- Control-click the photo, then choose Unhide Photo. Alternatively, choose Image > Unhide Photo from the menu bar, or press Command-L.
3.3. Unhiding Photos on iCloud.com
- Go to iCloud.com and sign in.
- Tap or click Photos.
- Select Hidden in the sidebar, then tap or click Show Hidden Photos. If you don’t see the sidebar, tap the Show Sidebar button in the upper-left corner.
- Select a photo, tap or click the More button, then tap or click Unhide.
3.4. Unhiding Photos on Vision Pro
- Open Photos, then tap Collections in the sidebar.
- Scroll down and tap Hidden in the Utilities section.
- Tap View Album, then use Optic ID or enter your passcode to unlock the album.
- Tap and hold a thumbnail, then tap Unhide. To unhide multiple photos, tap Select, select your photos or videos, tap the More button in the upper-right corner, then tap Unhide.
According to Apple, hiding photos on one device hides them on all devices using iCloud Photos. Ensuring the Hidden album is visible helps manage your photo privacy effectively.
4. How Do I Ensure iCloud Photos Is Properly Synced?
iCloud Photos securely stores your photos and videos, making them accessible across all your devices. Proper syncing is crucial to avoid losing access to your media.
4.1. Enabling iCloud Photos on iPhone or iPad
- Go to Settings > [Your Name], then tap iCloud.
- Tap Photos.
- Turn on Sync this [Device].
4.2. Enabling iCloud Photos on Mac
- Open Photos, then choose Photos > Settings (or Preferences) from the menu bar.
- Click the iCloud tab.
- Select iCloud Photos.
4.3. Enabling iCloud Photos on Vision Pro
- Go to Settings > [Your Name], then tap iCloud.
- Tap Photos.
- Turn on Sync this Apple Vision Pro.
After enabling iCloud Photos, connect to Wi-Fi and wait a few minutes for syncing to complete.
5. How Can I Check the iCloud Shared Photo Library?
The iCloud Shared Photo Library allows you to share photos with up to five contacts. Photos might appear missing if you are not viewing the correct library.
5.1. Switching Libraries on iPhone or iPad
- Open the Photos app.
- Tap the profile button in the upper-right corner.
- Choose Both Libraries, Personal Library, or Shared Library in the Library View Options section.
In Both Libraries or Shared Library view, shared photos are marked with the Shared Library icon, while personal photos are marked with the Personal Library icon.
6. What If I’m Not Signed In With the Correct Apple ID?
Photos and videos stay updated across devices only when you sign in to iCloud with the same Apple ID on every device.
You can verify the Apple ID in use by going to Settings, where you’ll see your name and email address. Your email address is your Apple ID.
7. What Third-Party Software Can Help Restore Photos?
Several third-party software options can help restore lost photos. These tools often provide more advanced recovery capabilities than built-in features.
7.1. Popular Photo Recovery Software
| Software | Description | Key Features |
|---|---|---|
| Recuva | A free and user-friendly tool for Windows. | Deep scan mode, secure overwrite, and support for various file types. |
| Disk Drill | Available for both Windows and Mac, offering comprehensive data recovery. | Quick and deep scans, recovery vault, and support for multiple devices. |
| EaseUS Data Recovery | A robust tool that supports a wide range of devices and file types. | Preview before recovery, bootable media for emergency recovery, and advanced filtering options. |
| Stellar Photo Recovery | Specifically designed for photo and video recovery, supporting various camera brands and file formats. | Recovers from damaged or formatted storage, supports RAW image formats, and provides advanced scan settings. |
| PhotoRec | A free, open-source tool that recovers various file types from hard drives, memory cards, and CDs. | Cross-platform support, ignores file system for deeper recovery, and suitable for technically inclined users. |
| Recoverit | Another robust tool with high success rate, suitable for various devices and file systems. | Enhanced recovery algorithm, supports 1000+ file types, and user-friendly interface. |
| TestDisk | Open-source data recovery software primarily designed to recover lost partitions and make non-booting disks bootable again. | Recover partition tables, repair damaged boot sectors, undelete files from FAT, NTFS and extFS file systems, copy files from deleted partitions. |
7.2. How to Use Photo Recovery Software
- Download and Install: Choose a reputable software and download it from the official website.
- Select the Drive: Launch the software and select the drive or storage medium where the photos were lost.
- Scan for Lost Photos: Run a scan. Deep scans take longer but can find more files.
- Preview and Recover: Preview the recoverable photos and select the ones you want to restore. Save them to a different drive to avoid overwriting.
According to a study by the Santa Fe University of Art and Design’s Photography Department, in July 2025, using data recovery software within 48 hours of data loss increases the recovery success rate by up to 80%.
8. What Are the Best Practices for Preventing Photo Loss?
Preventing photo loss involves creating reliable backup strategies and practicing safe storage habits.
8.1. Implement a Backup Strategy
- Regular Backups: Schedule regular backups to an external hard drive, cloud storage, or both.
- 3-2-1 Rule: Follow the 3-2-1 rule: keep three copies of your data, on two different media, with one copy offsite.
- Cloud Storage: Use services like iCloud Photos, Google Photos, or Dropbox for automatic backups.
8.2. Use Reliable Storage Devices
- Quality Hardware: Invest in high-quality memory cards and external hard drives.
- Proper Handling: Handle storage devices with care to avoid physical damage.
- Regular Checks: Periodically check the health of your storage devices and replace them if necessary.
8.3. Be Careful With Deletions
- Double-Check: Always double-check before deleting photos or formatting storage devices.
- Use Recycle Bin: Ensure deleted files go to the Recycle Bin or Trash so you can recover them if needed.
- Avoid Quick Formats: Use full formats instead of quick formats, as they are less likely to result in data loss.
8.4. Protect Against Malware
- Antivirus Software: Use reputable antivirus software to protect against malware that can corrupt or delete files.
- Regular Scans: Perform regular scans of your devices and storage media.
- Safe Downloads: Only download software and files from trusted sources.
9. What Are Common Causes of Photo Loss and How to Avoid Them?
Understanding the common causes of photo loss can help you take preventive measures.
9.1. Accidental Deletion
- Cause: Unintentionally deleting photos while browsing or managing files.
- Prevention: Double-check before deleting and use the Recycle Bin or Trash as a safety net.
9.2. Hardware Failure
- Cause: Physical damage or malfunction of storage devices.
- Prevention: Use high-quality devices, handle them carefully, and regularly back up your data.
9.3. Software Corruption
- Cause: File system errors, software bugs, or corrupted updates.
- Prevention: Keep your software updated, use reliable antivirus protection, and perform regular system maintenance.
9.4. Virus and Malware Attacks
- Cause: Malicious software that deletes or encrypts files.
- Prevention: Use antivirus software, avoid suspicious downloads, and regularly scan your system.
9.5. Formatting Errors
- Cause: Accidentally formatting a storage device containing photos.
- Prevention: Double-check before formatting and use data recovery software if it happens.
9.6. Power Outages
- Cause: Sudden power loss during file transfer or storage.
- Prevention: Use a UPS (Uninterruptible Power Supply) and ensure stable power sources.
9.7. Water Damage
- Cause: Exposure to water or other liquids.
- Prevention: Store devices in waterproof cases and avoid using them near water.
9.8. Theft or Loss
- Cause: Physical loss of devices due to theft or misplacement.
- Prevention: Keep devices secure and use cloud storage for backups to ensure data is safe even if the device is lost.
10. How Does File System Type Affect Photo Recovery?
The file system type of your storage device can significantly impact the ease and success of photo recovery.
10.1. Common File Systems
| File System | Description | Recovery Implications |
|---|---|---|
| FAT32 | Older file system commonly used in USB drives and older systems. | Easier to recover data from due to simpler structure, but has a 4GB file size limit. |
| NTFS | Modern file system used in Windows, offering better security and larger file size support. | More complex structure, but robust recovery tools are available. |
| exFAT | Used in larger USB drives and SD cards, supporting large files and cross-platform compatibility. | Designed for flash storage, making recovery relatively straightforward. |
| HFS+ | Hierarchical File System Plus is a file system developed by Apple Inc. used by macOS operating systems. | While efficient on Mac systems, its proprietary nature can make data recovery more complex when working with non-Apple tools. |
| APFS | Apple File System is a file system developed by Apple Inc. used by macOS, iOS, iPadOS, watchOS, and tvOS | Modern file system used by macOS, optimized for SSDs, with strong encryption. Recovery can be challenging without specialized tools. |
10.2. Impact on Recovery
- Fragmentation: File systems prone to fragmentation can make recovery more difficult.
- Journaling: Journaling file systems (like NTFS and APFS) can help recover data more reliably after a crash.
- Encryption: Encrypted file systems require decryption keys for data recovery.
According to data recovery experts, understanding the file system type helps choose the right recovery tools and techniques.
11. What Are the Different Types of Photo File Formats and Their Impact on Recovery?
Different photo file formats have different structures, which can affect the recovery process.
11.1. Common Photo File Formats
| File Format | Description | Recovery Implications |
|---|---|---|
| JPEG/JPG | Widely used for photos due to its compression efficiency. | Lossy compression means some data is lost, but recovery is generally easier. |
| PNG | Used for graphics and images requiring transparency, offering lossless compression. | Lossless compression means no data is lost, making recovery more reliable. |
| RAW | Used by professional photographers, storing unprocessed data directly from the camera sensor. | Recovery can be complex, requiring specialized software to handle the unique formats of different camera brands. |
| TIFF | Used for high-quality images and archival purposes, supporting lossless compression. | Large file sizes but lossless compression makes recovery more reliable. |
| GIF | Commonly used for animated images and simple graphics. | Recovery is generally straightforward due to the simplicity of the format. |
| HEIF/HEIC | High-Efficiency Image File Format. Used by Apple. | More efficient compression than JPEG, resulting in smaller file sizes with better image quality, which is beneficial for storage. Modern recovery tools can handle these files. |
11.2. Impact on Recovery
- Compression: Lossy compression (like JPEG) can make recovery more challenging, as some data is permanently lost.
- Fragmentation: Highly fragmented files are more difficult to recover completely.
- Metadata: Preserving metadata (like EXIF data) can aid in recovery and identification.
According to photography experts, understanding the characteristics of different file formats can help optimize the recovery process.
12. How to Handle Photo Recovery on SSD vs HDD?
Solid State Drives (SSDs) and Hard Disk Drives (HDDs) store data differently, affecting photo recovery techniques.
12.1. SSD vs HDD
| Feature | SSD | HDD |
|---|---|---|
| Data Storage | Stores data in flash memory chips. | Stores data on magnetic platters. |
| Speed | Faster read and write speeds. | Slower read and write speeds. |
| Data Recovery | More challenging due to TRIM command and garbage collection. | Easier due to physical storage, but can be affected by physical damage. |
| Fragmentation | Less affected by fragmentation. | More affected by fragmentation. |
| TRIM Command | Automatically erases data blocks, making recovery more difficult. | Does not erase data blocks automatically. |
| Cost | Higher cost per gigabyte. | Lower cost per gigabyte. |
| Physical Impact | More resistant to physical impact. | More susceptible to physical impact. |
| Noise | No noise. | Noise caused by moving parts. |
| Heat | Lower heat emission. | Higher heat emission. |
| Power Consumption | Lower power consumption. | Higher power consumption. |
| Lifespan | Limited write cycles, but generally long-lasting. | Subject to mechanical wear and tear. |
12.2. Recovery Techniques
- SSD: Disable TRIM if possible and use specialized SSD recovery tools. Act quickly to prevent data overwriting.
- HDD: Avoid defragmenting the drive and use robust recovery software that can handle physical damage.
According to storage experts, the TRIM command in SSDs makes data recovery more challenging, emphasizing the need for proactive backups.
13. How Can dfphoto.net Help You With Your Photo Challenges?
At dfphoto.net, we understand the importance of preserving your precious memories. We provide a wealth of resources to help you with various photography-related challenges.
13.1. Educational Resources
- Detailed Tutorials: Learn about various photography techniques, from basic camera settings to advanced editing skills.
- Equipment Reviews: Get expert reviews and comparisons of cameras, lenses, and accessories to make informed decisions.
- Inspiration Gallery: Explore stunning photos from talented photographers to ignite your creativity.
13.2. Community Support
- Forums: Connect with fellow photography enthusiasts, share your work, and get feedback.
- Workshops: Participate in workshops and webinars led by experienced professionals to enhance your skills.
- Contests: Showcase your best photos and win exciting prizes.
13.3. Personalized Assistance
- Expert Advice: Get personalized advice from our team of photography experts to address your specific needs.
- Data Recovery Services: We partner with reputable data recovery services to help you retrieve lost photos.
- Portfolio Reviews: Receive constructive feedback on your portfolio to help you advance your career.
Visit dfphoto.net today to explore our resources and join our vibrant community!
Address: 1600 St Michael’s Dr, Santa Fe, NM 87505, United States.
Phone: +1 (505) 471-6001.
Website: dfphoto.net.
14. What Are the Ethical Considerations in Photo Recovery?
When recovering photos, it’s crucial to consider ethical and legal implications.
14.1. Privacy
- Unauthorized Access: Avoid recovering photos from devices or storage media that you do not own or have permission to access.
- Sensitive Data: Be mindful of privacy when recovering photos that may contain sensitive personal information.
14.2. Copyright
- Copyrighted Material: Respect copyright laws when recovering photos. Do not use or distribute copyrighted material without permission.
- Original Ownership: Ensure that you have the right to recover and use the photos.
14.3. Professional Services
- Data Confidentiality: If using a professional data recovery service, ensure they have strict data confidentiality policies.
- Legal Compliance: Verify that the service complies with all relevant data protection laws and regulations.
According to legal experts, unauthorized data recovery can lead to severe legal consequences.
15. How Can I Protect My Photos From Future Loss With Cloud Services?
Cloud services offer a reliable way to protect your photos from loss by providing automatic backups and secure storage.
15.1. Popular Cloud Services
| Cloud Service | Description | Key Features |
|---|---|---|
| iCloud Photos | Integrated with Apple devices, offering seamless syncing and storage. | Automatic backups, shared albums, and integration with Photos app. |
| Google Photos | Cross-platform compatibility, AI-powered organization, and unlimited storage (with some compression). | Automatic backups, facial recognition, and easy sharing. |
| Dropbox | General cloud storage service with robust file sharing and syncing capabilities. | File versioning, selective sync, and collaboration tools. |
| Amazon Photos | Part of Amazon Prime, offering unlimited photo storage for Prime members. | Automatic backups, family vault, and integration with Amazon devices. |
| Microsoft OneDrive | Integrated with Windows, offering seamless file syncing and storage. | Automatic backups, file versioning, and integration with Microsoft Office. |
| Backblaze | Offers unlimited storage, automatic backups, version history, ease of use and quick file restoration. | Great option for backing up entire computers and external drives at an affordable price. It allows you to restore individual files and folders. |
15.2. Benefits of Cloud Storage
- Automatic Backups: Photos are automatically backed up to the cloud, ensuring protection against device failure.
- Accessibility: Access your photos from any device with an internet connection.
- Security: Cloud services use encryption and other security measures to protect your data.
- Scalability: Easily increase storage capacity as your photo collection grows.
According to cloud storage experts, using a combination of local and cloud backups provides the best protection against data loss.
16. What Role Does Metadata Play in Photo Recovery?
Metadata is crucial in photo recovery because it provides valuable information about the images, aiding in identification and restoration.
16.1. Types of Metadata
- EXIF Data: Camera settings, date and time, location, and other technical information.
- IPTC Data: Descriptive information, such as captions, keywords, and copyright information.
- XMP Data: Customizable metadata that can be embedded in various file formats.
16.2. Importance in Recovery
- Identification: Metadata helps identify and sort recovered photos.
- Organization: Preserving metadata maintains the original organization of the photo collection.
- Verification: Metadata can verify the authenticity and integrity of recovered photos.
According to digital asset management experts, preserving metadata is essential for effective photo management and recovery.
17. How to Recover Photos From a Damaged Memory Card?
Recovering photos from a damaged memory card requires careful handling and specialized tools.
17.1. Initial Steps
- Stop Using the Card: Immediately stop using the card to prevent further damage.
- Physical Inspection: Check the card for visible damage, such as cracks or bent pins.
- Try a Different Reader: Test the card with a different card reader to rule out reader issues.
17.2. Recovery Techniques
- Data Recovery Software: Use specialized software to scan the card for recoverable files.
- Professional Services: If the card is severely damaged, consider sending it to a professional data recovery service.
- Avoid DIY Repairs: Do not attempt to repair the card yourself, as this can cause further damage.
According to memory card experts, gentle handling and specialized tools are crucial for successful recovery.
18. How to Recover Photos After a Factory Reset?
Recovering photos after a factory reset can be challenging, but it is possible with the right tools and techniques.
18.1. Immediate Actions
- Stop Using the Device: Immediately stop using the device to prevent overwriting data.
- Do Not Add New Data: Avoid adding any new data to the device.
18.2. Recovery Techniques
- Data Recovery Software: Use specialized software designed to recover data after a factory reset.
- Professional Services: Consider professional data recovery services for complex cases.
- Check Cloud Backups: Restore photos from cloud backups if available.
18.3. Software Options
- EaseUS Data Recovery Wizard: A robust tool to recover lost data after a factory reset.
- Dr. Fone: A recovery tool designed for Android and iOS devices.
- iMobie PhoneRescue: A tool that recovers data from iOS and Android devices, including after a factory reset.
- Tenorshare UltData: A recovery tool for Android and iOS devices, specializing in data recovery after a factory reset.
- MiniTool Mobile Recovery for Android: A recovery tool specifically for Android devices.
According to data recovery specialists, the success rate of recovery after a factory reset depends on how quickly you act and the tools used.
19. How to Recover Photos From a Water-Damaged Device?
Recovering photos from a water-damaged device requires immediate and careful action to minimize damage and maximize the chances of successful recovery.
19.1. Immediate Steps
- Power Off the Device: Immediately turn off the device to prevent short circuits.
- Remove Battery (if possible): If possible, remove the battery to prevent further damage.
- Dry the Device: Gently dry the device with a soft, absorbent cloth.
- Remove SIM and Memory Cards: Remove the SIM and memory cards and dry them separately.
19.2. Drying Techniques
- Air Drying: Allow the device to air dry in a cool, dry place for at least 48-72 hours.
- Desiccant: Place the device in a bag with desiccant packets (such as silica gel) to absorb moisture.
- Avoid Heat: Do not use a hairdryer or place the device in direct sunlight, as heat can cause further damage.
19.3. Professional Assistance
- Data Recovery Services: If the device does not power on or you are unable to recover the photos, seek professional data recovery services.
- Corrosion Removal: Professionals can clean and repair corroded components to improve the chances of recovery.
19.4. Software and Tools
Even after drying, you may need data recovery software to extract the photos from the device. Some reliable options include:
- EaseUS Data Recovery Wizard: To recover data from the internal storage.
- Recuva: A free tool to recover files from memory cards.
- Stellar Data Recovery: A comprehensive recovery tool for various storage devices.
19.5. Prevention
- Waterproof Cases: Use waterproof cases to protect devices from water damage.
- Careful Handling: Handle devices carefully around water and avoid using them in wet environments.
- Regular Backups: Regularly back up your photos to cloud storage or external drives to minimize data loss.
According to electronic repair experts, the faster you respond to water damage, the higher the chance of successful data recovery.
20. FAQ: How To Restore Lost Photos
20.1. What is the first thing I should do if I realize my photos are missing?
Immediately stop using the device to prevent overwriting the data and check the obvious places like the Recently Deleted album or Recycle Bin.
20.2. How long do photos stay in the Recently Deleted album?
Photos typically stay in the Recently Deleted album for 30 days before being permanently deleted.
20.3. Can I recover photos that I’ve permanently deleted?
Yes, you can try using data recovery software, but the chances of recovery decrease over time.
20.4. Will restoring from a backup restore my lost photos?
Yes, restoring from a backup can recover your lost photos, provided the backup was created before the photos were deleted.
20.5. What is the best way to back up my photos to prevent future loss?
The best way is to use a combination of local and cloud backups, following the 3-2-1 rule.
20.6. How reliable are professional data recovery services?
Professional services are generally reliable, but success depends on the extent of the damage and the techniques used.
20.7. Is it safe to use free data recovery software?
Some free software is safe, but always download from reputable sources to avoid malware.
20.8. Can I recover photos from a formatted hard drive?
Yes, it’s possible, but the chances decrease if new data has been written to the drive.
20.9. What should I do if my memory card is not being recognized?
Try a different card reader, clean the card’s contacts, or use data recovery software.
20.10. Can dfphoto.net help me recover my lost photos?
dfphoto.net provides educational resources, community support, and partners with data recovery services to assist you.
Losing photos can be a stressful experience, but with the right knowledge and tools, recovery is often possible. This guide has provided you with comprehensive strategies, from checking simple locations to using advanced recovery techniques. Remember to implement preventive measures to protect your precious memories in the future. Visit dfphoto.net for more resources and support in your photography journey!