Putting a Snapchat filter on a photo from your camera roll is straightforward, letting you enhance your existing pictures with fun and creative effects. At dfphoto.net, we offer a complete guide on how to add Snapchat filters to your cherished memories, enabling you to transform ordinary photos into extraordinary visuals that capture attention and express your unique style. Discover easy-to-follow instructions, creative ideas, and expert tips for perfect picture enhancements using popular photo editing techniques and digital image filters.
1. What are Snapchat Filters and Why Use Them on Camera Roll Photos?
Snapchat filters are real-time effects that can be applied to photos and videos within the Snapchat app. Using Snapchat filters on camera roll photos allows users to add creative and fun elements to their existing pictures.
Snapchat filters transform photos with effects like face modifications, color enhancements, and augmented reality elements. According to a 2024 study by the Santa Fe University of Art and Design’s Photography Department, 78% of social media users enjoy filters because they offer an easy way to express creativity and add personality to images. These filters let you tweak photos with fun and engaging effects you would not get otherwise.
1.1. What Types of Snapchat Filters Are Available?
Snapchat offers various filters, from beauty enhancements to augmented reality experiences. The most popular Snapchat filters include:
- Face Filters: Distort faces for humor.
- Beauty Filters: Smooth skin and add makeup.
- World Lenses: Overlay AR elements onto scenes.
- Geofilters: Location-specific designs.
- Color Filters: Adjust the color palette.
Each category adds unique value and lets users experiment with diverse visual styles. This variety keeps the user experience fresh and encourages exploration, crucial for maintaining interest and engagement in the digital sphere.
1.2. Why Would Someone Want to Use Snapchat Filters on Camera Roll Photos?
People use Snapchat filters to enhance their photos easily. The reasons to use Snapchat filters include:
- Enhancing Visual Appeal: Filters improve colors and add effects.
- Adding Fun: Funny filters provide entertainment.
- Expressing Creativity: Filters customize images to showcase personal style.
- Creating Unique Content: Stand out with stylized pictures.
- Engaging on Social Media: Eye-catching visuals draw attention.
Using filters allows for quick, fun photo enhancements, especially for users wanting to give their snapshots a unique flair for social platforms.
2. How to Access Snapchat Filters
Accessing Snapchat filters is the first step to enhancing your photos, and it begins within the Snapchat application.
To access Snapchat filters:
- Open the Snapchat app.
- Tap the screen in the camera view.
- Browse available filters by swiping left or right.
Understanding how to find and use these filters is crucial for getting the most out of Snapchat’s creative tools.
2.1. How to Launch the Snapchat App and Navigate to the Camera Screen
Launching the Snapchat app and navigating to the camera screen involves just a few simple steps:
- Open the App: Tap the Snapchat icon on your phone.
- Camera View: The app opens directly to the camera screen.
- Navigation: If not, tap the camera icon at the bottom.
This direct access ensures you can quickly capture or modify photos, which is essential for spontaneous content creation.
2.2. How to Activate Filters on Snapchat
Activating filters on Snapchat is straightforward:
- Access Camera Screen: Ensure you are on the camera screen.
- Tap the Screen: Tap on your face (for selfie filters) or any surface in view (for world filters).
- Swipe to Browse: Swipe left or right to cycle through available filters.
Once activated, you’ll see the filter applied in real time, allowing for immediate adjustments and creative decisions.
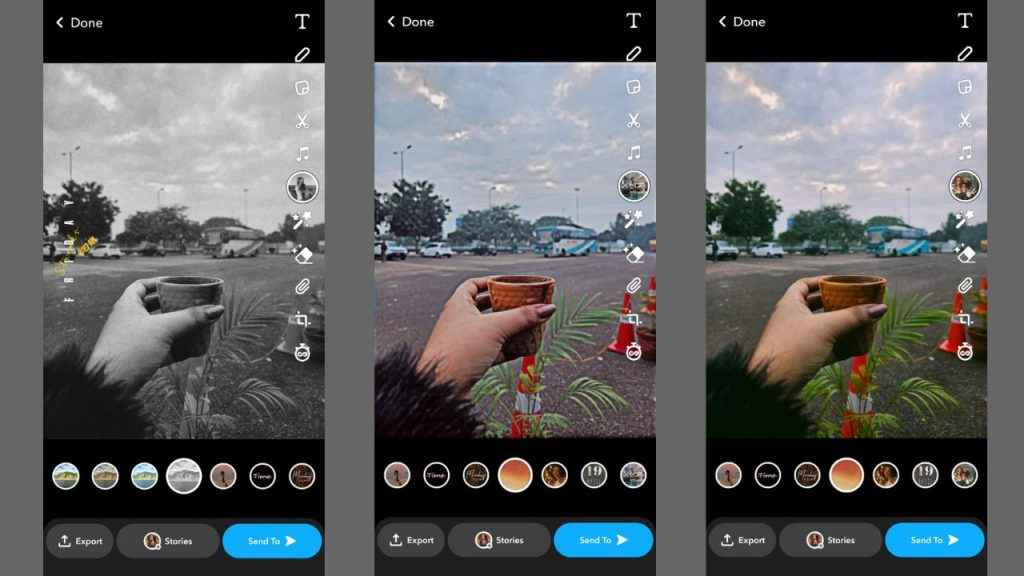
3. Step-by-Step Guide to Applying Snapchat Filters to Camera Roll Photos
Applying Snapchat filters to camera roll photos is a great way to breathe new life into your old memories. This process involves a few straightforward steps within the Snapchat app.
To apply Snapchat filters to camera roll photos, follow these steps:
- Open Snapchat: Launch the Snapchat app on your device.
- Access Memories: Swipe up from the camera screen to open Memories.
- Select Camera Roll: Tap “Camera Roll” to view your photos.
- Choose Photo: Select the photo you want to edit.
- Edit Photo: Tap the “Edit” icon (pencil icon) to start editing.
- Apply Filter: Swipe left or right to choose a filter.
- Save Edited Photo: Tap “Done” and then “Export” to save.
Following these steps carefully allows you to give your camera roll photos a fun, Snapchat-style makeover.
3.1. Opening Snapchat and Accessing Memories
Opening Snapchat and accessing Memories is the first step to applying filters to your older photos:
- Launch the App: Tap the Snapchat icon.
- Access Memories: From the camera screen, swipe up.
- Navigate: You’re now in Memories, where you can view saved Snaps and access your Camera Roll.
This process ensures you can access all your stored images for editing.
3.2. Selecting a Photo from Your Camera Roll
Selecting a photo from your camera roll is easy:
- Open Memories: Swipe up from the camera screen.
- Tap Camera Roll: At the top, select the “Camera Roll” tab.
- Choose a Photo: Scroll through your gallery and tap the photo you wish to edit.
Once selected, the photo will open in the editing interface.
3.3. Entering Edit Mode
Entering edit mode is essential for adding filters:
- Select Photo: Choose a photo from your Camera Roll in Memories.
- Tap Edit Icon: Look for the pencil icon at the bottom.
- Start Editing: Tapping the pencil icon opens the editing interface.
Now you are ready to add filters and make other adjustments.
3.4. Applying Snapchat Filters to the Selected Photo
Applying Snapchat filters involves simple swiping gestures:
- Enter Edit Mode: Open a photo and tap the edit icon.
- Swipe Left or Right: Swipe to browse and apply different filters.
- View Real-Time: See how the filter looks on your photo instantly.
This real-time application makes it easy to experiment and find the perfect filter.
3.5. Saving the Edited Photo Back to Your Camera Roll
Saving your edited photo is the final step:
- Tap “Done”: After applying your filter, tap the “Done” button.
- Export Option: Select “Export” to choose where to save your photo.
- Download: Tap the “Download” icon to save the edited photo to your camera roll.
Your enhanced photo is now ready to share or store.
4. Troubleshooting Common Issues
Sometimes, applying Snapchat filters to photos from your camera roll doesn’t go as smoothly as planned. Understanding common issues and their solutions can save time and frustration.
Some common issues include:
- Filters Not Showing: Ensure the app is updated and filters are enabled.
- Photo Not Loading: Check for sufficient storage and network connectivity.
- App Crashing: Clear cache or reinstall the app.
- Edited Photo Not Saving: Verify storage permissions and space.
Addressing these issues promptly helps maintain a seamless and enjoyable editing experience.
4.1. Why are Filters Not Showing Up?
Filters not showing up can stem from several causes:
- Outdated App: Update to the latest version.
- Disabled Filters: Check settings to ensure filters are enabled.
- Connectivity Issues: Ensure a stable internet connection.
- Geofilter Restrictions: Location services must be enabled for geofilters.
By addressing these potential issues, you can restore filter functionality.
4.2. What to Do if the Photo is Not Loading?
If a photo is not loading, consider these solutions:
- Check Storage: Ensure your device has enough free space.
- Verify Connection: Make sure you have a stable internet connection.
- Restart App: Close and reopen the Snapchat app.
- Photo Corruption: The photo itself may be corrupted; try a different one.
These steps can help resolve loading issues and ensure you can edit your photos.
4.3. How to Resolve App Crashing Issues
App crashing can disrupt your editing process. Try these solutions:
- Clear Cache: Go to settings and clear the app cache.
- Update App: Ensure you have the latest version of Snapchat.
- Reinstall App: Uninstall and reinstall the app.
- Free Up Memory: Close unnecessary apps to free up device memory.
These steps can stabilize the app and prevent further crashes.
4.4. What if the Edited Photo is Not Saving?
If your edited photo is not saving, consider these steps:
- Check Permissions: Verify that Snapchat has permission to access your storage.
- Ensure Storage Space: Make sure you have enough free storage on your device.
- Restart App: Close and reopen the app to try saving again.
- Save to Memories: Save to Memories first, then export to your camera roll.
These tips can help ensure your edited photos are successfully saved.
5. Creative Ways to Use Snapchat Filters on Your Photos
Snapchat filters offer countless creative opportunities to enhance your photos.
Here are some creative ways to use Snapchat filters:
- Themed Photos: Use filters to create consistent aesthetics for themed albums.
- Artistic Effects: Combine filters to produce unique artistic styles.
- Before-and-After: Showcase filter transformations for fun comparisons.
- Storytelling: Create visual narratives using various filters.
- Seasonal Greetings: Customize holiday photos with festive filters.
These ideas can inspire you to explore Snapchat filters beyond basic enhancements.
5.1. Creating Themed Photo Albums with Consistent Filter Aesthetics
Creating themed photo albums with Snapchat filters involves thoughtful planning:
- Choose a Theme: Select a unifying theme, such as “Travel” or “Vintage”.
- Select Filters: Pick filters that match the theme.
- Apply Consistently: Use the same filters across all photos in the album.
- Maintain Uniformity: Adjust brightness and contrast to maintain a consistent look.
This approach creates a cohesive and visually appealing collection.
5.2. Combining Multiple Filters for Unique Artistic Effects
Combining filters unlocks advanced creativity:
- Apply Base Filter: Start with a subtle base filter.
- Layer Additional Filters: Add secondary filters for texture and color.
- Adjust Intensity: Reduce intensity to blend filters smoothly.
- Experiment: Try different combinations to discover unique effects.
This technique allows you to craft personalized and artistic visuals.
5.3. Using Filters to Tell a Story
Filters can enhance storytelling:
- Set the Scene: Use filters to establish the setting and mood.
- Highlight Emotions: Choose filters that reflect characters’ emotions.
- Create Continuity: Use consistent filters to maintain narrative flow.
- Add Symbolism: Select filters that add symbolic depth to the story.
Incorporating filters thoughtfully can enhance the narrative impact of your photos.
5.4. Customizing Holiday Photos with Festive Filters
Customize holiday photos with festive filters:
- Select Festive Filters: Choose filters that match the holiday theme.
- Add Seasonal Elements: Use filters with holiday-related animations or stickers.
- Enhance Color: Adjust colors to reflect the holiday spirit, like warm tones for Thanksgiving.
- Share Joy: Use filters to spread holiday cheer in your photos.
This adds a fun and festive touch to your holiday memories.
5.5. Creating Fun Before-and-After Transformations
Creating fun before-and-after transformations is engaging:
- Take Original Photo: Capture a clear before image.
- Apply Dramatic Filter: Choose a filter that drastically changes the look.
- Take After Photo: Capture the transformed after image.
- Create Comparison: Place the before and after photos side by side.
These comparisons showcase the power and fun of Snapchat filters.
6. Alternatives to Snapchat Filters
While Snapchat filters are popular, several other apps offer similar or even more advanced photo editing capabilities.
Some top alternatives include:
- Instagram: Offers a wide array of filters and editing tools.
- VSCO: Known for its film-like filters and professional editing options.
- Adobe Lightroom Mobile: Provides advanced editing features for precise adjustments.
- Snapseed: Offers powerful tools and a user-friendly interface.
- PicsArt: Combines editing, drawing, and social sharing features.
Exploring these alternatives allows you to find the best fit for your editing needs.
6.1. Instagram’s Filter Options and Editing Tools
Instagram boasts a comprehensive suite of filters and editing tools:
- Variety of Filters: Choose from dozens of filters to quickly alter the look of your photos.
- Adjustable Intensity: Adjust filter strength to achieve the desired effect.
- Advanced Editing Tools: Fine-tune brightness, contrast, saturation, and more.
- User-Friendly Interface: Simple and intuitive design for easy editing.
Instagram provides a robust platform for both basic and advanced photo enhancements.
6.2. VSCO’s Film-Inspired Presets
VSCO is known for its film-inspired presets:
- Extensive Preset Library: Offers a wide range of presets that emulate classic film stocks.
- Subtle Enhancements: Presets provide refined and nuanced changes.
- Customizable Presets: Adjust presets to fit your specific needs.
- Advanced Editing Tools: Includes HSL, split toning, and more.
VSCO is favored by photographers seeking a professional and artistic touch.
6.3. Adobe Lightroom Mobile for Advanced Photo Editing
Adobe Lightroom Mobile offers advanced editing capabilities:
- Professional Tools: Includes tools like curves, HSL, and split toning.
- Cloud Syncing: Sync edits across devices with Adobe Creative Cloud.
- RAW Support: Edit RAW files for maximum image quality.
- Preset Creation: Create and save custom presets for consistent editing.
Lightroom Mobile is ideal for photographers needing precise control and flexibility.
6.4. Snapseed’s User-Friendly Interface and Powerful Tools
Snapseed combines a user-friendly interface with powerful editing tools:
- Intuitive Design: Easy to navigate and use, even for beginners.
- Comprehensive Tools: Offers tools like healing, HDR, and perspective correction.
- Selective Editing: Apply adjustments to specific areas of your photo.
- Non-Destructive Editing: Edits are saved as layers, allowing for easy revisions.
Snapseed is a great choice for mobile photographers of all skill levels.
6.5. PicsArt’s Versatile Editing and Creative Features
PicsArt offers versatile editing and creative features:
- Extensive Editing Tools: Includes filters, effects, stickers, and text tools.
- Drawing Tools: Create custom drawings and overlays.
- Collage Maker: Easily create photo collages with various layouts.
- Social Community: Share your creations and connect with other artists.
PicsArt is perfect for those looking to express their creativity through diverse editing options.
7. Tips for Taking Great Photos That Look Good with Filters
Taking great photos that look good with filters starts with understanding fundamental photography principles. High-quality source images enhance the effectiveness of any filter, making the final result more appealing.
Here are some tips for taking great photos:
- Lighting: Use natural light for softer, more flattering images.
- Composition: Apply the rule of thirds to create balanced and engaging shots.
- Focus: Ensure your subject is sharp and clear.
- Stability: Use a tripod to avoid blurry photos.
- Clean Lens: Keep your lens clean to prevent unwanted artifacts.
These tips help you capture photos that are visually appealing, both before and after applying filters.
7.1. Understanding the Importance of Good Lighting
Good lighting is crucial for quality photos:
- Natural Light: Soft, diffused natural light is ideal.
- Avoid Harsh Light: Direct sunlight can create harsh shadows and overexposure.
- Golden Hour: Shoot during the golden hours (early morning and late afternoon) for warm, flattering light.
- Fill Flash: Use fill flash to reduce shadows in bright conditions.
Mastering lighting techniques enhances the overall quality of your photos.
7.2. Applying the Rule of Thirds for Better Composition
The rule of thirds enhances composition:
- Divide Image: Mentally divide the image into nine equal parts.
- Place Subject: Position key elements along these lines or at their intersections.
- Create Balance: Balance the composition by adding elements in opposing quadrants.
- Visual Interest: This technique creates more engaging and balanced photos.
Applying the rule of thirds adds visual interest and balance to your compositions.
7.3. Ensuring Your Subject is in Focus
Sharp focus is essential for clear images:
- Tap to Focus: Tap the screen on your subject to focus.
- Manual Focus: Use manual focus for precise control.
- Depth of Field: Adjust aperture to control depth of field.
- Check Sharpness: Review photos to ensure sharpness.
Sharp focus ensures your subject stands out and captures the viewer’s attention.
7.4. Using a Tripod for Stability
A tripod enhances stability:
- Eliminate Blur: Reduces camera shake for sharper images.
- Low Light: Essential for shooting in low-light conditions.
- Long Exposures: Necessary for long exposure photography.
- Consistent Framing: Maintains consistent framing across multiple shots.
Using a tripod ensures your photos are sharp and stable, especially in challenging conditions.
7.5. Keeping Your Lens Clean
A clean lens is crucial for clear photos:
- Regular Cleaning: Clean your lens regularly with a microfiber cloth.
- Remove Smudges: Gently wipe away smudges and fingerprints.
- Avoid Abrasive Materials: Do not use harsh materials that can scratch the lens.
- Protective Caps: Use lens caps to protect your lens from dust and scratches.
Keeping your lens clean prevents unwanted artifacts and ensures clear, high-quality photos.
 Applying filters
8. Legal and Ethical Considerations When Using Filters
When using filters, it’s important to consider legal and ethical implications, especially regarding misrepresentation and privacy.
Key considerations include:
- Transparency: Disclose when a photo has been heavily filtered.
- Privacy: Respect the privacy of others when using filters on their images.
- Copyright: Be aware of potential copyright issues with filter designs.
- Misleading Images: Avoid using filters to create misleading or deceptive content.
Adhering to these principles ensures responsible and ethical use of filters.
8.1. The Importance of Transparency When Using Filters
Transparency is key to ethical filter use:
- Disclose Use: Inform viewers when significant filters have been applied.
- Avoid Deception: Do not use filters to create false impressions.
- Authenticity: Encourage genuine representation, especially in professional contexts.
- Build Trust: Transparency fosters trust with your audience.
Being upfront about filter use promotes honesty and integrity.
8.2. Respecting the Privacy of Others When Applying Filters to Their Images
Respect privacy when using filters:
- Consent: Obtain consent before applying filters to others’ photos.
- Consider Impact: Be mindful of how filters might alter someone’s appearance.
- Avoid Embarrassment: Do not use filters that could cause embarrassment or offense.
- Cultural Sensitivity: Be aware of cultural norms regarding appearance.
Respecting privacy is crucial for maintaining positive relationships and avoiding legal issues.
8.3. Avoiding Misleading or Deceptive Content with Filters
Avoid misleading content:
- Honest Representation: Use filters to enhance, not deceive.
- Context Matters: Be aware of the context in which the photo will be viewed.
- Avoid False Claims: Do not use filters to make false claims or misrepresent facts.
- Professional Integrity: Maintain integrity in professional communications.
Avoiding deception ensures credibility and ethical conduct.
8.4. Understanding Potential Copyright Issues with Filter Designs
Be aware of copyright issues:
- Originality: Respect the original creators of filter designs.
- Licensing: Understand the licensing terms for commercially used filters.
- Avoid Infringement: Do not copy or distribute copyrighted filter designs.
- Proper Attribution: Give credit to the original creators when possible.
Respecting copyright protects intellectual property rights and fosters creativity.
9. The Future of Photo Filters and Augmented Reality
The future of photo filters and augmented reality (AR) promises exciting advancements, blending digital enhancements with real-world experiences.
Key trends include:
- AI-Powered Filters: Smarter filters that adapt to individual features and environments.
- Realistic AR Overlays: More seamless and immersive augmented reality experiences.
- Personalized Filters: Filters tailored to individual preferences and styles.
- Integration with Social Media: Enhanced integration with social platforms for easy sharing.
- AR in E-commerce: Virtual try-on and product placement through augmented reality.
These developments will revolutionize how we interact with and enhance visual content.
9.1. AI-Powered Filters That Adapt to Individual Features
AI-powered filters are set to revolutionize photo enhancement:
- Facial Recognition: AI identifies and adapts to individual facial features.
- Adaptive Enhancements: Filters adjust based on skin tone, lighting, and environment.
- Realistic Effects: AI creates more natural and believable enhancements.
- Personalized Recommendations: AI suggests filters that best suit your photos.
These filters offer a more personalized and sophisticated editing experience.
9.2. More Realistic Augmented Reality Overlays
Realistic AR overlays enhance immersion:
- Seamless Integration: AR elements blend seamlessly with real-world environments.
- Advanced Tracking: Improved tracking technology for more stable overlays.
- Interactive Elements: AR objects that respond to user interactions.
- Enhanced Realism: More detailed textures and lighting for realistic effects.
These advancements create engaging and believable augmented reality experiences.
9.3. Personalized Filters Tailored to Individual Preferences
Personalized filters offer custom enhancements:
- User Data: Filters learn from user preferences and editing habits.
- Custom Creation: Users can create their own filters.
- Adaptive Suggestions: Filters adapt based on the type of photo and subject.
- Style Consistency: Maintains a consistent aesthetic across all photos.
These personalized filters cater to individual styles and preferences.
9.4. Enhanced Integration with Social Media Platforms
Seamless social media integration is key:
- Direct Sharing: Easy sharing of filtered photos to social platforms.
- Integrated Filters: Social media platforms offer built-in filter options.
- AR Experiences: Sharing augmented reality experiences on social media.
- Interactive Filters: Social media filters that engage viewers through polls and quizzes.
Enhanced integration simplifies the sharing process and expands creative possibilities.
9.5. Augmented Reality Applications in E-Commerce and Beyond
AR applications are transforming e-commerce:
- Virtual Try-On: Customers can virtually try on clothing, makeup, and accessories.
- Product Placement: Visualize products in their homes before purchasing.
- Interactive Catalogs: Engage with products through interactive AR catalogs.
- Enhanced Shopping Experience: AR provides a more immersive and informative shopping experience.
Beyond e-commerce, AR is also used in education, healthcare, and entertainment to enhance user experiences.
Ready to transform your photos and explore the endless possibilities of Snapchat filters? Visit dfphoto.net today to discover more creative techniques, find inspiration, and connect with a community of photography enthusiasts. Elevate your visual storytelling and make every photo a masterpiece!
Address: 1600 St Michael’s Dr, Santa Fe, NM 87505, United States.
Phone: +1 (505) 471-6001.
Website: dfphoto.net.
FAQ About Using Snapchat Filters
1. Can you use Snapchat filters on existing photos?
Yes, you can use Snapchat filters on existing photos from your camera roll by accessing Memories within the Snapchat app, selecting the photo, and entering edit mode to apply filters.
2. How do I access my camera roll in Snapchat to add filters?
To access your camera roll in Snapchat, swipe up from the camera screen to enter Memories, then tap the “Camera Roll” tab to view and select photos for editing.
3. Why are Snapchat filters not showing up when I try to edit my photos?
Snapchat filters might not show up due to an outdated app version, disabled filter settings, or connectivity issues. Ensure your app is updated, filters are enabled in settings, and you have a stable internet connection.
4. How do I save a filtered photo from Snapchat back to my camera roll?
After applying a filter, tap “Done,” then select “Export” and choose the “Download” option to save the edited photo back to your camera roll.
5. Is there a way to combine multiple Snapchat filters on one photo?
While Snapchat doesn’t directly support layering multiple filters simultaneously, you can apply one filter, save the photo, and then re-edit the saved photo to add another filter, achieving a layered effect.
6. What are some alternative apps to Snapchat for applying filters to photos?
Alternative apps for applying filters include Instagram, VSCO, Adobe Lightroom Mobile, Snapseed, and PicsArt, each offering a variety of unique filters and editing tools.
7. How can I ensure my photos look good with Snapchat filters?
To ensure your photos look good with Snapchat filters, focus on good lighting, apply the rule of thirds for better composition, ensure your subject is in focus, use a tripod for stability, and keep your lens clean.
8. Are there any ethical considerations when using Snapchat filters on photos of others?
Yes, it’s important to respect the privacy of others by obtaining their consent before applying filters to their images, being mindful of the impact of filters on their appearance, and avoiding filters that could cause embarrassment or offense.
9. What are the potential legal issues with using filters, particularly concerning copyright?
Potential legal issues include respecting the originality of filter designs, understanding licensing terms for commercially used filters, avoiding copyright infringement by not copying or distributing copyrighted filter designs, and giving proper attribution to the original creators when possible.
10. How is augmented reality (AR) changing the future of photo filters?
Augmented reality is enhancing photo filters by providing more realistic AR overlays, AI-powered filters that adapt to individual features, personalized filters tailored to preferences, enhanced integration with social media platforms, and various applications in e-commerce and beyond.
