Adding stickers to photos is a fun and creative way to personalize your images and express yourself. You can enhance your pictures, add a touch of humor, or convey a message. At dfphoto.net, we are passionate about helping you unlock your creative potential through photography and image editing. This guide explores how to add stickers to photos using various methods, providing you with the tools and inspiration you need to create stunning visuals, from simple photo enhancements to full-blown digital artistry using photo editing software, iPhone photo editing or sticker apps.
1. Why Add Stickers to Photos? Unleashing Your Creative Vision
Adding stickers to photos isn’t just about decorating; it’s about enhancing your storytelling and expressing your unique personality. Think of stickers as digital embellishments that can transform an ordinary snapshot into an eye-catching piece of art. But why exactly should you consider adding stickers to your photos?
- Personalization: Stickers allow you to tailor your photos to your specific tastes and preferences.
- Expression: They offer a visual way to express your emotions, thoughts, and ideas.
- Enhancement: Stickers can add a pop of color, humor, or emphasis to your photos, making them more engaging.
- Branding: For businesses, stickers can be a creative way to add logos or promotional messages to photos, increasing brand awareness.
- Fun: Ultimately, adding stickers is a fun and creative activity that can bring joy to both the creator and the viewer.
2. What Are the Different Ways to Add Stickers to Photos?
There are several ways to add stickers to photos, each with its own advantages and disadvantages. Here’s a breakdown of the most popular methods:
2.1. Using Built-in Photo Editing Tools on Smartphones
Many smartphones come with built-in photo editing tools that include a sticker feature. This is a convenient option for quick and simple sticker additions.
Pros:
- Easy to use
- No need to download additional apps
- Convenient for on-the-go editing
Cons:
- Limited sticker selection
- Basic editing features
- May not offer advanced customization options
2.2. Utilizing Dedicated Sticker Apps
Numerous sticker apps are available on the App Store and Google Play Store, offering a wide variety of stickers and advanced editing tools.
Pros:
- Extensive sticker libraries
- Advanced editing features
- Customization options
Cons:
- May require downloading additional apps
- Some apps may have in-app purchases or subscriptions
- Can take up storage space on your device
2.3. Employing Professional Photo Editing Software
Professional photo editing software like Adobe Photoshop provides the most comprehensive set of tools for adding and customizing stickers.
Pros:
- Advanced editing capabilities
- Unlimited customization options
- High-quality results
Cons:
- Steep learning curve
- Expensive subscription fees
- Requires a computer
2.4. Exploring Online Photo Editors
Online photo editors offer a middle ground between smartphone apps and professional software, providing a range of features without the need for downloads or subscriptions.
Pros:
- Accessible from any device with an internet connection
- Variety of editing tools and sticker options
- No installation required
Cons:
- May require an internet connection
- Limited features compared to professional software
- Can be slower than desktop applications
3. How to Add Stickers on Photo Using an iPhone
Apple has been at the forefront of integrating user-friendly features into its devices, and adding stickers to photos on an iPhone is a prime example. Here’s a detailed guide on how to do it:
3.1. Using the Built-In Photos App
The Photos app on your iPhone offers a simple and direct way to add stickers to your photos. This method is perfect for quick edits and personal touches.
3.1.1. Creating Stickers from Photos
-
Open the Photos App:
- Start by launching the Photos app on your iPhone.
-
Select a Photo:
- Choose the photo you want to add a sticker to.
-
Touch and Hold the Subject:
- Tap and hold the main subject of the photo until a white outline appears around it. This indicates that the iPhone has recognized the subject.
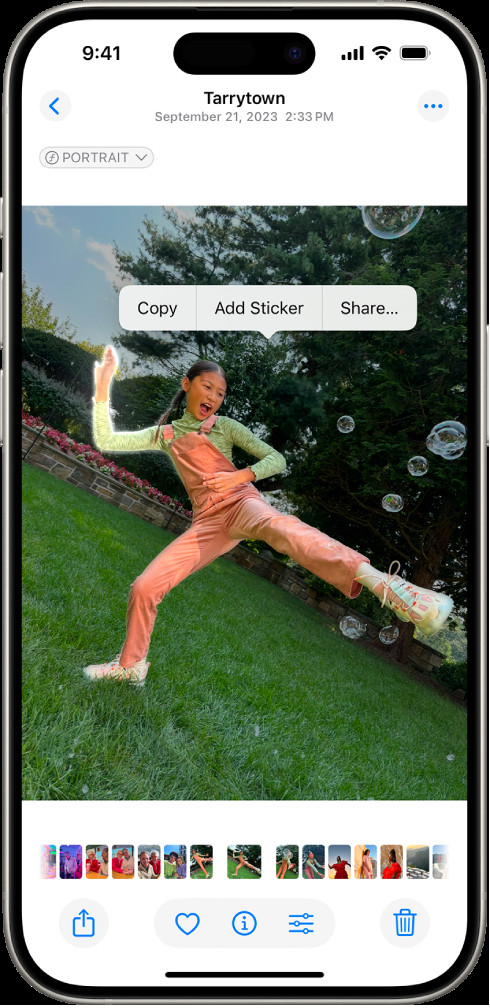 The Photos app is open to a photo of a person. The person is selected, and the option Add Sticker is available in the menu above.
Alt Text: Adding a sticker to a photo in the iPhone Photos app by selecting the subject.
-
Add Sticker:
- A menu will pop up above the selected subject. Tap “Add Sticker.” The sticker will be saved to your stickers menu.
-
Access the Sticker:
- The sticker is now available in your stickers menu, which you can access when using the iPhone onscreen keyboard or Markup tools.
3.1.2. Adding Effects to Stickers
- Access the Stickers Menu:
- When using the iPhone keyboard or Markup tools, access the stickers menu.
- Select Your Sticker:
- Choose the sticker you want to use from your collection.
- Add Effect:
- Tap “Add Effect” to apply visual effects such as Outline, Comic, or Puffy to your sticker.
- Customize and Place:
- Adjust the size, rotation, and placement of the sticker on your photo.
3.1.3. Turning Live Photos into Animated Stickers
-
Open a Live Photo:
- Go to the Photos app and select a Live Photo.
-
Touch and Hold the Subject:
- Tap and hold the moving subject of the Live Photo, then slide it up until you see a duplicate image of the subject.
-
Add Sticker:
- Tap “Add Sticker” to turn the moving subject into an animated sticker.
-
Access the Animated Sticker:
- The animated sticker will appear in your stickers menu, ready to use in messages, notes, and more.
3.2. Using Third-Party Apps on iPhone
While the built-in Photos app offers basic sticker functionality, third-party apps provide a wider range of options and features. Here are some popular choices:
- PicsArt: This app offers a vast library of stickers and advanced editing tools.
- Snapseed: Developed by Google, Snapseed is a powerful photo editing app with various sticker options.
- Phonto: If you want to add text-based stickers, Phonto is an excellent choice with a wide selection of fonts and customization options.
3.2.1. Detailed Steps for Using PicsArt
- Download and Install:
- Download PicsArt from the App Store and install it on your iPhone.
- Open PicsArt and Select a Photo:
- Launch the app and select the photo you want to edit.
- Tap on “Stickers”:
- In the bottom menu, find and tap the “Stickers” option.
- Browse or Search for Stickers:
- Explore the sticker library or use the search bar to find specific stickers.
- Select a Sticker:
- Tap on the sticker you want to add to your photo.
- Customize the Sticker:
- Adjust the size, rotation, and placement of the sticker using your fingers.
- Apply Effects (Optional):
- Use PicsArt’s editing tools to add effects to your sticker for a unique look.
- Save Your Photo:
- Tap the “Apply” button and then save your edited photo to your iPhone.
4. How to Add Stickers to Photos on Android
Android devices offer similar capabilities for adding stickers to photos. Here’s how you can do it:
4.1. Using Google Photos
Google Photos, the default photo management app on many Android devices, also provides basic sticker functionality.
4.1.1. Adding Stickers in Google Photos
- Open Google Photos:
- Launch the Google Photos app on your Android device.
- Select a Photo:
- Choose the photo you want to edit.
- Tap “Edit”:
- In the bottom menu, tap the “Edit” option.
- Choose “Markup”:
- Select the “Markup” tool.
- Add Stickers:
- Tap the sticker icon to access the sticker library.
- Select and Customize:
- Choose a sticker and customize its size, rotation, and placement.
- Save Your Photo:
- Tap “Done” and then save the edited photo.
4.2. Using Third-Party Apps on Android
Similar to iOS, Android has a wide range of third-party apps that offer advanced sticker options.
- PicsArt: As mentioned earlier, PicsArt is also available on Android and offers the same extensive sticker library and editing tools.
- PhotoDirector: This app is known for its user-friendly interface and powerful editing features.
- YouCam Perfect: This app focuses on beauty and selfie enhancements but also includes a variety of stickers for adding fun elements to your photos.
4.2.1. Detailed Steps for Using PhotoDirector
- Download and Install:
- Download PhotoDirector from the Google Play Store and install it on your Android device.
- Open PhotoDirector and Select a Photo:
- Launch the app and select the photo you want to edit.
- Tap on “Sticker”:
- In the bottom menu, find and tap the “Sticker” option.
- Browse or Search for Stickers:
- Explore the sticker library or use the search bar to find specific stickers.
- Select a Sticker:
- Tap on the sticker you want to add to your photo.
- Customize the Sticker:
- Adjust the size, rotation, and placement of the sticker using your fingers.
- Apply Effects (Optional):
- Use PhotoDirector’s editing tools to add effects to your sticker for a unique look.
- Save Your Photo:
- Tap the “Apply” button and then save your edited photo to your device.
5. Adding Stickers to Photos on a Computer
For more advanced editing and customization, using a computer with professional photo editing software or online editors is a great option.
5.1. Using Adobe Photoshop
Adobe Photoshop is the industry-standard photo editing software, offering unparalleled control and customization options.
5.1.1. Steps for Adding Stickers in Photoshop
- Open Photoshop and Import Your Photo:
- Launch Adobe Photoshop and open the photo you want to edit.
- Find and Download Stickers:
- Find high-quality sticker images online and download them to your computer. Ensure they are in PNG format with a transparent background for best results.
- Import the Sticker into Photoshop:
- Drag and drop the sticker image into your Photoshop workspace. It will open as a new layer.
- Adjust the Sticker:
- Use the Move Tool (V) to position the sticker on your photo.
- Use the Transform Tool (Ctrl+T or Cmd+T) to adjust the size, rotation, and perspective of the sticker.
- Add Effects (Optional):
- Use Photoshop’s blending options and layer styles to add effects like shadows, glows, or outlines to your sticker.
- Save Your Photo:
- Go to File > Save As and choose the appropriate file format (JPEG for general use, PNG for transparency).
5.1.2. Best Practices for Using Stickers in Photoshop
- Use High-Resolution Stickers: Ensure your stickers are high-resolution to avoid pixelation.
- Maintain Perspective: Adjust the perspective of the sticker to match the perspective of the photo for a realistic look.
- Use Blending Modes: Experiment with different blending modes to create unique effects.
- Add Shadows and Highlights: Use shadows and highlights to make the sticker look like it’s naturally integrated into the photo.
5.2. Using Online Photo Editors
Online photo editors like Canva and Fotor offer a user-friendly alternative to Photoshop, providing a range of features without the need for expensive software.
5.2.1. Using Canva
- Go to Canva:
- Open your web browser and go to the Canva website.
- Create an Account or Log In:
- If you don’t have an account, create one for free.
- Upload Your Photo:
- Click on “Create a design” and choose “Custom size” to set the dimensions of your photo.
- Upload your photo to Canva.
- Add Stickers:
- Click on the “Elements” tab in the left sidebar.
- Search for stickers using keywords like “cute stickers,” “funny stickers,” or specific themes.
- Customize the Sticker:
- Drag and drop the sticker onto your photo.
- Adjust the size, rotation, and placement of the sticker.
- Add Effects (Optional):
- Use Canva’s editing tools to add effects to your sticker or the photo itself.
- Download Your Photo:
- Click on the “Download” button in the top right corner and choose the appropriate file format.
6. Creative Ideas for Using Stickers in Photos
Stickers can be used in various creative ways to enhance your photos. Here are some ideas to inspire you:
- Adding Humor: Use funny stickers to add a humorous touch to your photos.
- Creating Memes: Combine photos with text-based stickers to create memes.
- Highlighting Important Elements: Use stickers to draw attention to specific parts of your photo.
- Personalizing Gifts: Add stickers to photos printed on gifts like mugs, t-shirts, or phone cases.
- Creating Themed Photos: Use stickers to create photos with specific themes like birthdays, holidays, or travel adventures.
- Adding Artistic Flair: Combine photos with artistic stickers to create unique digital art pieces.
7. Tips for Choosing the Right Stickers
Choosing the right stickers can make a big difference in the overall look of your photos. Here are some tips to help you select the best stickers:
- Consider the Theme: Choose stickers that match the theme of your photo.
- Use High-Quality Stickers: High-resolution stickers will look better and more professional.
- Match the Style: Choose stickers that complement the style of your photo.
- Don’t Overdo It: Use stickers sparingly to avoid cluttering your photo.
- Experiment: Try different stickers and combinations to find what works best.
- Check for Copyright: Ensure you have the right to use the stickers, especially for commercial purposes.
8. Integrating Stickers into Your Photography Workflow
Adding stickers to photos can be seamlessly integrated into your photography workflow. Here’s how:
8.1. Planning Your Shots
Before taking photos, consider how you might use stickers to enhance them. This can help you frame your shots and leave space for stickers.
8.2. Editing on the Go
Use smartphone apps to add stickers to photos immediately after taking them, allowing you to share your creations quickly on social media.
8.3. Batch Editing
Use online photo editors or professional software to batch edit multiple photos with stickers, saving time and maintaining consistency.
9. The Impact of Stickers on Visual Storytelling
Stickers can significantly enhance visual storytelling by adding layers of meaning and emotion to your photos.
9.1. Enhancing Emotional Resonance
Stickers can evoke emotions and connect with viewers on a deeper level. For example, adding a heart sticker to a photo can convey love and affection.
9.2. Adding Context and Narrative
Stickers can provide context and narrative to your photos, helping viewers understand the story you’re trying to tell. For example, adding travel-themed stickers to a photo can indicate that it was taken during a vacation.
9.3. Creating Engaging Visual Content
Stickers can make your photos more engaging and shareable on social media, attracting attention and increasing interaction.
10. Resources for Finding Stickers
Finding the right stickers can be a challenge, but here are some resources to help you discover high-quality and creative stickers:
- App Stores: The App Store and Google Play Store offer a vast selection of sticker apps.
- Online Marketplaces: Websites like Creative Market and Etsy offer a variety of sticker packs created by independent designers.
- Free Sticker Websites: Websites like Pngtree and Freepik offer free stickers for personal and commercial use.
11. Ethical Considerations When Using Stickers
While adding stickers to photos is a fun and creative activity, it’s important to consider ethical implications.
11.1. Respecting Copyright
Ensure you have the right to use the stickers you’re adding to your photos, especially for commercial purposes. Always check the licensing terms and conditions.
11.2. Avoiding Misrepresentation
Be careful not to use stickers in a way that misrepresents the subject of the photo or deceives viewers.
11.3. Giving Credit
If you’re using stickers created by other artists, give them credit whenever possible.
12. Frequently Asked Questions (FAQ)
12.1. Can I create my own stickers?
Yes, you can create your own stickers using photo editing software like Adobe Photoshop or mobile apps like Sticker Maker.
12.2. Are there any copyright issues with using stickers?
Yes, it’s important to ensure you have the right to use the stickers, especially for commercial purposes. Always check the licensing terms and conditions.
12.3. How can I make my stickers look more realistic?
Use shadows, highlights, and blending modes to integrate the stickers seamlessly into your photos.
12.4. What are the best apps for adding stickers to photos?
Some of the best apps include PicsArt, PhotoDirector, YouCam Perfect, and Snapseed.
12.5. Can I add animated stickers to photos?
Yes, you can add animated stickers using apps like GIPHY and some photo editing apps that support GIF formats.
12.6. How do I remove a sticker from a photo?
You can remove a sticker by using the eraser tool in your photo editing app or software.
12.7. Can I use stickers for commercial purposes?
Yes, but you need to ensure you have the necessary licenses and permissions for the stickers you’re using.
12.8. How do I resize stickers in a photo?
Most photo editing apps and software allow you to resize stickers using the transform tool.
12.9. What is the best file format for stickers?
PNG is the best file format for stickers because it supports transparency, which allows the sticker to blend seamlessly with the photo.
12.10. Can I add stickers to videos?
Yes, you can add stickers to videos using video editing apps like iMovie or Adobe Premiere Rush.
13. Conclusion: Elevate Your Photos with Stickers
Adding stickers to photos is a versatile and enjoyable way to enhance your images, express your creativity, and tell compelling stories. Whether you’re using built-in smartphone tools, dedicated apps, or professional software, the possibilities are endless. From personalizing your memories to creating engaging content for social media, stickers offer a unique avenue for visual expression. So, embrace the art of adding stickers and transform your photos into captivating works of art.
Ready to take your photography skills to the next level? Visit dfphoto.net for more tutorials, inspiration, and resources to help you master the art of visual storytelling. Explore our extensive collection of stunning photographs, connect with a vibrant community of photographers, and discover the latest trends and techniques in the world of photography. Address: 1600 St Michael’s Dr, Santa Fe, NM 87505, United States. Phone: +1 (505) 471-6001. Website: dfphoto.net. Let your creative journey begin today!