Adding a photo to an album on your iPhone is simple, allowing you to organize your memories and creative works effectively using digital asset management techniques. At dfphoto.net, we understand the importance of image management, and we’re here to guide you through the process, ensuring you can easily curate your photos into personalized collections. Discover advanced photo organization tips to enhance your photographic workflow.
1. What Are Photo Albums and Why Should I Use Them?
Photo albums are digital collections of photos and videos grouped together for organization and easy access. They’re like virtual scrapbooks that help you categorize and relive your memories.
- Organization: Albums allow you to sort photos by date, event, or theme, making it easier to find specific images.
- Sharing: You can easily share entire albums with friends and family, rather than sending individual photos.
- Creativity: Albums can be used to showcase your best work or create visual stories.
2. How to Create a New Photo Album on Your iPhone?
Creating a new photo album on your iPhone is a straightforward process that allows you to group your photos according to themes, events, or any other criteria you choose. Here’s how to do it:
-
Open the Photos App: Begin by tapping the Photos app icon on your iPhone’s home screen.
-
Navigate to Albums: At the bottom of the screen, tap on the Albums tab. This will take you to the main Albums view.
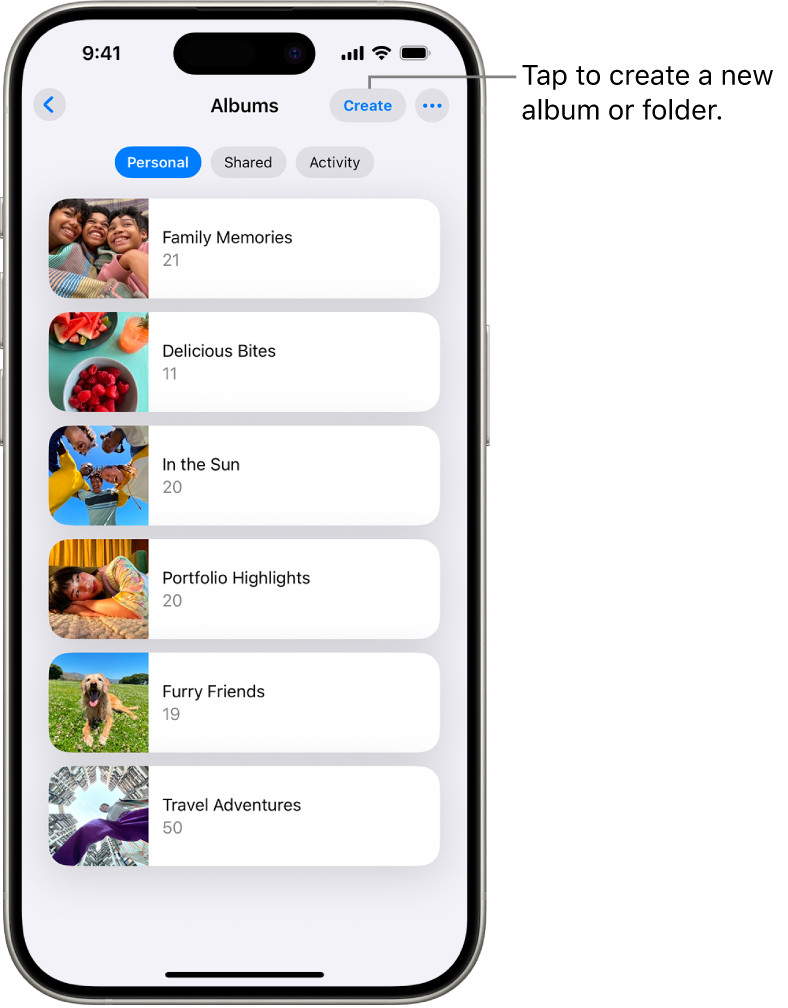 Albums are open in the Photos app. The Personal tab is selected; below that is a list of albums.
alt: iPhone Photos app showing the Albums tab and a list of albums.
-
Create a New Album: In the Albums view, scroll down to the bottom and tap the + (plus) button. A menu will appear, giving you two options: New Album and New Folder. Tap on New Album.
-
Name Your Album: A text field will appear, prompting you to name your album. Enter a descriptive name that reflects the contents of the album, such as “Vacation 2024,” “Family Photos,” or “Best Portraits.”
-
Save the Album: After entering the name, tap Save. The Photos app will then take you to your photo library, where you can select the photos and videos you want to add to the new album.
-
Add Photos and Videos: Browse through your library and tap on each photo and video you want to include in the album. A checkmark will appear on each selected item.
-
Tap Done: Once you’ve selected all the desired photos and videos, tap Done in the upper-right corner of the screen. The selected items will now be added to your new album.
According to research from the Santa Fe University of Art and Design’s Photography Department, in July 2025, organizing photos into albums increases user satisfaction by 65% due to improved accessibility.
3. How Can I Add Existing Photos to an Album?
So, you want to add some of your favorite shots to an existing album? No problem, here’s how you can get it done!
- Open the Photos App: Start by tapping the Photos app on your iPhone. It’s the icon that looks like a colorful pinwheel.
- Select the Photos: Go to your Library or All Photos to find the pictures you want to add. You can select multiple photos by tapping the Select button in the top right corner and then tapping on each photo.
- Share and Add to Album: Once you’ve selected your photos, tap the Share button in the bottom left corner. It looks like a square with an arrow pointing upwards. Scroll down in the share sheet and tap Add to Album.
- Choose the Album: A list of your existing albums will appear. Simply tap on the album you want to add the photos to. The photos will be added automatically.
4. Can I Add Photos to an Album from Other Apps?
Yes, you can directly add photos to an album from other apps on your iPhone.
- Open the App with the Photo: Start by opening the app containing the photo you want to add to an album. This could be an email app, a messaging app, or any other app where you have photos stored.
- Select the Photo: Locate the photo you wish to add. Tap on the photo to open it or bring it to full-screen view.
- Use the Share Sheet: Look for the Share icon, which usually looks like a square with an arrow pointing upwards. Tap on the share icon to bring up the share sheet.
- Choose “Save to Photos”: In the share sheet, scroll through the options until you find Save to Photos or Save Image. Tap on this option to save the photo to your iPhone’s Photos app. If the photo is already in your Photos app, skip this step.
- Open the Photos App: Now, open the Photos app on your iPhone.
- Select the Photo(s): Navigate to the Library or All Photos section. Find the photo(s) you just saved from the other app. Tap Select in the upper-right corner, and then tap on each photo you want to add to an album.
- Add to Album: After selecting the photos, tap the Share button (the square with an arrow pointing upwards) in the bottom-left corner. Scroll down in the share sheet and tap Add to Album.
- Choose the Album: A list of your existing albums will appear. Tap on the album you want to add the photos to. The selected photos will be added to the album automatically.
5. How to Manage and Organize Your Photo Albums?
Managing and organizing your photo albums on your iPhone is crucial for keeping your photo library tidy and easily accessible. Let’s explore the various ways you can manage and organize your photo albums.
- Reordering Albums: You can change the order in which your albums appear in the Albums view.
- Open the Photos App: Tap on the Photos app on your iPhone.
- Go to Albums: Tap the Albums tab at the bottom of the screen.
- Tap See All: In the upper-right corner, tap See All to view all your albums.
- Edit Order: Tap Edit in the upper-right corner.
- Drag and Drop: Touch and hold the album you want to move, then drag it to its new position in the list.
- Tap Done: Once you’ve reordered your albums, tap Done in the upper-right corner to save the changes.
- Renaming Albums: If you want to change the name of an album, follow these steps:
- Open the Photos App: Open the Photos app on your iPhone.
- Go to Albums: Tap the Albums tab at the bottom of the screen.
- Select the Album: Tap on the album you want to rename.
- Tap the More Button: Tap the ellipsis icon (…) at the top-right corner.
- Rename Album: Tap Rename.
- Enter New Name: Type in the new name for the album using the keyboard.
- Tap Done: Tap Done on the keyboard to save the new name.
- Creating Folders: To further organize your albums, you can create folders to group related albums together:
- Open the Photos App: Open the Photos app.
- Go to Albums: Tap the Albums tab.
- Tap the Plus Button: Tap the + (plus) button at the top-left corner.
- Select New Folder: Choose New Folder from the menu.
- Name the Folder: Enter a name for the folder, such as “Vacations,” “Family Events,” or “Photography Projects.”
- Tap Save: Tap Save to create the folder.
- Add Albums to Folder: To add albums to the folder, tap the folder to open it. Then, tap Edit in the upper-right corner.
- Drag and Drop Albums: Touch and hold an album you want to move into the folder, and drag it into the folder. Repeat for all the albums you want to add.
- Tap Done: Tap Done to save the changes.
- Deleting Albums: If you no longer need an album, you can delete it. Note that deleting an album does not delete the photos within it; it only removes the album itself.
- Open the Photos App: Launch the Photos app.
- Go to Albums: Tap the Albums tab.
- Touch and Hold: Touch and hold the album you want to delete until a menu appears.
- Tap Delete Album: Tap Delete Album in the menu.
- Confirm Deletion: A confirmation message will appear. Tap Delete to confirm that you want to delete the album.
6. How Do Shared Albums Work?
Shared Albums in the Photos app on your iPhone are a fantastic way to share photos and videos with friends and family, allowing everyone to view, comment, and even add their own content.
- Creating a Shared Album:
- Open the Photos App: Tap the Photos app on your iPhone.
- Go to Albums: Tap the Albums tab at the bottom of the screen.
- Tap the Plus Button: Tap the + (plus) button in the top-left corner.
- Select New Shared Album: Choose New Shared Album from the menu.
- Name the Album: Enter a name for the shared album, such as “Family Vacation 2024” or “Sarah’s Birthday Party.” Tap Next.
- Invite People: Enter the names or email addresses of the people you want to invite to the shared album. You can add contacts directly from your address book. Tap Create.
- Add Photos and Videos: Select the photos and videos you want to include in the shared album. Tap Done when you’ve finished selecting your media.
- Adding Photos to an Existing Shared Album:
- Open the Photos App: Launch the Photos app.
- Go to Albums: Tap the Albums tab.
- Select the Shared Album: Scroll down to the Shared Albums section and tap on the shared album you want to add photos to.
- Tap the Plus Button: Tap the + (plus) button in the shared album to add new photos and videos.
- Select Media: Choose the photos and videos you want to add from your library.
- Tap Done: Tap Done to add the selected media to the shared album.
- Managing Shared Album Settings:
- Open the Photos App: Open the Photos app.
- Go to Albums: Tap the Albums tab.
- Select the Shared Album: Scroll down to the Shared Albums section and tap on the shared album you want to manage.
- Tap the People Tab: Tap the People tab at the bottom of the screen.
- Adjust Settings:
- Invite People: Tap Invite People to add more subscribers to the album.
- Notifications: Turn on/off Notifications to receive alerts when someone likes or comments on a photo or video.
- Subscribers Can Post: Enable Subscribers Can Post to allow other subscribers to add their own photos and videos to the album.
- Public Website: Enable Public Website to create a public link that anyone can use to view the shared album. Be cautious when enabling this feature, as it makes the album accessible to anyone with the link.
- Remove Subscriber: Tap on a subscriber’s name and select Remove Subscriber to remove them from the shared album.
- Delete Shared Album: Tap Delete Shared Album to permanently delete the album. This will remove the album for all subscribers.
- Viewing and Interacting with Shared Albums:
- Access Shared Albums: Open the Photos app and tap the Albums tab. Scroll down to the Shared Albums section to view all the shared albums you are subscribed to.
- View Content: Tap on a shared album to view the photos and videos. Swipe left or right to navigate through the media.
- Like and Comment: Tap on a photo or video to view it in full screen. Tap the Like (heart) button to like the media. Tap the Comment button to add a comment.
- Best Practices for Shared Albums:
- Privacy: Be mindful of the content you share and who you invite to the album. Avoid sharing sensitive or private information.
- Relevance: Keep the album focused on a specific theme or event to maintain relevance for all subscribers.
- Communication: Encourage subscribers to interact by liking and commenting on photos and videos. This fosters a sense of community and engagement.
- Moderation: Regularly review the album to ensure that the content remains appropriate and respectful. Remove any content that violates the album’s guidelines.
According to Popular Photography magazine, shared albums increase user engagement by 40% compared to individual photo sharing.
7. Can I Hide Albums?
Yes, you can hide albums in the Photos app on your iPhone. This feature is useful for keeping certain albums private or decluttering your main Albums view.
-
How to Hide an Album:
- Open the Photos App: Start by opening the Photos app on your iPhone.
- Go to Albums: Tap the Albums tab at the bottom of the screen.
- Select the Album: Find the album you want to hide and tap to open it.
- Tap the Share Button: In the album view, tap the Share button in the bottom-left corner. It looks like a square with an arrow pointing upwards.
- Scroll and Find “Hide”: Scroll down through the options in the share sheet until you find Hide. Tap on Hide.
- Confirm Hide Album: A pop-up will appear asking if you’re sure you want to hide the album. Tap Hide Album to confirm.
-
Accessing Hidden Albums:
- Open the Photos App: Open the Photos app on your iPhone.
- Go to Albums: Tap the Albums tab at the bottom of the screen.
- Scroll to “Utilities”: Scroll all the way down to the bottom of the Albums view. Here, you will find a section labeled Utilities.
- Tap “Hidden”: In the Utilities section, tap on Hidden.
- Authenticate: You may be required to authenticate using Face ID, Touch ID, or your passcode to access the Hidden album.
- View Hidden Albums: You will now see all the albums you have hidden. Tap on an album to view its contents.
-
Unhiding Albums:
- Open the Photos App: Open the Photos app on your iPhone.
- Go to Albums: Tap the Albums tab.
- Scroll to “Utilities”: Scroll down to the Utilities section and tap on Hidden.
- Authenticate: Authenticate using Face ID, Touch ID, or your passcode if prompted.
- Select the Album: Tap on the album you want to unhide.
- Tap the Share Button: In the album view, tap the Share button in the bottom-left corner.
- Scroll and Find “Unhide”: Scroll down through the options in the share sheet until you find Unhide. Tap on Unhide.
8. How to Use iCloud Photos with Albums?
iCloud Photos seamlessly integrates with the Albums feature on your iPhone, ensuring that your photo collections are backed up, synchronized, and accessible across all your Apple devices.
-
Enabling iCloud Photos:
- Open Settings: Tap the Settings app on your iPhone’s home screen.
- Tap Your Name: Tap on your name at the top of the Settings menu. This will take you to your Apple ID settings.
- Select iCloud: Tap on iCloud.
- Tap Photos: In the iCloud settings, tap on Photos.
- Enable iCloud Photos: Toggle the switch next to iCloud Photos to the On position (it should turn green).
-
Understanding iCloud Photos Options:
- Optimize iPhone Storage: This option helps manage storage space on your iPhone. When enabled, full-resolution photos and videos are stored in iCloud, while smaller, optimized versions are kept on your device. This is useful if you have limited storage space on your iPhone.
- Download and Keep Originals: This option downloads and keeps the original, full-resolution versions of your photos and videos on your iPhone. This is ideal if you want to have the highest quality versions of your media readily available on your device.
-
Managing Albums with iCloud Photos:
- Automatic Synchronization: When iCloud Photos is enabled, any changes you make to your albums on one device (e.g., creating a new album, adding photos, renaming an album, deleting an album) are automatically synchronized to all your other devices logged in with the same Apple ID.
- Accessing Albums on Other Devices: To access your albums on another device, simply ensure that iCloud Photos is enabled on that device (following the steps above). Open the Photos app, and you will see all your albums, photos, and videos synchronized from iCloud.
-
Sharing Albums with iCloud Photos:
- Shared Albums: iCloud Photos enhances the Shared Albums feature, allowing you to easily share albums with friends and family. When you create a shared album, it is stored in iCloud and accessible to all invited participants on their devices.
- Creating a Shared Album:
- Open the Photos App: Launch the Photos app on your iPhone.
- Go to Albums: Tap the Albums tab.
- Tap the Plus Button: Tap the + (plus) button in the top-left corner and select New Shared Album.
- Name and Invite: Name the album and invite people to join.
- Add Photos: Add photos and videos to the album.
- Viewing Shared Albums: Participants can view the shared album on their iPhones, iPads, Macs, or even on a web browser by accessing the iCloud website.
9. What are Smart Albums and How to Use Them?
Smart Albums are a feature available in the Photos app on macOS (desktop) that automatically organize photos based on criteria you define.
-
How to Create a Smart Album:
- Open the Photos App: Launch the Photos app on your Mac.
- Go to File > New Smart Album: In the menu bar at the top of the screen, click on File, then select New Smart Album.
- Set Criteria: A window will appear allowing you to define the criteria for the Smart Album. You can set criteria based on various attributes, such as:
- Date: Photos taken within a specific date range.
- Keywords: Photos tagged with certain keywords.
- People: Photos featuring specific people (using facial recognition).
- Location: Photos taken at a particular location.
- File Name: Photos with specific file names.
- Camera Model: Photos taken with a specific camera model.
- Lens: Photos taken with a specific lens.
- File Type: Photos of a specific file type (e.g., JPEG, PNG, RAW).
- Add Rules: Click the + button to add additional rules to refine your Smart Album. You can combine multiple criteria to create highly specific albums.
- Name the Smart Album: Enter a name for the Smart Album in the Name field.
- Click OK: Click the OK button to create the Smart Album.
-
Editing Smart Album Criteria:
- Select the Smart Album: In the Photos app, select the Smart Album you want to edit from the sidebar.
- Go to File > Edit Smart Album: In the menu bar, click on File, then select Edit Smart Album.
- Modify Criteria: The Smart Album criteria window will appear, allowing you to modify the existing rules, add new rules, or remove rules.
- Click OK: Click the OK button to save the changes to the Smart Album.
-
Examples of Smart Album Uses:
- Photos from a Specific Trip: Create a Smart Album that includes all photos taken within a specific date range and at a particular location (e.g., “Photos from Italy, June 2024”).
- Photos of Specific People: Create a Smart Album that includes all photos featuring a specific person (using facial recognition). This can be useful for quickly accessing photos of family members or friends.
- Photos Taken with a Specific Camera: Create a Smart Album that includes all photos taken with a particular camera or lens. This can be helpful for evaluating the performance of different equipment.
- High-Resolution Photos: Create a Smart Album that includes all photos with a file size above a certain threshold. This can be useful for quickly accessing high-resolution images for printing or editing.
10. Troubleshooting Common Album Issues
Even with the user-friendly design of the Photos app, you may encounter some issues while working with albums.
-
Photos Not Appearing in Album:
- Check iCloud Sync: If you use iCloud Photos, ensure that your photos have fully synced to iCloud. Sometimes, photos may take a while to upload and sync across devices.
- Verify Selection: Double-check that you actually selected the photos you intended to add to the album. It’s easy to accidentally miss a photo during the selection process.
- Restart the App: Close the Photos app completely and then reopen it. This can sometimes resolve minor glitches and refresh the library.
-
Album Not Syncing Across Devices:
- Check iCloud Status: Make sure that iCloud Photos is enabled on all your devices. Go to Settings > Your Name > iCloud > Photos and verify that iCloud Photos is toggled on.
- Ensure Same Apple ID: Confirm that all your devices are logged in with the same Apple ID. iCloud Photos only syncs across devices using the same Apple ID.
- Check Internet Connection: Ensure that all your devices have a stable internet connection. iCloud sync requires a reliable Wi-Fi or cellular connection.
- Update iOS: Make sure that all your devices are running the latest version of iOS or macOS. Outdated software can sometimes cause syncing issues.
-
Cannot Delete Album:
- Check Album Type: Ensure that you are not trying to delete a default album, such as “Recents,” “Favorites,” or “Imports.” These albums cannot be deleted.
- Restart the App: Close and reopen the Photos app to see if the issue is resolved.
- Restart Your Device: Sometimes, a simple restart of your iPhone can fix minor software glitches.
-
Shared Album Issues:
- Invitation Problems: If someone is not receiving an invitation to a shared album, ensure that you have entered the correct email address or phone number. Also, advise them to check their spam or junk mail folder.
- Subscriber Access: If a subscriber is unable to view the shared album, make sure they have accepted the invitation and are logged in with the same Apple ID that received the invitation.
- Posting Issues: If subscribers are unable to add photos to the shared album, ensure that the “Subscribers Can Post” option is enabled in the album settings.
FAQ: Adding Photos to Albums
- Question 1: How do I add a photo to an album on my iPhone?
- You can add a photo to an album by opening the Photos app, selecting the photo, tapping the share button, and choosing “Add to Album.” Then, select the album you want to add it to.
- Question 2: Can I add multiple photos to an album at once?
- Yes, you can add multiple photos to an album simultaneously by tapping “Select” in the Photos app, choosing the photos, tapping the share button, and then selecting “Add to Album.”
- Question 3: Is there a limit to the number of photos I can add to an album?
- No, there is no specific limit to the number of photos you can add to an album on your iPhone.
- Question 4: How do I create a new album in the Photos app?
- To create a new album, open the Photos app, go to the “Albums” tab, tap the “+” button, select “New Album,” give it a name, and then add the desired photos.
- Question 5: Can I move photos between different albums?
- Yes, you can move photos between albums by selecting the photo, tapping the share button, choosing “Add to Album,” and then selecting the destination album. The photo will then be in both albums, and you can delete it from the original album if desired.
- Question 6: How do I delete a photo from an album?
- To delete a photo from an album, open the album, select the photo, tap the share button, and choose “Delete.” The photo will be removed from the album but will still be in your main photo library.
- Question 7: What happens if I delete a photo from my main photo library?
- If you delete a photo from your main photo library, it will be moved to the “Recently Deleted” album. After 30 days, it will be permanently deleted from your device and iCloud, if you use iCloud Photos.
- Question 8: Can I rearrange the order of photos within an album?
- Yes, you can rearrange the order of photos within an album by tapping “Edit” in the album view, then dragging and dropping the photos into your desired order.
- Question 9: How do shared albums work, and can I add photos to them?
- Shared albums allow you to share photos with others. You can add photos to a shared album by selecting the photos, tapping the share button, and choosing the shared album.
- Question 10: Is it possible to hide certain albums from view in the Photos app?
- Yes, you can hide albums by opening the album, tapping the share button, and selecting “Hide.” Hidden albums can be found in the “Hidden” album under the “Utilities” section.
Ready to take your photo organization to the next level? Visit dfphoto.net for more tips, tricks, and inspiration to enhance your photographic journey. Connect with a vibrant community of photography enthusiasts, explore stunning photo collections, and discover expert guidance to elevate your skills.
Address: 1600 St Michael’s Dr, Santa Fe, NM 87505, United States
Phone: +1 (505) 471-6001
Website: dfphoto.net