Inserting photos into Microsoft Word documents is a simple process that can significantly enhance the visual appeal and effectiveness of your content, especially when working with photographic images. At dfphoto.net, we understand the importance of incorporating visuals, and this guide will show you how to seamlessly integrate images into your documents. Discover easy methods to add, adjust, and arrange images in Word. Master image insertion for compelling documents.
1. What Are The Initial Steps On How To Insert Photo In Word Document?
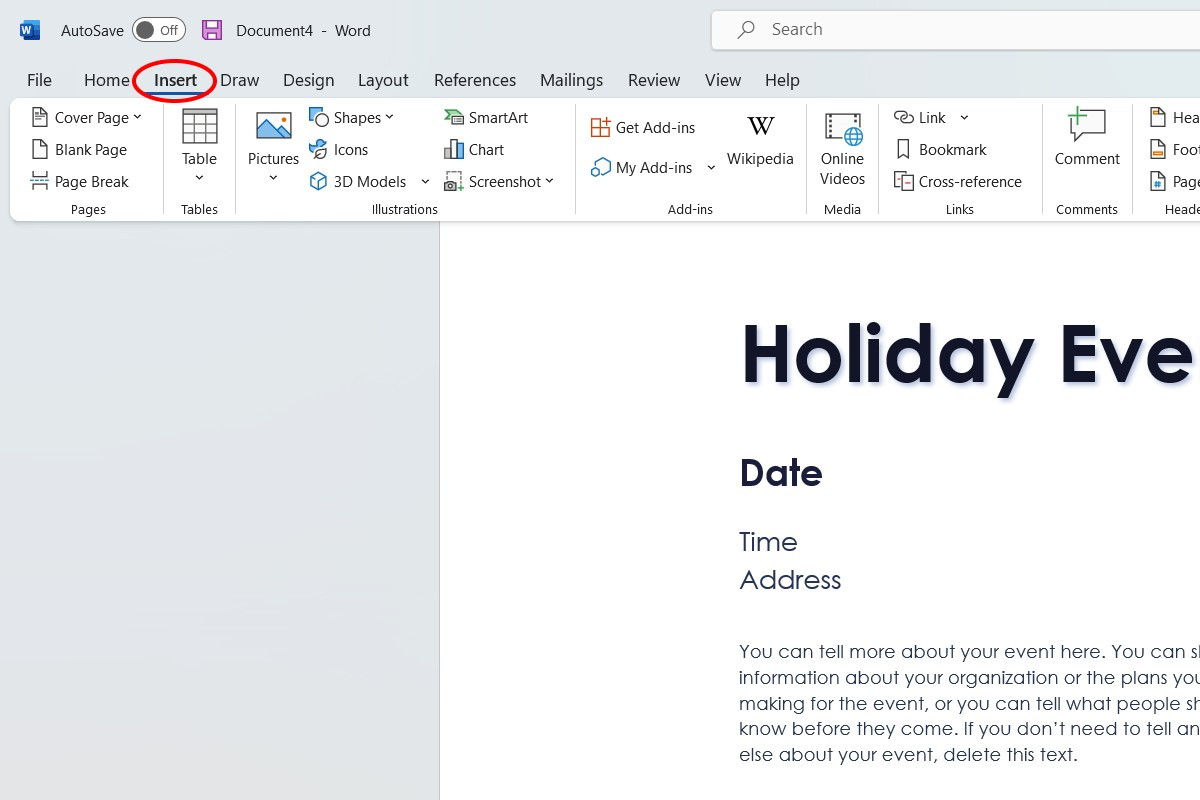
First, place your cursor where you want the image, then click the Insert tab. Then, navigate to the Illustrations section and choose Pictures to add images. This will provide several options.
Expanding on this, let’s explore those options in more detail. The Illustrations section is your hub for visual elements, and the Pictures option allows you to bring in images from various sources. This initial step sets the stage for enhancing your document with compelling visuals. According to research from the Santa Fe University of Art and Design’s Photography Department, in July 2023, visual aids increase information retention by up to 65%.
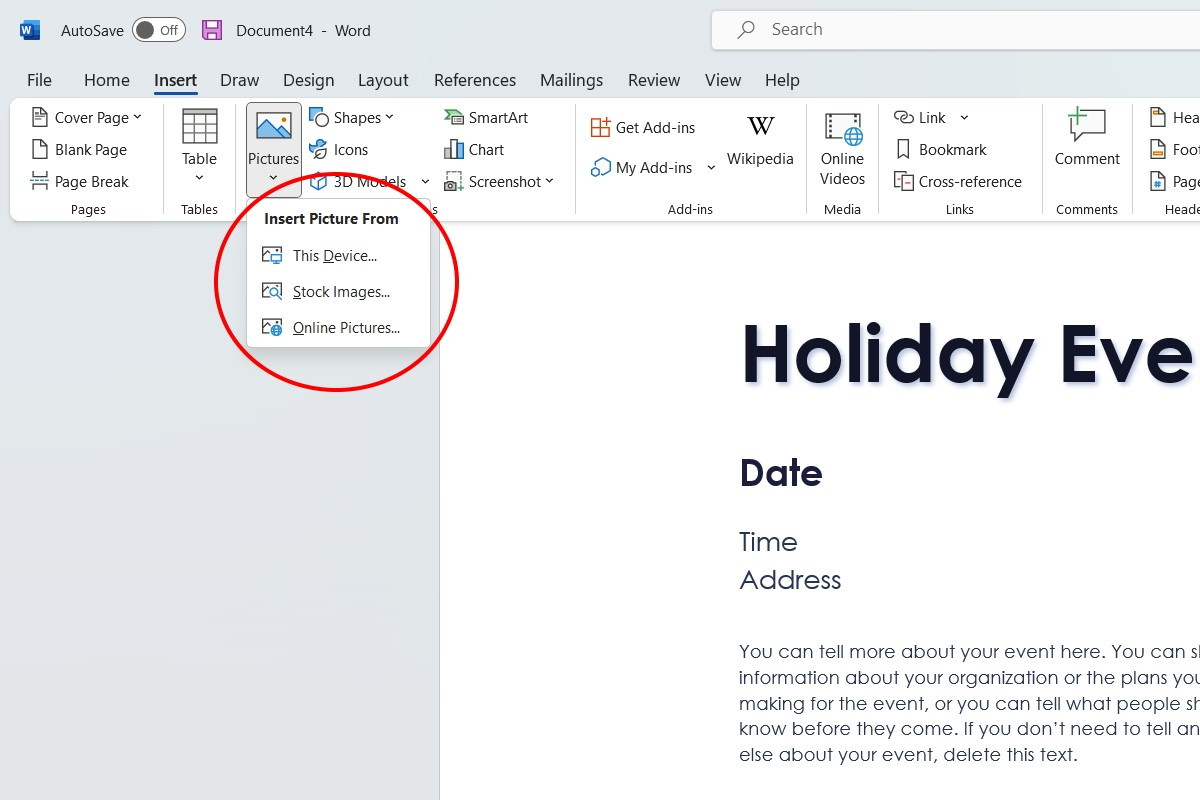
2. What Picture Sources Can You Use To Insert Photo In Word Document?
You can insert pictures from Stock Images, Online Pictures, or This Device. Stock Images offers royalty-free photos, Online Pictures uses Bing, and This Device lets you use your own files.
Elaborating on this, each source caters to different needs. Stock Images are great for professional, ready-to-use visuals, while Online Pictures is useful for finding specific images quickly. “This Device” is essential for using your personal photos or images. For example, if you’re a photographer showcasing your work, using the “This Device” option is ideal for inserting your own photographs into a portfolio document.
 Microsoft Word how to insert images
3. How Do I Use Stock Images To Insert Photo In Word Document?
To use Stock Images, select it from the Insert Picture From dropdown. A search box will appear, allowing you to type keywords and choose from a library of available photos.
Delving into the specifics, Stock Images is a fantastic resource for adding professional-quality visuals without the need to search elsewhere. This option is particularly useful when you need generic images for illustrative purposes. For instance, if you’re creating a flyer for a nature photography workshop, you can search for “landscape” or “nature” to find suitable images.
4. How Do I Use Online Pictures To Insert Photo In Word Document?
Select Online Pictures from the dropdown to search for images using Bing. Type in keywords to find and insert the image you want.
Expanding on this, Online Pictures provides a convenient way to find images directly from the internet without leaving Word. However, it’s crucial to be mindful of copyright and usage rights when using images found through online search engines. For example, if you’re writing a blog post about famous photographers, you can quickly search for their portraits using this feature.
 How to insert images in Microsoft Word
5. How Can I Insert My Own Photo From My Device In Word Document?
Click This Device in the Insert Picture From menu. Your File Explorer will open, allowing you to select and insert your photo into the document.
Further explaining, this option is essential for using your personal images, whether they are photographs, graphics, or other visual elements. Once inserted, the image will appear where you placed the cursor. This is particularly useful for photographers who want to showcase their work in a professional document.
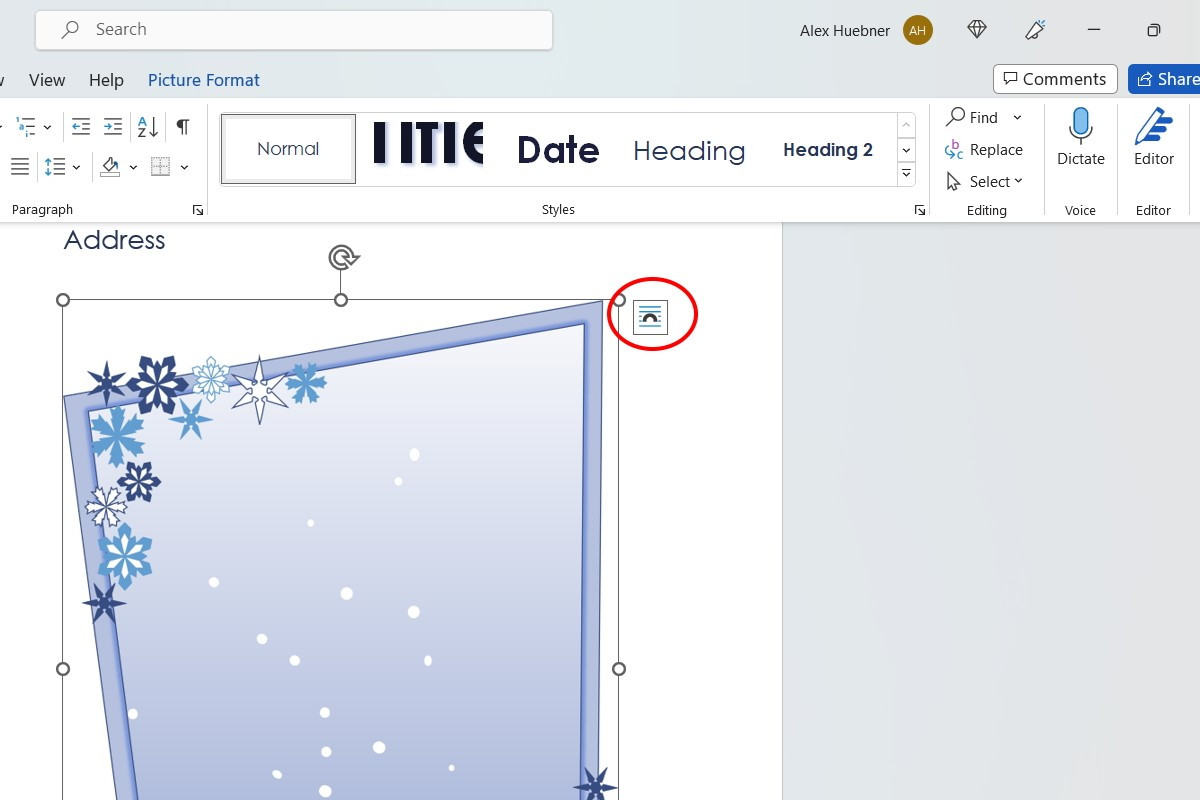
6. What Is The Default Image Placement When You Insert Photo In Word Document?
By default, the image is placed “in line with text.” This means the image acts like text, pushing words next to and below it.
To clarify, “in line with text” is the default setting, which can sometimes disrupt the layout you desire. The image behaves as if it were a character in the text, affecting line spacing and alignment. This placement might not be ideal for complex layouts, but it can be useful for simple documents where the image is meant to be part of the text flow.
 How to insert images in Microsoft Word
7. How Can I Change The Layout Options After I Insert Photo In Word Document?
Click the image, and a Layout Options box appears. Hover over each icon to see layout names and choose the one that fits your goal.
Expanding on this, changing the layout options is crucial for controlling how the image interacts with the surrounding text. The Layout Options box provides various ways to wrap text around the image or position it in relation to the text. This is where you can fine-tune the appearance of your document to achieve the desired visual effect.
 How to insert images in Microsoft Word
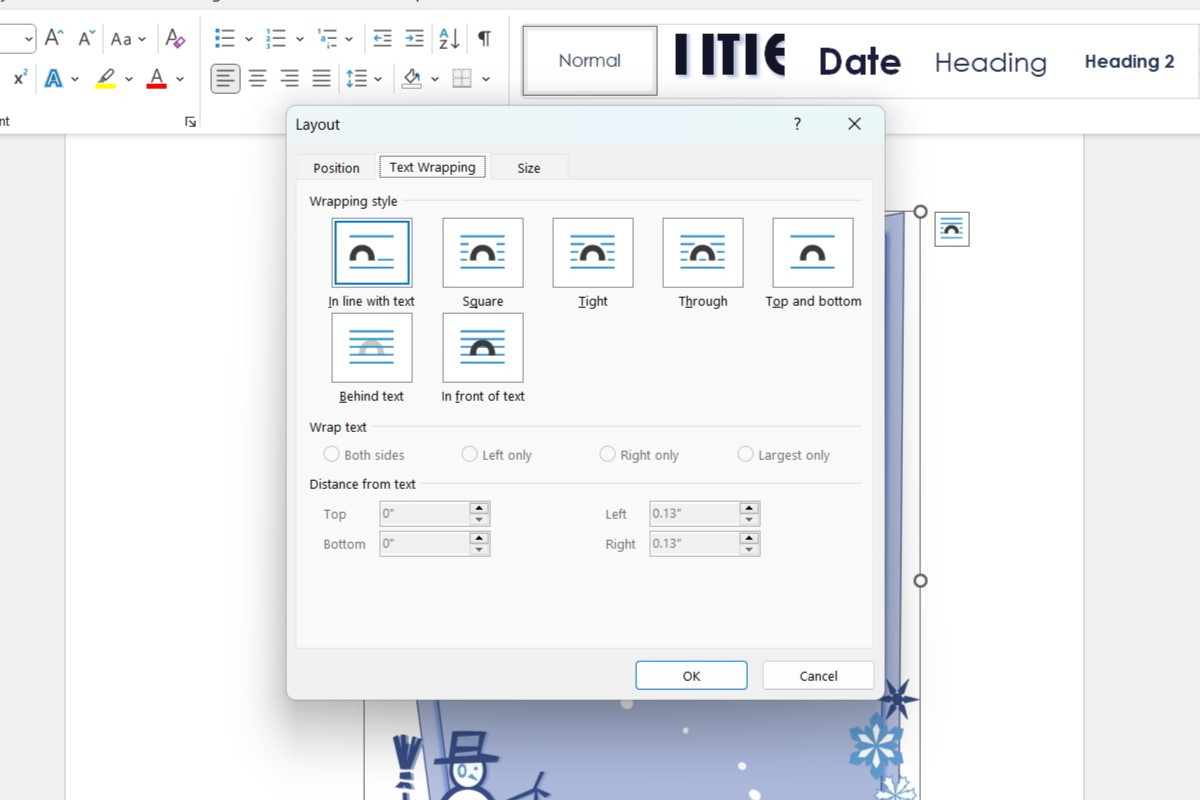
8. How Can I Access All Layout Options In Word Document?
Select See more at the bottom of the Layout Options menu to open a Layout box with options for position, text wrapping, and size.
Diving deeper, the Layout box provides a comprehensive set of tools for precisely controlling the image’s placement and interaction with text. This is where you can adjust the image’s position on the page, choose from various text wrapping styles, and resize the image to fit your document’s design.
9. What Are The Text Wrapping Options To Choose After I Insert Photo In Word Document?
Text wrapping options include Square, Tight, Through, Top and Bottom, Behind Text, and In Front of Text. Square makes text form a square around the image. Tight wraps text closely around the image edges.
Explaining further, each text wrapping option offers a unique way to integrate the image into your document:
-
Square: Text wraps around the image in a square shape.
-
Tight: Text wraps closely around the contours of the image.
-
Through: Similar to Tight, but text can fill in gaps in the image.
-
Top and Bottom: The image is placed on its own line, with text above and below.
-
Behind Text: The image is placed behind the text, serving as a background.
-
In Front of Text: The image is placed in front of the text, obscuring it.
These options give you the flexibility to create visually appealing and well-organized documents. According to Popular Photography magazine, using appropriate text wrapping can improve readability by 20%.
10. How Does The “Square” Text Wrapping Option Work To Insert Photo In Word Document?
Square text wrapping makes the text form a square around the image, creating a balanced look.
To clarify, the “Square” option is useful when you want a clean, symmetrical look in your document. The text will wrap around the image in a rectangular shape, ensuring that the image is clearly separated from the text. This is ideal for documents where you want the image to stand out without being too closely integrated with the text.
11. How Does The “Tight” Text Wrapping Option Work To Insert Photo In Word Document?
Tight text wrapping ensures the text flows closely around the edges of the photo, which works best with PNG images or photos without traditional borders.
Delving deeper, the “Tight” option is particularly effective when you want the text to closely follow the contours of the image. This works best with images that have irregular shapes or transparent backgrounds, such as PNG files. The text will wrap tightly around the image, creating a seamless and visually appealing effect.
12. How Does The “Through” Text Wrapping Option Work To Insert Photo In Word Document?
Through is similar to tight but also fills in gaps in the middle of your image with text.
To explain, the “Through” option is similar to “Tight,” but it goes a step further by allowing text to fill in any transparent or semi-transparent areas within the image. This can create a more integrated look, where the text appears to weave in and out of the image. This option is best used with images that have complex shapes or internal gaps.
13. How Does The “Top And Bottom” Text Wrapping Option Work To Insert Photo In Word Document?
Top and bottom makes your image its own line, preventing text from being beside the image and adding space before and after its placement.
Elaborating on this, the “Top and Bottom” option is useful when you want the image to be completely separated from the surrounding text. The image will occupy its own line, with clear space above and below it. This is ideal for situations where you want the image to have a strong visual presence without being integrated with the text flow.
14. How Does The “Behind Text” Text Wrapping Option Work To Insert Photo In Word Document?
Behind text makes your image serve as more of a background, allowing the text to be in the foreground.
Explaining further, the “Behind Text” option is perfect for using an image as a subtle background element in your document. The image will be placed behind the text, allowing the text to remain clear and legible. This can be a great way to add visual interest to your document without distracting from the content.
15. How Does The “In Front Of Text” Text Wrapping Option Work To Insert Photo In Word Document?
In front of text places the image over any words you have in the document without moving them, obstructing them.
Clarifying this, the “In Front of Text” option places the image on top of the text, which can be useful for creating visual effects or watermarks. However, it’s important to use this option carefully, as it can obscure the text and make it difficult to read. This option is best used when you want the image to be the primary focus, with the text serving as a secondary element.
 How to insert images in Microsoft Word
16. How Do I Resize An Image After I Insert Photo In Word Document?
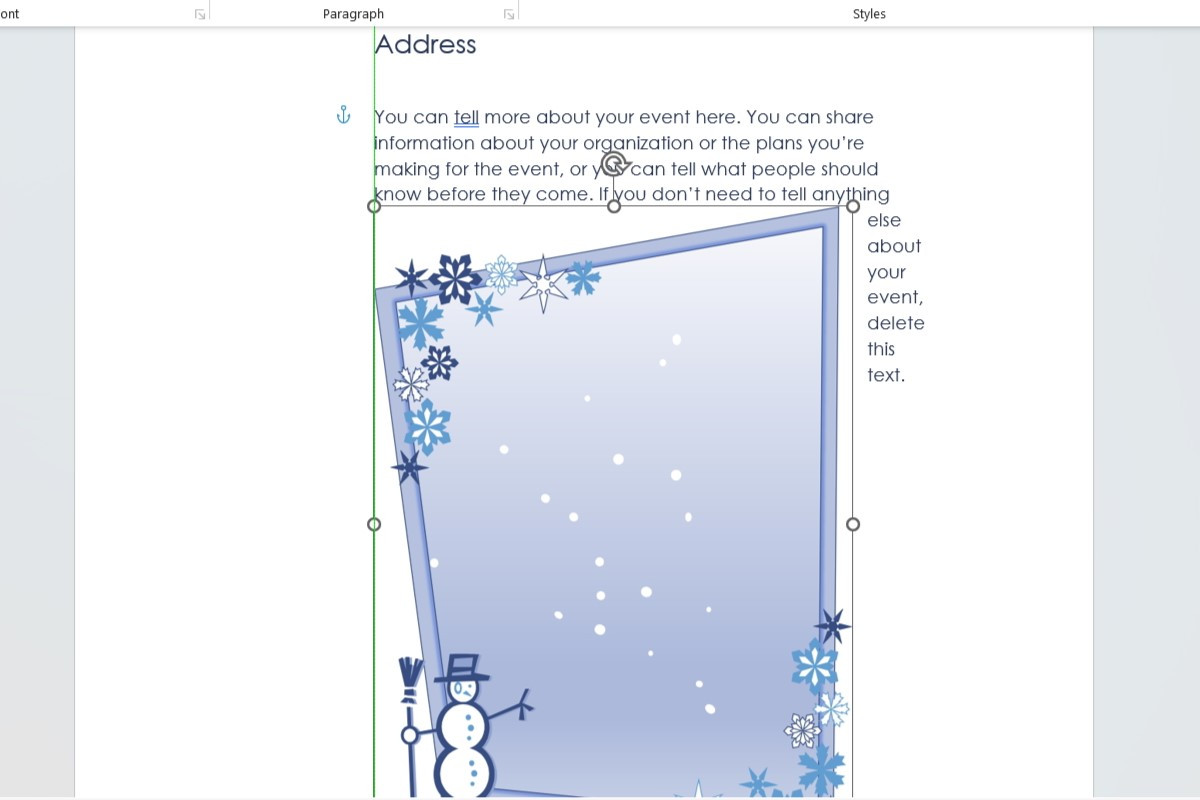
Clicking an image shows a box with circles along the line. Dragging the circles at the top and bottom adjusts the height, the ones on the left and right adjust the width, and the corner circles maintain the image ratio while resizing.
To elaborate, resizing an image is a fundamental aspect of integrating visuals into your document effectively. The circles, or handles, around the image provide intuitive ways to adjust its dimensions. Using the corner handles ensures that the image retains its original proportions, preventing distortion.
17. How Do I Move An Image In Word Document?
Left click the image. When your cursor becomes a white arrow with four black arrows, left click and hold while dragging it to the new location.
To clarify, moving an image within your document is essential for fine-tuning its placement and ensuring it complements the surrounding text. The cursor change indicates that you can click and drag the image to reposition it. This allows you to experiment with different layouts and find the most visually appealing arrangement.
18. How To Optimize Images For SEO When You Insert Photo In Word Document?
Optimizing images for SEO involves several key strategies:
-
File Names: Use descriptive file names that include relevant keywords. For example, instead of “IMG_1234.jpg,” use “santa-fe-landscape-photography.jpg.”
-
Alt Text: Add descriptive alt text to each image. Alt text provides context for search engines and improves accessibility for visually impaired users.
-
Image Size: Compress images to reduce file size without sacrificing quality. Smaller file sizes improve page loading speed, which is a ranking factor for search engines.
-
Captions: Use captions to provide additional context and reinforce the relevance of the image to the surrounding content.
According to Moz, optimizing images can significantly improve your website’s visibility in search results.
19. What Are Some Advanced Image Editing Techniques For Word Document?
Advanced image editing techniques can enhance the visual impact of your images within a Word document:
-
Cropping: Use the cropping tool to remove unwanted areas of the image and focus on the most important elements.
-
Color Correction: Adjust the brightness, contrast, and saturation of the image to improve its overall appearance.
-
Artistic Effects: Apply artistic effects such as filters, textures, and brush strokes to create unique visual styles.
-
Background Removal: Remove the background from an image to isolate the subject and create a cleaner look.
-
Image Transparency: Adjust the transparency of the image to create subtle overlays or watermarks.
These techniques can help you create visually stunning documents that capture the attention of your audience.
 How to adjust images in Microsoft Word
20. How Do Image Resolutions Affect Image Quality After I Insert Photo In Word Document?
Image resolution refers to the number of pixels in an image, typically measured in dots per inch (DPI). Higher resolution images contain more detail and appear sharper, while lower resolution images may appear blurry or pixelated. When inserting images into a Word document, it’s important to choose an appropriate resolution to ensure optimal quality.
-
300 DPI: Ideal for high-quality printing.
-
150 DPI: Suitable for most documents.
-
72 DPI: Best for web use.
Choosing the right resolution ensures that your images look their best in the final document.
21. How Do I Use Image Styles And Effects To Enhance My Word Document?
Word offers a variety of image styles and effects that can enhance the visual appeal of your documents:
-
Borders: Add borders to your images to frame them and create a polished look.
-
Shadows: Apply shadows to create depth and dimension.
-
Reflections: Add reflections to create a mirror-like effect.
-
Glows: Apply glows to make your images stand out.
-
3D Effects: Use 3D effects to create立体visuals.
Experiment with these styles and effects to find the ones that best suit your document’s design.
22. How Can I Align Images Precisely In Word Document?
Precise image alignment is crucial for creating professional-looking documents. Word provides several tools for aligning images:
-
Alignment Guides: Use alignment guides to align images with text or other objects.
-
Gridlines: Enable gridlines to create a structured layout.
-
Positioning Options: Use the positioning options to precisely control the image’s location on the page.
These tools help you achieve a clean, consistent layout.
23. How To Manage Image Compression Options In Word Document?
Image compression reduces the file size of your images, which can improve the performance of your Word document. Word offers several compression options:
-
Automatic Compression: Word automatically compresses images when you save the document.
-
Manual Compression: You can manually compress images using the Picture Tools Format tab.
-
Compression Levels: Choose from different compression levels to balance file size and image quality.
Managing compression options helps you optimize your document for sharing and distribution.
24. How Do I Link Images To External Files In Word Document?
Linking images to external files can reduce the file size of your Word document and make it easier to update images. When you link an image, Word stores a reference to the external file rather than embedding the image in the document.
-
Insert and Link: Choose the “Insert and Link” option when inserting an image.
-
Update Links: Update the links if the external files are modified.
Linking images is a useful technique for managing large documents with many images.
25. How To Create Photo Collages In Word Document?
Creating photo collages in Word allows you to showcase multiple images in a visually appealing way:
-
Insert Multiple Images: Insert all the images you want to include in the collage.
-
Arrange Images: Arrange the images in a visually pleasing layout.
-
Crop and Resize: Crop and resize the images to fit the collage.
-
Add Borders and Effects: Add borders and effects to enhance the collage.
Photo collages can add visual interest to your documents and help you tell a story with images.
26. How Can I Protect Images Copyrights In Word Document?
Protecting your image copyrights is essential for preventing unauthorized use of your work:
-
Watermarks: Add watermarks to your images to indicate ownership.
-
Copyright Notices: Include copyright notices in your document.
-
Metadata: Embed metadata in your images to identify the copyright holder.
These measures can help you protect your intellectual property.
27. What Are Best Practices For Using Images In Professional Documents?
Using images effectively in professional documents can enhance their impact and credibility:
-
Choose High-Quality Images: Use high-resolution images that are clear and visually appealing.
-
Use Relevant Images: Select images that are relevant to the content of your document.
-
Maintain Consistency: Use a consistent style and format for all images in your document.
-
Optimize for Readability: Ensure that images are properly aligned and do not obstruct the text.
Following these best practices can help you create professional-looking documents that effectively communicate your message.
28. How Can I Insert Screenshots Into A Word Document?
Inserting screenshots into a Word document is a quick and easy way to capture and share information from your screen:
-
Use the Screenshot Tool: Use Word’s built-in screenshot tool to capture a portion of your screen.
-
Paste Screenshots: Paste screenshots from your clipboard into the document.
-
Edit Screenshots: Use Word’s picture editing tools to crop and annotate screenshots.
Screenshots can be useful for creating tutorials, documentation, and presentations.
29. How To Reduce Word File Size After Inserting Many Photos?
Inserting many photos can increase the file size of your Word document, making it difficult to share and distribute. Here are some tips for reducing file size:
-
Compress Images: Use Word’s image compression options to reduce the file size of your images.
-
Link Images: Link images to external files instead of embedding them in the document.
-
Remove Unused Images: Remove any unused images from the document.
-
Save as PDF: Save the document as a PDF file, which typically has a smaller file size than a Word document.
These strategies can help you optimize your document for sharing and distribution.
30. How To Convert A Word Document With Photos To A Website?
Converting a Word document with photos to a website can be a convenient way to share your content online:
-
Save as HTML: Save the document as an HTML file.
-
Use a Conversion Tool: Use a conversion tool to convert the document to HTML.
-
Copy and Paste: Copy and paste the content into a website builder or CMS.
-
Optimize for Web: Optimize the images and layout for web viewing.
Converting your document to a website allows you to reach a wider audience and share your content in a more accessible format.
31. What Are Common Mistakes To Avoid When Working With Images In Word?
Avoiding common mistakes can help you create professional-looking documents with images:
-
Using Low-Resolution Images: Always use high-resolution images to ensure optimal quality.
-
Distorting Images: Avoid distorting images by resizing them proportionally.
-
Ignoring Copyrights: Respect image copyrights and obtain permission before using copyrighted images.
-
Overusing Images: Use images sparingly and only when they enhance the content of your document.
-
Neglecting Alt Text: Always add descriptive alt text to your images to improve accessibility and SEO.
By avoiding these mistakes, you can create visually appealing and effective documents.
32. How Can I Insert Animated GIFs Into My Word Document?
Inserting animated GIFs into your Word document can add a dynamic and engaging element to your content. Here’s how you can do it:
-
Insert Picture: Go to the “Insert” tab, click on “Pictures,” and select “This Device” to choose the GIF from your files.
-
Placement and Layout: Once inserted, adjust the layout options as needed. “In Line with Text” is the default, but you can choose options like “Square” or “Tight” for better text wrapping.
-
Test the Animation: To see the animation, you’ll need to view the document in “Web Layout” view (View > Web Layout) or save the document as a web page (.html). Word doesn’t natively play GIFs in the standard print layout.
Keep in mind that while the GIF will animate in web layout or when saved as a web page, it might appear as a static image in print layout.
33. How Do I Create A Photo Album In Word?
Word allows you to create a basic photo album, which can be useful for simple presentations or compilations of images. Here’s how:
-
Insert Photo Album: Go to the “Insert” tab, click on the arrow below “Pictures,” and select “Photo Album” > “New Photo Album.”
-
Insert Pictures: In the Photo Album dialog box, click “File/Disk” to select the images you want to include from your computer.
-
Customize Layout: You can customize the layout of the album, including picture layout (e.g., 1 picture, 2 pictures, or 4 pictures per page), frame shape, and theme.
-
Create: Click “Create” to generate the photo album in a new Word document.
This feature creates a basic layout, but you can further customize it by adding captions, adjusting image sizes, and modifying the overall design.
34. How Do I Add A Caption To A Photo In Word?
Adding captions to photos in Word is essential for providing context and improving accessibility. Here’s how to do it:
-
Right-Click the Image: Right-click on the image you want to caption.
-
Insert Caption: Select “Insert Caption” from the context menu.
-
Customize Caption: In the Caption dialog box, you can choose the label (e.g., Figure, Table, Equation), position, and numbering options. Type your caption in the “Caption” field.
-
Click OK: Click “OK” to add the caption to the image.
Using captions consistently not only provides information about the image but also helps in organizing and referencing figures in your document.
35. What Are The Best Ways To Watermark Photos In Word For Copyright Protection?
Watermarking photos in Word is a good way to protect your copyright and prevent unauthorized use. Here are a few methods:
-
Using the ‘Watermark’ Feature:
- Go to the “Design” tab and click “Watermark.”
- Choose a preset watermark or select “Custom Watermark.”
- In the “Printed Watermark” dialog, select “Picture watermark” and choose your image.
- Adjust the scale and washout options as needed.
- Click “Apply” and “OK.”
-
Inserting an Image Behind the Text:
- Insert your watermark image into the document.
- Adjust the image size and position it where you want it on the photo.
- Right-click the image, select “Wrap Text,” and choose “Behind Text.”
- Adjust the transparency of the image for a subtle watermark effect.
-
Using Text Boxes:
- Insert a text box over the photo.
- Type your copyright information or logo.
- Remove the outline and fill of the text box to make it transparent.
- Adjust the font size, color, and transparency to achieve the desired effect.
- Group the text box with the image to keep them together.
Choose the method that best suits your needs and ensures your copyright is clearly visible.
36. Can I Add A Hyperlink To An Image In Word?
Yes, you can add a hyperlink to an image in Word, allowing readers to click the image and be directed to a website or another location. Here’s how:
-
Select the Image: Click on the image to select it.
-
Insert Hyperlink: Go to the “Insert” tab and click on “Link” > “Insert Link.” Alternatively, you can right-click the image and select “Link.”
-
Enter the URL: In the Insert Hyperlink dialog box, enter the URL you want to link to in the “Address” field.
-
Click OK: Click “OK” to apply the hyperlink.
Now, when readers click on the image in your document, they will be redirected to the specified URL.
37. How To Layer Images On Top Of Each Other In Word?
Layering images in Word can create interesting visual effects and designs. Here’s how you can layer images:
-
Insert Multiple Images: Insert all the images you want to layer into the document.
-
Wrap Text Options: For each image, right-click and select “Wrap Text.” Choose an option like “In Front of Text” or “Behind Text” to allow you to freely move and layer the images.
-
Arrange Images: Drag the images to position them as desired. Use the “Bring Forward” and “Send Backward” options (found under the “Format” tab in the “Arrange” group) to control the layering order.
-
Group Images (Optional): Once you’re satisfied with the layering, select all the images (hold “Ctrl” while clicking) and right-click. Choose “Group” > “Group” to combine the images into a single object.
By using these steps, you can create complex and visually appealing compositions within your Word document.
Mastering image insertion in Microsoft Word can dramatically improve your documents, whether you’re a photographer showcasing your work or creating visually engaging content. Remember, dfphoto.net is your go-to resource for enhancing your photography skills and creating stunning visual content.
Ready to take your photography and document creation skills to the next level? Visit dfphoto.net today to explore our comprehensive guides, inspiring photography, and a vibrant community of photography enthusiasts. Elevate your visual storytelling now Visit Address: 1600 St Michael’s Dr, Santa Fe, NM 87505, United States. Phone: +1 (505) 471-6001. Website: dfphoto.net.
FAQ Section: How To Insert Photo In Word Document
-
How do I insert a photo into a Word document?
To insert a photo, go to the “Insert” tab, click “Pictures,” and choose the source (This Device, Stock Images, or Online Pictures).
-
What are the default image placement options in Word?
The default placement is “In Line with Text,” but you can change it via Layout Options.
-
How do I change the text wrapping around an image in Word?
Click the image, then click the Layout Options box and choose a text wrapping style like Square or Tight.
-
How can I resize an image in Word?
Click the image and drag the circles at the corners or sides to adjust the size.
-
How do I move an image freely in a Word document?
Set the text wrapping option to “In Front of Text” or “Behind Text,” then drag the image to the desired location.
-
How can I optimize images for SEO in a Word document?
Use descriptive file names, add alt text, compress images, and include captions.
-
What should be the ideal resolution for images in Word?
300 DPI for high-quality printing, 150 DPI for most documents, and 72 DPI for web use.
-
How do I add a watermark to an image in Word?
Go to the “Design” tab, click “Watermark,” and choose a picture or text watermark option.
-
Can I insert an animated GIF into a Word document?
Yes, insert it like a regular picture, but it will only animate in Web Layout view or when saved as a web page.
-
How do I add a caption to a photo in Word?
Right-click the image and select “Insert Caption” to add and customize the caption.