Transferring photos from your camera to your iPad is easier than you think, and this dfphoto.net guide will show you how! You’ll learn about various methods, including using Apple camera adapters, wireless options, and cloud storage. Let’s dive into the world of digital image management, ensuring you can effortlessly share and edit your photographic art.
1. Understanding the Basics of Photo Transfer
1.1. Why Transfer Photos from Camera to iPad?
Why bother transferring photos from your camera to your iPad? It’s all about convenience and workflow. An iPad offers a larger screen for reviewing images than your camera’s LCD, making it easier to check focus and composition. Plus, with apps like Adobe Lightroom Mobile and Procreate, you can edit and share your photos on the go.
1.2. Key Considerations Before Transfer
Before you start, consider these factors:
- Storage Space: Ensure your iPad has enough free space to accommodate the photos.
- Battery Life: Both your camera and iPad should have sufficient battery life to complete the transfer.
- File Format: iPads support common image formats like JPEG, PNG, and RAW. However, some cameras may use proprietary RAW formats that require specific apps or conversion.
- Image Quality: Decide if you want to transfer full-resolution images or compressed versions. Full resolution is best for editing, while compressed versions save space.
1.3. Essential Equipment and Software
You’ll need a few things:
- iPad: Any iPad model will work, but newer models have faster processors and more storage.
- Camera: Ensure your camera is compatible with the chosen transfer method.
- Apple Camera Adapter (Optional): A Lightning to USB or USB-C to SD Card adapter for direct connections.
- USB Cable: For connecting your camera directly to the iPad (if using an adapter).
- Wi-Fi Network (Optional): For wireless transfer methods.
- Cloud Storage Account (Optional): Services like iCloud, Google Photos, or Dropbox.
- Photo Management App: The built-in Photos app is sufficient, but third-party apps offer more features.
2. Methods for Transferring Photos
2.1. Using Apple Camera Adapters
The most reliable way to transfer photos is using Apple’s camera adapters. These adapters create a direct connection between your camera or SD card and your iPad.
2.1.1. Types of Apple Camera Adapters
- Lightning to SD Card Camera Reader: For iPads with a Lightning port and SD cards.
- Lightning to USB 3 Camera Adapter: For iPads with a Lightning port and USB connections. This adapter also supports faster USB 3 speeds on certain iPad Pro models.
- USB-C to SD Card Reader: For iPads with a USB-C port and SD cards.
2.1.2. Step-by-Step Guide to Using Adapters
- Connect the adapter to your iPad.
- Connect your camera to the adapter via USB or insert an SD card into the reader.
- Open the Photos app. The app should automatically open the Import tab. If not, tap the Import tab at the bottom.
- Select the photos you want to import or tap “Import All.”
- Choose whether to keep or delete the photos on your camera or SD card after importing.

2.1.3. Troubleshooting Adapter Issues
- iPad Not Recognizing the Adapter: Ensure your iPad is updated to the latest iOS or iPadOS version. Disconnect and reconnect the adapter.
- Photos App Not Opening: Manually open the Photos app and check for the Import tab.
- Unsupported File Format: Some file formats may not be supported. Try converting the files on your computer before transferring. According to Apple Support, Apple camera adapters can import multiple types of media files from your digital camera or SD card. If the format isn’t compatible with iOS, you won’t be able to view them on your device, but can import them to your computer later.
- Adapter Not Working: Test with a different adapter or camera to isolate the issue.
- Power Issues: Ensure your camera has sufficient battery or is connected to a power source. The Lightning to USB 3 Camera Adapter can also be connected to a power source for stable transfers.
2.2. Wireless Transfer Methods
Wireless transfer offers a cable-free solution, perfect for on-the-go photographers.
2.2.1. Using Wi-Fi Enabled Cameras
Many modern cameras have built-in Wi-Fi, allowing you to transfer photos directly to your iPad.
- Enable Wi-Fi on Your Camera: Refer to your camera’s manual for instructions on enabling Wi-Fi and connecting to a network.
- Install Camera’s Companion App: Most camera manufacturers have a companion app for iOS. Download and install it from the App Store.
- Connect Camera to iPad: Follow the app’s instructions to connect your camera to your iPad via Wi-Fi.
- Transfer Photos: Use the app to browse your camera’s photos and select the ones you want to transfer.
2.2.2. Using Eye-Fi Cards
Eye-Fi cards are SD cards with built-in Wi-Fi. They automatically transfer photos to your iPad or computer when in range of a configured Wi-Fi network.
- Install Eye-Fi App: Download and install the Eye-Fi app from the App Store.
- Configure Eye-Fi Card: Follow the app’s instructions to set up your Eye-Fi card and connect it to your Wi-Fi network.
- Insert Card into Camera: Insert the Eye-Fi card into your camera.
- Take Photos: As you take photos, they will automatically transfer to your iPad when in range of your Wi-Fi network.
2.2.3. Using Cloud Storage Services
Cloud storage services like iCloud, Google Photos, and Dropbox provide a convenient way to sync photos between your camera and iPad.
- Upload Photos to Cloud: Use your computer or camera’s companion app to upload photos to your chosen cloud storage service.
- Install Cloud Storage App on iPad: Download and install the cloud storage app on your iPad.
- Sync Photos: Enable automatic syncing in the app settings. Your photos will automatically download to your iPad.
 Cloud Storage Services
2.3. Direct USB Connection (For Cameras with USB-C)
Some newer cameras feature USB-C ports, allowing a direct connection to iPads with USB-C ports.
- Connect Camera to iPad: Use a USB-C cable to connect your camera directly to your iPad.
- Open Photos App: The Photos app should recognize the camera as a connected device.
- Import Photos: Select the photos you want to import and tap “Import.”
2.4. Using AirDrop (For iPhones)
If you first transfer photos to your iPhone, you can then use AirDrop to send them to your iPad.
- Transfer Photos to iPhone: Use any of the methods above to transfer photos to your iPhone.
- Select Photos in Photos App: Open the Photos app on your iPhone and select the photos you want to transfer.
- Tap Share Button: Tap the Share button in the bottom left corner.
- Choose AirDrop: Select your iPad from the AirDrop options.
- Accept Transfer on iPad: Your iPad will receive a notification to accept the transfer.
3. Managing Photos on Your iPad
3.1. Organizing Photos in the Photos App
The Photos app offers several ways to organize your photos:
- Albums: Create albums to group photos by event, location, or theme.
- Smart Albums: Automatically organize photos based on criteria like date, location, or people.
- Keywords: Add keywords to photos for easy searching.
- Facial Recognition: The Photos app automatically recognizes faces and groups photos accordingly.
3.2. Editing Photos on Your iPad
The Photos app includes basic editing tools:
- Adjustments: Adjust brightness, contrast, saturation, and other parameters.
- Filters: Apply pre-set filters for quick enhancements.
- Cropping: Crop and straighten photos.
For more advanced editing, consider third-party apps like:
- Adobe Lightroom Mobile: A professional-grade photo editing app with powerful tools and cloud syncing.
- VSCO: A popular app with a wide range of filters and editing tools.
- Snapseed: A free app from Google with a comprehensive set of editing tools.
- Procreate: A digital illustration app perfect for creative photo manipulation.
3.3. Backing Up Your Photos
Protect your precious memories by backing up your photos regularly:
- iCloud Photos: Automatically syncs your photos to iCloud.
- Google Photos: Offers free storage for compressed photos or paid storage for full-resolution images.
- External Hard Drive: Connect an external hard drive to your iPad using an adapter and copy your photos.
- Computer: Transfer your photos to your computer and back them up to an external hard drive or cloud service.
4. Advanced Tips and Tricks
4.1. Using Shortcuts for Faster Transfers
Create custom shortcuts to automate the photo transfer process. For example, you can create a shortcut that automatically imports photos from your camera to a specific album in the Photos app.
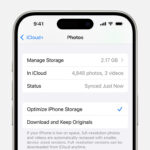
4.2. Optimizing iPad Storage for Photos
- Optimize iPad Storage: Enable this feature in Settings > Photos to store smaller, optimized versions of your photos on your iPad and full-resolution versions in iCloud.
- Delete Duplicate Photos: Use a duplicate photo finder app to remove duplicate photos and free up storage space.
- Compress Photos: Use a photo compression app to reduce the file size of your photos without significantly affecting quality.
4.3. RAW vs. JPEG: Which to Transfer?
RAW files contain all the data captured by your camera’s sensor, providing maximum flexibility for editing. JPEG files are compressed and processed by the camera, resulting in smaller file sizes but less editing flexibility.
If you plan to heavily edit your photos, transfer RAW files. If you need to save space and don’t plan to do extensive editing, JPEG files are sufficient.
4.4. Calibrating Your iPad Display for Accurate Colors
For accurate color reproduction, calibrate your iPad’s display using a colorimeter or spectrophotometer. This will ensure that your photos look their best on your iPad.
5. Troubleshooting Common Issues
5.1. iPad Not Recognizing Camera or SD Card
- Check Connections: Ensure all cables are securely connected.
- Restart Devices: Restart both your iPad and camera.
- Update Software: Ensure your iPad is running the latest version of iOS or iPadOS.
- Test with Another Device: Test the adapter, camera, or SD card with another device to isolate the issue.
- Check Compatibility: Ensure your camera and SD card are compatible with the adapter and iPad.
5.2. Slow Transfer Speeds
- Use USB 3 Adapter: If your iPad supports USB 3, use a Lightning to USB 3 Camera Adapter for faster transfer speeds.
- Transfer Smaller Batches: Transferring photos in smaller batches can sometimes improve transfer speeds.
- Close Other Apps: Close other apps on your iPad to free up resources.
- Ensure Adequate Power: Make sure your camera and iPad are sufficiently charged or connected to a power source.
5.3. Photos Not Importing Correctly
- Check File Format: Ensure the photos are in a supported file format.
- Check for Corruption: Check the photos for corruption on your camera or computer.
- Try a Different Method: Try a different transfer method, such as wireless transfer or cloud storage.
5.4. Photos Missing After Transfer
- Check Photos App: Ensure the photos have been imported into the Photos app.
- Check Hidden Album: Check the Hidden album in the Photos app.
- Search for Photos: Use the search function in the Photos app to search for the missing photos by date or filename.
6. The Future of Photo Transfer
6.1. Emerging Technologies in Photo Transfer
- Wireless Direct Transfer: Cameras are increasingly supporting wireless direct transfer to iPads and other devices.
- 5G Connectivity: Faster 5G networks will enable faster wireless transfers.
- AI-Powered Photo Management: AI-powered photo management apps will automatically organize and edit your photos.
6.2. The Role of dfphoto.net in the Photo Community
dfphoto.net is committed to providing the latest information and resources for photographers of all levels. From gear reviews to editing tutorials, dfphoto.net is your one-stop shop for all things photography.
Explore our extensive collection of articles and tutorials to learn new techniques, discover inspiring photographers, and stay up-to-date on the latest trends.
7. Conclusion: Seamless Photo Transfer for Creative Freedom
Transferring photos from your camera to your iPad doesn’t have to be a chore. With the right tools and techniques, you can streamline your workflow and unlock your creative potential.
Whether you prefer the reliability of Apple camera adapters, the convenience of wireless transfer, or the flexibility of cloud storage, there’s a method that’s perfect for you.
Embrace the power of dfphoto.net to enhance your photography skills and connect with a vibrant community of fellow enthusiasts.
Ready to take your photography to the next level? Visit dfphoto.net today and discover a world of inspiration, knowledge, and community.
Address: 1600 St Michael’s Dr, Santa Fe, NM 87505, United States. Phone: +1 (505) 471-6001. Website: dfphoto.net.
8. FAQ: Frequently Asked Questions
8.1. Can I transfer RAW files from my camera to my iPad?
Yes, you can transfer RAW files from your camera to your iPad. However, you’ll need a photo editing app that supports RAW files, such as Adobe Lightroom Mobile or Snapseed.
8.2. What is the fastest way to transfer photos from my camera to my iPad?
The fastest way to transfer photos is typically by using a Lightning to USB 3 Camera Adapter or USB-C cable, depending on your iPad model, as they support USB 3 speeds.
8.3. How do I know if my iPad supports USB 3 transfer speeds?
iPad Pro 12.9-inch (1st and 2nd generation), iPad Pro 10.5-inch, iPhone 15 Pro, and iPhone 15 Pro Max support USB-3 transfer speeds. All other adapters and iOS devices use USB 2 speeds.
8.4. Can I transfer photos from my camera to my iPad without an adapter?
Yes, you can transfer photos wirelessly using Wi-Fi enabled cameras, Eye-Fi cards, or cloud storage services.
8.5. Why is my iPad not recognizing my camera or SD card?
Check the connections, restart the devices, update the software, test with another device, and ensure compatibility between your camera, SD card, adapter, and iPad.
8.6. How much storage space do I need on my iPad for photos?
The amount of storage space you need depends on the number and size of your photos. RAW files take up significantly more space than JPEG files.
8.7. Can I edit photos on my iPad?
Yes, you can edit photos using the built-in Photos app or third-party apps like Adobe Lightroom Mobile, VSCO, and Snapseed.
8.8. How do I back up my photos from my iPad?
Back up your photos using iCloud Photos, Google Photos, an external hard drive, or your computer.
8.9. What is the difference between RAW and JPEG files?
RAW files contain all the data captured by your camera’s sensor, providing maximum flexibility for editing. JPEG files are compressed and processed by the camera, resulting in smaller file sizes but less editing flexibility.
8.10. Where can I find more photography tips and resources?
Visit dfphoto.net for the latest photography tips, tutorials, gear reviews, and community discussions.