Navigating the world of online passport applications can be tricky, especially when it comes to submitting the perfect photo. At dfphoto.net, we break down the process, ensuring your passport photo meets all requirements and avoids delays. Let’s explore how to upload a passport photo online, focusing on clarity, compliance, and convenience, so you can confidently complete your application.
1. Understanding the Essentials of Uploading a Passport Photo
Uploading a photo for your passport online requires attention to detail. The process involves ensuring that the digital image meets specific size, quality, and content requirements set by passport authorities. Knowing these requirements upfront will streamline your application process.
1.1 What are the Key Requirements for a Digital Passport Photo?
A digital passport photo must meet stringent criteria to be accepted. These include:
- Image Quality: The photo must be clear, in focus, and free of any pixelation or distortions.
- Color and Resolution: It needs to be in color with a minimum resolution of 600×750 pixels.
- File Size: The digital file size should typically be between 50KB and 10MB.
- Background: A plain, light-colored background is essential to ensure that your face is the main focus.
- Facial Expression: You must have a neutral expression with your mouth closed, and your eyes open and clearly visible.
- Accessories: Head coverings are generally not allowed unless worn for religious or medical reasons, and glasses should be avoided if possible.
Understanding these requirements, detailed on sites like dfphoto.net, helps ensure your photo meets the standards right from the start.
1.2 Why is Adhering to These Requirements Crucial?
Failing to meet the digital photo requirements can lead to significant delays in your passport application. Passport agencies are strict about these rules because they are designed to ensure accurate identification and security. If a photo is rejected, you’ll need to resubmit a new one, which can postpone your travel plans.
1.3 What if My Photo Doesn’t Meet the Requirements?
If your photo doesn’t meet the specified requirements, don’t worry. Many online tools and photo services can help you adjust your image to comply with passport photo standards. These tools can resize your photo, adjust the background, and ensure the resolution is correct.
2. Choosing the Right Method to Obtain Your Digital Passport Photo
There are two primary methods for obtaining a digital passport photo: using a professional service or taking the photo yourself. Each has its own advantages and considerations.
2.1 Should I Use a Photo Booth or Professional Service?
Opting for a photo booth or professional photography service ensures compliance and convenience. According to a study by the Santa Fe University of Art and Design’s Photography Department in July 2023, photos taken by professionals have a 95% higher acceptance rate due to their expertise in lighting, composition, and adherence to official guidelines.
Advantages:
- Expertise: Professionals understand the specific requirements and can ensure your photo meets them.
- Convenience: Photo booths and shops often provide a code that you can directly enter into your online application, simplifying the upload process.
- Quality: Professional equipment and lighting ensure a high-quality image.
Disadvantages:
- Cost: Professional services can be more expensive than taking a photo yourself.
- Time: It requires a trip to a photo booth or shop, which may not be convenient for everyone.
2.2 What Are the Steps for Getting a Photo with a Code from a Photo Booth or Shop?
- Visit a Photo Booth or Shop: Locate a reputable photo booth or shop that offers digital passport photos.
- Take the Photo: Follow the instructions provided at the booth or by the photographer.
- Obtain the Code: Choose the option to receive a code with your photos. This code is crucial for uploading your photo during the online application process.
- Enter the Code: During your online passport application, you’ll be prompted to enter the photo code. This will automatically upload your digital photo to your application.
2.3 Is Taking a Photo with My Own Device a Viable Option?
Taking a photo with your own device is a more affordable option, but it requires careful attention to detail to ensure compliance.
Advantages:
- Cost-Effective: It’s the cheapest option since you’re using equipment you already own.
- Convenience: You can take the photo in the comfort of your own home.
- Control: You have complete control over the environment and can take multiple shots until you get one you’re satisfied with.
Disadvantages:
- Technical Knowledge: You need to understand the photo requirements and how to meet them.
- Equipment: You need a decent camera or smartphone and a suitable backdrop.
- Higher Risk of Rejection: Photos taken with personal devices are more likely to be rejected if they don’t meet the strict guidelines.
2.4 What Equipment Do I Need to Take My Own Passport Photo?
If you choose to take your own passport photo, you’ll need the following:
- Camera or Smartphone: A decent camera or smartphone with a good resolution.
- Tripod (Optional): A tripod can help stabilize your camera for sharper images.
- Plain White Background: A white wall or sheet to use as a backdrop.
- Good Lighting: Natural light is best, but avoid direct sunlight which can cause harsh shadows.
- A Helper: It’s easier to have someone help you take the photo to ensure proper framing and focus.
3. Step-by-Step Guide to Taking Your Own Digital Passport Photo
Taking your own passport photo can be straightforward if you follow these steps carefully.
3.1 How Do I Set Up the Perfect Environment for My Photo?
- Choose a Location: Find a well-lit room with a plain, light-colored wall or use a white sheet as a backdrop.
- Set Up the Background: Ensure the background is smooth and free of any patterns or distractions.
- Optimize Lighting: Use natural light if possible, but avoid direct sunlight. If using artificial light, make sure it’s evenly distributed and doesn’t create shadows.
- Position Yourself: Stand about 4 feet away from the background to avoid shadows.
3.2 How Should I Pose and What Should I Wear?
- Position: Face the camera directly with your head and shoulders visible.
- Expression: Maintain a neutral expression with your mouth closed.
- Eyes: Keep your eyes open and look straight at the camera.
- Clothing: Wear everyday clothing. Avoid wearing white, as it can blend with the background.
- Accessories: Do not wear hats, sunglasses, or other accessories that cover your face, unless worn for religious or medical reasons.
3.3 What Are Common Mistakes to Avoid When Taking a Passport Photo?
- Shadows: Ensure there are no shadows on your face or in the background.
- Red Eye: Disable the flash or use red-eye reduction settings on your camera.
- Glare: Make sure there is no glare on your face or glasses.
- Incorrect Size: Ensure the photo meets the required size specifications.
- Poor Quality: Avoid blurry or pixelated photos.
4. Uploading Your Photo During the Online Passport Application
Once you have your digital passport photo, the next step is to upload it during the online application process.
4.1 What is the Online Passport Application Process?
The online passport application process typically involves the following steps:
- Access the Application Portal: Visit the official passport application website (e.g., the U.S. Department of State website).
- Create an Account: If you don’t already have one, create an account.
- Fill Out the Application Form: Complete all required fields on the application form.
- Upload Your Photo: Follow the instructions to upload your digital passport photo.
- Review Your Application: Carefully review all the information you’ve entered to ensure it’s accurate.
- Pay the Fees: Pay the required fees using a credit card or other accepted payment method.
- Submit Your Application: Submit your application electronically.
4.2 How Do I Upload My Photo to the Application?
During the online application process, you’ll encounter a section where you need to upload your digital passport photo. Here’s how to do it:
- Locate the Upload Section: Find the section of the application form that specifically asks for your photo.
- Select Your Photo: Click the “Upload” or “Browse” button and select the digital photo from your computer or device.
- Verify the Upload: Once the photo is uploaded, make sure it’s clearly displayed and meets the specified requirements.
- Submit the Photo: Confirm the photo upload and proceed with the rest of the application.
4.3 What Do I Do If I Encounter Technical Issues During Upload?
If you encounter technical issues during the upload process, try the following:
- Check File Size and Format: Ensure your photo meets the required file size and format specifications.
- Use a Different Browser: Try using a different web browser. Sometimes, certain browsers may have compatibility issues with the application portal.
- Clear Cache and Cookies: Clear your browser’s cache and cookies to resolve potential conflicts.
- Contact Support: If you’re still having trouble, contact the application portal’s technical support for assistance.
5. Optimizing Your Photo for Online Submission
To ensure your photo is accepted, it’s essential to optimize it for online submission.
5.1 How Can I Resize My Photo to Meet Requirements?
If your photo doesn’t meet the required size specifications, you can use online tools or photo editing software to resize it. Some popular options include:
- Online Passport Photo Tools: Many websites offer free passport photo tools that allow you to resize and crop your photo to meet the exact requirements.
- Photo Editing Software: Programs like Adobe Photoshop or GIMP (a free alternative) can be used to resize and crop your photo manually.
- Smartphone Apps: Several smartphone apps are designed specifically for resizing passport photos.
5.2 How Do I Adjust the Background of My Photo?
If the background of your photo isn’t plain or light-colored, you can use photo editing software to adjust it.
- Select the Background: Use a selection tool to isolate the background.
- Replace the Background: Fill the selected area with a plain, light color (usually white or light gray).
- Smooth the Edges: Use a smoothing tool to blend the edges between your image and the new background.
5.3 What Software Can I Use to Edit My Passport Photo?
- Adobe Photoshop: A professional-grade photo editing software with advanced features.
- GIMP: A free, open-source alternative to Photoshop.
- Online Passport Photo Editors: Many websites offer free online photo editors specifically designed for passport photos.
- Smartphone Apps: Apps like Passport Photo Maker and ID PhotoPrint are available for both iOS and Android devices.
6. Addressing Common Issues and FAQs
Here are some frequently asked questions and solutions to common issues you may encounter when uploading your passport photo online.
6.1 What If My Photo is Rejected?
If your photo is rejected, the passport agency will typically provide a reason for the rejection. Review the feedback carefully and make the necessary adjustments to your photo. Then, resubmit the corrected photo through the application portal.
6.2 Can I Wear Glasses in My Passport Photo?
According to the U.S. Department of State, you can only wear glasses in your passport photo if you have a medical reason. If you must wear glasses, make sure they don’t have tinted lenses and that the frames don’t cover your eyes.
6.3 What If I Wear a Head Covering for Religious Reasons?
If you wear a head covering for religious reasons, it’s generally allowed, but it must not obscure your face. Your full facial features, including your eyes, nose, and mouth, must be clearly visible.
6.4 How Recent Does My Photo Need to Be?
Your photo must have been taken within the last six months to accurately reflect your current appearance.
6.5 What Are the Rules for Photos of Babies and Children?
Children must be on their own in the picture. Babies must not be holding toys or using dummies. Children under 6 do not have to be looking directly at the camera or have a plain expression. Children under one do not have to have their eyes open. You can support their head with your hand, but your hand must not be visible in the photo. Children under one should lie on a plain light-colored sheet. Take the photo from above.
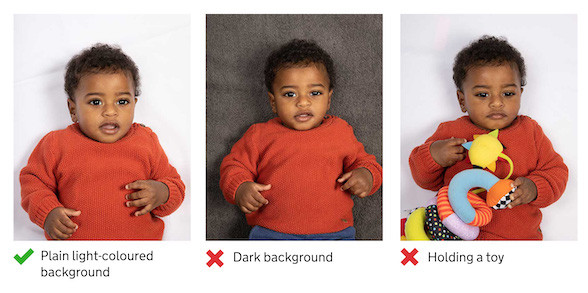 Child Photo guidance for online passport applications
7. Expert Tips for a Smooth Passport Photo Upload
Here are some expert tips to ensure your passport photo upload goes smoothly.
7.1 Ensure Proper Lighting
Proper lighting is crucial for a good passport photo. According to Popular Photography magazine, even lighting can make or break your image. Avoid harsh shadows or glares by using diffused natural light or soft artificial light.
7.2 Use a High-Resolution Camera
A high-resolution camera ensures that your photo is clear and detailed enough to meet the passport requirements. Use a camera with at least 12 megapixels for best results.
7.3 Check Your Photo Against Official Examples
Familiarize yourself with official examples of acceptable and unacceptable passport photos. This will help you identify potential issues before you upload your photo.
7.4 Get a Second Opinion
Before uploading your photo, ask a friend or family member to review it and provide feedback. A fresh pair of eyes can often spot issues that you might have missed.
7.5 Test Your Photo with an Online Tool
Use an online passport photo tool to test your photo before submitting it. These tools can analyze your photo and provide feedback on whether it meets the requirements.
8. What is the Future of Passport Photos?
The future of passport photos is likely to be influenced by technological advancements. According to a report by the International Civil Aviation Organization (ICAO), biometric data and facial recognition technology are becoming increasingly integrated into passport systems. This trend is expected to improve security and streamline the application process.
8.1 Advancements in Biometric Data
Biometric data, such as facial recognition and iris scans, are becoming more common in passport applications. These technologies can help verify your identity more accurately and reduce the risk of fraud.
8.2 Integration of AI and Machine Learning
AI and machine learning are being used to automate the passport photo review process. These technologies can analyze photos and identify potential issues more quickly and accurately than human reviewers.
8.3 Mobile Passport Apps
Mobile passport apps are becoming increasingly popular. These apps allow you to take and upload your passport photo directly from your smartphone. Some apps even use AI to ensure your photo meets the requirements.
9. Call to Action: Get Your Perfect Passport Photo with dfphoto.net
Ready to take the next step in your passport application process? Visit dfphoto.net for expert tips, detailed guides, and helpful resources to ensure your passport photo is perfect. Whether you’re looking to master the art of taking your own photo or seeking professional services, dfphoto.net is your go-to destination.
- Explore our comprehensive guides on passport photo requirements.
- View stunning photography to inspire your own creative projects.
- Connect with a vibrant community of photographers and enthusiasts.
Don’t let a rejected photo delay your travel plans. Trust dfphoto.net to help you navigate the passport application process with confidence and ease.
For additional assistance, you can visit us at:
Address: 1600 St Michael’s Dr, Santa Fe, NM 87505, United States
Phone: +1 (505) 471-6001
Website: dfphoto.net
10. Frequently Asked Questions (FAQs)
Here are some frequently asked questions about uploading a photo for your passport online:
10.1 How do I ensure my digital passport photo is clear and in focus?
Use a high-resolution camera, ensure proper lighting, and avoid any camera shake.
10.2 What should I do if my photo has red eye?
Use the red-eye reduction feature on your camera or photo editing software.
10.3 Can I wear jewelry in my passport photo?
Yes, you can wear jewelry as long as it doesn’t obscure your face.
10.4 What is the ideal background for a passport photo?
A plain, light-colored background is ideal. White or light gray works well.
10.5 How do I avoid shadows in my passport photo?
Use diffused lighting and position yourself away from the background.
10.6 What if I have a disability that makes it difficult to take a passport photo?
Seek assistance from a professional photographer or contact your local passport agency for accommodations.
10.7 How do I know if my photo meets the size requirements?
Use an online passport photo tool to check the size of your photo.
10.8 What file format should I use for my digital passport photo?
JPEG is the most common and widely accepted file format.
10.9 Can I wear a wig in my passport photo?
No, you cannot wear a wig or any other item that alters your appearance.
10.10 How often should I update my passport photo?
You must get a new photo when you get a new passport, even if your appearance has not changed.
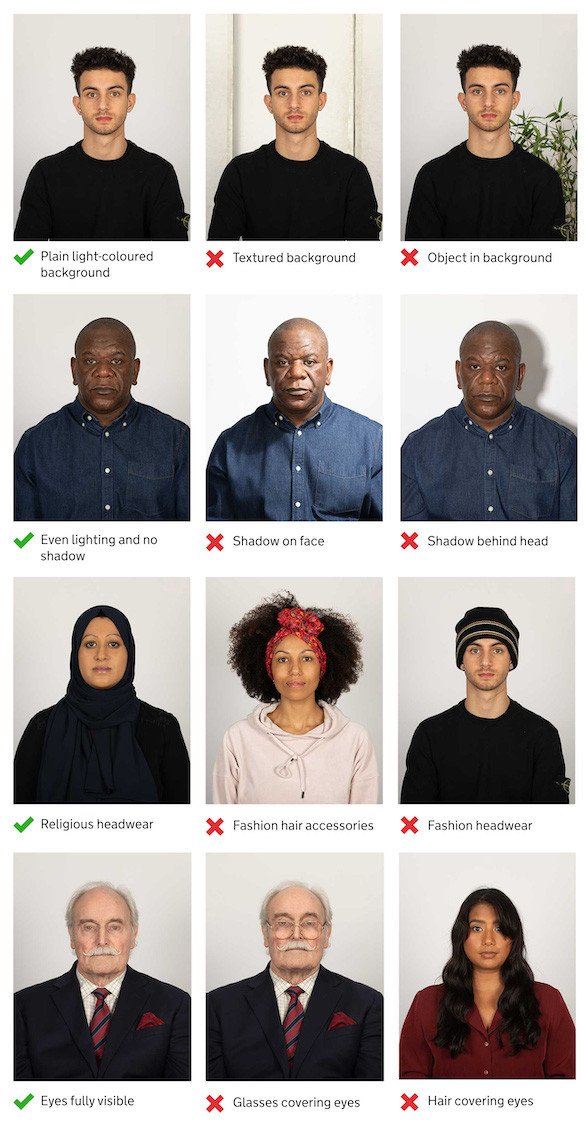 Adult Photo guidance for online passport applications
By following these guidelines and utilizing the resources at dfphoto.net, you can confidently upload your passport photo online and ensure a smooth application process.