Removing your photos from Facebook might seem daunting, but it’s achievable. This article will guide you through the process, from manual deletion to using tools like Redact, ensuring you regain control over your digital footprint. dfphoto.net provides insightful resources on photo management and online privacy. Take charge of your photo legacy and safeguard your online presence today by diving into techniques like account maintenance and digital archiving.
1. Why Remove Your Photos From Facebook?
There are many reasons why someone might want to remove photos from Facebook. Let’s explore some common motivations:
- Privacy Concerns: You might be concerned about who has access to your photos and how Facebook uses them. Privacy settings can be complex and ever-changing, leading to uncertainty about data security.
- Digital Footprint Management: You might want to curate your online image to align with your personal or professional goals. Photos from the past might not reflect your current self or brand.
- Data Security: Concerns about data breaches and the potential misuse of personal information can prompt you to delete sensitive photos.
- Changing Relationships: Photos featuring ex-partners or former friends might be painful reminders that you prefer to remove.
- Content Moderation: You might regret posting certain photos due to their content, quality, or the context in which they were shared.
Regardless of your reasons, understanding the available methods for removing photos from Facebook empowers you to control your online narrative.
2. Understanding Facebook’s Photo Policies
Before diving into the how-to, it’s helpful to understand Facebook’s policies regarding photos. According to Facebook’s Data Policy, you own the content you post, including photos. This means you have the right to remove them. However, it’s essential to be aware of a few key points:
- Ownership: You retain ownership of your photos even after uploading them to Facebook.
- License: By uploading photos, you grant Facebook a non-exclusive, transferable, sub-licensable, royalty-free, worldwide license to use your content. This license ends when you delete your content, unless your content has been shared with others, and they have not deleted it.
- Deletion: When you delete a photo, it is generally removed from Facebook’s servers. However, there might be residual copies in backup systems for a reasonable period.
- Shared Content: If your photo has been shared by others, deleting it from your profile doesn’t automatically remove it from their timelines. They would need to delete their posts as well.
Understanding these policies helps you make informed decisions about your photos and how to manage them on Facebook.
3. Five Intents When Users Search For “How to Remove Your Photos From Facebook”
When people search for “How To Remove Your Photos From Facebook,” they typically have one of these intents in mind:
- Quick Deletion: Users want to quickly and easily delete a specific photo or a small number of photos.
- Bulk Deletion: Users need to remove a large number of photos, possibly all photos, from their account.
- Privacy Control: Users aim to understand how to limit who can see their photos and manage their privacy settings.
- Account Cleanup: Users are cleaning up their Facebook presence for personal or professional reasons.
- Data Security: Users are concerned about the security of their photos and want to remove them to protect their privacy.
4. Manual Deletion: The Traditional Approach
The most straightforward way to remove photos from Facebook is by manually deleting them. Here’s how:
- Navigate to Your Profile: Go to your Facebook profile page.
- Access Your Photos: Click on the “Photos” tab.
- Find the Album: Locate the album containing the photo you want to delete. This could be “Profile Pictures,” “Timeline Photos,” or any custom album you’ve created.
- Open the Photo: Click on the photo to open it.
- Click the Options Menu: Look for the three dots (ellipsis) in the top right corner of the photo.
- Select “Delete”: Choose the “Delete” option from the menu.
- Confirm Deletion: A confirmation box will appear. Click “Delete” again to permanently remove the photo.
Pros of Manual Deletion:
- Free: It doesn’t cost anything.
- Precise: You have complete control over which photos are removed.
- No Third-Party Access: You don’t need to grant access to your account to any external apps or services.
Cons of Manual Deletion:
- Time-Consuming: Deleting photos one by one can be incredibly tedious, especially if you have hundreds or thousands of images.
- Repetitive: The process is the same for each photo, making it monotonous.
- Not Scalable: It’s not practical for bulk deletion.
Manual deletion is suitable for removing a few specific photos. However, it’s not an efficient solution for larger-scale photo removal.
5. Archiving: A Temporary Solution
Facebook offers an “Archive” feature that allows you to hide photos from your timeline without permanently deleting them. This can be useful if you’re not ready to completely remove a photo but want to limit its visibility. Here’s how to archive a photo:
- Follow steps 1-5 from the Manual Deletion section to access the photo’s options menu.
- Select “Move to Archive”: Choose this option from the menu.
- Confirm Archiving: The photo will be moved to your archive, where only you can see it.
Pros of Archiving:
- Reversible: You can easily unarchive a photo and restore it to your timeline.
- Preserves Memories: The photo is still stored on Facebook, so you don’t lose it completely.
- Privacy Control: Hides the photo from public view.
Cons of Archiving:
- Not Permanent: The photo still exists on Facebook’s servers.
- Doesn’t Reduce Storage: It doesn’t free up storage space on your account.
- Limited Privacy: Facebook still has access to the photo.
Archiving is a good option for photos you’re unsure about deleting or want to keep private for personal reasons.
6. Using the Activity Log for Bulk Management
Facebook’s Activity Log provides a centralized place to manage your activity, including photos. You can use it to review and delete multiple photos at once. Here’s how:
- Go to Your Profile: Navigate to your Facebook profile.
- Click “View Activity Log”: You can find this button on your profile page.
- Filter by Photos: In the left sidebar, click on “Photos” to filter your activity log to show only photo-related actions.
- Select Photos: Check the boxes next to the photos you want to remove.
- Click “Remove”: Click the “Remove” button at the top of the page to delete the selected photos.
- Confirm Deletion: A confirmation box will appear. Click “Delete” to confirm.
Pros of Activity Log Management:
- Bulk Selection: Allows you to select and delete multiple photos at once.
- Centralized Control: Provides a single interface for managing your photo activity.
- Reviewing Tool: Useful for reviewing past photo activity.
Cons of Activity Log Management:
- Can Be Slow: Loading the Activity Log can take time, especially if you have a lot of activity.
- Limited Filtering: Filtering options are not very granular.
- Still Manual: Requires manual selection of photos.
The Activity Log is a step up from manual deletion but still requires significant manual effort for large-scale photo removal.
7. Introducing Redact: An Automated Solution
For those seeking a more efficient solution for removing photos from Facebook, tools like Redact offer automated deletion capabilities. Redact is a software application designed to help you manage and delete content across various social media platforms, including Facebook.
How Redact Works:
- Download and Install: Download and install the Redact application from the official website.
- Connect to Facebook: Launch Redact and connect it to your Facebook account. You’ll need to grant Redact permission to access your account.
- Configure Settings: Specify the criteria for photo deletion. You can filter by date range, album, and other parameters.
- Preview Results: Redact will display a list of photos that match your criteria. Review the list to ensure accuracy.
- Initiate Deletion: Start the deletion process. Redact will automatically remove the selected photos from your Facebook account.
 Redact FB App
Pros of Using Redact:
- Automation: Automates the photo deletion process, saving you time and effort.
- Bulk Deletion: Capable of deleting large numbers of photos quickly.
- Granular Filtering: Offers advanced filtering options to target specific photos.
- Cross-Platform Support: Works with multiple social media platforms.
Cons of Using Redact:
- Third-Party Access: Requires granting access to your Facebook account to a third-party application.
- Cost: The premium version of Redact may require a subscription fee.
- Potential Security Risks: As with any third-party app, there are potential security risks associated with granting access to your account.
Step-by-Step Guide to Using Redact for Facebook Photo Removal:
- Download and Install Redact: If you haven’t already, download Redact from Redact.dev and install it on your computer.
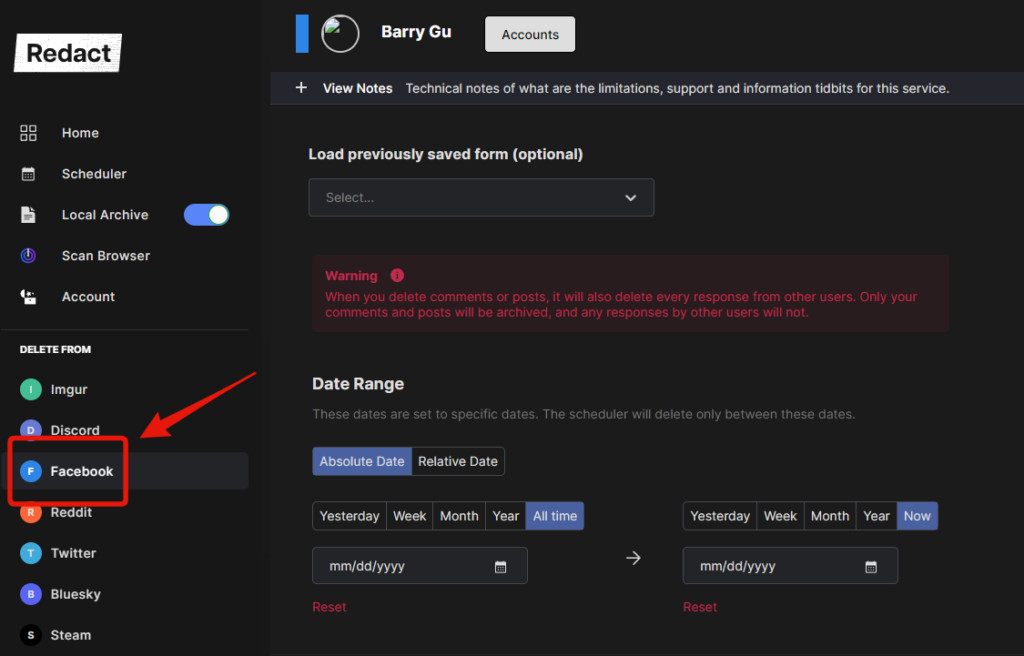
- Launch Redact and Select Facebook: Open the Redact application and click on the Facebook icon in the left sidebar.
- Login to Facebook: You’ll be prompted to log in to your Facebook account. Enter your credentials and grant Redact the necessary permissions.
- Configure Date Range: In the Facebook Settings page, use the date picker to specify the date range for the photos you want to remove. To delete all photos, ensure the “All Time” option is selected.
- Select Post Types: Choose the post types you want to target. In this case, select “Posts” to focus on photos posted on your timeline.
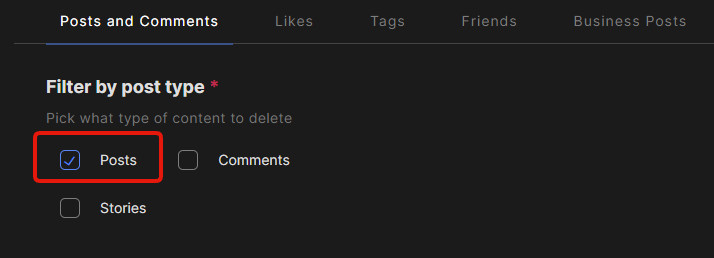 post types
 - Choose Timeline Location: Select “My Timeline” from the location options. This ensures that Redact searches for photos on your timeline.
- Specify Attachment Types: Uncheck all attachment types except for “Images.” This tells Redact to focus specifically on deleting photos.
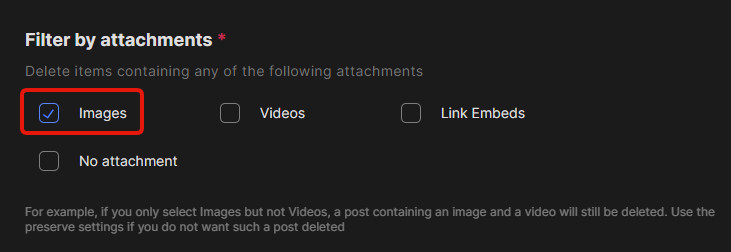 Attachment Type
 - Preview Results: Click on the “Preview” button to see a list of photos that match your criteria. Scroll through the results to ensure that you want to delete these photos.
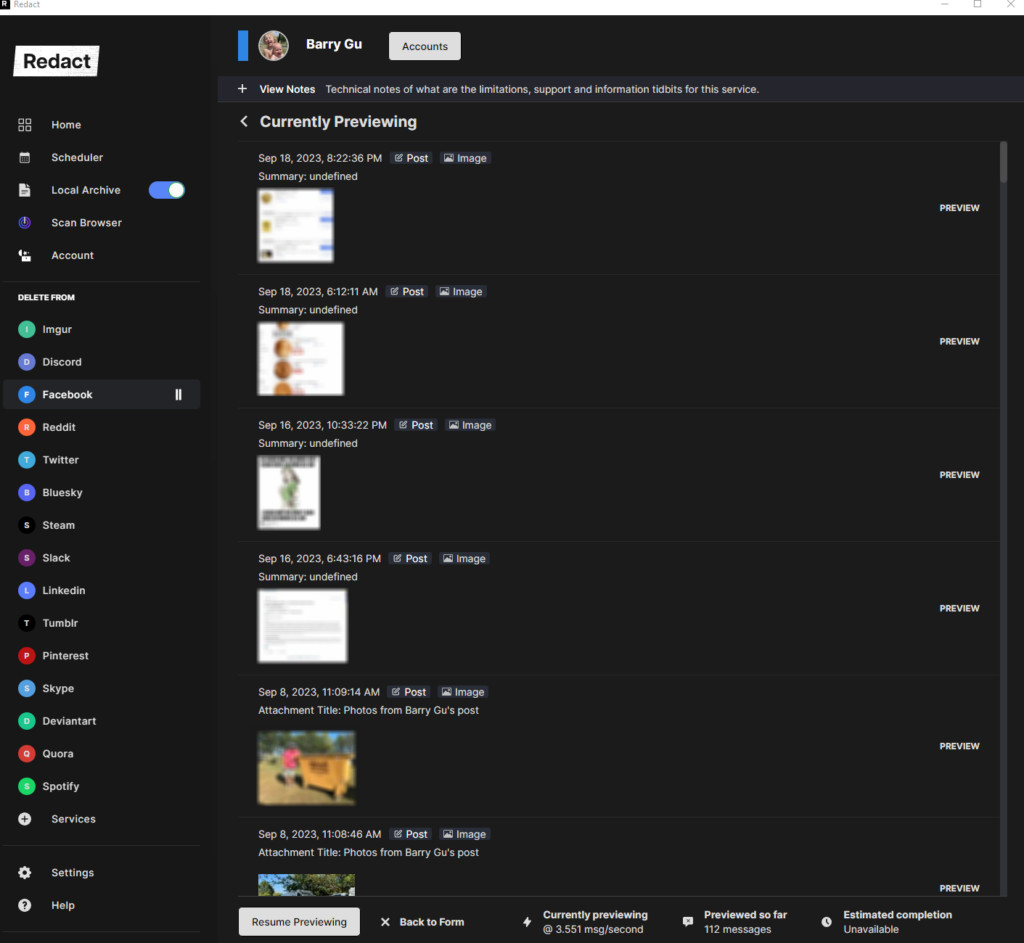 download 1024×943
 - Start Deletion: If you’re satisfied with the preview, select “Deletion Mode” and click the “Start Deleting” button. Redact will begin automatically removing the selected photos from your Facebook account.
Redact offers a convenient and efficient way to remove photos from Facebook. However, it’s crucial to exercise caution when granting access to third-party applications and to review the preview results carefully before initiating the deletion process.
8. Downloading Your Facebook Data: A Safety Net
Before deleting any photos from Facebook, it’s wise to download a copy of your Facebook data. This serves as a backup in case you later regret deleting certain photos. Here’s how to download your Facebook data:
- Go to Your Settings: Click the down arrow in the top right corner of Facebook and select “Settings & Privacy,” then “Settings.”
- Click “Your Facebook Information”: In the left sidebar, click on “Your Facebook Information.”
- Download Your Information: Click on “Download Your Information.”
- Select Data Range: Choose the data range you want to download. You can select “All of my data” or specify a custom range.
- Select Format: Choose the format for your download. HTML is easy to view in a web browser, while JSON is better for importing into other applications.
- Create File: Click “Create File.” Facebook will begin preparing your download.
- Download File: Once the file is ready, you’ll receive a notification. Click the notification to download your file.
Benefits of Downloading Your Data:
- Backup: Provides a backup of your photos and other Facebook data.
- Peace of Mind: Allows you to delete photos without fear of losing them forever.
- Data Analysis: You can use your downloaded data for personal analysis or archival purposes.
Downloading your Facebook data is a proactive step that ensures you retain control over your personal information.
9. Adjusting Facebook Privacy Settings
In addition to deleting photos, it’s essential to adjust your Facebook privacy settings to control who can see your future posts and photos. Here are some key privacy settings to consider:
- Who Can See Your Posts: This setting controls who can see your future posts. You can choose “Public,” “Friends,” “Only Me,” or create custom lists.
- Who Can See Your Friends List: This setting controls who can see your friends list. You can choose “Public,” “Friends,” or “Only Me.”
- Who Can Look You Up Using the Email Address or Phone Number You Provided: These settings control who can find you on Facebook using your email address or phone number. You can choose “Everyone,” “Friends of Friends,” or “Friends.”
- Do You Want Search Engines Outside of Facebook to Link to Your Profile: This setting controls whether search engines like Google can link to your Facebook profile. You can choose “Yes” or “No.”
- Limit the Audience for Posts You’ve Shared with Friends of Friends or Public: This setting allows you to retroactively limit the audience for past posts.
To access these settings, go to “Settings & Privacy” > “Settings” > “Privacy.”
Tips for Optimizing Your Privacy Settings:
- Review Regularly: Review your privacy settings periodically to ensure they align with your preferences.
- Use Custom Lists: Create custom lists to share posts with specific groups of people.
- Be Mindful of Public Posts: Be aware that anything you post publicly can be seen by anyone on the internet.
Adjusting your privacy settings is an ongoing process that requires vigilance and attention to detail.
10. Understanding Facebook’s Facial Recognition
Facebook uses facial recognition technology to identify you in photos and videos. This feature can be useful for tagging friends and family, but it also raises privacy concerns. Here’s what you need to know about Facebook’s facial recognition:
- How It Works: Facebook analyzes the pixels in photos and videos to create a unique “template” of your face. This template is then used to identify you in other photos and videos.
- Privacy Settings: You can control whether Facebook uses facial recognition to identify you in photos and videos.
- Opting Out: You can opt out of facial recognition by going to “Settings & Privacy” > “Settings” > “Face Recognition.”
Implications of Facial Recognition:
- Privacy Concerns: Some people are uncomfortable with Facebook using their facial data for identification purposes.
- Tagging Suggestions: Facial recognition is used to suggest tags for you in photos and videos.
- Security: Facial recognition can be used for security purposes, such as verifying your identity when logging in.
Understanding Facebook’s facial recognition technology empowers you to make informed decisions about your privacy.
11. Third-Party Apps and Privacy Risks
When using third-party apps with Facebook, it’s essential to be aware of the potential privacy risks. Many apps request access to your Facebook data, including your photos, friends list, and personal information. Here are some tips for mitigating these risks:
- Review Permissions: Carefully review the permissions an app requests before granting access to your Facebook account.
- Limit Access: Grant only the minimum necessary permissions to the app.
- Revoke Access: Periodically review the apps that have access to your Facebook account and revoke access to any apps you no longer use or trust.
- Read Privacy Policies: Read the privacy policies of third-party apps to understand how they collect, use, and share your data.
To review and manage your app permissions, go to “Settings & Privacy” > “Settings” > “Apps and Websites.”
Common Privacy Risks Associated with Third-Party Apps:
- Data Collection: Apps may collect your personal information and share it with third parties.
- Unauthorized Access: Apps may access your Facebook account without your knowledge or consent.
- Malware: Some apps may contain malware or other malicious software.
Exercising caution when using third-party apps is crucial for protecting your privacy on Facebook.
12. Facebook’s Data Retention Policies
Even after you delete photos from Facebook, it’s important to understand Facebook’s data retention policies. Facebook may retain certain data for a period of time, even after you delete it. This is typically done for technical reasons, such as backup and disaster recovery.
Key Points About Data Retention:
- Backup Systems: Facebook may retain copies of your data in backup systems for a reasonable period.
- Log Data: Facebook may retain log data, which includes information about your activity on the platform.
- Legal Obligations: Facebook may retain data to comply with legal obligations.
While Facebook aims to remove deleted data from its servers, it’s essential to be aware that some data may persist for a limited time.
13. Alternative Platforms for Photo Sharing
If you’re concerned about privacy on Facebook, you might consider using alternative platforms for photo sharing. Here are a few popular options:
- Instagram: While owned by Facebook, Instagram offers more granular privacy controls and is primarily focused on photo and video sharing.
- Flickr: Flickr is a popular platform for photographers, offering high-quality image storage and a vibrant community.
- Google Photos: Google Photos provides unlimited photo storage (with some limitations) and advanced features like facial recognition and automatic organization.
- 500px: 500px is a platform for professional photographers, offering a showcase for high-quality images and a marketplace for selling photos.
- Self-Hosted Solutions: For maximum control, you can host your photos on your own website or server using software like WordPress or Piwigo.
Each of these platforms offers different features and privacy settings. Choose the one that best aligns with your needs and preferences.
14. The Importance of Regular Account Maintenance
Managing your photos on Facebook is an ongoing process that requires regular account maintenance. Here are some tips for keeping your account clean and organized:
- Review Your Photos Regularly: Periodically review your photos to identify any that you want to delete or archive.
- Organize Your Albums: Create albums to organize your photos and make them easier to find.
- Adjust Your Privacy Settings: Regularly adjust your privacy settings to control who can see your photos and posts.
- Remove Unnecessary Apps: Remove any third-party apps that you no longer use or trust.
- Download Your Data: Download your Facebook data periodically to create a backup.
By practicing regular account maintenance, you can ensure that your Facebook presence reflects your current self and preferences.
15. Staying Informed About Facebook’s Policies
Facebook’s policies and features are constantly evolving. It’s essential to stay informed about these changes to effectively manage your photos and protect your privacy. Here are some ways to stay up-to-date:
- Follow Facebook’s Blog: Subscribe to Facebook’s official blog to receive updates about new features and policies.
- Read News Articles: Read news articles and blog posts about Facebook to stay informed about industry trends and best practices.
- Join Online Communities: Join online communities and forums to discuss Facebook-related topics with other users.
- Consult dfphoto.net: Visit dfphoto.net for insightful articles and resources on photo management and online privacy. Address: 1600 St Michael’s Dr, Santa Fe, NM 87505, United States. Phone: +1 (505) 471-6001. Website: dfphoto.net.
By staying informed, you can make informed decisions about your Facebook account and protect your privacy.
16. Conclusion: Taking Control of Your Digital Legacy
Removing photos from Facebook is a process that requires careful consideration and planning. Whether you choose to manually delete photos, use automated tools like Redact, or adjust your privacy settings, the goal is to regain control over your digital legacy. By following the steps outlined in this article, you can effectively manage your photos on Facebook and protect your privacy. Remember to download your data, review your privacy settings, and stay informed about Facebook’s policies. With a proactive approach, you can ensure that your Facebook presence reflects your current self and preferences.
Want to learn more about photography techniques, explore stunning photo collections, and connect with a thriving community of photographers in the USA? Visit dfphoto.net today and discover a world of inspiration and learning.
17. Frequently Asked Questions (FAQ)
Here are some frequently asked questions about removing photos from Facebook:
1. Can I delete all my photos from Facebook at once?
While Facebook doesn’t offer a built-in feature to delete all photos at once, you can use third-party tools like Redact to automate this process. Alternatively, you can manually delete photos in batches using the Activity Log.
2. How do I delete a specific photo from Facebook?
To delete a specific photo, go to your profile, access your photos, open the photo you want to delete, click the options menu (three dots), and select “Delete.” Confirm your decision to permanently remove the photo.
3. Will deleting a photo from Facebook also delete it from Instagram?
No, deleting a photo from Facebook will not automatically delete it from Instagram, even if you’ve linked your accounts. You need to delete the photo separately from Instagram.
4. What happens when I archive a photo on Facebook?
Archiving a photo hides it from your timeline but doesn’t delete it. Only you can see archived photos. You can unarchive a photo to restore it to your timeline.
5. How can I control who can see my photos on Facebook?
You can control who can see your photos by adjusting your privacy settings. Go to “Settings & Privacy” > “Settings” > “Privacy” to manage your settings for posts, friends list, and profile visibility.
6. Does Facebook keep my photos even after I delete them?
Facebook may retain copies of your data in backup systems for a reasonable period, even after you delete them. However, the goal is to remove deleted data from its servers.
7. How do I download a copy of my Facebook photos?
To download your Facebook photos, go to “Settings & Privacy” > “Settings” > “Your Facebook Information” > “Download Your Information.” Select the data range and format, and click “Create File.”
8. What are the privacy risks of using third-party apps with Facebook?
Third-party apps may collect your personal information, access your Facebook account without your consent, or contain malware. Review app permissions carefully and revoke access to apps you no longer use or trust.
9. How does Facebook’s facial recognition work?
Facebook uses facial recognition technology to identify you in photos and videos. You can control whether Facebook uses facial recognition to identify you in photos by going to “Settings & Privacy” > “Settings” > “Face Recognition.”
10. Where can I find more information about managing my photos and privacy on Facebook?
You can find more information on Facebook’s Help Center or visit dfphoto.net for insightful articles and resources on photo management and online privacy. Address: 1600 St Michael’s Dr, Santa Fe, NM 87505, United States. Phone: +1 (505) 471-6001. Website: dfphoto.net.