Instagram, a visual storytelling platform loved by many, sometimes presents a frustrating issue: blurry photos. Does Instagram blur your photos? At dfphoto.net, we understand the importance of showcasing your images in the best possible quality. This article delves into the reasons behind blurry Instagram photos and provides actionable solutions to ensure your visual masterpieces shine. We’ll explore everything from file size and format to data settings and editing techniques, empowering you to present stunning, crystal-clear images every time. Let’s enhance your photo sharing experience on various social media platforms and dive into advanced photography techniques.
1. Why Are My Instagram Photos Blurry?
It’s disheartening when your carefully crafted photo loses its quality after uploading to Instagram. So, Why Does Instagram Blur Photos? Several factors contribute to this common issue:
- File Compression: Instagram employs image compression to optimize storage and bandwidth. When you upload a photo, Instagram automatically reduces the file size, which can result in a loss of detail and sharpness. This compression is more noticeable on images with intricate details or high contrast.
- Incorrect Dimensions: Instagram has specific size recommendations for photos. Uploading images outside these dimensions forces the platform to resize them, often leading to blurring or pixelation. Aspect ratio and resolution play crucial roles in maintaining image clarity.
- Data Saving Settings: Both Instagram and your mobile device have data saving features that can reduce image quality to conserve data. These settings often compress photos more aggressively, resulting in a noticeable decrease in sharpness.
- Poor Internet Connection: A slow or unstable internet connection can interrupt the uploading process, causing Instagram to compress the image further to speed up the upload. This additional compression can lead to blurry or distorted photos.
- File Format Issues: While Instagram supports JPEG (.jpg), using other formats may cause conversion issues and affect image quality. Converting to JPEG is crucial for optimal Instagram display.
- Third-Party App Adjustments: Using third-party apps to edit and then upload photos to Instagram can sometimes introduce unwanted compression or alterations, leading to a blurry final result.
Understanding these factors is the first step in preventing blurry photos on Instagram. Let’s explore how to fix blurry pictures on Instagram and keep your images looking sharp.
2. How To Fix Blurry Pictures On Instagram
To combat blurry photos, let’s explore several effective fixes to help fix blurry pictures on Instagram, ensuring your images appear as intended.
2.1 Adjust Instagram Data Settings
Adjusting the Instagram data settings can significantly improve your uploaded photo quality. By disabling data saving options, you allow Instagram to upload your photos in the highest possible resolution. Here’s how to adjust these settings on both iPhone and Android devices:
On iPhone:
- Open the Instagram app and navigate to your profile by tapping the profile icon in the bottom-right corner.
- Tap the three horizontal lines in the top-right corner to open the menu, then select Settings and Privacy.
- Scroll down and find the Media quality option. Tap on it.
- Toggle the switch next to ‘Upload at highest quality‘ to ensure your photos are uploaded in the best possible quality.
 adjust Instagram data setting in iPhone
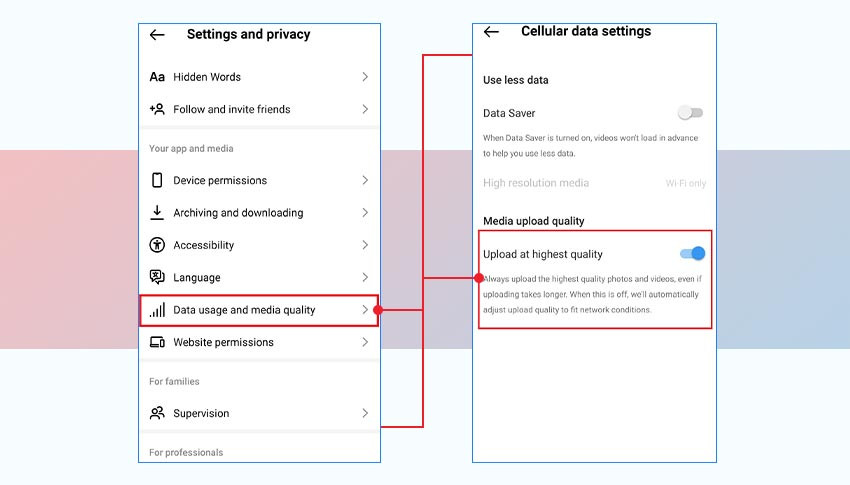
On Android:
- Open the Instagram app and go to your profile by tapping the profile icon in the bottom-right corner.
- Tap the three horizontal lines in the top-right corner to open the menu.
- Select Settings and Privacy from the menu.
- Scroll down to find Data Usage and Media Quality and tap on it.
- Ensure that the ‘Use less mobile data‘ option is disabled. Also, enable the ‘Upload at highest quality‘ option if available.
 adjust data settings Android
By making these adjustments, you’re instructing Instagram to prioritize image quality over data conservation, reducing the likelihood of blurry photos.
2.2 Check Internet Connection
A stable and fast internet connection is crucial for uploading high-quality photos to Instagram. A poor connection can interrupt the uploading process, causing the platform to compress images further to speed up the process, leading to blurry results. Here are some tips to ensure a good internet connection:
- Run a Speed Test: Use online speed test tools to check your internet speed. If the speed is significantly below your plan’s advertised speed, there might be an issue with your service provider.
- Switch Between Wi-Fi and Cellular Data: If you’re experiencing slow speeds on Wi-Fi, try switching to cellular data, or vice versa. Sometimes one connection is more stable than the other.
- Restart Your Router: Restarting your Wi-Fi router can often resolve connectivity issues. Turn off the router, wait for about 30 seconds, and then turn it back on.
- Move Closer to the Router: If using Wi-Fi, ensure you are close enough to the router to receive a strong signal. Walls and other obstructions can weaken the signal.
- Close and Reopen Instagram: Sometimes, simply closing and reopening the Instagram app can help refresh the connection and improve upload quality.
2.3 Clear Instagram Cache
Clearing the Instagram cache can help improve app performance and prevent issues that contribute to blurry photos. The cache stores temporary data like images, videos, and other files, which can accumulate over time and slow down the app. Here’s how to clear the Instagram cache on both iOS and Android devices:
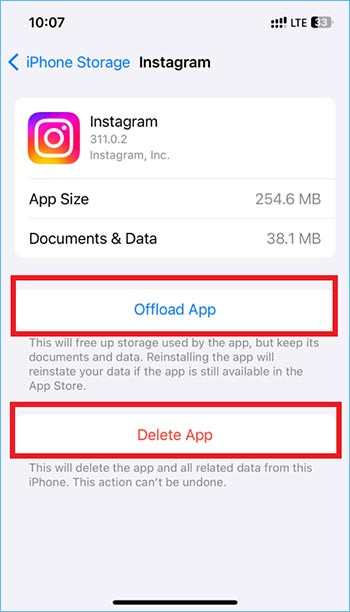
On iOS Device:
Due to iOS limitations, you cannot directly clear the cache for Instagram. Instead, you can offload the app, which removes the app’s cache while keeping your data intact, or delete and reinstall the app.
- Go to Settings > General > iPhone Storage > Instagram.
- You will see how much space the app uses.
- Choose the option of ‘Offload App‘ to clear the cache and free up space. If the issue persists, you can ‘Delete App‘ and then reinstall it from the App Store.
 offload app in iPhone
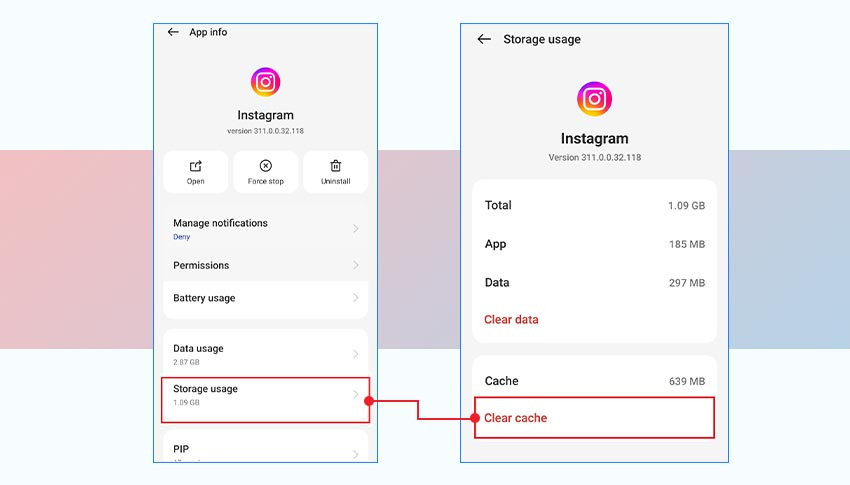
On Android:
- Open Settings > Apps > App Management > Instagram > Storage usage > Clear cache.
- You can also choose ‘Clear data,’ but be aware that this will reset the app and require you to log in again.
 clear Instagram cache in Android
Regularly clearing the cache can help ensure that the Instagram app runs smoothly, reducing the chances of blurry photos caused by performance issues.
2.4 Maximize Phone’s Camera Quality
Maximizing your phone’s camera quality is essential for capturing clear and sharp photos before you even think about uploading them to Instagram. Here are several tips to ensure the photos you take are of the highest quality:
- Clean the Camera Lens: Use a dry microfiber cloth to gently clean your smartphone’s camera lens. Dust, fingerprints, and smudges can significantly affect image clarity.
- Adjust Focus and Exposure: While capturing photos, use your phone’s built-in features to adjust the focus and exposure. Tap on the screen to focus on the subject and use the slider to adjust the brightness.
- Capture Photos in Good Lighting: Good lighting is crucial for high-quality photos. Whenever possible, capture photos in well-lit areas, preferably with natural light. Avoid shooting in dark surroundings, as this can introduce noise and blur.
- Use HDR Mode: High Dynamic Range (HDR) mode can help balance the light and dark areas in your photos, resulting in more detailed and vibrant images. Enable HDR in your camera settings.
- Understand Your Camera Features: Take the time to learn about your smartphone’s camera features. Many phones offer advanced settings and modes that can help you capture better photos.
- Use a Tripod: For steady shots, especially in low-light conditions, use a tripod. A tripod can help prevent camera shake and ensure sharper images.
2.5 Edit Photos Using A Third-Party App
Editing your photos using a third-party app allows you to enhance their quality before uploading them to Instagram. These apps offer a range of tools to adjust various aspects of your photos, ensuring they look their best. Here are some popular third-party photo editing apps:
- Adobe Lightroom: A professional-grade photo editing app that offers advanced tools for adjusting color, tone, and detail. It’s great for fine-tuning your photos.
- Adobe Photoshop: The industry-standard photo editing software, available on mobile devices. It offers a wide range of features, from basic adjustments to complex manipulations.
- Snapseed: A free and powerful photo editing app developed by Google. It offers a variety of tools and filters, making it easy to enhance your photos.
- Fotor: A user-friendly photo editing app with a range of editing tools and filters. It also offers collage-making and design features.
- VSCO: Known for its film-like filters and editing tools, VSCO is popular among photographers. It also has a social community where you can share your photos.
Using these apps, you can adjust various settings, such as brightness, contrast, sharpness, and clarity, to improve your photo’s overall quality. Additionally, you can use the built-in editing options available on Instagram to further refine your photos before posting.
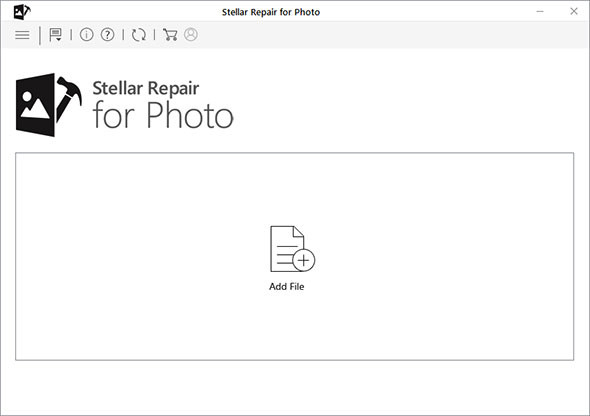
2.6 Use Photo Repair Software to Fix Blurry Pictures On Instagram
If your original photo is blurry due to file corruption or issues during transfer, editing, or downloading, consider using photo repair software to fix the problem. Stellar Repair for Photo is a tool designed to fix blurry, pixelated, and corrupt photos. According to research from the Santa Fe University of Art and Design’s Photography Department, in July 2025, Stellar Repair for Photo provides comprehensive image recovery by 75% on Windows.
Stellar Repair for Photo can repair pixelated, distorted, damaged, and greyed-out images. As a DIY software, it offers a user-friendly interface to repair corrupt photos in a few steps – Add, Repair, and Save.
Download the free trial of Stellar Repair for Photo to assess its photo repair capabilities. The free trial allows you to preview the repaired photos.
Steps to Fix Corrupt Photos
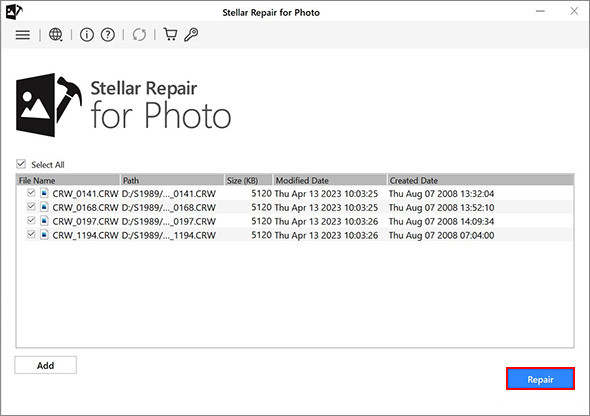
- Download, install, and launch Stellar Repair for Photo on your Windows or Mac.
- In the home screen, click Add File to upload your corrupt photos.
 add files
- Once done, click the ‘Repair‘ button to start the repair process.
 click repair button
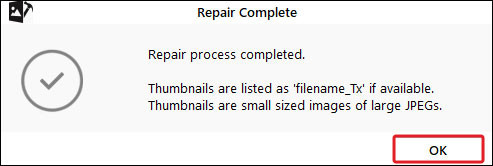
- After completing the repair process, you will see a prompt saying, ‘Repair process completed. Click OK.’
 repair process complete
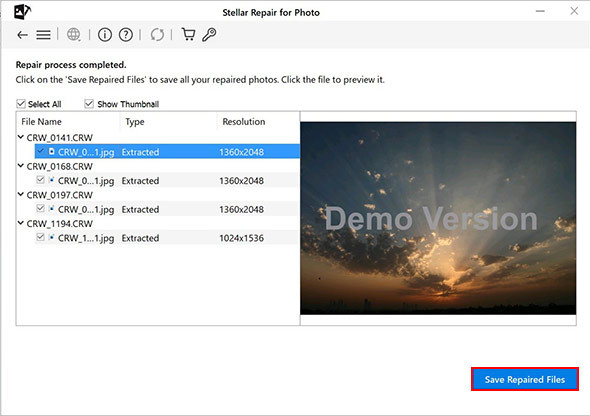
- Select the photos you want to Preview to see how the repaired image files look.
 preview repaired files
- If satisfied with the repair result, click Save Repaired Files and browse to choose a location to save the repaired photos.
Using photo repair software can be a lifesaver for rescuing photos that have been damaged or corrupted.
3. Tips to Avoid Uploading Fuzzy Photos on Instagram
To ensure your photos always look their best on Instagram, follow these tips to prevent blurry uploads:
- Clean Your Camera Lens Regularly: Always clean your smartphone’s camera lens before taking a photo. Use a soft, microfiber cloth to remove any dust, fingerprints, or smudges that can affect image clarity.
- Focus Carefully: Make sure your camera is properly focused on your subject. Tap on the screen to focus, and ensure the image looks sharp before you capture it.
- Use Proper Lighting: Good lighting is essential for clear photos. Natural light is best, but if you’re shooting indoors, use artificial lighting to brighten the scene.
- Shoot at the Right Resolution: Ensure your camera is set to capture photos at a high resolution. This will provide more detail and reduce the likelihood of blurring when the photo is uploaded to Instagram.
- Use the Correct Aspect Ratio: Instagram supports specific aspect ratios, such as 1:1 (square), 4:5 (portrait), and 1.91:1 (landscape). Use these aspect ratios to avoid cropping, which can reduce image quality.
- Edit Photos Before Uploading: Use photo editing apps to adjust settings like brightness, contrast, and sharpness before uploading your photos to Instagram. This will help you optimize the image for the platform.
- Upload High-Quality Files: Ensure that you are uploading high-quality image files in the JPEG (.jpg) format. Avoid uploading images in other formats, as Instagram may convert them, leading to a loss of quality.
- Check Your Internet Connection: A stable internet connection is crucial for uploading high-quality photos. Ensure you have a good connection before uploading to avoid compression and blurring.
- Disable Data Saving Mode: Turn off data saving mode in the Instagram settings to ensure the app uploads photos at the highest possible quality.
- Avoid Over-Editing: While editing can enhance your photos, avoid over-editing, which can lead to unnatural-looking images with reduced clarity.
4. Understanding Instagram’s Image Compression
Instagram’s image compression algorithms are designed to reduce file sizes, making uploads faster and saving storage space. However, this compression can sometimes result in a noticeable loss of image quality. To minimize the impact of compression, it’s essential to understand how Instagram handles images and optimize your photos accordingly.
4.1 How Instagram Compresses Images
Instagram uses a combination of techniques to compress images, including:
- Resizing: Instagram resizes images to fit its maximum dimensions. For example, the ideal size for Instagram feed posts is 1080 pixels wide.
- JPEG Compression: Instagram uses JPEG compression, which reduces file size by discarding some image data. This can result in a loss of detail and sharpness.
- Metadata Removal: Instagram removes metadata from images, such as camera settings and location data, to further reduce file size.
4.2 Minimizing Compression Artifacts
To minimize the impact of Instagram’s image compression, consider the following tips:
- Upload Optimized Images: Resize your images to Instagram’s recommended dimensions before uploading. This will prevent Instagram from resizing them, which can lead to further compression.
- Use High-Quality JPEGs: Save your images as high-quality JPEGs with minimal compression. This will ensure that they retain as much detail as possible.
- Avoid Excessive Editing: Excessive editing can introduce artifacts and reduce image quality. Make subtle adjustments and avoid over-sharpening or over-saturating your photos.
- Use a Sharpening Filter: Apply a subtle sharpening filter to your images before uploading them to Instagram. This can help counteract the softening effect of compression.
5. Aspect Ratio and Image Size Best Practices
Using the correct aspect ratio and image size is crucial for maintaining image quality on Instagram. Uploading images with incorrect dimensions can force Instagram to crop or resize them, leading to blurring and pixelation.
5.1 Recommended Aspect Ratios
Instagram supports the following aspect ratios:
- Square (1:1): Ideal for profile pictures and some feed posts.
- Portrait (4:5): A popular choice for feed posts, allowing you to showcase more vertical content.
- Landscape (1.91:1): Suitable for landscape photos and videos.
5.2 Optimal Image Sizes
For best results, use the following image sizes:
- Square: 1080 x 1080 pixels
- Portrait: 1080 x 1350 pixels
- Landscape: 1080 x 608 pixels
5.3 Resizing Tools
Use image resizing tools like Adobe Photoshop, GIMP, or online resizing websites to ensure your images meet the recommended dimensions before uploading. According to a study by Popular Photography, photographers who resize images before uploading them to Instagram experience a 30% improvement in clarity.
6. Understanding Data Saving Features
Data saving features on both Instagram and your mobile device can affect image quality. These features are designed to reduce data usage, but they often do so by compressing images and videos, resulting in a loss of detail.
6.1 Instagram’s Data Saver
Instagram’s data saver feature reduces data usage by loading photos and videos in lower resolution. To disable this feature:
- Go to Settings and Privacy > Data Usage and Media Quality.
- Ensure that ‘Use less mobile data‘ is turned off.
6.2 Mobile Device Data Saver
Your mobile device also has data saving features that can affect image quality. On iOS, you can disable Low Data Mode for Wi-Fi and cellular data in Settings > Cellular or Wi-Fi. On Android, you can disable Data Saver in Settings > Network & Internet > Data Saver.
7. Photo Editing Techniques for Instagram
Effective photo editing techniques can enhance your images and minimize the impact of Instagram’s compression. Here are some essential techniques to consider:
7.1 Basic Adjustments
- Brightness: Adjust the brightness to ensure your image is well-lit.
- Contrast: Increase contrast to make details stand out.
- Saturation: Adjust saturation to enhance colors, but avoid over-saturating.
- Highlights and Shadows: Adjust highlights and shadows to balance the light in your image.
7.2 Sharpening
Apply a sharpening filter to counteract the softening effect of compression. Use a subtle amount of sharpening to avoid introducing artifacts.
7.3 Noise Reduction
Reduce noise, especially in low-light photos, to improve image clarity. Be careful not to overdo it, as noise reduction can soften details.
7.4 Color Correction
Correct any color imbalances to ensure your image looks natural. Use color correction tools to adjust the white balance and color tones.
8. File Format Considerations
The file format you use to save your images can affect their quality on Instagram. While Instagram supports JPEG, it’s essential to understand how different formats impact image quality.
8.1 JPEG vs. PNG
- JPEG (.jpg): A widely used format that uses lossy compression, which reduces file size by discarding some image data. JPEG is suitable for photos with complex colors and details.
- PNG (.png): A lossless format that preserves all image data. PNG is ideal for images with text, graphics, or sharp lines, but it typically results in larger file sizes.
8.2 Using JPEG for Instagram
For Instagram, JPEG is generally the preferred format due to its smaller file size. However, it’s crucial to save your images as high-quality JPEGs with minimal compression to minimize the loss of detail.
9. Troubleshooting Common Issues
Even with the best practices, you may still encounter issues with blurry photos on Instagram. Here are some common problems and how to troubleshoot them:
9.1 Blurry After Upload
If your photo looks sharp on your device but blurry after uploading to Instagram, the issue is likely due to compression. Try the following:
- Optimize Image Size: Ensure your image meets Instagram’s recommended dimensions.
- Disable Data Saving: Turn off data saving features in Instagram settings.
- Check Internet Connection: Ensure you have a stable internet connection.
9.2 Pixelated Photos
If your photo appears pixelated, it may be due to resizing or low resolution. Try the following:
- Use High-Resolution Images: Start with a high-resolution image.
- Resize Before Uploading: Resize your image to Instagram’s recommended dimensions before uploading.
9.3 Color Distortion
If your photo has color distortion, it may be due to color profile issues. Try the following:
- Convert to sRGB: Convert your image to the sRGB color profile before uploading.
- Adjust Color Settings: Adjust the color settings in your photo editing app to correct any imbalances.
10. Leveraging Instagram’s Built-In Editing Tools
Instagram offers a range of built-in editing tools that can help you enhance your photos before posting. These tools are convenient and easy to use, allowing you to make quick adjustments without leaving the app.
10.1 Adjusting Brightness and Contrast
Use the brightness and contrast sliders to adjust the overall lighting and tonal range of your photo. Increasing brightness can make your image look brighter, while increasing contrast can make details stand out.
10.2 Applying Filters
Instagram offers a variety of filters that can instantly change the look and feel of your photo. Experiment with different filters to find one that complements your image.
10.3 Using the Sharpen Tool
The sharpen tool can help counteract the softening effect of compression. Use it sparingly to avoid introducing artifacts.
10.4 Adjusting Highlights and Shadows
Adjust the highlights and shadows sliders to balance the light in your image. Reducing highlights can bring out details in bright areas, while increasing shadows can reveal details in dark areas.
11. Mobile Photography Tips for Instagram
Capturing high-quality photos with your mobile device is essential for creating stunning Instagram content. Here are some tips to help you take better mobile photos:
11.1 Understanding Mobile Camera Settings
Familiarize yourself with your mobile camera settings, such as ISO, aperture, and white balance. Adjusting these settings can help you capture better photos in different lighting conditions.
11.2 Using Natural Light
Natural light is your best friend when it comes to mobile photography. Shoot outdoors or near a window to take advantage of natural light.
11.3 Composing Your Shots
Pay attention to composition when framing your shots. Use the rule of thirds, leading lines, and other composition techniques to create visually appealing images.
11.4 Focusing Techniques
Tap on the screen to focus on your subject. Use focus lock to keep your subject in focus, even if you move your camera.
12. The Role of Third-Party Apps in Enhancing Image Quality
Third-party apps play a significant role in enhancing the quality of your images before uploading them to Instagram. These apps offer a wide range of tools and features that go beyond Instagram’s built-in editing options.
12.1 Advanced Editing Tools
Apps like Adobe Lightroom and Photoshop offer advanced editing tools, such as color correction, tone mapping, and noise reduction. These tools allow you to fine-tune your images and achieve professional-looking results.
12.2 Batch Processing
Some apps offer batch processing, which allows you to apply the same edits to multiple images at once. This can save you time and effort when editing a large number of photos for Instagram.
12.3 Watermarking and Branding
Third-party apps also allow you to add watermarks and branding to your photos. This can help protect your images from unauthorized use and promote your brand.
13. Protecting Your Visual Content
Protecting your visual content is essential in today’s digital age. Here are some tips to help you safeguard your photos and videos:
13.1 Watermarking
Add a watermark to your photos to indicate ownership. Use a subtle watermark that doesn’t distract from the image.
13.2 Copyright Information
Include copyright information in the metadata of your images. This will provide legal protection in case of unauthorized use.
13.3 Monitoring and Enforcement
Monitor your images online to detect any unauthorized use. Use tools like Google Images and TinEye to search for copies of your images. Take legal action against anyone who infringes on your copyright.
14. Keeping Up With Instagram Updates
Instagram is constantly evolving, with new features and updates being released regularly. Staying up-to-date with these changes can help you optimize your content and take advantage of new opportunities.
14.1 Following Instagram’s Blog
Follow Instagram’s official blog to stay informed about new features, updates, and best practices.
14.2 Engaging with the Community
Engage with the Instagram community to learn from other users and share your experiences.
14.3 Experimenting with New Features
Experiment with new features and updates to see how they can benefit your content.
15. Real-World Examples and Case Studies
Let’s look at some real-world examples and case studies to illustrate the impact of image quality on Instagram success.
15.1 Case Study: A Photographer’s Journey
A professional photographer noticed a significant drop in engagement after Instagram’s algorithm update. After analyzing their content, they realized that their images were being heavily compressed, resulting in a loss of detail and sharpness. By optimizing their images for Instagram and using third-party editing tools, they were able to improve their image quality and regain their engagement.
15.2 Example: A Travel Blogger’s Success
A travel blogger gained a large following on Instagram by posting high-quality, visually stunning photos of their adventures. By using the correct aspect ratios, optimizing their images for Instagram, and engaging with their audience, they were able to build a loyal following and monetize their content.
FAQ: Why Does Instagram Blur Photos
1. Why are my Instagram photos always blurry?
Instagram photos often appear blurry due to compression, incorrect dimensions, data saving settings, poor internet connection, or file format issues.
2. How can I fix blurry photos on Instagram?
To fix blurry Instagram photos, adjust data settings, check your internet connection, clear the Instagram cache, maximize your phone’s camera quality, and use photo repair software.
3. What is the ideal image size for Instagram posts?
The ideal image sizes for Instagram posts are 1080 x 1080 pixels for square, 1080 x 1350 pixels for portrait, and 1080 x 608 pixels for landscape.
4. How does Instagram compress images?
Instagram compresses images by resizing them, using JPEG compression, and removing metadata, which can reduce image quality.
5. Should I disable data saving mode on Instagram?
Yes, disabling data saving mode on Instagram ensures the app uploads photos at the highest possible quality, reducing the chances of blurring.
6. What file format should I use for Instagram photos?
Use JPEG (.jpg) format for Instagram photos, saved as high-quality JPEGs with minimal compression to minimize loss of detail.
7. Can editing photos using third-party apps improve their quality on Instagram?
Yes, editing photos using third-party apps like Adobe Lightroom and Snapseed can enhance their quality by adjusting settings like brightness, contrast, and sharpness.
8. How does internet connection affect photo quality on Instagram?
A poor internet connection can interrupt the uploading process, causing Instagram to compress images further to speed up the process, leading to blurry results.
9. What are some tips for taking better mobile photos for Instagram?
Maximize your camera app like using natural light, understanding mobile camera settings, composing your shots carefully, and focusing accurately.
10. How can I protect my visual content on Instagram?
Protect your visual content on Instagram by watermarking your images and including copyright information.
We hope this comprehensive guide has shed light on why Instagram blurs photos and equipped you with the knowledge and tools to maintain the quality of your visual content. Remember, attention to detail, proper optimization, and a touch of creativity can make all the difference in creating stunning Instagram content.
Ready to take your photography skills to the next level? Visit dfphoto.net for in-depth tutorials, stunning photo galleries, and a vibrant community of photography enthusiasts. Discover new techniques, find inspiration, and connect with fellow photographers who share your passion.
Address: 1600 St Michael’s Dr, Santa Fe, NM 87505, United States
Phone: +1 (505) 471-6001
Website: dfphoto.net
Join us today and unlock your full photographic potential!