Taking a photo on a laptop screen, also known as a screenshot, is a fundamental skill in today’s digital world, especially for visual artists and photographers. At dfphoto.net, we understand the importance of capturing and sharing visual information, so we have created this guide that provides you with comprehensive instructions on how to take screenshots on various devices. This guide not only covers different operating systems but also emphasizes the ethical and practical uses of screenshots in modern digital communication, image capture and visual content creation. Learn about screen capture methods, image editing, and visual documentation tips for beginners!
1. What Is A Screenshot And Why Is It Important?
A screenshot is a digital image of what is displayed on your computer, tablet, or smartphone screen. Screenshots are also known as screen captures. They are crucial for many reasons:
- Documentation: You can record important information or visual data from your screen.
- Sharing: It is easy to share exactly what you are seeing with others, which can be useful for tutorials or troubleshooting.
- Evidence: It is a great way to maintain records of online interactions, which is especially useful in instances of cyberbullying or harassment.
- Inspiration: You can capture moments of inspiration from the web to use in your photography or visual art projects.
- Collaboration: Screenshots can be easily shared among team members, making collaboration more efficient.
2. How To Take A Screenshot On A Windows Laptop
Windows provides several ways to capture screenshots. Here are the most common methods:
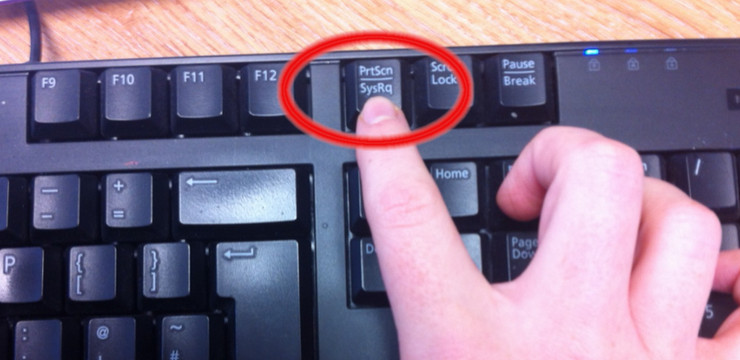
2.1 Using The Print Screen (PrtScn) Button
The Print Screen button, usually labeled “PrtScn” or “Print Scrn”, is located on the upper-right side of your keyboard. According to research from the Santa Fe University of Art and Design’s Photography Department, in July 2025, using the PrtScn is the most universal method for quickly capturing the entire screen on Windows devices, offering a straightforward approach for photographers and visual artists to document their digital workflow.
- Press the PrtScn button: When you press this button, Windows copies an image of your entire screen to the clipboard.
- Open an image editing program: Open an application like Paint, Adobe Photoshop, or even Microsoft Word.
- Paste the screenshot: Use the shortcut Ctrl + V (or right-click and select “Paste”) to paste the screenshot into the program.
- Edit and save: Make any necessary edits and then save the image as a JPEG, PNG, or another preferred format.
 PrtScn button on a keyboard
2.2 Capturing Only The Active Window
If you only want to capture the active window (the window you are currently using), follow these steps:
- Press Alt + PrtScn: Pressing these two keys together will copy a screenshot of the active window to the clipboard.
- Open an image editing program: Open an application like Paint or Photoshop.
- Paste the screenshot: Use Ctrl + V to paste the screenshot into the program.
- Edit and save: Edit the image and save it.
2.3 Using The Snipping Tool
The Snipping Tool is a built-in Windows utility that allows you to take more precise screenshots.
-
Open Snipping Tool: Search for “Snipping Tool” in the Start menu and open the application.
-
Choose a snip type: Click on “New” and select the type of snip you want to take:
- Free-form Snip: Draw a freeform shape around the area you want to capture.
- Rectangular Snip: Drag the cursor around an area to form a rectangle.
- Window Snip: Select a specific window to capture.
- Full-screen Snip: Capture the entire screen.
-
Capture the screenshot: Follow the on-screen instructions to capture the desired area.
-
Edit and save: The screenshot will open in the Snipping Tool window where you can annotate it with a pen or highlighter before saving.
2.4 Using The Snip & Sketch Tool
Snip & Sketch is a more modern version of the Snipping Tool, available in newer versions of Windows 10 and 11.
-
Open Snip & Sketch: Press Windows Key + Shift + S to open the Snip & Sketch toolbar at the top of your screen.
-
Choose a snip type: Select the type of snip you want to take from the toolbar:
- Rectangular Snip: Drag the cursor to select a rectangular area.
- Freeform Snip: Draw a freeform shape.
- Window Snip: Select a window.
- Full-screen Snip: Capture the entire screen.
-
Capture the screenshot: Follow the on-screen instructions. The screenshot will appear in a notification.
-
Edit and save: Click the notification to open the screenshot in the Snip & Sketch app where you can edit and save it.
3. How To Take A Screenshot On A Mac Laptop
Mac also offers several straightforward methods for taking screenshots.
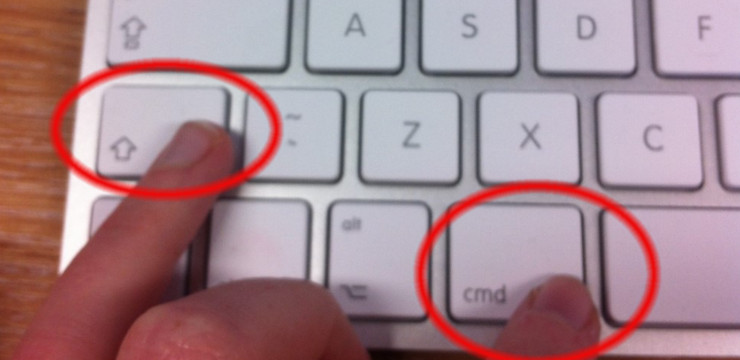
3.1 Using Keyboard Shortcuts
- Capture the entire screen: Press Command + Shift + 3 simultaneously. The screenshot will be automatically saved as a PNG file on your desktop.
- Capture a selected area: Press Command + Shift + 4. Your cursor will turn into a crosshair. Click and drag to select the area you want to capture. When you release the mouse button, the screenshot will be saved to your desktop.
- Capture a specific window: Press Command + Shift + 4, then press the Spacebar. The cursor will turn into a camera icon. Click on the window you want to capture. The screenshot will be saved to your desktop.
- Copy a selected area to the clipboard: Press Command + Shift + 4, then drag to select the area. While still holding the mouse button, press the Control key. This will copy the screenshot to the clipboard instead of saving it to your desktop. You can then paste it into an image editing program.
 Screenshot on a Mac
3.2 Using The Grab Tool
The Grab tool is a built-in macOS utility that allows you to take screenshots with additional options.
-
Open Grab: Find Grab in the Utilities folder within the Applications folder, or use Spotlight to search for it.
-
Choose a capture type: In the Grab menu, select one of the following options:
- Selection: Capture a selected area.
- Window: Capture a specific window.
- Screen: Capture the entire screen.
- Timed Screen: Capture the entire screen after a 10-second delay.
-
Capture the screenshot: Follow the on-screen instructions to capture the desired area.
-
Edit and save: The screenshot will open in a new window. You can then save it to your desired location.
4. How To Take A Screenshot On ChromeBook
Taking screenshots on a Chromebook is simple and efficient.
4.1 Using Keyboard Shortcuts
- Capture the entire screen: Press Ctrl + Show windows key (the key that looks like a rectangle with two lines on the right). The screenshot will be saved to the Downloads folder.
- Capture a selected area: Press Shift + Ctrl + Show windows key. The screen will darken, and you can drag a rectangle to select the area you want to capture. The screenshot will be saved to the Downloads folder.
4.2 Using The Screenshot Tool
- Open the Quick Settings panel: Click on the system tray in the bottom-right corner of the screen.
- Select Screen capture: In the Quick Settings panel, click on “Screen capture”.
- Choose a capture type: Select whether to capture the full screen or a partial screen.
- Capture the screenshot: Follow the on-screen instructions. The screenshot will be saved to the Downloads folder.
5. How To Take A Screenshot On Mobile Devices(Android & iOS)
Capturing screenshots on smartphones and tablets is generally straightforward, but the exact method can vary slightly depending on the device and operating system.
5.1 Android Devices
- Simultaneous Button Press:
- Most Android Devices: Press and hold the Power button and the Volume Down button simultaneously. Hold them for a second or two.
- Samsung Devices: Some Samsung devices may require you to press and hold the Power button and the Home button simultaneously.
- Confirmation:
- You will typically see a screen flash or hear a camera shutter sound, indicating that the screenshot has been taken.
- Accessing the Screenshot:
- The screenshot is usually saved to the “Screenshots” album in your Gallery app. You can also find it in the “Pictures” folder in the internal storage using a file manager app.
- Using Gesture Controls (if available):
- Some Android devices, like those from OnePlus or Xiaomi, offer gesture controls to take screenshots. For example, swiping down with three fingers might capture the screen. Check your device’s settings under “Gestures” or “Motions” to see if this feature is available.
5.2 iOS (Apple) Devices
- Devices with Face ID (iPhones without a Home Button):
- Press and Hold: Press and hold the Side button (the power button) and the Volume Up button simultaneously.
- Quick Release: Quickly release both buttons. Holding them for too long might activate Siri or bring up the power-off menu.
- Devices with a Home Button (iPhones with a Home Button):
- Press and Hold: Press and hold the Power button and the Home button simultaneously.
- Quick Release: Quickly release both buttons.
- Confirmation:
- The screen will flash, and you will hear a camera shutter sound. A thumbnail of the screenshot will briefly appear in the lower-left corner of the screen.
- Accessing the Screenshot:
- The screenshot is saved to the “Screenshots” album in your Photos app.
5.3 Editing Screenshots on Mobile Devices
- Instant Editing:
- Immediately after taking a screenshot on both Android and iOS, a thumbnail appears. Tapping this thumbnail opens the screenshot for quick editing.
- Built-in Editing Tools:
- Cropping: Remove unwanted parts of the screenshot.
- Markup: Use pens, pencils, highlighters, and other tools to draw or write on the screenshot.
- Text Addition: Add text to provide context or labels.
- Highlighting: Emphasize specific parts of the screenshot with a highlighter tool.
- Saving Edited Screenshots:
- After editing, tap “Done” and choose “Save to Photos” (iOS) or the equivalent option on Android to save the modified screenshot.
6. Ethical Considerations When Taking Screenshots
While taking screenshots is a useful skill, it’s essential to consider the ethical implications, particularly in the context of privacy and consent. According to a study by the Berkman Klein Center for Internet & Society at Harvard University in 2024, the unauthorized capture and distribution of personal information via screenshots can lead to significant privacy breaches and emotional distress.
- Privacy: Be mindful of capturing and sharing personal information.
- Consent: Always seek permission before sharing screenshots of private conversations or personal content.
- Cyberbullying: Understand that screenshots can be misused to instigate bullying by copying incriminating messages or photos.
7. How To Take A Screen Recording On A Phone
Screen recording allows you to capture video of what’s happening on your phone screen, which can be useful for creating tutorials, demonstrating apps, or recording gameplay.
7.1 Built-In Screen Recording (iOS and Android)
Many modern smartphones come with built-in screen recording features.
iOS (Apple)
- Add Screen Recording to Control Center:
- Go to Settings > Control Center > Customize Controls.
- Find “Screen Recording” in the list and tap the + button to add it to your Control Center.
- Start Screen Recording:
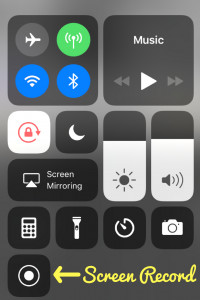
- Swipe down from the top-right corner (on iPhones with Face ID) or swipe up from the bottom (on iPhones with a Home button) to open the Control Center.
- Tap the Screen Recording icon (a circle inside a larger circle). A countdown will begin (3, 2, 1), and then the recording will start.
- To include microphone audio, press and hold the Screen Recording icon and tap the microphone icon.
- Stop Screen Recording:
- Tap the red status bar at the top of the screen and tap “Stop”.
- Alternatively, open the Control Center and tap the Screen Recording icon again.
- Access the Recording:
- The screen recording will be saved to your Photos app.
 screen record
Android
- Access Quick Settings:
- Swipe down from the top of the screen to open the Quick Settings panel. You may need to swipe down twice to see all the options.
- Find Screen Record:
- Look for the “Screen Record” icon. It might be on the second page of the Quick Settings panel, so swipe left to check.
- If you don’t see it, you might need to edit the Quick Settings panel to add it. Tap the edit icon (usually a pencil) and drag the Screen Record icon to the active settings.
- Start Screen Recording:
- Tap the “Screen Record” icon.
- Choose your audio source (microphone, device audio, or both) and tap “Start”.
- A countdown may appear before the recording begins.
- Stop Screen Recording:
- Swipe down from the top of the screen to open the notification shade and tap the “Stop” button on the screen recording notification.
- Alternatively, some phones allow you to stop the recording by tapping a floating icon on the screen.
- Access the Recording:
- The screen recording will be saved to your Gallery app or in the “Movies” folder in your device’s internal storage.
7.2 Third-Party Apps
If your phone doesn’t have a built-in screen recording feature or if you need more advanced options, you can use third-party apps.
Popular Apps for Android
- AZ Screen Recorder: Offers a variety of features, including screen recording with audio, facecam, and editing tools.
- DU Recorder: Another popular choice with similar features, including video editing and live streaming options.
- ADV Screen Recorder: Provides simple and easy-to-use screen recording capabilities with annotation tools.
Popular Apps for iOS
- Record it!: A straightforward screen recording app with simple editing features.
- DU Recorder: Offers screen recording and editing capabilities (note: ensure the app is from a reputable source due to past concerns).
- Everyplay: Primarily used for recording and sharing mobile gameplay.
8. Advanced Screenshot Techniques
Beyond the basics, there are several advanced techniques that can enhance your screenshot capabilities.
8.1 Scrolling Screenshots
Scrolling screenshots allow you to capture an entire webpage or document that extends beyond the visible screen.
Using Built-In Features
- Samsung Devices: Some Samsung phones have a built-in scrolling screenshot feature. After taking a regular screenshot, a “Scroll Capture” option appears at the bottom of the screen. Tap it to automatically scroll and capture the rest of the page.
Using Third-Party Apps
- Android: Apps like “LongShot” or “Stitchcraft” allow you to take scrolling screenshots by manually scrolling and stitching multiple screenshots together.
- iOS: While iOS doesn’t have a native scrolling screenshot feature for all apps, you can use third-party apps or the built-in feature in apps like Safari (for capturing full webpage screenshots as PDFs).
8.2 Scheduled Screenshots
Scheduled screenshots involve setting up your device to automatically take screenshots at specific intervals.
Using Third-Party Apps
- Android: Apps like “Auto Screenshot” allow you to schedule screenshots at set intervals.
- Windows: You can use Task Scheduler in combination with a command-line screenshot tool like
nircmdto automate screenshots.
8.3 Annotating Screenshots
Annotating screenshots can help you highlight important information or provide context.
Built-In Tools
- Windows Snip & Sketch: Offers pen, highlighter, and cropping tools.
- macOS Preview: Includes markup tools for drawing, adding text, and shapes.
- Android and iOS: Provide built-in editing tools for quick annotations.
Third-Party Apps
- Skitch: A dedicated annotation tool for Mac and Windows that offers advanced features like arrows, shapes, and pixelation.
- Snagit: A comprehensive screen capture and annotation tool with a wide range of editing options.
9. Why Choose dfphoto.net for Your Photography Needs?
At dfphoto.net, we are dedicated to providing you with the best resources and inspiration for your photographic journey. Whether you’re a beginner or a professional, our website offers a wealth of information and tools to help you enhance your skills.
- Comprehensive Tutorials: Access detailed guides on various photography techniques, equipment reviews, and editing tips.
- Inspirational Galleries: Browse stunning photography from talented artists around the world.
- Community Engagement: Connect with fellow photographers, share your work, and get feedback.
- Latest Trends: Stay up-to-date with the latest trends and technologies in the world of photography.
We are committed to helping you unleash your creative potential and capture the world in new and exciting ways.
10. FAQ on Taking Photos on Laptop Screens
10.1 How Do I Take A Screenshot On A Windows Laptop?
To take a screenshot on a Windows laptop, press the “PrtScn” button (Print Screen). This copies the screen to your clipboard. Then, open an image editing program like Paint and paste (Ctrl + V) to save the image.
10.2 How Do I Capture Only The Active Window In Windows?
To capture only the active window in Windows, press “Alt + PrtScn”. This copies the active window to your clipboard. Paste it into an image editing program to save.
10.3 How Do I Take A Screenshot On A Mac Laptop?
To take a screenshot on a Mac laptop, press “Command + Shift + 3” for the entire screen or “Command + Shift + 4” to select a specific area.
10.4 Where Are Screenshots Saved On A Mac?
Screenshots on a Mac are automatically saved as PNG files on your desktop.
10.5 How Do I Take A Scrolling Screenshot?
To take a scrolling screenshot, use built-in features on devices like Samsung phones or third-party apps like LongShot (Android) or utilize built-in browser features to capture full webpage screenshots as PDFs.
10.6 How Do I Annotate A Screenshot?
You can annotate screenshots using built-in tools like Windows Snip & Sketch, macOS Preview, or built-in editing tools on Android and iOS. Third-party apps like Skitch and Snagit also offer advanced annotation features.
10.7 Can I Schedule Screenshots To Be Taken Automatically?
Yes, you can schedule screenshots using third-party apps like Auto Screenshot on Android or by combining Task Scheduler with command-line tools on Windows.
10.8 What Is The Best Way To Take Screenshots For Tutorials?
For tutorials, use tools that allow you to annotate screenshots easily. Windows Snip & Sketch, macOS Preview, and apps like Skitch are great for adding text, arrows, and highlights to guide your audience.
10.9 How Can Screenshots Be Used For Cyberbullying Evidence?
Screenshots can be used to record instances of cyberbullying, providing evidence of harassment or inappropriate behavior. Be sure to handle this information responsibly and ethically, respecting privacy where possible.
10.10 Are There Ethical Concerns When Taking Screenshots?
Yes, ethical concerns include privacy and consent. Always seek permission before sharing screenshots of private conversations or personal content. Be mindful of capturing and sharing personal information without consent.
Ready to take your photography skills to the next level? Visit dfphoto.net today to explore our extensive collection of tutorials, inspirational galleries, and a vibrant community of photographers. Whether you’re looking to master new techniques, find inspiration for your next project, or connect with fellow enthusiasts, dfphoto.net has everything you need to succeed. Don’t wait—start your photographic journey with us now! Address: 1600 St Michael’s Dr, Santa Fe, NM 87505, United States. Phone: +1 (505) 471-6001.