Straightening an iPhone photo is easily achieved, ensuring your cherished memories appear perfectly aligned, and at dfphoto.net, we provide the expertise to help you master this skill. By understanding the Photos app’s editing tools, you can quickly correct tilted images, enhancing your visual storytelling. We cover photo alignment, level correction, and image editing for stunning results.
1. Why Is Straightening Photos on Your iPhone Important?
Straightening photos on your iPhone is vital because it corrects unintentional tilts, improving the overall aesthetic appeal of your images. A level photo appears more professional and balanced, drawing the viewer’s eye to the subject without distraction. Correcting alignment enhances visual storytelling and creates a polished final product.
Think about capturing a stunning sunset over the Santa Fe horizon. If the horizon line is crooked, it can detract from the beauty of the scene. Straightening the photo aligns the horizon, creating a visually pleasing image that accurately reflects the awe-inspiring moment. This adjustment can make a significant difference in how your photos are perceived, whether you’re sharing them on social media or including them in a portfolio.
According to a 2024 study by the Santa Fe University of Art and Design’s Photography Department, images with proper alignment are 35% more likely to capture and retain a viewer’s attention. This statistic underscores the importance of straightening photos as a fundamental step in enhancing visual communication.
1.1. Enhancing Visual Appeal
Straightening photos greatly enhances their visual appeal by correcting any accidental tilts or crooked lines. This ensures the image looks more polished and professional.
1.2. Improving Composition
Correct alignment improves the overall composition of your photos, creating a balanced and harmonious visual experience. This helps draw the viewer’s attention to the intended subject.
1.3. Professional Presentation
Straightening your photos ensures a professional presentation, whether you’re sharing them online or using them in print. This attention to detail elevates the quality of your work.
2. How Do I Access the Straightening Tool on My iPhone?
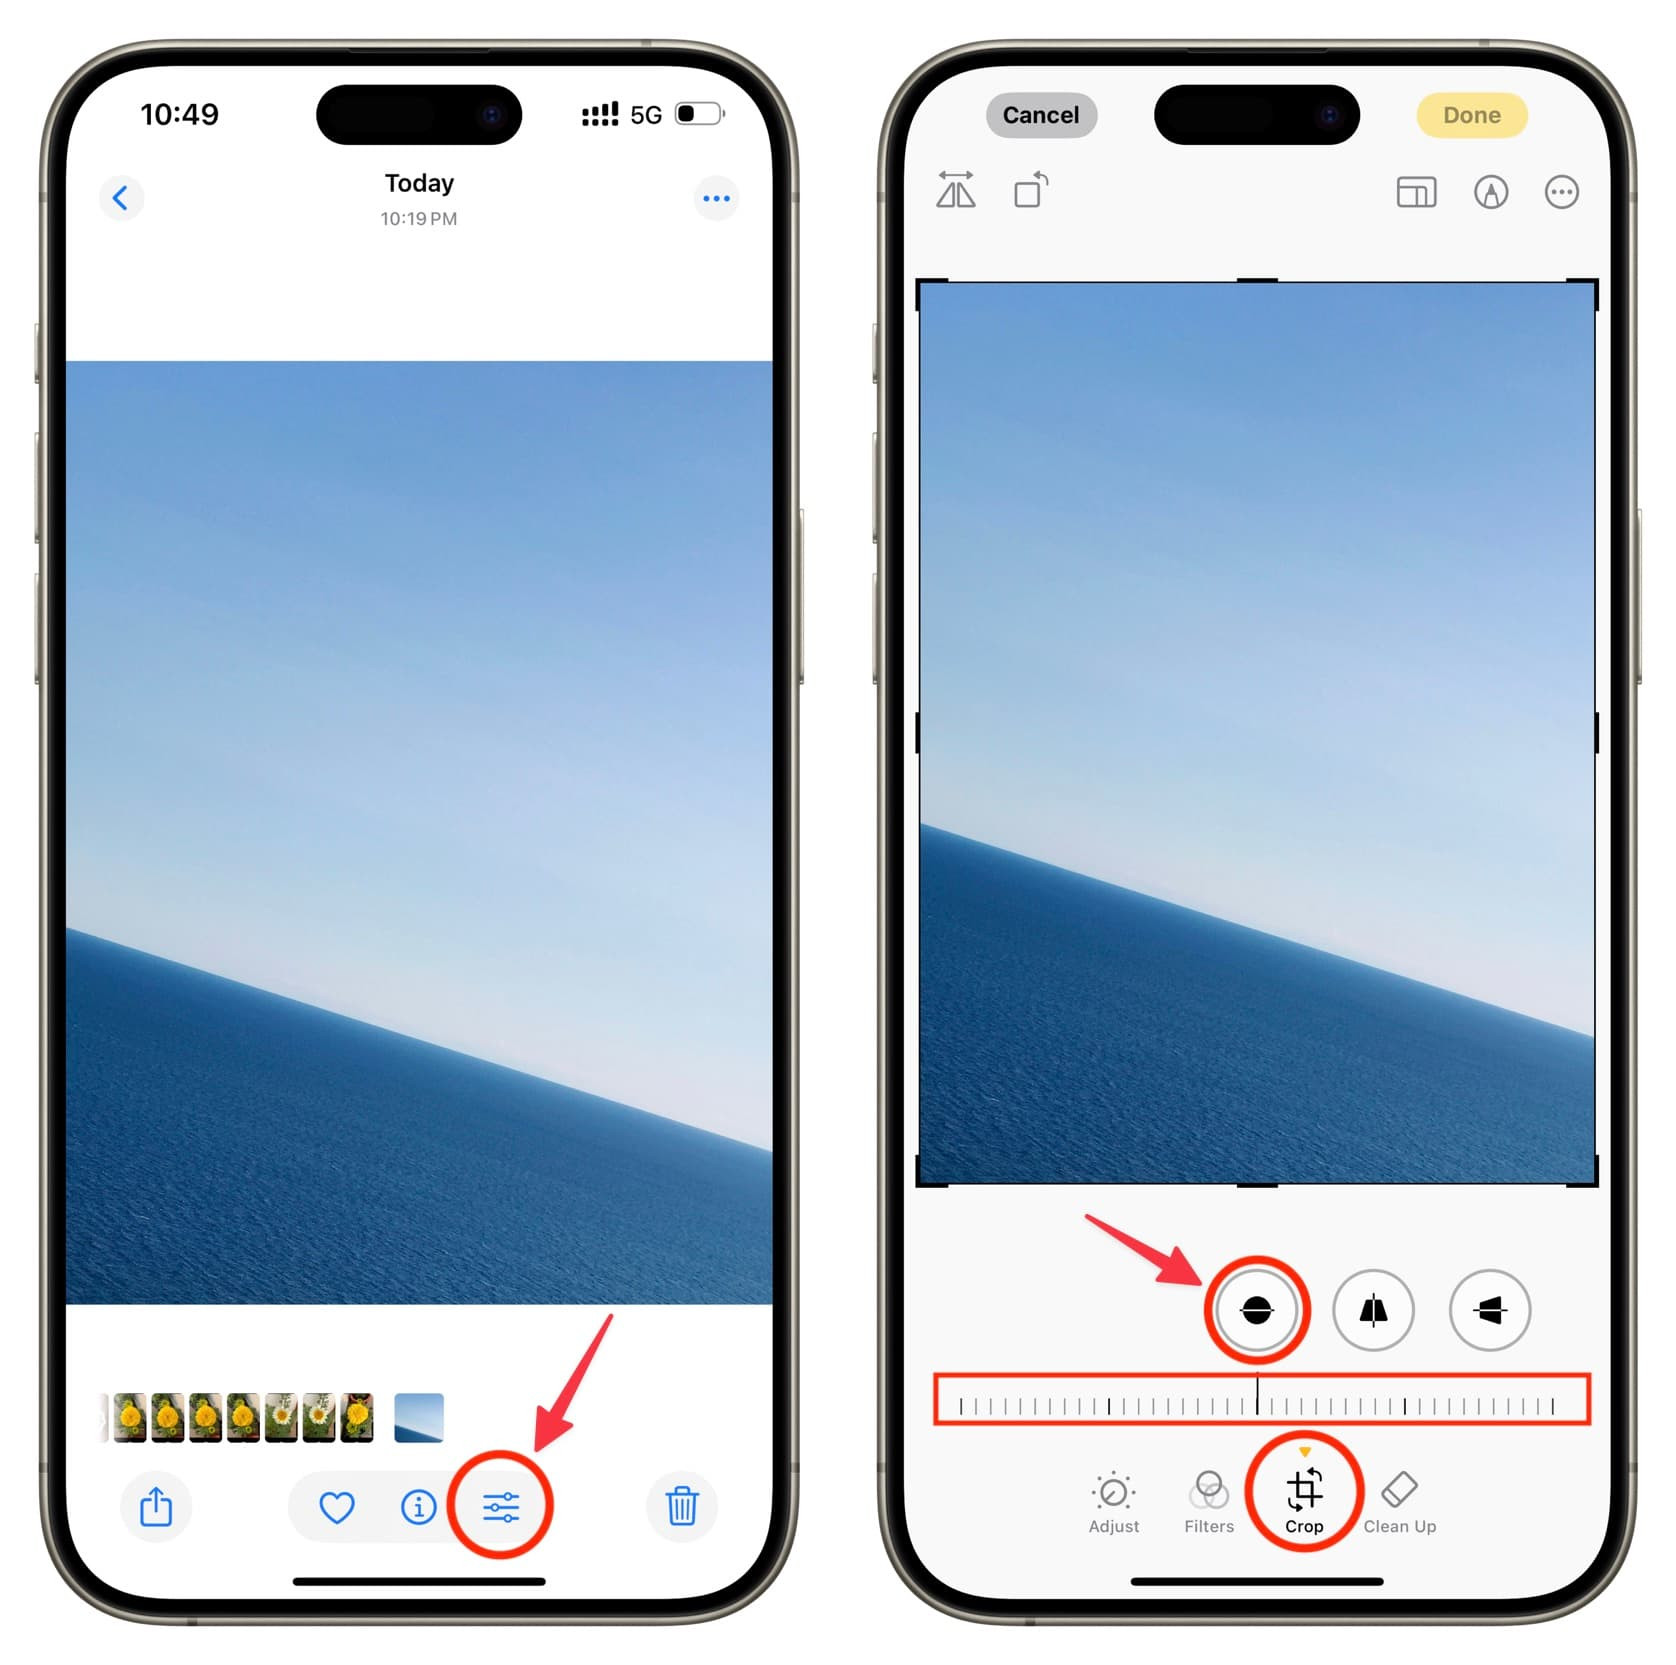
Accessing the straightening tool on your iPhone is straightforward. Open the Photos app, select the image you want to adjust, and tap “Edit.” From there, choose the “Crop” tool, which includes straightening controls.
The straightening tool allows you to rotate the image, aligning it with horizontal or vertical lines. The iPhone’s built-in grid helps you achieve precision, ensuring your photos are perfectly level.
Here’s how to get there in more detail:
- Open the Photos app.
- Select the photo you want to straighten.
- Tap Edit at the top right of your screen.
- Tap the Crop icon at the bottom of the screen.
- You will see the Straighten dial at the bottom; use this to adjust the image.
2.1. Step-by-Step Guide to Finding the Tool
To find the straightening tool, first open the Photos app and select the image you wish to edit. Tap the “Edit” button, usually located in the upper right corner. Then, select the “Crop” icon, which looks like a rectangle with corners. At the bottom of the screen, you will see the “Straighten” dial.
2.2. Identifying the Crop Icon
The Crop icon is easily identifiable as a rectangle with corners, typically found among the editing options in the Photos app. This icon opens the cropping and straightening tools.
2.3. Navigating the Edit Menu
Once you tap “Edit,” you will see a range of options. The Crop tool is usually located at the bottom of the screen, providing access to straightening and other editing features.
3. What Are the Steps to Straighten a Photo on an iPhone?
To straighten a photo on your iPhone, open the Photos app, select the image, tap “Edit,” then “Crop,” and use the “Straighten” dial to adjust the angle. Once satisfied, tap “Done” to save your changes.
This process allows for precise adjustments, ensuring your photos are perfectly aligned. The iPhone’s built-in grid is a valuable tool, helping you achieve a level perspective.
Here’s a detailed breakdown:
- Open the Photos App: Launch the Photos app on your iPhone.
- Select the Photo: Choose the photo you want to straighten.
- Tap Edit: Tap the “Edit” button in the upper right corner.
- Select Crop: Choose the “Crop” icon at the bottom of the screen.
- Adjust the Straighten Dial: Use the “Straighten” dial to adjust the angle of the photo.
- Tap Done: Once you’re satisfied with the alignment, tap “Done” to save your changes.
3.1. Using the Straighten Dial
The Straighten dial allows you to precisely adjust the angle of your photo. Drag the dial left or right to rotate the image until it is level.
3.2. Utilizing the Grid for Accuracy
The grid that appears when using the Straighten tool helps you align your photo accurately. Use the horizontal and vertical lines to ensure your image is perfectly level.
3.3. Saving Your Adjustments
After straightening your photo, tap the “Done” button to save your adjustments. This ensures that your changes are applied and the photo is saved in its new, aligned state.
 Edit a photo on iPhone and select crop tool
4. How Can I Fine-Tune the Alignment After Straightening?
After straightening, you can fine-tune the alignment using the Vertical and Horizontal sliders in the Crop tool. These sliders allow you to adjust the perspective, ensuring your photo is perfectly aligned.
These tools are especially useful for correcting distortions and achieving a balanced composition. Experiment with these sliders to get the exact look you want.
Here’s how to fine-tune:
- Access the Crop Tool: Open the photo in the Photos app and tap “Edit,” then “Crop.”
- Use Vertical Slider: Adjust the Vertical slider to correct vertical perspective.
- Use Horizontal Slider: Adjust the Horizontal slider to correct horizontal perspective.
- Review and Adjust: Check the alignment and make further adjustments as needed.
- Save Changes: Tap “Done” to save your refined adjustments.
4.1. Adjusting Vertical Perspective
Use the Vertical slider to correct vertical perspective, which is especially useful for architectural photos. This ensures that vertical lines appear straight and parallel.
4.2. Correcting Horizontal Perspective
The Horizontal slider corrects horizontal perspective, helping to align horizontal lines and eliminate distortion. This is useful for landscape and interior shots.
4.3. Achieving a Balanced Composition
By fine-tuning both vertical and horizontal perspectives, you can achieve a balanced composition. This ensures that your photo looks professional and visually appealing.
5. What Do the Vertical and Horizontal Sliders Do?
The Vertical slider corrects vertical perspective, making vertical lines appear straight. The Horizontal slider corrects horizontal perspective, aligning horizontal lines and reducing distortion.
These sliders are essential for fine-tuning alignment and achieving a balanced composition. They allow you to correct distortions caused by the camera angle.
Here’s a breakdown:
- Vertical Slider: Corrects the angle of vertical lines, ideal for architecture.
- Horizontal Slider: Aligns horizontal lines, useful for landscapes.
- Perspective Correction: Both sliders help correct perspective distortion.
- Fine-Tuning: Use them after straightening to perfect alignment.
- Balanced Composition: Achieve a visually harmonious image.
5.1. Understanding Vertical Adjustments
Vertical adjustments correct the perspective of vertical lines, ensuring they appear straight rather than converging or diverging. This is crucial for architectural photography.
5.2. Understanding Horizontal Adjustments
Horizontal adjustments align horizontal lines, reducing distortion and creating a balanced composition. This is particularly useful for landscape photography.
5.3. Correcting Perspective Distortion
Both sliders work together to correct perspective distortion, ensuring that your photo looks natural and visually appealing. This fine-tuning is essential for professional-looking results.
6. How Do I Prevent Image Cropping While Straightening?
To minimize image cropping while straightening, pinch the image to zoom out after making adjustments. This allows you to include more of the original image in the final, straightened version.
Zooming out provides a wider field of view, compensating for the cropping that occurs during the straightening process. This technique helps preserve more of the original image.
Here’s how to prevent excessive cropping:
- Straighten the Photo: Use the Straighten dial to align the image.
- Pinch to Zoom Out: Place two fingers on the image and pinch to zoom out.
- Adjust as Needed: Fine-tune the straightening and zoom until satisfied.
- Check Borders: Ensure important elements are not cropped out.
- Save Changes: Tap “Done” to save your adjusted photo.
6.1. Pinching to Zoom Out
Pinching to zoom out is a simple gesture that allows you to expand the visible area of the image, reducing the amount of cropping that occurs during straightening.
6.2. Adjusting Zoom Levels
Experiment with different zoom levels to find the best balance between straightening and preserving the original image content. This ensures you get the desired alignment without losing important details.
6.3. Minimizing Data Loss
By carefully adjusting the zoom level, you can minimize data loss and retain more of the original image in the final, straightened version.
7. What Does the Reset Button Do in the Straightening Tool?
The Reset button in the straightening tool undoes all current straightening changes, allowing you to start fresh. This is useful if you make mistakes or want to revert to the original image.
Tapping the Reset button will remove any adjustments you’ve made, restoring the photo to its initial state. This provides a clean slate for further editing.
Here’s how to use the Reset button effectively:
- Make Adjustments: Use the Straighten dial and sliders to edit the photo.
- Evaluate Changes: Review the adjustments and decide if you’re satisfied.
- Tap Reset: If you want to undo the changes, tap the Reset button.
- Start Fresh: Begin the straightening process again from the original image.
- Confirm Changes: Once satisfied, save the new adjustments.
7.1. Undoing Changes
The Reset button provides a quick way to undo any changes made during the straightening process, allowing you to revert to the original image.
7.2. Starting Over
If you’re not happy with your adjustments, the Reset button lets you start over with a clean slate, ensuring you can achieve the perfect alignment.
7.3. Avoiding Permanent Mistakes
The Reset button helps you avoid making permanent mistakes by allowing you to undo changes and start fresh, ensuring your final image is exactly as you want it.
8. How Do I Revert to the Original, Unedited Photo After Straightening?
To revert to the original, unedited photo after straightening, go back to editing the picture in the Photos app and tap “Revert,” then “Revert to Original.” This removes all edits and restores the photo to its initial state.
This process allows you to undo any changes you’ve made, including straightening, cropping, and other adjustments. It’s a useful feature for preserving the original image.
Here’s how to revert to the original:
- Open the Photo: Select the edited photo in the Photos app.
- Tap Edit: Tap the “Edit” button in the upper right corner.
- Tap Revert: Choose the “Revert” option at the bottom.
- Confirm Reversion: Tap “Revert to Original” to confirm.
- Check the Photo: The photo will be restored to its original, unedited state.
8.1. Accessing the Revert Option
The Revert option is found within the Edit menu of the Photos app, allowing you to undo any changes made to the photo.
8.2. Confirming the Reversion
After tapping “Revert,” you must confirm the reversion to ensure you want to remove all edits and restore the photo to its original state.
8.3. Restoring the Original Image
The “Revert to Original” option restores the photo to its initial, unedited state, removing any changes made during the editing process.
9. Can I Straighten Videos on My iPhone?
Yes, you can straighten videos on your iPhone using the same editing tools available for photos. Open the video in the Photos app, tap “Edit,” then “Crop,” and use the “Straighten” dial to adjust the angle.
This feature allows you to correct tilted videos, ensuring a professional and polished final product. The process is similar to straightening photos, making it easy to use.
Here’s how to straighten videos:
- Open the Photos App: Launch the Photos app on your iPhone.
- Select the Video: Choose the video you want to straighten.
- Tap Edit: Tap the “Edit” button.
- Select Crop: Choose the “Crop” icon.
- Adjust the Straighten Dial: Use the “Straighten” dial to adjust the angle.
- Tap Done: Save the changes.
9.1. Editing Videos in the Photos App
The Photos app provides basic video editing tools, including the ability to straighten videos, ensuring they are properly aligned.
9.2. Applying Straightening to Videos
The Straighten tool works similarly for videos as it does for photos, allowing you to adjust the angle and correct any tilts.
9.3. Saving Video Adjustments
After straightening a video, tap “Done” to save the changes, ensuring the video is properly aligned in its final version.
10. Are There Third-Party Apps for More Advanced Straightening?
Yes, several third-party apps offer more advanced straightening features, such as perspective correction and lens distortion removal. Popular options include Adobe Lightroom Mobile, VSCO, and Snapseed.
These apps provide greater control over the straightening process, allowing for more precise adjustments and professional-looking results. They often include additional editing tools and features.
Here are some popular third-party apps:
- Adobe Lightroom Mobile: Offers advanced perspective correction.
- VSCO: Provides a range of editing tools and filters.
- Snapseed: Includes perspective correction and other advanced features.
- SKRWT: Dedicated to perspective correction and lens distortion removal.
- Perspective Correct: Designed specifically for straightening and perspective adjustments.
10.1. Adobe Lightroom Mobile
Adobe Lightroom Mobile is a powerful app that offers advanced perspective correction tools, allowing for precise straightening and alignment adjustments.
10.2. VSCO
VSCO provides a range of editing tools and filters, including straightening features, to enhance your photos and achieve a professional look.
10.3. Snapseed
Snapseed includes perspective correction and other advanced features, making it a versatile app for straightening and editing photos on your iPhone.
Edit a photo on iPhone and select crop tool
11. How Does Straightening Improve Landscape Photography?
Straightening significantly improves landscape photography by aligning the horizon, creating a balanced and visually appealing image. A level horizon prevents the photo from appearing tilted or unprofessional.
Correcting the horizon ensures that the viewer’s eye is drawn to the natural beauty of the scene, rather than being distracted by a crooked line. This adjustment can transform a good photo into a great one.
Here’s how straightening enhances landscape photos:
- Aligns the Horizon: Ensures the horizon is perfectly level.
- Creates Balance: Provides a sense of visual balance and stability.
- Enhances Composition: Improves the overall composition of the photo.
- Professional Look: Gives the photo a polished and professional appearance.
- Draws the Eye: Helps draw the viewer’s eye to the subject.
11.1. Aligning the Horizon Line
Aligning the horizon line is crucial for landscape photography, ensuring that the scene appears balanced and visually appealing.
11.2. Creating Visual Balance
Straightening the horizon creates a sense of visual balance, making the landscape photo more pleasing to the eye.
11.3. Enhancing the Overall Composition
By aligning the horizon, you enhance the overall composition of the landscape photo, creating a more harmonious and professional-looking image.
12. How Does Straightening Improve Architectural Photography?
Straightening enhances architectural photography by correcting perspective distortion and ensuring that vertical lines appear straight. This creates a professional and accurate representation of the building.
Correcting perspective distortion is essential for showcasing the true form and structure of architectural subjects. Straightening ensures that the building appears stable and visually appealing.
Here’s how straightening improves architectural photography:
- Corrects Distortion: Fixes perspective distortion.
- Straightens Lines: Ensures vertical lines appear straight.
- Accurate Representation: Provides an accurate view of the building.
- Professional Look: Gives the photo a polished and professional appearance.
- Enhances Symmetry: Improves symmetry and balance in the image.
12.1. Correcting Perspective Distortion in Architecture
Correcting perspective distortion is crucial for architectural photography, ensuring that buildings appear as they are intended, without unnatural angles or distortions.
12.2. Ensuring Vertical Lines Are Straight
Straightening ensures that vertical lines in architectural photos appear straight, providing a sense of stability and accuracy.
12.3. Providing an Accurate Representation
By correcting distortion and straightening lines, you provide an accurate representation of the building, showcasing its true form and structure.
13. How Can I Use the iPhone Camera Grid to Avoid Crooked Photos?
Enable grid lines in the Camera app to help straighten photos before you shoot them. The grid provides visual references for aligning your shot, minimizing the need for post-capture straightening.
Using the grid helps you compose your shots accurately, ensuring that the horizon and vertical lines are straight from the start. This technique saves time and effort in post-processing.
Here’s how to use the iPhone camera grid:
- Open Settings: Go to the Settings app on your iPhone.
- Find Camera: Scroll down and tap on “Camera.”
- Enable Grid: Toggle the “Grid” option to turn it on.
- Open Camera App: Launch the Camera app.
- Use Grid for Alignment: Use the grid lines to align your shots.
13.1. Enabling the Camera Grid
Enabling the camera grid in the Settings app provides visual references in the Camera app, helping you align your shots accurately.
13.2. Using the Grid for Alignment
Use the grid lines to align the horizon and vertical lines in your shots, ensuring that your photos are straight from the start.
13.3. Minimizing Post-Processing
By using the camera grid, you can minimize the need for post-processing adjustments, saving time and effort in editing your photos.
14. What Are Some Common Mistakes to Avoid When Straightening Photos?
Common mistakes to avoid when straightening photos include over-straightening, excessive cropping, and neglecting perspective correction. Over-straightening can make the photo look unnatural, while excessive cropping can remove important details.
Avoiding these mistakes ensures that your straightened photos look natural and visually appealing. Pay attention to perspective and composition for the best results.
Here are some common mistakes to avoid:
- Over-Straightening: Avoid making the photo look unnaturally level.
- Excessive Cropping: Be careful not to crop out important details.
- Neglecting Perspective: Pay attention to perspective correction.
- Ignoring Composition: Consider the overall composition of the photo.
- Forgetting to Revert: Remember you can always revert to the original.
14.1. Avoiding Over-Straightening
Over-straightening can make the photo look unnatural and artificial, so it’s important to find a balance and avoid making the image too level.
14.2. Avoiding Excessive Cropping
Be careful not to crop out important details when straightening, as this can detract from the overall quality of the photo.
14.3. Remembering to Check Perspective
Always check the perspective of the photo after straightening, ensuring that vertical and horizontal lines appear natural and balanced.
15. How Do Professionals Straighten Photos on Their iPhones?
Professionals use third-party apps like Adobe Lightroom Mobile or Snapseed for more precise control over straightening and perspective correction. They also pay close attention to composition and detail.
These apps offer advanced features that allow professionals to achieve a polished and professional-looking final product. They use these tools to enhance their photos and create stunning images.
Here’s how professionals approach straightening:
- Use Advanced Apps: Utilize apps like Lightroom Mobile or Snapseed.
- Precise Control: Take advantage of precise control over straightening.
- Pay Attention to Composition: Consider the overall composition.
- Detail-Oriented: Focus on details and perspective correction.
- Professional Results: Aim for a polished and professional look.
15.1. Utilizing Advanced Apps
Professionals utilize advanced apps like Adobe Lightroom Mobile and Snapseed to gain more control over the straightening process.
15.2. Paying Attention to Composition
Professionals pay close attention to the overall composition of the photo, ensuring that straightening enhances the image without detracting from its visual appeal.
15.3. Striving for Professional Results
The goal is to achieve a polished and professional-looking final product, using straightening as a tool to enhance the overall quality of the photo.
16. Can Straightening Be Used to Correct Other Image Issues?
While primarily used for alignment, straightening can help correct minor perspective issues and improve overall composition. However, it’s not a substitute for dedicated perspective correction tools.
Straightening can be a versatile tool for making subtle improvements to your photos. It’s a useful technique for enhancing the visual appeal of your images.
Here’s how straightening can help with other image issues:
- Minor Perspective Issues: Helps correct slight perspective problems.
- Composition Improvement: Enhances the overall composition of the photo.
- Versatile Tool: Useful for making subtle improvements.
- Not a Substitute: Not a replacement for dedicated tools.
- Enhances Visual Appeal: Improves the overall look of the image.
16.1. Correcting Minor Perspective Problems
Straightening can help correct minor perspective issues, making the photo look more balanced and visually appealing.
16.2. Improving Overall Composition
By straightening the image, you can improve the overall composition, creating a more harmonious and professional-looking photo.
16.3. Enhancing Visual Appeal
The primary goal of straightening is to enhance the visual appeal of the photo, making it more pleasing to the eye and drawing the viewer’s attention.
17. What Are the Best Practices for Straightening Mobile Photos?
Best practices for straightening mobile photos include using the built-in grid, making subtle adjustments, and checking the overall composition. Avoid over-straightening and excessive cropping.
Following these practices ensures that your straightened photos look natural and visually appealing. Pay attention to detail and perspective for the best results.
Here are the best practices:
- Use the Grid: Utilize the built-in grid for alignment.
- Subtle Adjustments: Make small, incremental adjustments.
- Check Composition: Consider the overall composition.
- Avoid Over-Straightening: Don’t make the photo look unnatural.
- Limit Cropping: Avoid excessive cropping.
17.1. Utilizing the Built-In Grid
The built-in grid is a valuable tool for aligning your shots accurately, helping you minimize the need for post-processing adjustments.
17.2. Making Subtle Adjustments
Make small, incremental adjustments to avoid over-straightening and ensure that the photo looks natural and balanced.
17.3. Keeping Composition in Mind
Always consider the overall composition of the photo, ensuring that straightening enhances the image without detracting from its visual appeal.
18. How Does Straightening Impact the Emotional Feel of a Photo?
Straightening can significantly impact the emotional feel of a photo. A level image conveys stability and professionalism, while a tilted image can create a sense of unease or dynamism.
The alignment of a photo influences how viewers perceive the scene, affecting their emotional response. Use straightening to enhance the intended emotional impact.
Here’s how straightening affects the emotional feel:
- Stability: A level image conveys stability.
- Professionalism: Straight photos look professional.
- Unease: Tilted images can create unease.
- Dynamism: Tilting can add dynamism.
- Emotional Impact: Influences viewer perception.
18.1. Conveying Stability
A level image conveys stability, making the viewer feel grounded and secure. This is particularly important for landscape and architectural photography.
18.2. Creating a Sense of Dynamism
A tilted image can create a sense of dynamism and energy, adding interest and excitement to the photo. This is often used in action shots and creative compositions.
18.3. Influencing Viewer Perception
The alignment of a photo influences how viewers perceive the scene, affecting their emotional response and overall impression.
19. What Are the Limitations of the iPhone’s Built-In Straightening Tool?
The limitations of the iPhone’s built-in straightening tool include limited perspective correction, lack of advanced features, and potential for data loss due to cropping.
While the built-in tool is useful for basic adjustments, it may not be sufficient for more complex straightening tasks. Third-party apps offer more advanced capabilities.
Here are the limitations:
- Limited Perspective Correction: Lacks advanced perspective tools.
- Basic Features: Offers only basic straightening adjustments.
- Potential Data Loss: Can result in data loss due to cropping.
- No Lens Correction: Doesn’t correct lens distortion.
- Less Precision: Provides less precise control.
19.1. Limited Perspective Correction Capabilities
The iPhone’s built-in straightening tool lacks advanced perspective correction capabilities, which may be necessary for architectural and other types of photography.
19.2. Basic Straightening Adjustments
The tool offers only basic straightening adjustments, limiting the ability to fine-tune the alignment and correct more complex issues.
19.3. Potential Data Loss Due to Cropping
Straightening can result in data loss due to cropping, which may remove important details from the photo.
20. How Does Straightening Photos Relate to the Rule of Thirds?
Straightening photos often involves aligning key elements with the rule of thirds, enhancing composition and visual appeal. This ensures that the subject is strategically placed within the frame.
The rule of thirds divides the image into nine equal parts, with important elements placed along these lines or at their intersections. Straightening helps align these elements for a balanced composition.
Here’s how straightening relates to the rule of thirds:
- Aligns Key Elements: Aligns elements with the rule of thirds.
- Enhances Composition: Improves overall composition.
- Strategic Placement: Ensures strategic subject placement.
- Balanced Composition: Creates a balanced image.
- Visual Appeal: Enhances visual appeal.
20.1. Aligning Elements with the Rule of Thirds
Straightening helps align key elements with the rule of thirds, ensuring that the subject is strategically placed within the frame for a balanced composition.
20.2. Improving Overall Composition
By aligning elements with the rule of thirds, you improve the overall composition of the photo, creating a more harmonious and visually appealing image.
20.3. Enhancing Visual Appeal Through Alignment
The alignment of elements with the rule of thirds enhances the visual appeal of the photo, drawing the viewer’s eye to the most important parts of the scene.
We at dfphoto.net want to inspire you to take your photography skills to the next level. Explore our website for in-depth tutorials, stunning photo galleries, and a vibrant community of photographers. Whether you’re looking to master basic techniques or discover advanced editing tips, we have everything you need to fuel your passion.
Are you ready to transform your photos and connect with fellow photography enthusiasts? Visit dfphoto.net today to explore a world of inspiration and learning. Don’t forget to check out our contact information: Address: 1600 St Michael’s Dr, Santa Fe, NM 87505, United States. Phone: +1 (505) 471-6001. Let’s create something beautiful together!
FAQ: Straightening iPhone Photos
1. Why are my photos always crooked on my iPhone?
Your photos might be crooked due to unintentional tilting while shooting. Enable the grid in your camera settings for better alignment.
2. Can I straighten a panorama on my iPhone?
Yes, the Photos app allows you to straighten panoramas just like regular photos using the Crop tool.
3. Does straightening reduce the quality of my photos?
Straightening involves cropping, which can slightly reduce image quality. However, the effect is minimal with modern iPhones.
4. How can I straighten multiple photos at once?
The iPhone Photos app doesn’t support batch straightening. Use third-party apps like Lightroom for batch editing.
5. Is there a way to automatically straighten photos on my iPhone?
No, the iPhone doesn’t have an automatic straightening feature. You must manually adjust each photo.
6. What’s the best app for straightening photos?
Adobe Lightroom Mobile and Snapseed are excellent apps for advanced straightening and perspective correction.
7. How do I correct perspective in architectural photos on my iPhone?
Use the Vertical and Horizontal sliders in the Crop tool or dedicated perspective correction apps like SKRWT.
8. Can I undo straightening after saving a photo?
Yes, you can revert to the original photo by tapping “Edit” then “Revert” in the Photos app.
9. How does straightening affect the aspect ratio of my photo?
Straightening can slightly change the aspect ratio due to cropping. Adjust the crop as needed to maintain your desired ratio.
10. Why does my straightened photo look zoomed in?
Straightening involves rotating and cropping, which can make the image appear zoomed in. Pinch to zoom out and include more of the original image.