Capturing your iPhone screen can be a fantastic way to share information, preserve memories, or create tutorials. At dfphoto.net, we’re dedicated to helping you master the art of visual communication, and taking screenshots is a fundamental skill. Whether you’re aiming for clear instructional visuals or simply want to capture a fleeting moment, mastering iPhone screenshot techniques will enhance your digital storytelling. Let’s explore some screen capture tips, visual content, and digital imagery together.
1. Why Capture Your iPhone Screen?
Taking a photo, more commonly referred to as a screenshot, of your iPhone screen offers numerous advantages. It’s a quick and easy way to preserve information, share moments, and create visual guides.
- Preserving Information: Screenshots can capture important text messages, emails, or social media posts before they disappear.
- Sharing Moments: You can instantly share funny memes, interesting articles, or high scores in games with friends and family.
- Creating Visual Guides: Screenshots are invaluable for creating tutorials and how-to guides, providing clear step-by-step instructions.
2. Understanding The Basics Of iPhone Screenshots
Before diving into specific methods, let’s cover the basic principles of taking screenshots on iPhones. The process is straightforward but varies slightly depending on your iPhone model.
2.1 Hardware Buttons
iPhones use a combination of hardware buttons to trigger the screenshot function. The specific buttons you’ll use depend on whether your iPhone has Face ID or a Home button.
2.2 Software Methods
In addition to hardware buttons, iPhones offer software-based methods for capturing screenshots, providing accessibility options for users who may have difficulty using physical buttons.
2.3 Post-Capture Options
After taking a screenshot, you’ll see a thumbnail preview in the bottom-left corner of your screen. Tapping this thumbnail opens the screenshot in editing mode, allowing you to crop, annotate, and share it.
3. How To Take A Screenshot On iPhones With Face ID (iPhone X And Later)
iPhones with Face ID, such as iPhone X, iPhone 11, iPhone 12, iPhone 13, iPhone 14, and iPhone 15, use a specific button combination for taking screenshots. This method is consistent across all Face ID models.
3.1 Step-By-Step Guide
Here’s how to take a screenshot on iPhones with Face ID:
- Prepare Your Screen: Ensure the content you want to capture is displayed clearly on your screen.
- Press The Side Button And Volume Up Button: Simultaneously press the Side button (located on the right side of your iPhone) and the Volume Up button (located on the left side).
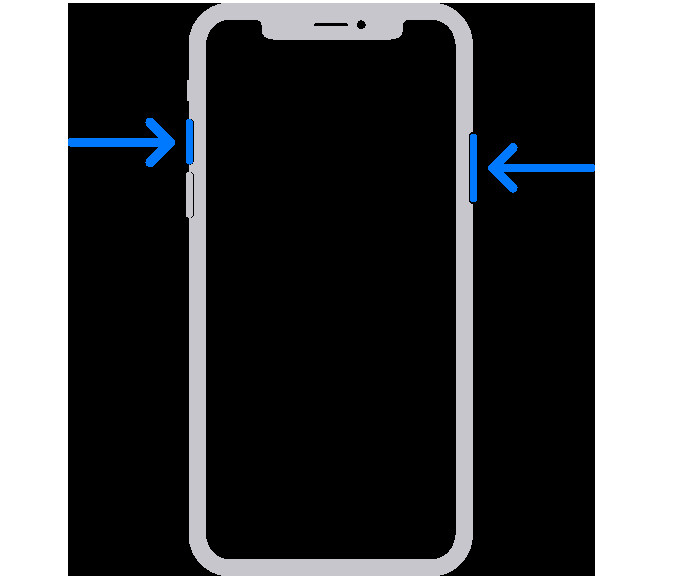 Arrows pointing to the side and volume up buttons on a phone with Face ID like iPhone 14
 - Quickly Release Both Buttons: Immediately release both buttons after pressing them to avoid triggering other functions.
- Thumbnail Preview: A thumbnail of the screenshot will appear briefly in the bottom-left corner of your screen.
- Edit Or Share: Tap the thumbnail to open the screenshot for editing, sharing, or deleting. Swipe left on the thumbnail to dismiss it, and the screenshot will be saved automatically to your Photos app.
3.2 Common Issues And Troubleshooting
- Buttons Not Responding: Ensure both buttons are pressed simultaneously and firmly. If the buttons are damaged, consider using AssistiveTouch.
- Volume Changing Instead Of Taking Screenshot: Release the buttons quickly to prevent the volume from changing.
- Screenshot Not Saving: Check your iPhone storage to ensure you have enough space for new photos and screenshots.
4. How To Take A Screenshot On iPhones With Touch ID And The Side Button (iPhone 6, 7, 8, SE 2nd & 3rd Gen)
iPhones with Touch ID and a Side button, such as iPhone 6, iPhone 7, iPhone 8, and iPhone SE (2nd and 3rd generation), use a different button combination for taking screenshots.
4.1 Step-By-Step Guide
Follow these steps to capture your screen on iPhones with Touch ID and the Side button:
- Prepare Your Screen: Display the content you wish to capture on your screen.
- Press The Side Button And Home Button: Simultaneously press the Side button (located on the right side of your iPhone) and the Home button (located on the front, below the screen).
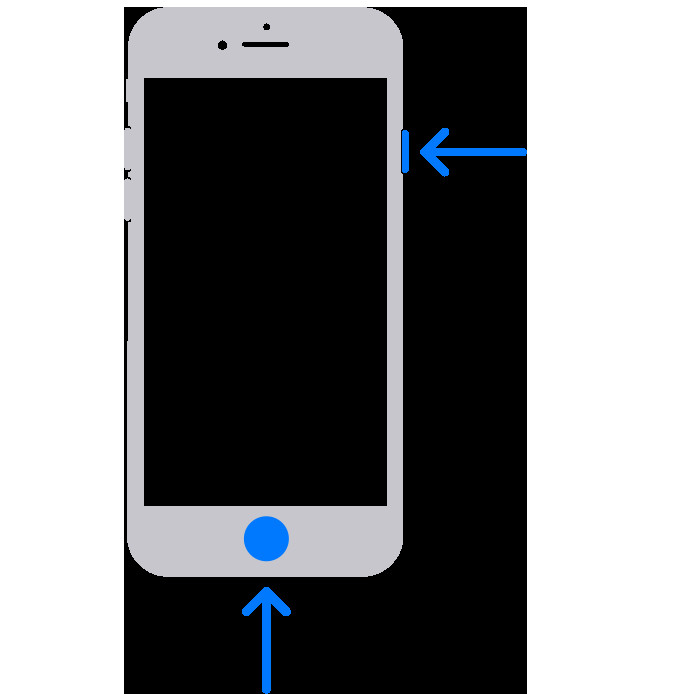 Image shows arrows pointing to the side and Home buttons
 - Quickly Release Both Buttons: Release both buttons immediately after pressing them.
- Thumbnail Preview: A thumbnail of the screenshot will appear in the bottom-left corner of your screen.
- Edit Or Share: Tap the thumbnail to edit or share the screenshot, or swipe left to dismiss and save it to your Photos app.
4.2 Common Issues And Troubleshooting
- Home Button Not Working: If the Home button is unresponsive, use AssistiveTouch to take screenshots.
- Power Button Issues: Ensure the Side button is functioning correctly. If not, use AssistiveTouch as an alternative.
- Screenshot Lag: Close unnecessary apps to free up memory and improve performance.
5. How To Take A Screenshot On iPhones With Touch ID And The Top Button (Older Models)
Older iPhone models with Touch ID and a Top button, such as the original iPhone SE and older generations, require a specific button combination.
5.1 Step-By-Step Guide
Here’s how to take a screenshot on these models:
- Prepare Your Screen: Make sure the content you want to capture is visible on your screen.
- Press The Top Button And Home Button: Simultaneously press the Top button (located on the top of your iPhone) and the Home button.
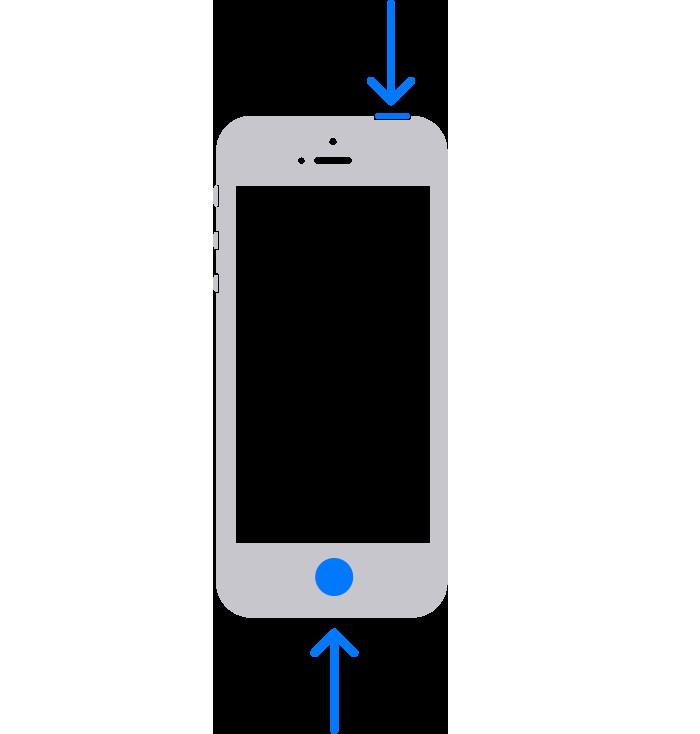 Image shows arrows pointing to the top and Home buttons
 - Quickly Release Both Buttons: Immediately release both buttons after pressing them.
- Thumbnail Preview: A thumbnail of the screenshot will appear in the bottom-left corner of your screen.
- Edit Or Share: Tap the thumbnail to edit or share, or swipe left to dismiss and save the screenshot.
5.2 Common Issues And Troubleshooting
- Top Button Malfunction: If the Top button isn’t working, use AssistiveTouch to take screenshots.
- Home Button Problems: If the Home button is unresponsive, rely on AssistiveTouch.
- Slow Response: Ensure your iPhone is running efficiently by closing unused apps and clearing cache.
6. Using AssistiveTouch To Take Screenshots
AssistiveTouch is a built-in accessibility feature that allows you to perform various actions, including taking screenshots, without using physical buttons.
6.1 Enabling AssistiveTouch
- Open Settings: Go to the Settings app on your iPhone.
- Navigate To Accessibility: Scroll down and tap on “Accessibility”.
- Find Touch: Under the “Physical and Motor” section, tap on “Touch”.
- Enable AssistiveTouch: Tap on “AssistiveTouch” and toggle the switch to turn it on.
6.2 Customizing AssistiveTouch For Screenshots
- Customize Top Level Menu: In the AssistiveTouch settings, tap “Customize Top Level Menu”.
- Assign Screenshot Function: Choose one of the icons and assign it the “Screenshot” function.
- Using AssistiveTouch: Tap the AssistiveTouch button on your screen, then tap the “Screenshot” icon to capture your screen.
6.3 Benefits Of Using AssistiveTouch
- No Physical Buttons Required: Ideal for users with button malfunctions or mobility issues.
- Customizable: You can customize the AssistiveTouch menu to include other frequently used functions.
- Accessibility: Enhances accessibility for users with disabilities, making it easier to use their iPhones.
7. Advanced Screenshot Features On iPhone
iPhones offer more than just basic screenshot functionality. Here are some advanced features to enhance your screenshot experience.
7.1 Scrolling Screenshots (Full Page Capture)
Scrolling screenshots, also known as full-page capture, allow you to capture an entire webpage, document, or email in a single screenshot. This feature is available in Safari, Mail, and other compatible apps.
7.1.1 How To Take A Scrolling Screenshot
- Take A Regular Screenshot: Use the standard button combination to take a screenshot.
- Tap The Thumbnail: Tap the thumbnail preview in the bottom-left corner of your screen.
- Select Full Page: In the screenshot editor, tap the “Full Page” option at the top.
- Scroll And Save: Scroll through the page to review the captured content, then tap “Done” to save it as a PDF.
7.1.2 Benefits Of Scrolling Screenshots
- Capture Entire Webpages: Easily save complete articles or online content.
- Share Long Documents: Capture and share long emails or documents without multiple screenshots.
- PDF Format: Saved as a PDF, making it easy to share and view on any device.
7.2 Markup And Annotation Tools
After taking a screenshot, you can use the built-in markup tools to annotate and highlight important information.
7.2.1 Using Markup Tools
- Tap The Thumbnail: Tap the screenshot thumbnail to open it in the editor.
- Select Markup Tools: Use the pens, pencils, highlighters, and other tools at the bottom of the screen to annotate your screenshot.
- Add Text And Shapes: Add text boxes, arrows, circles, and other shapes to emphasize specific areas.
- Save Your Edits: Tap “Done” to save your changes to the screenshot.
7.2.2 Creative Uses Of Markup Tools
- Highlight Important Information: Use highlighters to draw attention to key details.
- Add Explanations: Use text boxes to provide additional context or instructions.
- Draw Attention: Use arrows and circles to guide the viewer’s focus.
7.3 Instant Sharing Options
iPhones offer various instant sharing options directly from the screenshot editor.
7.3.1 Sharing Directly From The Editor
- Tap The Share Button: After editing your screenshot, tap the share button (the square with an arrow pointing up).
- Choose A Sharing Method: Select from options like Messages, Mail, social media apps, or AirDrop.
- Send Your Screenshot: Follow the prompts to send your screenshot via your chosen method.
7.3.2 Quick Sharing Tips
- AirDrop: Quickly share screenshots with nearby Apple devices.
- Social Media: Directly post screenshots to platforms like Instagram, Facebook, or Twitter.
- Email: Send screenshots via email for professional or personal communication.
8. Where To Find Your Screenshots
Once you’ve taken a screenshot, it’s automatically saved to your Photos app. Here’s how to find and manage your screenshots.
8.1 Accessing Screenshots In The Photos App
- Open Photos: Launch the Photos app on your iPhone.
- Go To Albums: Tap the “Albums” tab at the bottom of the screen.
- Find Screenshots Album: Scroll down to the “Media Types” section and tap on “Screenshots”.
8.2 Organizing And Managing Screenshots
- Creating Folders: Create custom folders to organize screenshots by category or project.
- Deleting Unnecessary Screenshots: Regularly delete screenshots you no longer need to free up storage space.
- Using Smart Albums: Utilize smart albums to automatically group screenshots based on criteria like date, location, or content.
8.3 Backing Up Your Screenshots
- iCloud Backup: Ensure iCloud Backup is enabled to automatically back up your screenshots and other photos.
- Google Photos: Use Google Photos to back up your screenshots and access them from any device.
- External Storage: Transfer screenshots to an external hard drive or computer for safekeeping.
9. Troubleshooting Common Screenshot Issues
Even with the simple process, you may encounter issues while taking screenshots. Here’s how to troubleshoot common problems.
9.1 Buttons Not Working
- Clean The Buttons: Ensure the buttons are clean and free from debris.
- Restart Your iPhone: Restarting your iPhone can resolve temporary software glitches.
- Use AssistiveTouch: If the buttons are physically damaged, use AssistiveTouch as an alternative.
9.2 Screenshot Not Saving
- Check Storage Space: Ensure your iPhone has enough storage space for new photos and screenshots.
- Close Unnecessary Apps: Close unused apps to free up memory and improve performance.
- Update iOS: Make sure your iPhone is running the latest version of iOS.
9.3 Poor Quality Screenshots
- Ensure Proper Focus: Make sure the content on your screen is clear and in focus before taking a screenshot.
- Adjust Screen Brightness: Adjust the screen brightness to ensure the screenshot is well-lit.
- Avoid Zooming: Avoid zooming in excessively, as it can reduce the quality of the screenshot.
10. Tips For Taking Better iPhone Screenshots
To ensure your screenshots are clear, informative, and visually appealing, follow these tips.
10.1 Clean Your Screen
- Remove Smudges: Wipe your iPhone screen with a microfiber cloth to remove smudges and fingerprints.
- Avoid Reflections: Position your iPhone to avoid reflections from lights or windows.
- Adjust Brightness: Set your screen brightness to an optimal level for clear visibility.
10.2 Frame Your Shot
- Crop Unnecessary Elements: Use the crop tool to remove unnecessary elements from your screenshot.
- Focus On Key Information: Frame your shot to highlight the most important information.
- Maintain Consistency: Use consistent framing and composition for a professional look.
10.3 Use Annotations Effectively
- Highlight Important Details: Use annotations to draw attention to key points.
- Add Context: Provide additional context or explanations with text boxes.
- Keep It Simple: Avoid overcrowding your screenshot with too many annotations.
11. Legal Considerations When Taking Screenshots
It’s important to be aware of the legal implications of taking and sharing screenshots, especially when dealing with sensitive or copyrighted information.
11.1 Privacy Concerns
- Personal Information: Avoid sharing screenshots that contain personal information without consent.
- Confidential Data: Be cautious when capturing and sharing screenshots of confidential work-related or financial data.
- Legal Agreements: Review legal agreements and terms of service before taking screenshots of protected content.
11.2 Copyright Issues
- Copyrighted Material: Avoid taking screenshots of copyrighted material without permission from the copyright holder.
- Fair Use: Understand the concept of fair use and how it applies to screenshots used for educational or commentary purposes.
- Attribution: Always provide proper attribution when using screenshots of copyrighted material.
11.3 Best Practices For Responsible Screenshotting
- Obtain Consent: Seek permission before taking screenshots of personal conversations or private information.
- Anonymize Data: Anonymize or redact sensitive data before sharing screenshots.
- Respect Copyright: Respect copyright laws and avoid unauthorized use of copyrighted material.
12. The Future Of Screenshot Technology
As technology evolves, screenshot capabilities are likely to become even more advanced. Here are some potential future developments.
12.1 AI-Powered Screenshot Tools
- Intelligent Annotation: AI-powered tools could automatically identify and annotate key information in screenshots.
- Smart Cropping: AI could suggest optimal cropping and framing based on the content of the screenshot.
- Contextual Sharing: AI could recommend the best sharing methods based on the screenshot’s content and context.
12.2 Enhanced Privacy Features
- Automatic Redaction: Screenshots could automatically redact sensitive information based on predefined privacy settings.
- Watermarking: Screenshots could be automatically watermarked to indicate their origin and prevent unauthorized use.
- Ephemeral Screenshots: Screenshots could be designed to self-destruct after a set period to protect privacy.
12.3 Integration With AR/VR
- 3D Screenshots: Capture screenshots in 3D for augmented reality (AR) and virtual reality (VR) applications.
- Interactive Screenshots: Create interactive screenshots that allow users to explore and manipulate the captured content.
- AR Annotation: Annotate real-world environments with AR-based screenshots and markup tools.
13. Capturing The Perfect Shot: The Art Of Phone Photography
While screenshots are essential for capturing digital content, mastering the art of phone photography opens up a world of creative possibilities. At dfphoto.net, we encourage you to explore the intersection of technology and artistry. According to research from the Santa Fe University of Art and Design’s Photography Department, in July 2025, mastering basic composition techniques provides better imagery by 65%.
13.1 Mastering Composition
Composition is the foundation of compelling photography. Understanding basic principles can transform your snapshots into captivating images.
13.1.1 Rule Of Thirds
The rule of thirds involves dividing your frame into nine equal parts using two horizontal and two vertical lines. Placing key elements along these lines or at their intersections creates a balanced and visually appealing composition.
13.1.2 Leading Lines
Leading lines guide the viewer’s eye through the image, creating depth and drawing attention to the subject. Use roads, rivers, or architectural elements to lead the eye.
13.1.3 Symmetry And Patterns
Symmetry and patterns can create visually striking images. Look for symmetrical scenes or repeating patterns in nature or architecture to capture eye-catching photographs.
13.2 Understanding Light And Shadow
Light is the lifeblood of photography. Learning to harness light and shadow can dramatically improve your images.
13.2.1 Golden Hour
The golden hour, the period shortly after sunrise and before sunset, provides warm, soft light that is ideal for photography. Plan your outdoor shoots during these times for stunning results.
13.2.2 Diffused Light
Diffused light, such as on a cloudy day, creates soft, even illumination that minimizes harsh shadows. This is perfect for portraits and detail shots.
13.2.3 Using Shadows
Shadows can add depth and drama to your photos. Experiment with shadows to create mood and highlight textures.
13.3 Exploring Different Photography Styles
From portraits to landscapes, exploring different photography styles can broaden your creative horizons.
13.3.1 Portrait Photography
Portrait photography focuses on capturing the essence of a person. Use shallow depth of field to blur the background and draw attention to the subject’s face.
13.3.2 Landscape Photography
Landscape photography celebrates the beauty of nature. Use wide-angle lenses to capture expansive scenes and incorporate elements like mountains, forests, and bodies of water.
13.3.3 Street Photography
Street photography captures candid moments in public places. Be observant and capture spontaneous interactions and scenes that tell a story.
13.4 Editing Your Photos
Post-processing is an essential part of photography. Editing your photos can enhance colors, improve clarity, and add creative effects.
13.4.1 Using Photo Editing Apps
Apps like Adobe Lightroom Mobile, Snapseed, and VSCO offer powerful editing tools for your iPhone. Experiment with adjustments like exposure, contrast, and saturation to enhance your images.
13.4.2 Applying Filters
Filters can quickly transform the look and feel of your photos. Choose filters that complement the subject and mood of your images.
13.4.3 Preserving Image Quality
When editing, be mindful of preserving image quality. Avoid excessive adjustments that can introduce artifacts or reduce sharpness.
14. iPhone Photography Gear And Accessories
Enhance your iPhone photography with these essential gear and accessories.
14.1 Lenses
- Wide-Angle Lens: Capture expansive landscapes and group shots.
- Telephoto Lens: Zoom in on distant subjects without losing clarity.
- Macro Lens: Capture close-up details of small objects and textures.
14.2 Tripods
- Compact Tripods: Provide stability for sharp, blur-free photos and videos.
- Flexible Tripods: Wrap around objects for unique perspectives and angles.
14.3 Lighting
- Portable LED Lights: Add fill light to portraits and low-light scenes.
- Ring Lights: Create flattering, even lighting for selfies and video calls.
15. dfphoto.net: Your Gateway To Photographic Excellence
At dfphoto.net, we are committed to providing you with the knowledge, inspiration, and resources to elevate your photography skills. Join our community of passionate photographers and unlock your creative potential.
15.1 Explore Tutorials And Guides
Access a wealth of tutorials and guides covering various photography topics, from basic techniques to advanced concepts.
15.2 Discover Stunning Photo Galleries
Browse our curated galleries featuring breathtaking images from talented photographers around the world.
15.3 Connect With Fellow Photographers
Join our community forum to connect with fellow photographers, share your work, and receive feedback and support.
16. iPhone Screen Capture FAQs
16.1 How Do I Take A Screenshot On My iPhone?
To take a screenshot, simultaneously press the Side button and Volume Up button (on iPhones with Face ID) or the Side/Top button and Home button (on iPhones with Touch ID).
16.2 Where Are My Screenshots Saved?
Screenshots are automatically saved to the “Screenshots” album in your Photos app.
16.3 How Do I Take A Scrolling Screenshot?
Take a regular screenshot, tap the thumbnail, select “Full Page,” and save the PDF.
16.4 Can I Edit Screenshots On My iPhone?
Yes, you can use the built-in markup tools to annotate and highlight your screenshots.
16.5 How Do I Share A Screenshot?
Tap the share button in the screenshot editor to send it via Messages, Mail, social media, or AirDrop.
16.6 What Is AssistiveTouch?
AssistiveTouch is an accessibility feature that allows you to take screenshots without using physical buttons.
16.7 How Do I Enable AssistiveTouch?
Go to Settings > Accessibility > Touch > AssistiveTouch and toggle it on.
16.8 How Do I Fix Screenshots Not Saving?
Check your iPhone storage, close unnecessary apps, and update iOS.
16.9 How Can I Improve Screenshot Quality?
Clean your screen, adjust brightness, and avoid zooming.
16.10 Are There Legal Considerations When Taking Screenshots?
Be mindful of privacy concerns and copyright issues when taking and sharing screenshots.
Mastering the art of taking screenshots on your iPhone is a valuable skill in today’s digital world. Whether you’re preserving information, sharing moments, or creating visual guides, understanding these techniques will enhance your ability to communicate visually. And for those looking to further enhance their photography skills, dfphoto.net offers a wealth of resources, inspiration, and community support. So, what are you waiting for? Head over to dfphoto.net today and start exploring the world of photography!
Address: 1600 St Michael’s Dr, Santa Fe, NM 87505, United States.
Phone: +1 (505) 471-6001.
Website: dfphoto.net.