Taking a double exposure photo can unlock unique artistic expressions and creative storytelling in your photography; explore the techniques, tips, and insights presented here, brought to you by dfphoto.net, to master this captivating art form and transform your visual narratives. Discover the secrets to achieving stunning, layered images.
1. What Is Double Exposure Photography, And Why Try It?
Double exposure photography involves superimposing two or more images onto a single frame. This technique creates surreal, dreamlike effects by blending different scenes or subjects, opening up a world of creative possibilities. It is a fantastic way to experiment with depth, texture, and storytelling in a single image. According to research from the Santa Fe University of Art and Design’s Photography Department, in July 2025, double exposure increases creative expression in photographers, so it’s a skill worth exploring.
1.1. Why is Double Exposure Photography Popular?
Double exposure photography is popular because it allows photographers to:
- Create unique and artistic images that stand out.
- Blend different elements and concepts into a single, cohesive visual story.
- Experiment with surreal and dreamlike effects that capture the imagination.
- Add depth, texture, and complexity to their photographs.
- Unleash creativity and explore new avenues of artistic expression.
1.2. What Can You Achieve with Double Exposure?
With double exposure, you can achieve:
- Surreal Landscapes: Combine landscapes with textures or patterns for ethereal scenes.
- Ghostly Portraits: Superimpose portraits with nature elements like trees or flowers.
- Abstract Art: Blend shapes, lines, and colors to create visually striking abstract compositions.
- Conceptual Stories: Use layered images to convey complex narratives or emotions.
1.3. Where Can You Learn More About Double Exposure?
For more in-depth tutorials, inspiration, and a community of photographers, visit dfphoto.net. There you can explore various articles, galleries, and forums dedicated to mastering the art of double exposure photography.
2. What Equipment Do You Need for Double Exposure Photography?
While advanced digital cameras offer convenient in-camera double exposure modes, you can also achieve this effect with film cameras or through post-processing software like Adobe Photoshop.
2.1. Essential Equipment:
- Camera:
- Digital Camera: Look for models with built-in multiple exposure settings.
- Film Camera: An SLR camera with a double exposure lever or mode is ideal.
- Lens: Any lens will work, but prime lenses (e.g., 50mm) can offer creative control over depth of field.
- Software (Optional): Adobe Photoshop or similar for digital blending.
- Tripod (Recommended): Helps maintain sharpness, especially in low light.
2.2. Key Camera Features for Double Exposure:
| Feature | Description | Benefit |
|---|---|---|
| Multiple Exposure Mode | Allows you to take multiple shots on the same frame. | Simplifies the process, ensuring precise alignment and blending. |
| Exposure Compensation | Adjusts the brightness of each exposure to avoid overexposure. | Maintains balanced tones and prevents blown-out highlights. |
| Live View | Helps in aligning and composing the second exposure accurately. | Enhances precision and control over the final image. |
2.3. Why a Tripod is Important for Double Exposure:
Using a tripod is important for double exposure because it:
- Keeps the camera stable between exposures, preventing blurry images.
- Allows for precise alignment of the two images.
- Enables longer exposures in low-light conditions, which can be necessary for certain double exposure techniques.
3. How Do You Take a Double Exposure Photo with a Digital Camera?
Many modern digital cameras have a built-in multiple exposure mode. This allows you to take several shots that the camera will automatically blend into a single image.
3.1. Steps to Take a Double Exposure on a Digital Camera:
- Enable Multiple Exposure Mode: Find this setting in your camera’s menu.
- Set Number of Exposures: Choose how many images you want to combine (usually 2 or 3).
- Choose Blending Mode: Experiment with different blending modes like “Additive,” “Average,” or “Lighten.”
- Take Your First Shot: Compose and capture your first image.
- Take Your Second Shot: Compose and capture your second image.
- Review: The camera will combine the images automatically.
3.2. What are Common Blending Modes and How Do They Impact the Final Image?
| Blending Mode | Description | Impact on Final Image |
|---|---|---|
| Additive | Adds the pixel values of each layer together. | Creates a brighter image, potentially with blown-out highlights if not properly compensated. |
| Average | Averages the pixel values of each layer. | Balances the exposure, reducing the risk of overexposure. |
| Lighten | Selects the lighter pixels from each layer, making them visible in the final image. | Highlights brighter areas and can create interesting textures. |
| Darken | Selects the darker pixels from each layer, making them visible in the final image. | Emphasizes darker areas and can create dramatic contrast. |
3.3. How to Adjust Exposure Compensation for Double Exposures:
Adjusting exposure compensation for double exposures is important because each exposure adds light to the final image. To avoid overexposure, reduce the exposure compensation for each shot. For example, if taking two exposures, try setting the exposure compensation to -1 stop for each shot. This ensures that the final image is properly exposed.
4. How Do You Take a Double Exposure Photo with a Film Camera?
Film cameras offer a more traditional approach to double exposure. You’ll need a camera that allows you to take multiple exposures on the same frame without advancing the film.
4.1. Steps to Take a Double Exposure on a Film Camera:
- Load Your Film: Choose a film stock that suits your creative vision (e.g., black and white for contrast, color for vibrancy).
- Take Your First Shot: Compose and expose your first image.
- Engage Double Exposure Lever: This lever (or button) allows you to cock the shutter without advancing the film.
- Take Your Second Shot: Recompose and take your second shot on the same frame.
- Develop Your Film: See your double exposure come to life in the darkroom.
4.2. Why Should You Choose the Right Film Stock for Double Exposure?
Choosing the right film stock can significantly impact the look and feel of your double exposure photos. Black and white film, like ILFORD HP5+, is excellent for high-contrast images and emphasizes textures and shapes. Color film can add vibrancy and mood, allowing for more complex and layered compositions. Experiment with different film stocks to see which best suits your artistic goals.
4.3. How Do You Prevent Accidental Multiple Exposures on a Film Camera?
To prevent accidental multiple exposures on a film camera, ensure that the multiple exposure lever or button is disengaged after taking your double exposure. Some cameras have a locking mechanism to prevent accidental double exposures. Always double-check your camera settings before taking each shot.
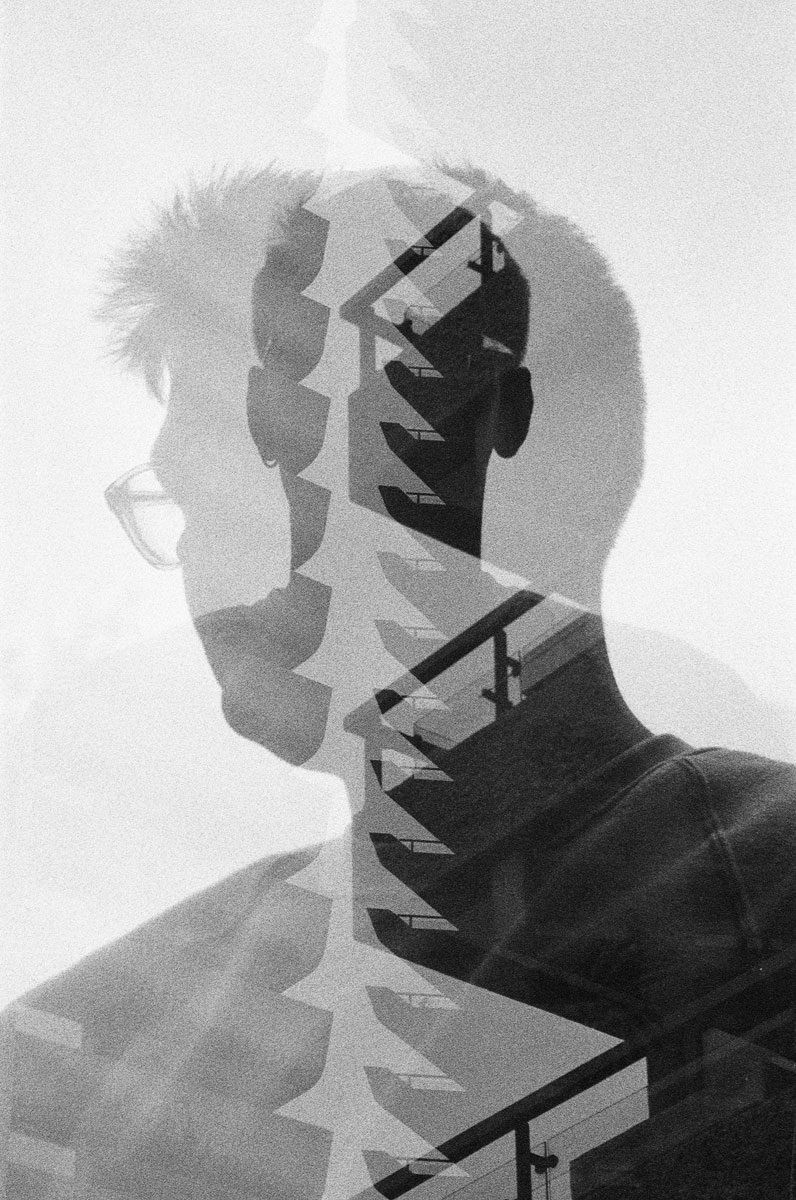 Black and white double exposure portrait with stairs in the middle.
5. How Can You Create a Double Exposure in Post-Processing with Photoshop?
If your camera doesn’t have a built-in double exposure mode, you can easily create one in Adobe Photoshop.
5.1. Steps to Create a Double Exposure in Photoshop:
- Open Your Images: Open both images you want to combine in Photoshop.
- Place Images on Layers: Drag one image onto the other to create two layers.
- Change Blending Mode: Select the top layer and experiment with blending modes like “Screen,” “Multiply,” or “Overlay.”
- Adjust Opacity: Reduce the opacity of the top layer to blend the images more subtly.
- Add a Layer Mask: Use a layer mask to selectively reveal or hide parts of each image.
- Fine-Tune: Adjust levels, curves, and colors to perfect your double exposure.
5.2. Common Photoshop Blending Modes and Their Effects:
| Blending Mode | Description | Impact on Final Image |
|---|---|---|
| Screen | Lightens the image by multiplying the inverse of the layer colors. | Creates a bright, ethereal effect, good for blending light textures and highlights. |
| Multiply | Darkens the image by multiplying the layer colors. | Creates a darker, richer effect, ideal for adding depth and shadow. |
| Overlay | Combines Multiply and Screen modes, lightening light areas and darkening dark areas. | Creates a high-contrast effect, enhancing both highlights and shadows. |
| Soft Light | Similar to Overlay but more subtle, creating a softer contrast. | Adds gentle contrast and depth without being too harsh. |
5.3. How to Use Layer Masks for Selective Blending in Photoshop:
Layer masks allow you to selectively hide or reveal parts of an image, providing precise control over the blending process. To use a layer mask:
- Select the layer you want to mask.
- Click the “Add Layer Mask” icon at the bottom of the Layers panel.
- Use the Brush tool with black to hide parts of the layer and white to reveal parts of the layer.
- Adjust the brush size, hardness, and opacity to create seamless blends.
6. What Are Essential Tips for Planning Your Double Exposure Photography?
Planning is crucial for successful double exposure photography. Consider the elements you want to combine and how they will interact.
6.1. Conceptualizing Your Double Exposure:
- Choose a Theme: Decide on a central idea or emotion you want to convey.
- Select Complementary Images: Pick images that enhance each other’s meaning.
- Visualize the Final Result: Imagine how the two images will blend together.
6.2. How to Choose Complementary Images for Double Exposure:
When choosing complementary images, consider:
- Contrast: High-contrast images work well for silhouette effects.
- Texture: Combining textures can add depth and visual interest.
- Shapes: Look for shapes that fit together or create interesting juxtapositions.
- Meaning: Choose images that enhance each other’s symbolic or emotional impact.
6.3. How to Use Negative Space in Double Exposure Photography:
Negative space is the empty area around your subject. In double exposure, using negative space in one image allows the second image to fill in those areas, creating a balanced and visually appealing composition. For example, a silhouette against a bright background provides ample negative space for a landscape or texture.
7. What are Creative Double Exposure Ideas to Inspire You?
Explore different themes and subjects to unleash your creativity. The possibilities are endless.
7.1. Portrait and Nature Blends:
Combine portraits with elements of nature, such as trees, flowers, or landscapes, to create ethereal and evocative images. This technique can add depth and symbolism to your portraits.
7.2. Urban and Abstract Combinations:
Blend cityscapes with abstract patterns or textures for dynamic and visually striking compositions. This can transform familiar urban scenes into surreal and artistic creations.
7.3. How to Achieve Surreal Effects with Double Exposure:
To achieve surreal effects with double exposure:
- Use unexpected combinations of images.
- Play with scale and perspective.
- Incorporate abstract elements.
- Experiment with blending modes and opacity levels.
- Don’t be afraid to break the rules and try something new.
7.4. Ideas for Blending Portraits with Nature:
- Silhouette Portraits: Combine a silhouette portrait with a vibrant sunset or a starry night sky.
- Floral Overlays: Overlay a portrait with delicate flowers or leaves for a dreamy effect.
- Tree Integration: Merge a portrait with the branches of a tree, symbolizing growth and connection.
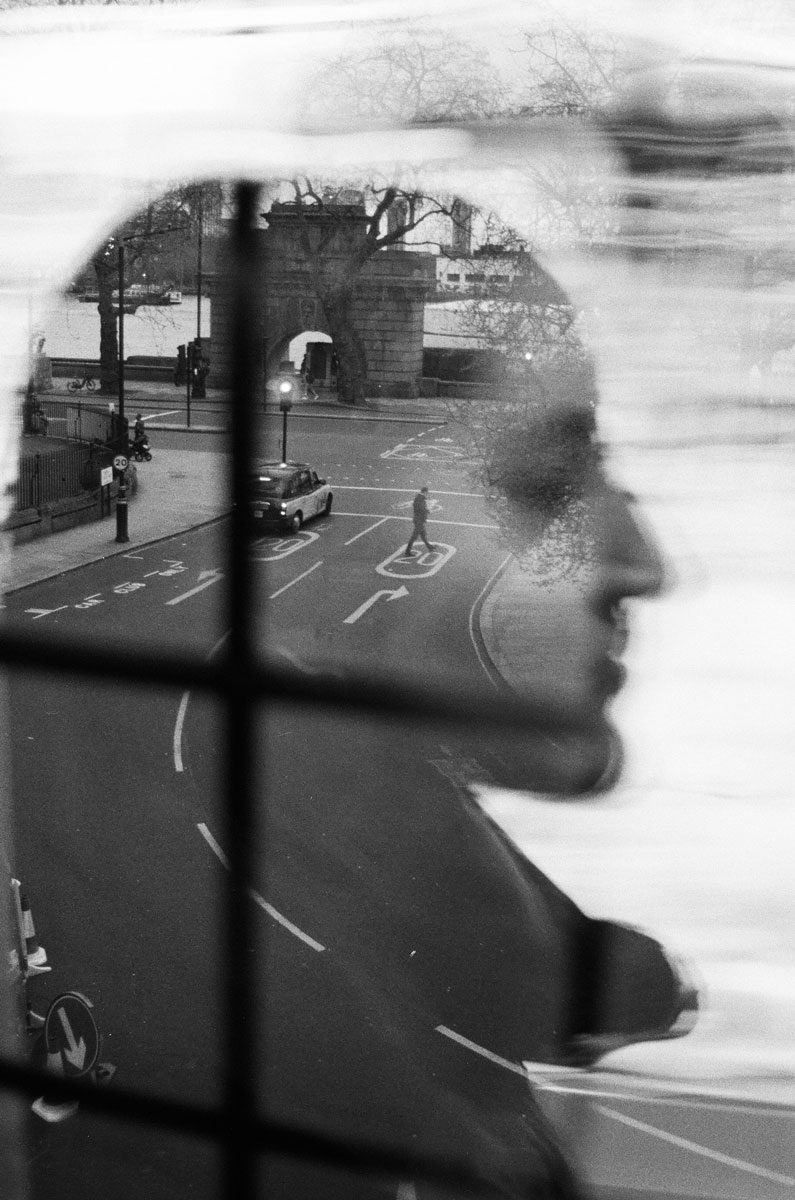 Black and white double exposure portrait with a road going through the middle.
8. What Exposure Settings Work Best for Double Exposure Photography?
Proper exposure is crucial for achieving well-balanced double exposure images. You need to adjust your settings to avoid overexposure and maintain detail in both images.
8.1. How to Meter Correctly for Double Exposures:
- Digital Cameras: Use spot metering to measure the light in both your primary subject and the background. Adjust exposure compensation to -1 or -2 stops for each exposure to prevent overexposure.
- Film Cameras: Estimate the exposure for each shot, aiming to underexpose each by about one stop. This helps retain detail in both images.
8.2. What are the Best Aperture Settings for Double Exposure?
Aperture settings depend on the desired depth of field. For portraits, a wider aperture (e.g., f/2.8 or f/4) can create a shallow depth of field, blurring the background and emphasizing the subject. For landscapes, a narrower aperture (e.g., f/8 or f/11) can ensure sharpness throughout the image. Experiment to see what works best for your specific vision.
8.3. Why Should You Adjust ISO for Double Exposure Photography?
Adjusting ISO can help you achieve the correct exposure, especially in low-light conditions. However, keep in mind that higher ISO settings can introduce noise into your images. Try to keep the ISO as low as possible while maintaining a reasonable shutter speed and aperture.
9. How Can Composition Techniques Enhance Your Double Exposure Photos?
Composition is key to creating visually compelling double exposure images. Use techniques like the rule of thirds, leading lines, and framing to guide the viewer’s eye and create a balanced composition.
9.1. Using the Rule of Thirds in Double Exposure:
The rule of thirds involves dividing your frame into nine equal parts with two horizontal and two vertical lines. Placing key elements along these lines or at their intersections can create a more dynamic and visually appealing composition.
9.2. Incorporating Leading Lines in Double Exposure:
Leading lines are lines that draw the viewer’s eye into the image, creating depth and guiding their attention to the main subject. Use roads, rivers, or other linear elements to lead the eye through your double exposure composition.
9.3. How to Frame Your Subject in Double Exposure Photography:
Framing involves using elements within the scene to create a frame around your subject, drawing attention to it and adding depth to the image. Use natural elements like trees, arches, or windows to frame your subject in a double exposure composition.
10. What Common Mistakes Should You Avoid in Double Exposure Photography?
Even experienced photographers can make mistakes. Knowing what to avoid can save you time and frustration.
10.1. Avoiding Overexposure in Double Exposure:
Overexposure is a common problem in double exposure photography. To avoid it, underexpose each shot by about one stop. Also, use blending modes that help balance the exposure, such as “Average” or “Multiply.”
10.2. How to Prevent Misalignment in Double Exposure:
Misalignment can ruin a double exposure. Use a tripod to keep the camera steady and ensure that the two images are properly aligned. Pay attention to your camera’s settings and ensure that you are not accidentally advancing the film or changing the composition between exposures.
10.3. Why Should You Avoid Cluttered Compositions in Double Exposure?
Cluttered compositions can make your double exposure images confusing and overwhelming. Keep your compositions clean and simple, focusing on a few key elements. Use negative space to create a sense of balance and harmony.
 Black and white double exposure portrait with branches for hair
11. How Can You Edit Your Double Exposure Photos for the Best Results?
Post-processing can enhance your double exposure images, bringing out their full potential. Use software like Adobe Photoshop or Lightroom to fine-tune your images and achieve the desired look.
11.1. Adjusting Levels and Curves in Post-Processing:
Adjusting levels and curves can help you fine-tune the contrast and brightness of your double exposure images. Experiment with different settings to achieve the desired look and feel.
11.2. How to Fine-Tune Colors and Tones in Double Exposure Edits:
Fine-tuning colors and tones can enhance the mood and atmosphere of your double exposure images. Use color balance, saturation, and vibrance adjustments to create a cohesive and visually appealing color palette.
11.3. Removing Unwanted Elements in Double Exposure Photography:
Use the clone stamp tool or healing brush to remove any unwanted elements from your double exposure images. This can help clean up the composition and draw attention to the key elements.
12. How to Showcase Your Double Exposure Photography Online?
Sharing your work can inspire others and help you connect with fellow photographers. Use online platforms to showcase your double exposure images and get feedback from the community.
12.1. Building an Online Portfolio for Double Exposure Photography:
Create a dedicated online portfolio to showcase your best double exposure images. Use platforms like dfphoto.net, Behance, or a personal website to display your work and attract potential clients or collaborators.
12.2. How to Use Social Media to Share Your Double Exposure Photos:
Share your double exposure photos on social media platforms like Instagram, Facebook, and Twitter. Use relevant hashtags to reach a wider audience and engage with the photography community.
12.3. Engaging with the Photography Community Online:
Join online photography forums, groups, and communities to connect with fellow photographers, share your work, and get feedback. Engage in discussions, offer advice, and learn from others.
13. What are the Ethical Considerations in Double Exposure Photography?
As with any form of photography, ethical considerations are important. Respect privacy, obtain consent when photographing people, and be mindful of cultural sensitivities.
13.1. Respecting Privacy in Double Exposure Photography:
Avoid photographing people in private situations without their consent. Be mindful of cultural norms and sensitivities, and always respect the privacy of others.
13.2. Obtaining Consent When Photographing People:
Always obtain consent from people before photographing them, especially if you plan to use their images for commercial purposes. Explain how their images will be used and give them the opportunity to decline.
13.3. Avoiding Cultural Appropriation in Double Exposure:
Be mindful of cultural appropriation when creating double exposure images. Avoid using cultural symbols or imagery in a way that is disrespectful or offensive. Do your research and seek guidance from cultural experts if needed.
14. How Can You Stay Inspired in Double Exposure Photography?
Inspiration is essential for continuous growth and creativity. Explore different sources of inspiration to keep your double exposure photography fresh and exciting.
14.1. Exploring Different Genres of Photography:
Explore different genres of photography, such as portrait, landscape, street, and abstract, to broaden your creative horizons and discover new ideas for double exposure.
14.2. Following Other Double Exposure Photographers:
Follow other double exposure photographers on social media and online platforms to get inspired by their work and learn from their techniques.
14.3. Experimenting with New Techniques and Ideas:
Don’t be afraid to experiment with new techniques and ideas in your double exposure photography. Try different blending modes, compositions, and subjects to discover your own unique style.
15. Double Exposure Photography: A Path to Visual Storytelling
Double exposure photography allows you to craft complex narratives and emotional landscapes within a single frame. Each layer contributes to a richer, more nuanced story.
15.1. What Types of Stories Can You Tell Through Double Exposure?
You can tell stories about:
- Identity: Blending portraits with environments to reveal inner character.
- Memory: Superimposing past and present scenes to evoke nostalgia.
- Transformation: Merging images to symbolize change or growth.
- Social Commentary: Combining images to critique or comment on societal issues.
15.2. Examples of Compelling Double Exposure Storytelling:
- A portrait of a refugee overlaid with their homeland, symbolizing displacement and loss.
- An image of urban decay blended with seeds sprouting, representing hope and renewal.
- A portrait of a musician combined with musical instruments, visualizing their passion and artistry.
15.3. Tips for Creating Powerful Visual Narratives with Double Exposure:
- Plan a Cohesive Theme: Ensure that each element of your double exposure contributes to the overall story.
- Use Symbolism: Incorporate meaningful symbols that enhance the narrative.
- Evoke Emotion: Craft images that resonate with viewers on an emotional level.
FAQ: Mastering Double Exposure Photography
1. What is the best camera setting for double exposure?
The best camera setting is to use multiple exposure mode if your camera has it, and set the exposure compensation to -1 stop for each exposure to avoid overexposure.
2. How do you take a double exposure on iPhone?
You can take a double exposure on iPhone using apps like ProCamera or by using the疊印feature in some photo editing apps.
3. Can you do double exposure on a disposable camera?
Yes, you can do a double exposure on a disposable camera by preventing the film from advancing after the first shot.
4. How can I improve my double exposure photography skills?
Practice regularly, study the work of other double exposure photographers, and experiment with different techniques and compositions.
5. What is the difference between multiple exposure and double exposure?
Double exposure specifically refers to combining two images, while multiple exposure involves combining three or more images.
6. How does contrast affect double exposure photos?
High contrast in your silhouette shot is essential for creating a clear outline, while low contrast can result in a blended and messy feel.
7. Why are film cameras often preferred for double exposure?
Film cameras offer a more hands-on, traditional approach and often have a double exposure lever that simplifies the process.
8. What are some popular themes for double exposure photography?
Popular themes include portrait and nature blends, urban and abstract combinations, and surreal effects.
9. How do I choose the right film stock for double exposure?
Choose black and white film for high-contrast images, and color film for adding vibrancy and mood to your compositions.
10. Where can I find inspiration for double exposure photography?
Explore different genres of photography, follow other double exposure photographers, and experiment with new techniques and ideas. Also, dfphoto.net is a great resource for inspiration and learning.
Ready to dive into the captivating world of double exposure photography? Visit dfphoto.net to explore in-depth tutorials, discover breathtaking images, and connect with a vibrant community of photographers in the USA. Whether you’re seeking to master complex techniques, find inspiration, or share your own stunning creations, dfphoto.net is your ultimate resource. Don’t wait—start your journey today and unleash your creative potential! For inquiries, contact us at Address: 1600 St Michael’s Dr, Santa Fe, NM 87505, United States. Phone: +1 (505) 471-6001.