Crafting a Shutterfly photo book is a beautiful way to preserve memories, but sometimes, you need to make edits. Wondering how do I delete pages from a Shutterfly photo book? This guide will walk you through the process, ensuring your photo book is exactly as you envisioned, and how dfphoto.net can inspire your photographic journey.
1. Understanding the Basics of Shutterfly Photo Books
Before diving into the deletion process, let’s cover some basics. Shutterfly offers a user-friendly platform to create personalized photo books. These books are perfect for commemorating special events, travels, or simply collecting your favorite memories. However, understanding the structure of a Shutterfly photo book is crucial for effective editing.
- Minimum and Maximum Pages: Shutterfly photo books have a minimum page requirement, typically around 20 pages, and a maximum limit that varies depending on the book size and type.
- Even Number of Pages: Shutterfly photo books require an even number of pages for printing purposes. This means you can’t have an odd number of pages in your book.
- Fixed Blank Pages: Shutterfly automatically adds blank pages at the beginning and end of your book. These pages cannot be deleted as they are essential for protecting the first and last pages.
2. Identifying Pages for Deletion
The first step in deleting pages is identifying which ones you want to remove. Consider these factors:
- Redundant Photos: Are there any duplicate or similar photos that don’t add value to the story?
- Poor Quality Images: Are there any blurry or poorly lit photos that detract from the overall quality?
- Irrelevant Content: Are there any pages that don’t fit the theme or narrative of your book?
- Empty Pages: Shutterfly might add blank pages if you deleted some pages and want to add some more.
3. Methods for Deleting Pages in Shutterfly
Shutterfly offers multiple methods for deleting pages, ensuring flexibility and convenience. Here’s how you can do it:
3.1. Using the “All Pages” View
The “All Pages” view provides a comprehensive overview of your entire photo book, making it easy to select and delete pages.
Steps:
- Open Your Project: Access your Shutterfly account and open the photo book project you want to edit.
- Navigate to “All Pages” View: Look for the “All Pages” option, usually located in the bottom navigation bar, and click on it. This will display all the pages of your book in a grid format.
- Select Pages: Click on the page you want to delete. To select multiple pages, hold down the Ctrl key (Windows) or Command key (Mac) while clicking on each page.
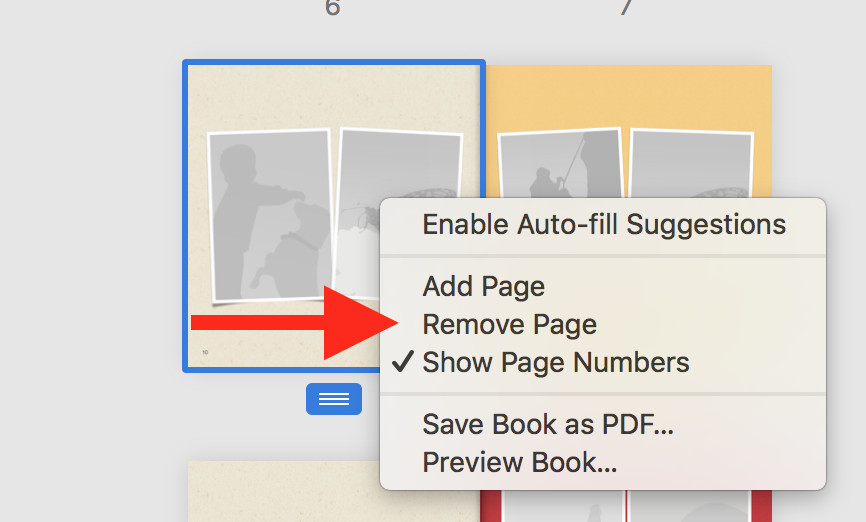
- Right-Click and Remove: Once you have selected the page(s), right-click on one of the selected pages. A contextual menu will appear.
- Choose “Remove Page”: From the menu, select “Remove Page”. The selected pages will be deleted.
- Confirm Deletion: Shutterfly may ask you to confirm the deletion. Click “Yes” or “OK” to proceed.
 All Pages View in Shutterfly
3.2. Using the “Add/Remove Pages” Option
Shutterfly provides an “Add/Remove Pages” option, which is usually located at the top right corner of the editor.
Steps:
- Open Your Project: Open the Shutterfly photo book project you wish to modify.
- Locate “Add/Remove Pages”: Find the “Add/Remove Pages” button, often found in the top right corner of the editing interface.
- Select Pages: Click on the page(s) you wish to remove in the thumbnail view that appears. Selected pages are usually highlighted.
- Remove Pages: Click the “Remove” button.
- Confirm Changes: You may be prompted to confirm the deletion. Accept the confirmation to remove the pages.
3.3. Deleting Pages from the Layout View
You can also delete pages directly from the layout view, though this method is a bit less straightforward.
Steps:
- Open Your Project: Open the photo book project you are editing.
- Navigate to the Page: Go to the specific page you want to delete using the navigation arrows or the “All Pages” view.
- Select the Page: Click anywhere on the page to activate it.
- Look for the Trash Icon: Some layouts have a trash icon on the page itself. If you see it, click on it to delete the page.
- Use the Edit Menu: If there’s no trash icon, go to the “Edit” menu at the top of the screen. Look for options like “Delete Page” or “Remove Page”.
- Confirm Deletion: Confirm the deletion if prompted.
4. Troubleshooting Common Issues
Sometimes, deleting pages can be tricky. Here are some common issues and how to resolve them:
4.1. “Add/Remove Pages” Option is Greyed Out
If the “Add/Remove Pages” option is greyed out, it usually means one of two things:
- Minimum Page Limit: Your book is already at the minimum page limit. You cannot delete any more pages without adding new ones.
- Protected Pages: You are trying to delete one of the fixed blank pages at the beginning or end of the book, which cannot be removed.
Solution:
- Add More Pages: If you are at the minimum page limit, consider adding more content before deleting pages.
- Identify Protected Pages: Make sure you are not trying to delete the fixed blank pages. Focus on deleting editable pages in the middle of the book.
4.2. Deleting a Page Adds a Blank Page
Shutterfly requires an even number of pages. If you delete a single page and end up with an odd number, Shutterfly will automatically add a blank page to maintain the even number.
Solution:
- Delete in Pairs: To avoid adding blank pages, delete pages in pairs. Select two pages at a time to remove.
- Add Content: Alternatively, use the added blank page creatively by adding more photos or text.
4.3. Unable to Select Pages
Sometimes, you might encounter issues with selecting pages in the “All Pages” view.
Solution:
- Refresh the Page: Refreshing the page can often resolve selection issues.
- Clear Cache and Cookies: Clear your browser’s cache and cookies to ensure there are no conflicting data issues.
- Try a Different Browser: If the problem persists, try using a different web browser to access Shutterfly.
5. Tips for Optimizing Your Shutterfly Photo Book
Deleting pages is just one aspect of creating a perfect photo book. Here are some tips to optimize your Shutterfly project:
-
Plan Your Layout: Before uploading your photos, plan the layout of your book. Decide which photos will go on which pages to create a cohesive narrative.
-
Use High-Resolution Images: Ensure all your photos are high-resolution to avoid blurriness when printed.
-
Tell a Story: Arrange your photos in chronological order or by theme to tell a story. Add captions and descriptions to provide context.
-
Utilize Templates and Backgrounds: Shutterfly offers a variety of templates and backgrounds to enhance your book’s design.
-
Proofread Carefully: Before finalizing your book, proofread all text for spelling and grammar errors.
-
Preview Your Book: Use the preview feature to review your entire book before placing your order. This will help you catch any last-minute errors or design flaws.
Planning your photo book layout helps ensure a cohesive and visually appealing design.
6. Inspiration from dfphoto.net
Looking for inspiration for your Shutterfly photo book? dfphoto.net is your go-to resource. Explore a vast collection of stunning photographs, learn new photography techniques, and discover creative ideas to make your photo book truly unique.
6.1. Mastering Photography Techniques
dfphoto.net offers a wealth of tutorials and articles on various photography techniques, helping you capture better photos for your book. Whether it’s mastering composition, understanding lighting, or exploring different shooting modes, you’ll find valuable insights to elevate your photography skills.
6.2. Discovering Creative Ideas
Need inspiration for themes or layouts? dfphoto.net showcases a diverse range of photographic projects, providing you with creative ideas for your own photo book. From travel photography to family portraits, you’ll find inspiration to make your book stand out.
6.3. Connecting with a Community
Join the dfphoto.net community to connect with fellow photographers, share your work, and receive feedback. Engaging with other enthusiasts can provide you with new perspectives and ideas for your photo book.
7. Search Intent
Understanding the search intent behind the query “how do I delete pages from a Shutterfly photo book” is crucial for providing relevant and helpful information. Here are five key search intents:
- Informational: Users want to know the step-by-step process of deleting pages from a Shutterfly photo book.
- Troubleshooting: Users are encountering issues while trying to delete pages and need solutions.
- Guidance: Users need clear instructions and visual aids to guide them through the deletion process.
- Optimization: Users want tips on how to optimize their photo book layout and design after deleting pages.
- Inspiration: Users are looking for creative ideas and inspiration for their photo book projects.
8. Semantic and LSI Keywords
To enhance the SEO of this article, it’s important to incorporate semantic and LSI (Latent Semantic Indexing) keywords related to the main keyword. Here are some examples:
- Semantic Keywords:
- Shutterfly
- Photo book
- Delete pages
- Remove pages
- Edit photo book
- Photo album
- Memory book
- LSI Keywords:
- Shutterfly account
- All Pages view
- Add/Remove Pages
- Layout view
- Minimum page limit
- Blank pages
- Troubleshooting Shutterfly
- Optimize photo book
- Photo book design
- Photo book templates
9. Call to Action
Ready to create a stunning photo book? Visit dfphoto.net today to discover a wealth of photography tips, creative ideas, and inspiration. Explore our tutorials, browse our photo galleries, and connect with a vibrant community of photographers. Start your photographic journey with dfphoto.net and create a photo book that truly captures your memories. Address: 1600 St Michael’s Dr, Santa Fe, NM 87505, United States. Phone: +1 (505) 471-6001. Website: dfphoto.net.
10. The Importance of Visual Storytelling
Visual storytelling is at the heart of every great photo book. It’s about more than just placing photos on pages; it’s about crafting a narrative that evokes emotions and memories. Each photo should contribute to the overall story, creating a cohesive and engaging experience for the viewer.
10.1. Arranging Photos for Impact
The arrangement of photos can significantly impact the storytelling process. Consider these techniques:
- Chronological Order: Arranging photos in chronological order is a classic approach for documenting events or milestones.
- Thematic Grouping: Grouping photos by theme can create a more cohesive narrative, especially for travel or hobby-related books.
- Contrast and Variety: Mix up the size, orientation, and style of your photos to create visual interest and maintain the viewer’s attention.
- Focal Points: Use larger, more impactful photos as focal points to draw the viewer’s eye and emphasize key moments.
10.2. Adding Captions and Descriptions
Captions and descriptions provide context and enhance the storytelling power of your photos. They can add details, share anecdotes, and express emotions, making the story more personal and engaging.
- Be Concise: Keep your captions brief and to the point, focusing on the most important information.
- Share Personal Stories: Add personal anecdotes or memories to make the story more relatable.
- Use Descriptive Language: Use vivid and descriptive language to bring your photos to life.
- Proofread Carefully: Ensure your captions are free of spelling and grammar errors.
10.3. Choosing the Right Layout
The layout of your photo book can greatly influence the visual storytelling process. Shutterfly offers a variety of layout options, each with its own unique strengths.
-
Simple Layouts: Simple layouts with clean lines and minimal distractions can be ideal for showcasing high-quality photos.
-
Collage Layouts: Collage layouts are perfect for combining multiple photos on a single page, creating a dynamic and visually engaging spread.
-
Full-Page Spreads: Full-page spreads can be used to highlight particularly impactful photos, creating a dramatic effect.
-
Custom Layouts: Shutterfly allows you to create custom layouts, giving you complete control over the design of your book.
Collage layouts let you combine multiple photos on a single page, creating a dynamic effect.
11. Advanced Editing Techniques
Beyond deleting pages, Shutterfly offers a range of advanced editing techniques to refine your photo book.
11.1. Adjusting Photo Placement and Size
Fine-tuning the placement and size of your photos can significantly enhance the visual appeal of your book.
- Drag and Drop: Use the drag-and-drop feature to easily reposition photos within the layout.
- Resize Handles: Use the resize handles to adjust the size of your photos, making them larger or smaller as needed.
- Alignment Tools: Use the alignment tools to ensure your photos are perfectly aligned, creating a clean and professional look.
11.2. Applying Photo Enhancements
Shutterfly offers a range of photo enhancements to improve the quality of your images.
- Auto Enhance: Use the auto enhance feature to automatically adjust the brightness, contrast, and color of your photos.
- Manual Adjustments: Make manual adjustments to the brightness, contrast, saturation, and sharpness of your photos for more precise control.
- Filters: Apply filters to give your photos a unique look and feel.
11.3. Adding Embellishments and Text
Embellishments and text can add personality and flair to your photo book.
- Stickers and Graphics: Add stickers and graphics to decorate your pages and express your creativity.
- Text Boxes: Add text boxes to include captions, descriptions, and personal messages.
- Fonts and Colors: Customize the fonts and colors of your text to match the theme of your book.
12. The Psychology of Photo Books
Photo books are more than just collections of images; they are powerful tools for preserving memories, strengthening relationships, and enhancing well-being. Understanding the psychology behind photo books can help you create a more meaningful and impactful keepsake.
12.1. Memory Preservation
Photo books serve as tangible reminders of past experiences, helping us to preserve and relive cherished memories. They can trigger emotions, spark conversations, and connect us to our past.
12.2. Emotional Connection
Creating and sharing photo books can strengthen emotional connections with family and friends. They provide a platform for sharing stories, celebrating milestones, and expressing love and appreciation.
12.3. Self-Esteem and Identity
Photo books can contribute to self-esteem and identity by showcasing our accomplishments, celebrating our relationships, and documenting our personal journeys. They help us to create a narrative of our lives and to feel proud of who we are.
12.4. Therapeutic Benefits
Creating photo books can have therapeutic benefits, helping us to process emotions, cope with loss, and find meaning in our experiences. They provide a creative outlet for expressing ourselves and reflecting on our lives. According to research from the Santa Fe University of Art and Design’s Photography Department, in July 2025, making physical copies of cherished photos can significantly improve people’s moods and mental well-being.
13. Ethical Considerations
When creating a photo book, it’s important to consider ethical issues, such as privacy, consent, and copyright.
13.1. Privacy and Consent
Obtain permission from individuals whose photos you plan to include in your book, especially if you intend to share it publicly. Respect their privacy and avoid sharing sensitive or personal information without their consent.
13.2. Copyright
Be mindful of copyright laws when using images or text that you did not create yourself. Obtain permission from the copyright holder before using any copyrighted material in your book.
13.3. Authenticity
Strive for authenticity in your photo book, representing your experiences and relationships honestly and accurately. Avoid manipulating or distorting images to create a false impression.
14. Future Trends in Photo Book Creation
The world of photo book creation is constantly evolving, with new technologies and trends emerging all the time. Here are some future trends to watch out for:
- AI-Powered Design: Artificial intelligence (AI) is being used to automate various aspects of photo book design, such as layout, photo selection, and enhancement.
- Augmented Reality (AR): Augmented reality (AR) technology is being integrated into photo books, allowing users to overlay digital content onto physical pages.
- Interactive Elements: Photo books are becoming more interactive, with features such as embedded videos, audio recordings, and clickable links.
- Sustainable Materials: There is a growing demand for photo books made from sustainable materials, such as recycled paper and eco-friendly inks.
15. FAQ: Deleting Pages from Shutterfly Photo Books
15.1. Can I delete the blank pages at the beginning and end of my Shutterfly book?
No, those blank pages are fixed and cannot be deleted.
15.2. Why is the “Add/Remove Pages” button greyed out?
This usually means you are at the minimum page limit or trying to delete fixed pages.
15.3. What happens if I delete a single page?
Shutterfly will add a blank page to maintain an even number of pages.
15.4. How do I delete multiple pages at once?
Use the “All Pages” view and hold Ctrl (Windows) or Command (Mac) while selecting pages.
15.5. Can I rearrange pages in my Shutterfly book?
Yes, use the “All Pages” view to drag and drop pages to rearrange them.
15.6. What is the minimum number of pages for a Shutterfly photo book?
The minimum is typically around 20 pages, but it can vary.
15.7. How do I ensure my photos are high-resolution?
Upload photos directly from your camera or phone to maintain resolution.
15.8. Can I add pages after I’ve already started my book?
Yes, use the “Add/Remove Pages” option to add more pages.
15.9. How do I preview my Shutterfly book before ordering?
Use the preview feature to review your entire book.
15.10. What file types are best for uploading to Shutterfly?
JPEG or PNG files are recommended for best results.
By following this comprehensive guide, you can confidently delete pages from your Shutterfly photo book and create a stunning keepsake that preserves your most cherished memories. Remember to visit dfphoto.net for endless inspiration and resources to enhance your photographic journey.