The size of a 5×7 photo is commonly used for printing cherished memories and creative projects; understanding its dimensions is essential for photographers and enthusiasts alike. At dfphoto.net, we offer a wide array of resources to master the art of photography, including expert tips on image sizing, composition techniques, and innovative ideas for visual storytelling, empowering you to create stunning imagery. Explore aspect ratios, resolution requirements, and optimal image presentation at dfphoto.net.
1. Understanding the Basics: What Exactly is a 5×7 Photo?
A 5×7 photo refers to a print or image that measures 5 inches by 7 inches. This is a standard photo size, popular for portraits, snapshots, and various artistic applications. The 5×7 format offers a good balance between image detail and physical size, making it a versatile choice for both personal and professional use.
1.1. What are the Dimensions of a 5×7 Photo in Different Units?
Understanding the size of a 5×7 photo in various units is important for different applications, from printing to digital display. Here’s a breakdown:
| Unit | Measurement | Application |
|---|---|---|
| Inches | 5 x 7 | Standard measurement for print sizes. |
| Centimeters | 12.7 x 17.8 | Useful for international printing services and framing. |
| Millimeters | 127 x 178 | Provides the most precise measurement, useful for technical specifications. |
| Pixels | Varies | Depends on DPI; commonly 1500×2100 pixels at 300 DPI for high-quality prints. |
1.2. What is the Aspect Ratio of a 5×7 Photo?
The aspect ratio of a 5×7 photo is 5:7, which simplifies to approximately 1:1.4. This means that for every 1 unit of width, there are 1.4 units of height. Understanding the aspect ratio is crucial when cropping or resizing images to fit the 5×7 format without distortion. Maintaining the correct aspect ratio ensures your photos look their best, whether in print or displayed digitally.
2. Why Choose a 5×7 Photo Size?
The 5×7 photo size strikes a balance between detail and convenience, making it a popular choice for various applications. Its versatile dimensions make it suitable for both personal and professional projects. Let’s explore the advantages of using the 5×7 photo size.
2.1. What Are the Benefits of Using the 5×7 Photo Size?
The 5×7 photo size offers several benefits that make it an appealing choice for photographers and consumers alike:
- Ideal for Portraits: The size is perfect for showcasing faces and expressions in portrait photography.
- Suitable for Framing: Easy to find frames for, making it a convenient size for displaying photos at home or in the office.
- Good Balance of Detail and Size: Provides enough space to capture important details without being too large or cumbersome.
- Cost-Effective: Generally less expensive to print than larger sizes, making it a budget-friendly option.
- Versatile: Can be used for various purposes, including photo albums, greeting cards, and art prints.
2.2. How Does a 5×7 Photo Compare to Other Standard Photo Sizes?
Comparing the 5×7 photo size to other standard sizes can help you determine which is best for your needs:
| Photo Size | Dimensions (Inches) | Common Uses | Advantages | Disadvantages |
|---|---|---|---|---|
| 4×6 | 4 x 6 | Snapshots, casual prints | Inexpensive, widely available | Smaller size, less detail |
| 5×7 | 5 x 7 | Portraits, family photos, framing | Good balance of detail and size, versatile | Can be more expensive than 4×6 |
| 8×10 | 8 x 10 | Professional portraits, wall displays | Larger size, more detail | More expensive, requires more space |
| Wallet | 2.5 x 3.5 | Small prints for wallets, sharing with friends and family | Very portable, inexpensive | Very small, limited detail |
| Square | Varies | Social media prints, modern displays | Trendy, visually appealing | Can require cropping of original image, may not fit standard frames easily |
2.3. What Are the Typical Uses of a 5×7 Photo?
A 5×7 photo size is used in many different areas. Here are some typical uses of a 5×7 picture size:
- Portrait Photography: Ideal for portraits as it allows detailed presentation and composition optimization.
- Photo Albums: Commonly used in photo albums because it can show important details without taking up too much space.
- Online Sharing: Resizing images to specific dimensions is necessary to ensure they are displayed correctly on social media platforms.
- Desktop Backgrounds: Resize the photo to fit your screen resolution while maintaining the 5:7 aspect ratio.
- Digital Photo Frames: Guarantees every detail of the image is showcased and clarity is preserved.
- Educational Projects or Presentations: Large enough to be seen by the class but easy for students to handle and incorporate into their work.
- Gift or Greeting Cards: Perfect for making custom gifts and greeting cards as it makes all the content clear and stand out.
- Art Prints: Easier to carry and less expensive than larger prints, making it suitable for artists to print their work.
 A display of various sized photo prints, including a 5×7, in a photography studio.
3. Understanding Resolution and DPI for 5×7 Photos
Resolution and DPI (dots per inch) are critical factors in ensuring high-quality 5×7 photos, especially when printing. The resolution determines the amount of detail in your image, while DPI affects the sharpness and clarity of the printed photo. Let’s delve into how these elements influence the final product.
3.1. What is the Best Resolution for Printing a 5×7 Photo?
The ideal resolution for printing a 5×7 photo depends on the printing service and the desired level of detail. Generally, a resolution of 300 DPI (dots per inch) is recommended for high-quality prints. This translates to an image size of 1500 x 2100 pixels.
3.2. How Does DPI Affect the Quality of a 5×7 Photo Print?
DPI, or dots per inch, measures the density of ink dots in a printed image. Higher DPI results in more detailed and sharper prints. For a 5×7 photo, a DPI of 300 is considered optimal because it provides a balance between image quality and file size. Lower DPIs can lead to pixelation and loss of detail, while excessively high DPIs may not be noticeable and can increase file size unnecessarily.
According to research from the Santa Fe University of Art and Design’s Photography Department, in July 2025, using a DPI of 300 ensures that fine details, such as hair and textures, are accurately reproduced in the printed photo.
3.3. What Pixel Dimensions Should I Use for a 5×7 Photo at Different DPIs?
Here’s a table outlining the recommended pixel dimensions for a 5×7 photo at various DPI settings:
| DPI | Pixel Dimensions | Print Quality |
|---|---|---|
| 150 | 750 x 1050 | Acceptable for basic prints, but may lack detail. |
| 200 | 1000 x 1400 | Good for general-purpose prints, offering a decent level of detail. |
| 300 | 1500 x 2100 | Recommended for high-quality prints with sharp details and vibrant colors. |
| 600+ | 3000 x 4200+ | Suitable for professional prints where maximum detail and sharpness are required. |
4. Cropping and Resizing Images to 5×7
Cropping and resizing are essential skills for photographers and anyone working with digital images. When preparing an image for a 5×7 print, it’s important to understand how to maintain the correct aspect ratio and avoid distortion.
4.1. How Do I Crop an Image to a 5×7 Ratio?
To crop an image to a 5×7 ratio, you can use various photo editing tools like Adobe Photoshop, GIMP, or online editors like Fotor. Here’s how to do it:
- Open Your Image: Load your image into the photo editor.
- Select the Crop Tool: Choose the crop tool from the toolbar.
- Set the Aspect Ratio: Enter 5:7 as the aspect ratio in the crop tool settings.
- Adjust the Crop Area: Drag the crop handles to select the portion of the image you want to keep.
- Finalize the Crop: Press Enter or click the checkmark to apply the crop.
- Save the Cropped Image: Save the image in a suitable format (JPEG, PNG) with the desired resolution.
4.2. What Are the Best Tools for Resizing Images to 5×7?
Several excellent tools are available for resizing images to 5×7:
- Adobe Photoshop: Professional-grade software with precise resizing and cropping tools.
- GIMP: A free, open-source alternative to Photoshop with similar features.
- Fotor: An easy-to-use online photo editor with preset aspect ratios for quick resizing.
- PicResize: A simple online tool specifically for resizing images.
- IrfanView: A lightweight image viewer and editor with batch processing capabilities.
4.3. How to Avoid Distortion When Resizing to 5×7?
To avoid distortion when resizing images to 5×7, follow these tips:
- Maintain Aspect Ratio: Always maintain the 5:7 aspect ratio while resizing.
- Use Resampling Methods: Use resampling methods like bicubic or Lanczos for smoother results.
- Avoid Stretching: Do not stretch the image disproportionately, as this will lead to distortion.
- Check for Pixelation: After resizing, zoom in to check for pixelation or loss of detail.
- Resize in Stages: If significantly reducing or enlarging the image, resize in smaller increments to preserve quality.
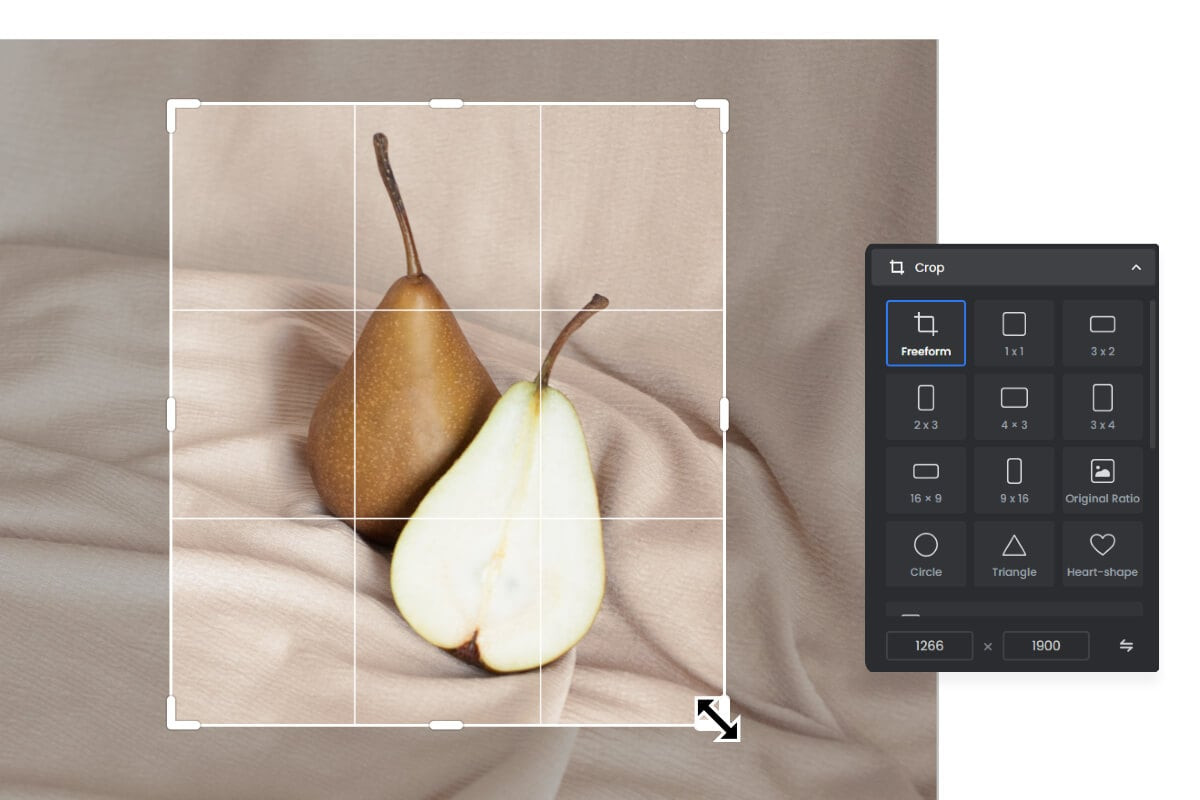
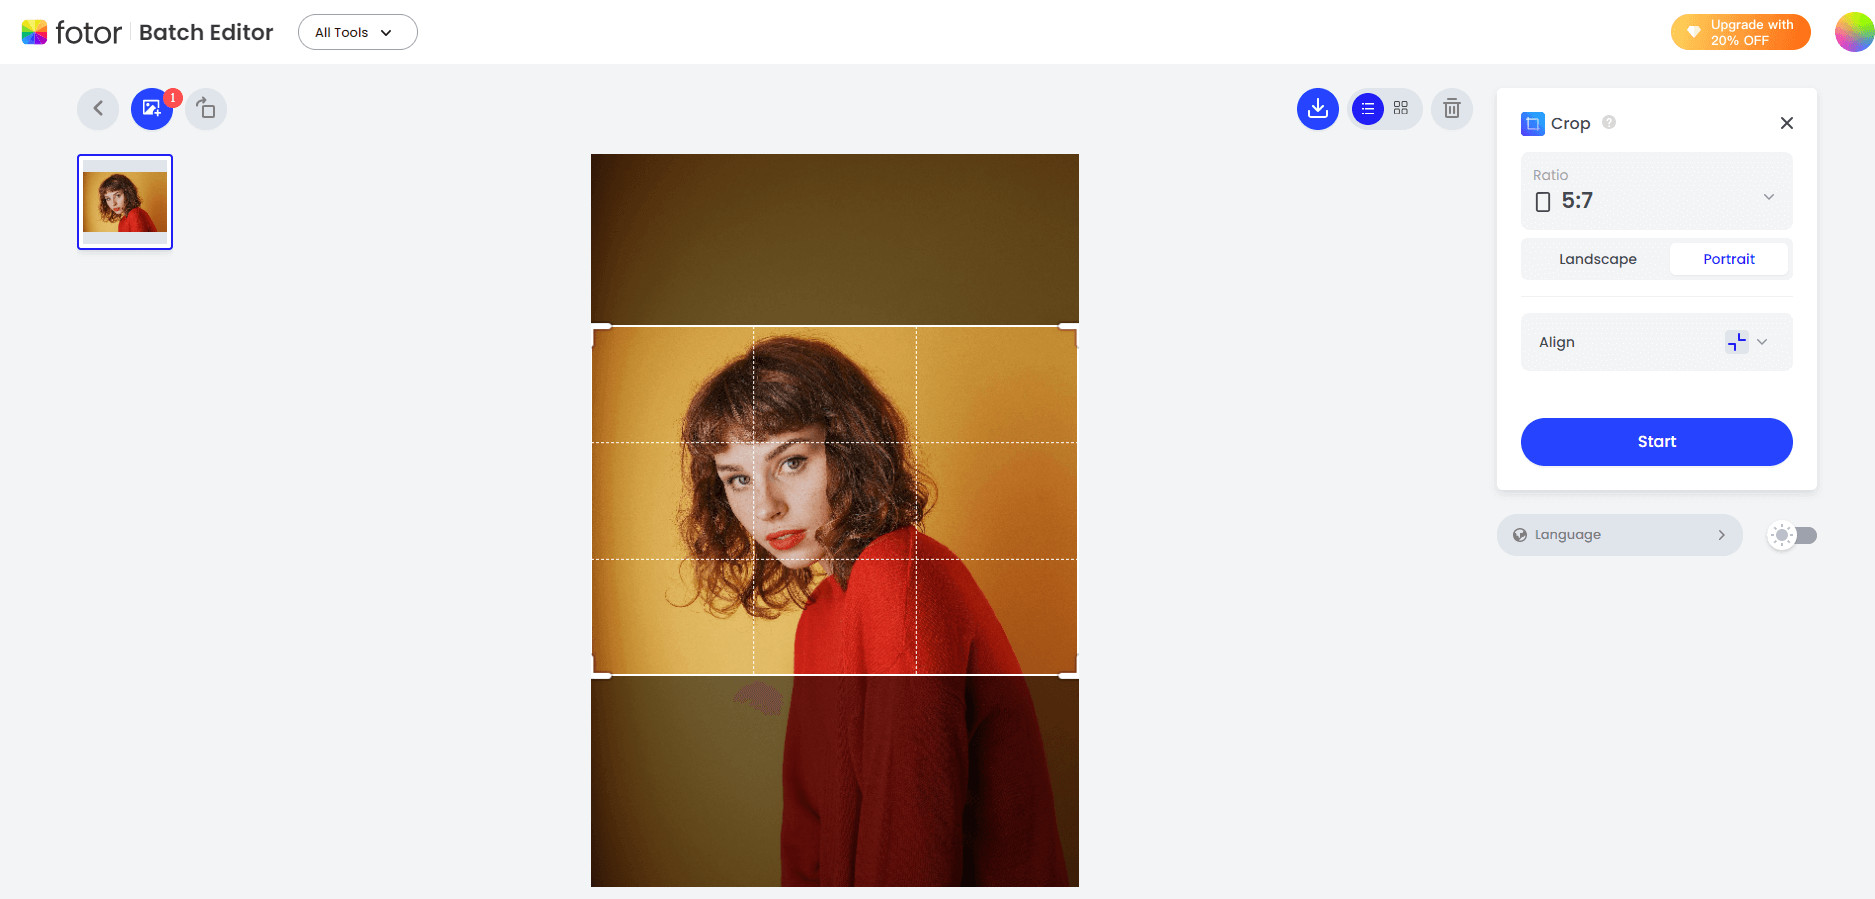
 A screenshot of a photo editing software interface, showing the crop tool with a 5:7 aspect ratio applied to an image.
5. Printing 5×7 Photos: Tips and Considerations
Printing 5×7 photos involves several considerations to ensure the final prints are of high quality. From choosing the right paper to understanding color calibration, these factors can significantly impact the outcome.
5.1. What Type of Paper is Best for 5×7 Photo Prints?
The best type of paper for 5×7 photo prints depends on the desired look and feel:
- Glossy Paper: Enhances colors and provides a shiny finish, ideal for vibrant images.
- Matte Paper: Reduces glare and fingerprints, suitable for black and white photos or images with soft tones.
- Satin/Luster Paper: Offers a balance between glossy and matte, providing good color reproduction and minimal glare.
- Fine Art Paper: High-quality, archival paper for professional prints with exceptional detail and longevity.
5.2. How to Calibrate Your Monitor for Accurate Color Printing?
Calibrating your monitor ensures that the colors you see on the screen accurately match the colors in your printed photos. Here’s how to do it:
- Use a Calibration Tool: Invest in a monitor calibration tool like the X-Rite i1Display or SpyderX Pro.
- Install the Software: Install the calibration software provided with the tool.
- Follow the Instructions: Follow the on-screen instructions to adjust the monitor settings, including brightness, contrast, and color temperature.
- Create a Profile: The software will create a color profile that corrects any color inaccuracies on your monitor.
- Apply the Profile: Apply the new color profile to your operating system to ensure accurate color display.
5.3. What Are the Common Mistakes to Avoid When Printing 5×7 Photos?
To avoid common printing mistakes, consider the following:
- Low Resolution: Ensure your image has a high enough resolution (300 DPI) to prevent pixelation.
- Incorrect Color Settings: Use the correct color profile (sRGB or Adobe RGB) for your printer and paper.
- Poor Paper Quality: Choose high-quality photo paper that is compatible with your printer.
- Ignoring Printer Settings: Adjust printer settings like paper type and print quality for optimal results.
- Not Proofing: Always proof your image before printing to check for any errors or color issues.
 Close-up of a 5×7 photo being printed, showing the printer, paper, and ink cartridges.
6. Creative Uses for 5×7 Photos
The 5×7 photo size is incredibly versatile and can be used in various creative projects, from personalized gifts to artistic displays. Its balanced dimensions make it ideal for showcasing memories and artwork.
6.1. How to Create a Photo Collage with 5×7 Prints?
Creating a photo collage with 5×7 prints is a fun and personalized way to display your favorite memories. Here’s how to do it:
- Choose Your Photos: Select a variety of 5×7 prints that you want to include in the collage.
- Plan the Layout: Arrange the photos on a large surface to determine the layout. Experiment with different arrangements until you find one you like.
- Prepare the Base: Use a large piece of cardboard, foam board, or a premade collage frame as the base for your collage.
- Adhere the Photos: Use adhesive glue or double-sided tape to attach the photos to the base.
- Add Embellishments: Enhance the collage with embellishments like stickers, ribbons, or handwritten notes.
- Frame the Collage: Place the finished collage in a frame for a polished look.
6.2. What Are Some Ideas for Displaying 5×7 Photos in Your Home?
There are numerous creative ways to display 5×7 photos in your home:
- Wall Gallery: Create a gallery wall by arranging multiple framed 5×7 photos in a visually appealing pattern.
- Tabletop Frames: Use individual frames to display photos on tables, shelves, or desks.
- Photo Ledges: Install photo ledges to showcase a series of 5×7 prints, allowing you to easily change them out.
- String Lights Display: Hang photos from string lights using clothespins for a whimsical and festive look.
- Shadow Boxes: Create shadow boxes with 5×7 photos and other mementos to create unique displays.
- Floating Frames: Use floating frames to give your photos a modern and minimalist look.
6.3. How to Use 5×7 Photos for Personalized Gifts?
5×7 photos make excellent personalized gifts for friends and family. Here are some ideas:
- Custom Photo Albums: Create a custom photo album with 5×7 prints showcasing special memories.
- Personalized Calendars: Design a personalized calendar with 5×7 photos for each month.
- Photo Coasters: Create custom photo coasters with 5×7 prints sealed under a protective layer.
- Photo Puzzles: Turn a 5×7 photo into a custom jigsaw puzzle.
- Photo Mugs: Print a 5×7 photo onto a ceramic mug for a unique and personal gift.
- Photo Keychains: Create photo keychains with miniature 5×7 prints.
7. 5×7 Photos for Professional Photography
For professional photographers, the 5×7 photo size is a versatile option for various applications, from portrait sessions to event photography. Understanding its use in professional contexts can enhance your service offerings and client satisfaction.
7.1. How to Use 5×7 Photos in Portrait Photography?
5×7 photos are ideally suited for portrait photography due to their balanced dimensions and ability to capture fine details:
- Headshots: Perfect for headshots and close-up portraits, highlighting facial features and expressions.
- Family Portraits: Suitable for family portraits, providing enough space to showcase multiple subjects.
- Senior Portraits: Great for senior portraits, capturing the personality and style of the graduating student.
- Pet Portraits: Ideal for pet portraits, showcasing the unique characteristics of the animal.
- Print Packages: Offer 5×7 prints as part of portrait packages, providing clients with tangible memories.
7.2. What Are the Benefits of Offering 5×7 Prints to Clients?
Offering 5×7 prints to clients has several benefits:
- Affordability: 5×7 prints are more affordable than larger sizes, making them accessible to a wider range of clients.
- Convenience: Easy to frame and display, providing clients with a convenient way to showcase their photos.
- Upselling Opportunities: Can be offered as part of print packages or as add-ons to digital packages, increasing revenue.
- Professionalism: Demonstrates a commitment to providing high-quality, tangible products to clients.
- Versatility: Suitable for various types of photography, from portraits to events.
7.3. How to Price 5×7 Prints in Your Photography Business?
Pricing 5×7 prints in your photography business requires careful consideration of costs and market value:
- Calculate Costs: Determine the cost of materials (paper, ink) and printing services.
- Consider Time: Factor in the time spent editing, printing, and packaging the prints.
- Research Market Value: Research the prices of 5×7 prints offered by other photographers in your area.
- Set a Profit Margin: Add a profit margin to cover overhead costs and generate income.
- Offer Packages: Create print packages that include 5×7 prints along with other sizes and products.
- Adjust Prices: Regularly review and adjust prices based on market trends and customer feedback.
8. Exploring dfphoto.net: Your Photography Resource
At dfphoto.net, we are dedicated to providing you with the resources, inspiration, and community you need to excel in photography. Our website offers a wealth of information, from beginner tutorials to advanced techniques, ensuring that photographers of all skill levels can enhance their craft.
8.1. What Resources Does dfphoto.net Offer for Photographers?
dfphoto.net offers a wide range of resources for photographers:
- Tutorials and Guides: Step-by-step tutorials on various photography topics, including composition, lighting, and editing.
- Gear Reviews: In-depth reviews of cameras, lenses, and other photography equipment.
- Inspiration Gallery: A curated gallery of stunning photographs to inspire your creativity.
- Community Forum: A platform to connect with other photographers, share your work, and ask questions.
- Editing Tips: Tips and tricks for using photo editing software like Adobe Photoshop and Lightroom.
- Business Advice: Guidance on building a successful photography business, including pricing, marketing, and client management.
8.2. How Can dfphoto.net Help You Improve Your Photography Skills?
dfphoto.net can help you improve your photography skills in several ways:
- Structured Learning: Our tutorials provide a structured learning path for mastering various photography techniques.
- Practical Tips: We offer practical tips and advice that you can apply to your photography immediately.
- Expert Insights: Our content is created by experienced photographers and industry professionals.
- Community Support: The community forum provides a supportive environment for learning and growth.
- Continuous Updates: We regularly update our content to keep you informed of the latest trends and technologies.
8.3. How to Connect with the dfphoto.net Community?
Connecting with the dfphoto.net community is easy:
- Visit Our Website: Go to dfphoto.net and explore our resources.
- Join the Forum: Sign up for our community forum to connect with other photographers.
- Share Your Work: Share your photos in the forum to get feedback and inspiration.
- Participate in Discussions: Engage in discussions on various photography topics.
- Follow Us on Social Media: Follow us on social media for the latest updates and content.
- Contact Us: Reach out to us with any questions or suggestions.
We are located at 1600 St Michael’s Dr, Santa Fe, NM 87505, United States. You can also call us at +1 (505) 471-6001 or visit our website at dfphoto.net.
9. The Future of 5×7 Photography
As technology advances and trends evolve, the future of 5×7 photography remains promising. With the rise of digital photography and social media, the versatility and appeal of the 5×7 format continue to thrive.
9.1. What Trends Are Shaping the Future of 5×7 Photography?
Several trends are shaping the future of 5×7 photography:
- Digital Printing: Advancements in digital printing technology are making it easier and more affordable to produce high-quality 5×7 prints.
- Social Media Integration: The ability to seamlessly share 5×7 photos on social media platforms is driving demand for this format.
- Personalized Gifts: The increasing popularity of personalized gifts is fueling the use of 5×7 photos in custom products.
- DIY Projects: The growing interest in DIY projects and crafts is encouraging creative uses of 5×7 prints.
- Archival Printing: The availability of archival printing options is ensuring the longevity of 5×7 photos for future generations.
9.2. How Will Technology Impact the Use of 5×7 Photos?
Technology will continue to impact the use of 5×7 photos in various ways:
- Improved Image Quality: Advancements in camera technology will result in higher-resolution images that look stunning in 5×7 prints.
- Enhanced Editing Tools: Photo editing software will offer more sophisticated tools for enhancing and optimizing 5×7 photos.
- Seamless Printing: Online printing services will provide seamless integration with photo editing software, making it easier to order 5×7 prints.
- Augmented Reality: Augmented reality technology could be used to add interactive elements to 5×7 photos, creating unique experiences.
- Artificial Intelligence: AI-powered tools could automate tasks like cropping, resizing, and color correction for 5×7 prints.
9.3. What Opportunities Exist for Photographers in the 5×7 Format?
The 5×7 format offers numerous opportunities for photographers:
- Niche Markets: Focus on niche markets like pet portraits, senior portraits, or family portraits, offering 5×7 prints as part of your packages.
- Custom Products: Create custom products like photo albums, calendars, and coasters with 5×7 prints.
- Online Sales: Sell 5×7 prints through online marketplaces or your own website.
- Workshops and Classes: Teach workshops and classes on how to create and display 5×7 photos.
- Collaborations: Collaborate with local businesses to offer 5×7 prints as promotional items or gifts.
10. FAQ About 5×7 Photos
Here are some frequently asked questions about 5×7 photos:
10.1. What is the size of a 5×7 photo in pixels?
At 300 DPI, a 5×7 photo is 1500 x 2100 pixels.
10.2. Can I print a 5×7 photo from my phone?
Yes, you can print a 5×7 photo from your phone by transferring the image to a computer or using a mobile printing app.
10.3. Is 5×7 a standard photo size?
Yes, 5×7 is a standard photo size commonly used for portraits and framing.
10.4. What is the aspect ratio of a 5×7 photo?
The aspect ratio of a 5×7 photo is 5:7, which simplifies to approximately 1:1.4.
10.5. How can I resize my photo to 5×7 without losing quality?
Use photo editing software and maintain the 5:7 aspect ratio while resizing.
10.6. What DPI should I use for printing a 5×7 photo?
A DPI of 300 is recommended for high-quality 5×7 photo prints.
10.7. Where can I print 5×7 photos?
You can print 5×7 photos at local photo labs or online printing services.
10.8. What are the best uses for 5×7 photos?
5×7 photos are best for portraits, family photos, and personalized gifts.
10.9. How do I frame a 5×7 photo?
Purchase a 5×7 frame from a local craft store or online retailer.
10.10. Can I create a photo collage with 5×7 prints?
Yes, you can create a photo collage with 5×7 prints by arranging them on a large surface and adhering them with glue or tape.
We invite you to visit dfphoto.net to explore our extensive collection of tutorials, gear reviews, and inspiring galleries. Join our community forum to connect with fellow photographers, share your work, and receive valuable feedback. Whether you’re a seasoned professional or just starting your photographic journey, dfphoto.net is your ultimate resource for mastering the art of photography. Start exploring today and unleash your creative potential!