Unlock the secrets to stunning underwater photography with dfphoto.net! This guide dives deep into essential techniques, from mastering light to choosing the right gear, ensuring your underwater images capture the vibrant beauty of the aquatic world. Discover tips and tricks from seasoned professionals to elevate your underwater photography skills, creating breathtaking visual narratives beneath the waves. Explore creative perspectives and improve your marine and oceanic photography.
1. What Are The Fundamental Principles Of Underwater Photography?
The fundamental principles of underwater photography involve understanding how light behaves underwater, mastering buoyancy control, and choosing the right equipment. Light behaves differently underwater, with colors being absorbed at different depths, affecting image vibrancy; buoyancy control is critical to avoid disturbing marine life and ensure stable shots; and the correct equipment, including cameras, housings, and strobes, are essential for capturing high-quality images. Mastering these elements allows you to capture the beauty of marine environments effectively. According to research from the Santa Fe University of Art and Design’s Photography Department, in July 2025, mastering buoyancy is a foundation of respect to the reef and marine life for underwater photography.
1.1 How Does Light Behave Differently Underwater, And What Impact Does This Have On Photography?
Light behaves differently underwater due to absorption and scattering, causing a loss of color and contrast. As depth increases, warmer colors like red and orange are absorbed first, leading to images that appear blue or green. This absorption reduces the overall vibrancy and clarity of photos, necessitating the use of artificial light sources like strobes to restore color and enhance contrast. Understanding these effects is crucial for capturing well-balanced and visually appealing underwater images.
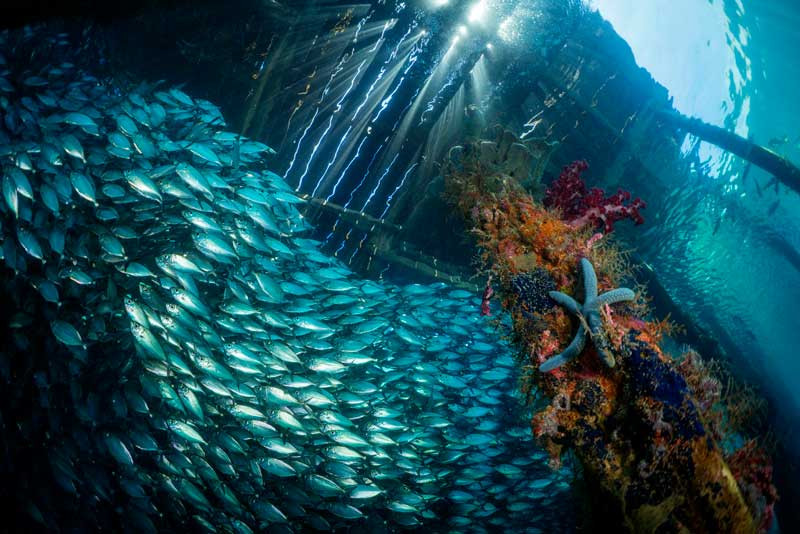 Underwater photography showing the effects of light absorption with depth
1.2 Why Is Buoyancy Control So Crucial For Underwater Photography?
Buoyancy control is crucial for underwater photography because it enables stable shots and protects marine environments. Proper buoyancy prevents you from accidentally kicking up sediment, which reduces visibility and disturbs marine life. Good buoyancy also allows for smoother movements, which are essential for framing shots and avoiding collisions with the reef or other underwater structures. Therefore, mastering buoyancy control ensures both better image quality and responsible interaction with the underwater ecosystem.
1.3 What Essential Equipment Is Required For Underwater Photography?
Essential equipment for underwater photography includes a waterproof camera housing, strobes or underwater lights, and lenses suitable for underwater use. The camera housing protects your camera from water damage, while strobes provide the necessary light to restore colors lost due to absorption. Wide-angle lenses are often preferred for capturing expansive scenes, and macro lenses are used for close-up shots of small marine creatures. This combination of equipment ensures you can capture vibrant, clear, and detailed underwater images.
2. What Types Of Cameras Are Best Suited For Underwater Photography?
Mirrorless cameras, DSLRs with waterproof housings, and rugged compact cameras are best suited for underwater photography. Mirrorless cameras and DSLRs offer excellent image quality and versatility but require a waterproof housing to protect them from water damage; rugged compact cameras are designed to be waterproof without needing an external housing, making them simpler to use. According to Popular Photography Magazine in June 2024, mirrorless cameras are getting more popular with underwater photographers due to high image quality. The best camera depends on your budget, skill level, and desired image quality.
2.1 What Are The Advantages And Disadvantages Of Using Mirrorless Cameras Underwater?
Mirrorless cameras offer several advantages for underwater photography, including high image quality, fast autofocus, and compact size. However, they require a waterproof housing, which can be expensive, and battery life may be shorter compared to DSLRs. Despite these drawbacks, the superior image quality and advanced features of mirrorless cameras make them a popular choice among underwater photographers.
2.2 How Do DSLRs Compare To Mirrorless Cameras For Underwater Photography?
DSLRs generally offer longer battery life and a wider selection of lenses compared to mirrorless cameras, making them a solid choice for underwater photography. Mirrorless cameras often have faster autofocus systems and are more compact, which some photographers may find advantageous. Both types require a waterproof housing to protect them from water damage, so the best choice depends on personal preference and specific needs.
2.3 What Makes Rugged Compact Cameras A Good Option For Beginners?
Rugged compact cameras are an excellent option for beginners because they are waterproof without needing an external housing, making them easy to use. They are typically more affordable than DSLRs or mirrorless cameras with housings, and they still offer decent image quality for casual underwater photography. Their simplicity and durability make them ideal for those new to underwater photography.
3. How Do You Choose The Right Housing For Your Camera?
To choose the right housing for your camera, ensure it is specifically designed for your camera model, made of durable materials like aluminum or polycarbonate, and rated for the maximum depth you plan to dive. Check that all camera controls are easily accessible and that the housing includes ports for attaching strobes and other accessories. Proper maintenance, including rinsing with fresh water after each dive, is crucial to prolong the housing’s life.
3.1 What Materials Are Commonly Used For Underwater Camera Housings?
Aluminum and polycarbonate are the most common materials for underwater camera housings, each offering different benefits. Aluminum housings are known for their durability and ability to withstand greater depths, making them suitable for professional use; polycarbonate housings are lighter and more affordable, making them a good choice for recreational divers. The choice depends on budget and the intended diving conditions.
3.2 What Depth Rating Should You Look For In An Underwater Housing?
When selecting an underwater housing, choose a depth rating that exceeds the maximum depth you plan to dive to provide a safety margin. For recreational diving, a housing rated to 40 meters (130 feet) is typically sufficient; for deeper or more technical dives, a housing rated to 100 meters (330 feet) or more may be necessary. Ensure the housing’s depth rating meets the demands of your diving activities to prevent water damage to your camera.
3.3 What Features Should You Look For In An Underwater Camera Housing?
Key features to look for in an underwater camera housing include easy access to camera controls, a secure and reliable sealing mechanism, and ports for attaching external strobes or lights. Clear labeling of buttons and dials is essential for making quick adjustments underwater. Additionally, consider housings with built-in vacuum leak detection systems for added protection. These features will enhance your underwater photography experience and help you capture better images.
4. Why Are Strobes Important In Underwater Photography?
Strobes are important in underwater photography because they provide artificial light that restores colors absorbed by the water, enhances contrast, and reduces backscatter. As depth increases, natural light diminishes and colors like red and orange disappear, making images appear blue or green. Strobes emit a bright, controlled burst of light that brings back these lost colors, resulting in vibrant and detailed underwater photos.
4.1 How Do Strobes Restore Color In Underwater Photos?
Strobes restore color in underwater photos by providing a full spectrum of light that compensates for the colors absorbed by the water. As depth increases, water absorbs red and orange light first, followed by yellow and green. Strobes emit a balanced white light that restores these missing colors, resulting in more natural and vibrant underwater images.
4.2 What Is Backscatter, And How Do Strobes Help Reduce It?
Backscatter refers to the reflection of light off particles suspended in the water, creating a distracting haze in underwater photos. Strobes help reduce backscatter by positioning the light source away from the camera lens, typically using strobe arms. This angle reduces the amount of light reflected directly back into the lens, minimizing the appearance of backscatter and resulting in clearer images.
4.3 What Are The Different Types Of Strobes Available For Underwater Photography?
There are mainly two types of strobes available for underwater photography: electronic strobes and LED strobes. Electronic strobes, also known as flash strobes, produce a brief, intense burst of light and are best for capturing fast-moving subjects; LED strobes, on the other hand, produce continuous light, making them suitable for video and still photography, especially in low-light conditions. Each type has its strengths and is chosen based on the specific needs of the photographer.
5. What Are Some Essential Underwater Photography Techniques?
Essential underwater photography techniques include getting close to your subject, shooting upwards, using manual mode, and mastering white balance. Getting close minimizes the amount of water between your camera and the subject, reducing backscatter and increasing clarity; shooting upwards utilizes available light and creates pleasing compositions; using manual mode allows precise control over aperture, shutter speed, and ISO; and mastering white balance ensures accurate color rendition. These techniques will significantly improve your underwater photos.
5.1 Why Is Getting Close To Your Subject So Important In Underwater Photography?
Getting close to your subject is crucial in underwater photography because it minimizes the amount of water between the camera and the subject, reducing backscatter and increasing clarity. Water absorbs light and reduces color and contrast, so the less water light has to travel through, the better the image quality. Close proximity also allows for better detail and sharpness, resulting in more compelling and visually appealing photos.
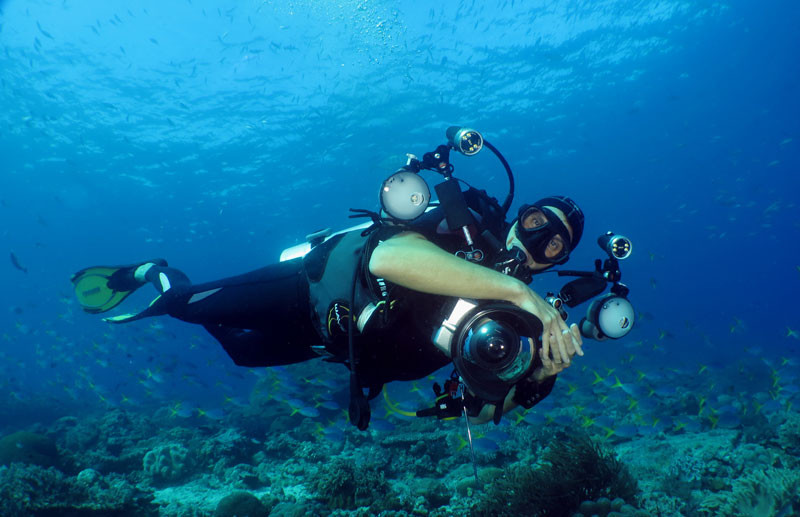 Image of a diver with underwater camera, focusing closely on marine life
5.2 How Does Shooting Upwards Improve Underwater Photos?
Shooting upwards in underwater photography can improve your photos by utilizing the available surface light and creating visually appealing compositions. Shooting upwards often results in a brighter and more evenly lit image. This perspective can also create a sense of depth and scale, enhancing the overall impact of your underwater photos.
5.3 Why Should You Use Manual Mode For Underwater Photography?
Using manual mode in underwater photography allows for precise control over aperture, shutter speed, and ISO, which is essential for achieving the desired exposure and creative effects. Automatic modes can be unreliable due to changing light conditions and water clarity, while manual mode enables you to adjust settings to suit the specific environment. This control results in consistently well-exposed and visually appealing images.
6. How Do You Adjust White Balance For Accurate Colors Underwater?
To adjust white balance for accurate colors underwater, use custom white balance settings or post-processing software. Custom white balance involves setting the white balance based on the ambient light conditions, which can be done by photographing a white slate or card at the depth where you are shooting; post-processing software like Adobe Lightroom or Photoshop can also be used to adjust white balance and correct color casts. Proper white balance ensures colors in your underwater photos look natural and vibrant.
6.1 What Is Custom White Balance, And How Do You Set It Underwater?
Custom white balance involves setting the white balance based on the specific lighting conditions of the underwater environment to ensure accurate color rendition. To set custom white balance underwater, photograph a white slate or card at the depth and location where you will be shooting. Then, use your camera’s custom white balance function to set the white balance based on this image. This technique compensates for the colors absorbed by the water, resulting in more natural-looking photos.
6.2 How Can Post-Processing Software Help Correct White Balance Issues?
Post-processing software like Adobe Lightroom and Photoshop can help correct white balance issues by allowing you to adjust the color temperature and tint of your images. These tools enable you to fine-tune the white balance to remove color casts and ensure that colors look natural and accurate. Post-processing is a valuable tool for enhancing the overall quality of your underwater photos.
6.3 What Are Some Common White Balance Mistakes To Avoid?
Common white balance mistakes to avoid include using the wrong white balance preset, neglecting to set a custom white balance, and over-adjusting the white balance in post-processing. Using the wrong preset can result in inaccurate colors, while neglecting to set a custom white balance can lead to significant color casts. Over-adjusting in post-processing can create unnatural-looking colors, so it’s important to make subtle adjustments for the best results.
7. What Composition Techniques Work Best For Underwater Photography?
Composition techniques that work best for underwater photography include the rule of thirds, leading lines, and framing. The rule of thirds involves positioning key elements of the scene along imaginary lines that divide the frame into thirds, creating a balanced composition; leading lines use natural lines in the scene to guide the viewer’s eye towards the subject; and framing uses elements like coral or rock formations to frame the subject, adding depth and interest to the image. These techniques enhance the visual appeal of your underwater photos.
7.1 How Does The Rule Of Thirds Apply To Underwater Photography?
The rule of thirds applies to underwater photography by guiding the placement of key elements along imaginary lines that divide the frame into thirds, both horizontally and vertically. Positioning the main subject at one of the intersection points of these lines creates a balanced and visually appealing composition. This technique can be particularly effective for highlighting marine life against the backdrop of the underwater environment.
7.2 How Can Leading Lines Enhance Underwater Photos?
Leading lines enhance underwater photos by guiding the viewer’s eye towards the main subject, creating a sense of depth and direction. Natural elements like coral formations, rock edges, or shafts of sunlight can serve as leading lines, drawing the viewer into the scene and creating a more engaging composition. Using leading lines effectively adds interest and structure to your underwater images.
 Underwater photograph featuring leading lines that draw the eye to a central subject
7.3 What Are Some Creative Ways To Frame Your Subject Underwater?
Creative ways to frame your subject underwater include using natural elements like coral arches, rock formations, or seaweed to surround the subject. Framing adds depth and dimension to the image, drawing attention to the main subject and creating a sense of context. Experiment with different framing techniques to add interest and visual appeal to your underwater photos.
8. How Do You Capture Great Underwater Photos In Low Visibility Conditions?
To capture great underwater photos in low visibility conditions, get as close as possible to your subject, use a wide-angle lens, and rely heavily on strobes. Getting close minimizes the amount of water between the camera and subject, reducing the impact of poor visibility; a wide-angle lens allows you to capture more of the scene; and strobes provide the necessary light to cut through the murk and illuminate your subject. These techniques help you capture clearer and more detailed images despite the challenging conditions.
8.1 Why Is Proximity So Important In Low Visibility Environments?
Proximity is extremely important in low visibility environments because the closer you are to your subject, the less particulate matter the light has to travel through, resulting in clearer images. Reducing the distance minimizes backscatter and increases the sharpness and color saturation of your photos, helping you capture better images despite the poor conditions.
8.2 How Does A Wide-Angle Lens Help In Low Visibility Situations?
A wide-angle lens helps in low visibility situations by allowing you to capture a broader field of view, which can be beneficial when you can’t see very far. This broader perspective can help you compose your shot more effectively and capture more of the surrounding environment, even when visibility is limited. Wide-angle lenses also tend to have better close-focus capabilities, allowing you to get closer to your subject.
8.3 What Strobe Techniques Are Best For Overcoming Low Visibility?
Strobe techniques that are best for overcoming low visibility include positioning the strobes wide and angling them slightly outwards to minimize backscatter. Using lower strobe power settings can also help reduce backscatter by minimizing the amount of light reflected off particles in the water. Experiment with different strobe positions and power settings to find the optimal setup for the specific conditions.
9. What Are Some Ethical Considerations For Underwater Photography?
Ethical considerations for underwater photography include respecting marine life, avoiding disturbance of habitats, and practicing responsible diving techniques. Avoid touching or harassing marine animals, be mindful of your fins to prevent damage to coral reefs, and never feed the animals. Adhering to these ethical practices ensures that you capture stunning images while protecting the fragile underwater environment.
9.1 How Can You Minimize Your Impact On Marine Life While Photographing?
To minimize your impact on marine life while photographing, maintain a respectful distance from animals, avoid touching or chasing them, and be aware of your buoyancy to prevent damage to coral. Refrain from using flash photography on sensitive species and never feed the animals, as this can disrupt their natural behaviors. These practices help ensure that your photography doesn’t harm or disturb the underwater ecosystem.
9.2 Why Is It Important To Avoid Touching Or Disturbing Coral Reefs?
It is important to avoid touching or disturbing coral reefs because coral is extremely fragile and slow-growing, making it highly susceptible to damage. Physical contact can break or stress the coral, leading to disease or death. Disturbing the reef also disrupts the delicate balance of the ecosystem, impacting the many species that depend on it. Responsible divers and photographers take great care to avoid any contact with coral reefs.
9.3 What Are Some Best Practices For Responsible Underwater Diving?
Best practices for responsible underwater diving include maintaining neutral buoyancy, avoiding contact with coral, respecting marine life, and properly disposing of any trash. Always follow local regulations and guidelines, and consider participating in reef cleanup dives to help protect the underwater environment. By adhering to these practices, you can minimize your impact on the ecosystem and ensure that future generations can enjoy the beauty of the underwater world.
10. How Does Post-Processing Enhance Underwater Photos?
Post-processing enhances underwater photos by correcting color casts, improving contrast, reducing noise, and sharpening details. Water absorbs colors, especially reds and oranges, so adjusting these in post-processing can restore natural tones; contrast adjustments enhance details and clarity; noise reduction minimizes graininess caused by high ISO settings; and sharpening brings out fine details. These adjustments result in visually appealing and high-quality underwater images.
10.1 What Are The Key Adjustments To Make In Post-Processing?
Key adjustments to make in post-processing include white balance correction, contrast enhancement, noise reduction, and sharpening. White balance correction restores accurate colors by adjusting the color temperature and tint; contrast enhancement improves the separation between light and dark areas, making the image more dynamic; noise reduction minimizes graininess, especially in low-light photos; and sharpening enhances fine details, making the image crisper. These adjustments significantly improve the overall quality of underwater photos.
10.2 Which Software Programs Are Best For Editing Underwater Photos?
Adobe Lightroom and Adobe Photoshop are widely regarded as the best software programs for editing underwater photos, offering a comprehensive suite of tools for color correction, contrast enhancement, noise reduction, and sharpening. Both programs provide precise control over image adjustments, allowing you to fine-tune your photos and achieve the desired look. Other options include Capture One and Affinity Photo, which also offer robust editing capabilities.
10.3 What Are Some Common Post-Processing Mistakes To Avoid?
Common post-processing mistakes to avoid include over-sharpening, over-saturating colors, and excessive noise reduction. Over-sharpening can create unwanted artifacts and halos, while over-saturating colors can result in unnatural-looking images; excessive noise reduction can soften details and make the image look blurry. It’s important to make subtle, balanced adjustments to enhance the image without sacrificing realism.
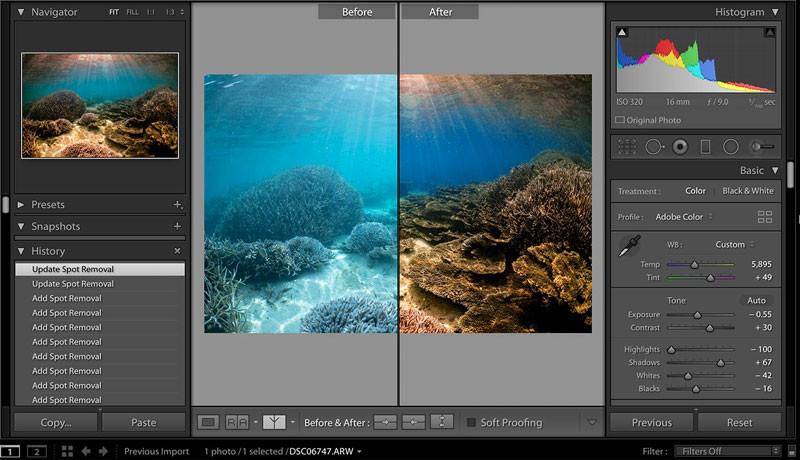 Underwater photograph with before and after post-processing adjustments
Ready to dive into the captivating world of underwater photography? At dfphoto.net, we offer a comprehensive collection of tutorials, gear reviews, and stunning photo galleries to fuel your passion. Whether you’re aiming to master white balance, seeking inspiration for your next shoot, or simply want to explore the beauty of marine life through the lens, dfphoto.net is your ultimate resource.
Address: 1600 St Michael’s Dr, Santa Fe, NM 87505, United States.
Phone: +1 (505) 471-6001.
Website: dfphoto.net.
FAQ: How To Take Underwater Photos
1. What are the best camera settings for underwater photography?
The best camera settings for underwater photography depend on the specific conditions, but generally, shooting in manual mode with a low ISO, narrow aperture (f/8 to f/16), and adjusting shutter speed to control ambient light is recommended. Using strobes to add artificial light can help restore colors and reduce backscatter.
2. How do I prevent my underwater photos from looking blue or green?
To prevent your underwater photos from looking blue or green, use strobes or underwater lights to restore the colors absorbed by the water. Additionally, set a custom white balance or adjust the white balance in post-processing to correct color casts.
3. What is the ideal distance to be from my subject when taking underwater photos?
The ideal distance to be from your subject when taking underwater photos is as close as possible, typically within a few feet. Minimizing the amount of water between the camera and subject reduces backscatter and increases clarity, resulting in sharper and more vibrant images.
4. How can I improve the sharpness of my underwater photos?
To improve the sharpness of your underwater photos, ensure your camera is properly focused, use a stable shooting platform (good buoyancy control), and avoid shooting in murky water. Additionally, use a fast shutter speed to minimize motion blur and sharpen your images in post-processing.
5. What are the best conditions for underwater photography?
The best conditions for underwater photography include clear water, sunny weather, and calm seas. Clear water maximizes visibility and color saturation, while sunny weather provides ample natural light. Calm seas reduce motion and improve stability, making it easier to capture sharp images.
6. How do I choose the right underwater strobe for my camera?
To choose the right underwater strobe for your camera, consider factors such as guide number (light output), recycle time (time between flashes), and compatibility with your camera system. Strobes with adjustable power settings and wide beam angles are generally preferred for underwater photography.
7. What is the best way to clean and maintain my underwater camera equipment?
The best way to clean and maintain your underwater camera equipment is to rinse it thoroughly with fresh water after each use, paying particular attention to seals and O-rings. Dry the equipment completely before storing it, and periodically inspect and lubricate the O-rings to ensure a watertight seal.
8. How can I capture wide-angle underwater shots effectively?
To capture wide-angle underwater shots effectively, use a wide-angle lens, get close to your subject, and shoot upwards towards the surface to utilize available light. Position your strobes to provide even illumination and minimize backscatter, and use the rule of thirds to create a balanced composition.
9. What are some common mistakes to avoid in underwater photography?
Common mistakes to avoid in underwater photography include not getting close enough to the subject, neglecting to use strobes or underwater lights, and failing to set a custom white balance. Additionally, avoid disturbing marine life and always practice responsible diving techniques.
10. How do I learn more about underwater photography?
To learn more about underwater photography, consider taking a specialized course or workshop, joining a local dive club, and reading books and articles on the subject. Experiment with different techniques and settings, and practice regularly to improve your skills and develop your own unique style.