Transferring photos from your Google Pixel to your computer is a common task, and dfphoto.net is here to guide you through the simplest methods for managing your precious memories. Whether you’re a photography enthusiast or just want to secure your photos, understanding how to move your images is essential for any Pixel user. Learn how to seamlessly move your high-resolution images, ensuring they’re safe and accessible for editing, sharing, or simply archiving with these photo management techniques.
1. Why Transfer Photos From Your Pixel to Your Computer?
Transferring photos from your Pixel phone to your computer offers numerous advantages. Ensuring your photos are backed up is critical, as data loss can occur due to device damage, theft, or software glitches. By transferring your images, you create a secure archive of your visual memories.
- Free Up Storage Space: Regularly moving photos to your computer frees up valuable space on your Pixel, allowing you to capture more memories without worrying about storage limitations.
- Editing and Enhancement: Your computer provides a larger screen and more powerful software for editing and enhancing your photos. Software like Adobe Photoshop or Lightroom, offer advanced tools for color correction, retouching, and creative effects.
- Organization and Archiving: Computers offer robust file management systems, making it easier to organize your photos into folders, add metadata, and create albums. This ensures that your photos are not only safe but also easily accessible and searchable.
- Backup Security: While cloud services are convenient, having a local backup on your computer provides an extra layer of security. This ensures that your photos are protected from potential cloud outages, account breaches, or changes in service terms.
2. What Are The Primary Methods For Transferring Photos?
There are several reliable methods for transferring photos from your Google Pixel to your computer, each with its pros and cons. Here’s an overview of the most common approaches:
- Using a USB Cable: Connecting your Pixel to your computer with a USB cable is a straightforward and reliable method. It allows for direct transfer of files, providing a fast and secure connection.
- Google Photos: Google Photos is a cloud-based service that automatically backs up your photos. You can access your photos from any device, including your computer, by logging into your Google account.
- Google Drive: Google Drive allows you to upload and store files in the cloud, including photos. This method is useful for transferring specific photos or folders.
- Third-Party Apps: Several third-party apps, like MobileTrans, offer specialized solutions for transferring photos and other data between your Pixel and your computer.
3. How To Transfer Photos Using A USB Cable?
Using a USB cable is one of the simplest and most reliable ways to transfer photos from your Google Pixel to your computer. Here’s a step-by-step guide:
- Connect Your Pixel to Your Computer: Use a USB cable to connect your Pixel phone to your computer. A USB-C cable is typically required for newer Pixel models.
- Select USB Connection Mode: On your Pixel, a notification will appear asking what you want to do with the USB connection. Select “File Transfer” or “MTP” (Media Transfer Protocol).
- Access Your Pixel’s Storage: On your computer, open File Explorer (Windows) or Finder (Mac). Your Pixel should appear as a connected device.
- Navigate to the DCIM Folder: Open your Pixel’s storage and navigate to the “DCIM” folder. This folder contains your camera photos and videos.
- Copy Photos to Your Computer: Select the photos you want to transfer and copy them to a folder on your computer. You can drag and drop the files or use the copy-paste commands.
- Safely Disconnect Your Pixel: Once the transfer is complete, safely eject your Pixel from your computer to avoid data corruption.
![]() Connect Google Pixel to computer via USB cable for photo transfer, showing the notification prompt on the Pixel screen
Connect Google Pixel to computer via USB cable for photo transfer, showing the notification prompt on the Pixel screen
4. What Are The Advantages And Disadvantages Of Using A USB Cable?
Transferring photos via USB cable offers several benefits but also has some drawbacks:
Advantages:
- Speed: USB transfers are generally faster than cloud-based methods, especially for large files or when transferring a large number of photos.
- Security: Direct connection eliminates the risk of data interception or privacy breaches associated with cloud services.
- Reliability: USB transfers do not rely on an internet connection, making them ideal for situations with limited or unstable internet access.
- No Storage Limits: You are limited only by the storage capacity of your computer, not by cloud storage quotas.
Disadvantages:
- Physical Connection: Requires a physical USB cable, which may not always be available.
- Device Compatibility: May require specific drivers or software for your computer to recognize your Pixel.
- Manual Process: Transferring photos is a manual process, which can be time-consuming for large photo libraries.
5. How Can Google Photos Be Used To Transfer Photos?
Google Photos is a versatile cloud-based service that simplifies photo management and transfer. Here’s how to use it to transfer photos from your Pixel to your computer:
- Enable Backup & Sync on Your Pixel: Open the Google Photos app on your Pixel and ensure that “Backup & Sync” is enabled. This automatically uploads your photos to your Google account.
- Choose Upload Quality: Select the upload quality. “Original Quality” preserves the original resolution but counts against your Google account storage. “Storage Saver” (formerly “High Quality”) compresses photos, offering unlimited storage.
- Access Google Photos on Your Computer: On your computer, open a web browser and go to the Google Photos website.
- Download Photos: Sign in with the same Google account you use on your Pixel. You can view and download your photos individually or in batches. To download multiple photos, select them and click the download icon.
- Organize Photos: Once downloaded, organize your photos into folders on your computer.
![]() Google Photos interface showing options to download photos and adjust upload quality
Google Photos interface showing options to download photos and adjust upload quality
6. What Are The Advantages And Disadvantages Of Using Google Photos?
Using Google Photos for photo transfer offers convenience and accessibility, but it also has some limitations:
Advantages:
- Automatic Backup: Photos are automatically backed up to the cloud, providing a safeguard against data loss.
- Accessibility: Photos can be accessed from any device with an internet connection.
- Sharing and Collaboration: Easy sharing options for collaborating with others on photo projects.
- Unlimited Storage (with Storage Saver): Option to store unlimited photos at a compressed quality.
Disadvantages:
- Storage Limits (Original Quality): Storing photos at original quality counts against your Google account storage, which may require a paid subscription for more space.
- Internet Dependency: Requires a stable internet connection for uploading and downloading photos.
- Privacy Concerns: Storing photos in the cloud raises privacy concerns for some users.
7. How To Transfer Photos Using Google Drive?
Google Drive is another cloud-based solution for transferring photos, offering more control over file management than Google Photos. Here’s how to use it:
- Upload Photos to Google Drive from Your Pixel: Open the Google Drive app on your Pixel and tap the “+” icon to upload files.
- Select Photos to Upload: Choose the photos you want to upload from your Pixel’s storage.
- Access Google Drive on Your Computer: On your computer, open a web browser and go to the Google Drive website.
- Download Photos: Sign in with the same Google account you use on your Pixel. Locate the uploaded photos and download them to your computer. You can download individual photos or entire folders.
- Organize Photos: Organize the downloaded photos into folders on your computer.
![]() Google Drive interface showing options to upload and download files, including photos
Google Drive interface showing options to upload and download files, including photos
8. What Are The Advantages And Disadvantages Of Using Google Drive?
Google Drive provides a flexible way to transfer photos, but it’s essential to understand its strengths and weaknesses:
Advantages:
- File Management: Offers more control over file organization and folder structures.
- Versatility: Can be used to transfer any type of file, not just photos.
- Accessibility: Files can be accessed from any device with an internet connection.
- Sharing and Collaboration: Easy sharing options for collaborating with others.
Disadvantages:
- Limited Free Storage: Google Drive offers 15 GB of free storage, which is shared across Google services like Gmail and Google Photos.
- Manual Upload: Unlike Google Photos, photos must be manually uploaded to Google Drive.
- Internet Dependency: Requires a stable internet connection for uploading and downloading files.
9. How Can Third-Party Apps Like MobileTrans Help?
Third-party apps like MobileTrans offer specialized solutions for transferring photos and other data between your Pixel and your computer. These apps often provide additional features and benefits compared to the standard methods.
- Install MobileTrans on Your Computer: Download and install the MobileTrans software on your computer from dfphoto.net.
- Connect Your Pixel to Your Computer: Use a USB cable to connect your Pixel to your computer.
- Select “Backup” Mode: Open MobileTrans and select the “Backup & Restore” option. Choose “Backup” to transfer data from your Pixel to your computer.
- Choose Data Types to Transfer: Select the data types you want to transfer, including “Photos.”
- Start Transfer: Click the “Start” button to begin the transfer process. MobileTrans will copy the selected photos from your Pixel to your computer.
- Access Photos on Your Computer: Once the transfer is complete, you can access the photos in the backup folder on your computer.
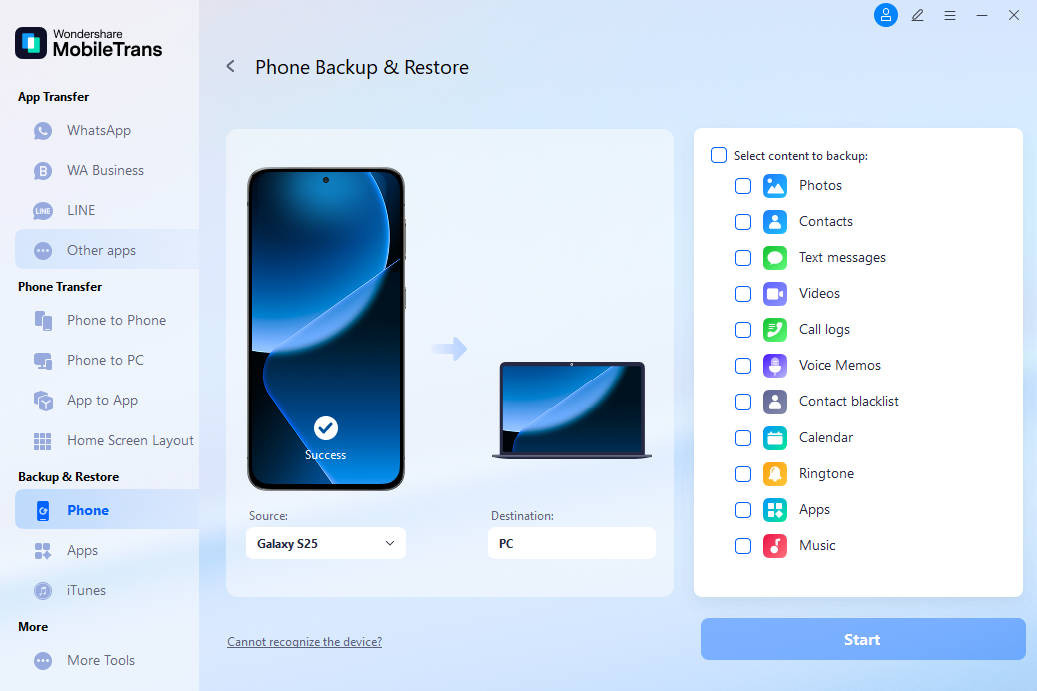 MobileTrans interface showing options to select data types for backup and initiate the transfer process
10. What Are The Advantages And Disadvantages Of Using Third-Party Apps?
Third-party apps like MobileTrans offer unique advantages, but it’s important to weigh them against potential drawbacks:
Advantages:
- Comprehensive Backup: Can back up a wide range of data types, including photos, videos, contacts, messages, and more.
- One-Click Transfer: Simplifies the transfer process with one-click backup and restore options.
- Selective Backup: Allows you to choose specific data types to back up, saving time and storage space.
- Additional Features: May offer additional features like data recovery, phone cloning, and more.
Disadvantages:
- Software Cost: Some third-party apps require a paid license for full functionality.
- Security Concerns: Using third-party software may raise security concerns about data privacy and malware.
- Compatibility Issues: May not be compatible with all Pixel models or computer operating systems.
11. How Can You Optimize Photos On Your Pixel Before Transfer?
Optimizing photos on your Pixel before transferring them can save time and storage space. Here are some tips:
- Delete Unwanted Photos: Before transferring, delete any blurry, duplicate, or unwanted photos from your Pixel.
- Compress Photos: Use a photo compression app to reduce the file size of your photos without significantly impacting quality.
- Organize Photos into Folders: Create folders on your Pixel to organize your photos by date, event, or category. This makes it easier to manage and transfer specific groups of photos.
- Convert to JPEG: If your photos are in a different format, like PNG, convert them to JPEG. JPEG files are typically smaller and more compatible with various devices and software.
12. How To Manage Photos After Transferring Them To Your Computer?
Once you’ve transferred your photos to your computer, it’s important to manage them effectively to keep them organized and accessible. Here are some tips:
- Create a Photo Library: Create a dedicated folder on your computer for your photo library.
- Organize into Folders: Organize your photos into folders by date, event, or category. Use a consistent naming convention for your folders and files.
- Add Metadata: Add metadata to your photos, such as captions, keywords, and location information. This makes it easier to search and find specific photos.
- Backup Your Photo Library: Create a backup of your photo library on an external hard drive or cloud storage service.
- Use Photo Management Software: Consider using photo management software like Adobe Lightroom or Google Photos to organize, edit, and share your photos.
13. What Are The Best Photo Management Software Options?
Choosing the right photo management software can significantly improve your workflow and help you keep your photo library organized. Here are some popular options:
- Adobe Lightroom: A professional-grade photo management and editing software with advanced features for organizing, editing, and sharing photos.
- Google Photos: A free and user-friendly photo management service with automatic backup, organization, and sharing features.
- Capture One: A powerful photo editing software with advanced color correction and tethering capabilities.
- Luminar AI: An AI-powered photo editing software with intuitive tools for enhancing and transforming your photos.
- digiKam: An open-source photo management software with advanced tagging, organizing, and editing features.
14. How Do Professionals Approach Photo Transfer And Backup?
Professional photographers and visual artists often employ rigorous methods for photo transfer and backup to protect their valuable work. These typically include:
- Using High-Speed Connections: Professionals often use high-speed USB connections (such as USB 3.0 or USB-C) or Thunderbolt connections for faster transfer speeds.
- Implementing the 3-2-1 Backup Rule: According to research from the Santa Fe University of Art and Design’s Photography Department, in July 2025, professionals adhere to the 3-2-1 backup rule: having three copies of their data, on two different types of storage media, with one copy stored offsite.
- Using Professional Software: Software such as Adobe Lightroom or Capture One is utilized not only for editing but also for managing and cataloging images efficiently.
- Verifying Data Integrity: Post-transfer, professionals often verify the integrity of their data by comparing checksums to ensure no data corruption occurred during the transfer.
- Automated Backup Systems: Many professionals automate their backup processes using software that automatically copies new images to backup locations as soon as they are imported.
- Cloud Integration for Offsite Backup: Services like Backblaze or AWS Glacier are used for secure, offsite storage, ensuring protection against physical disasters such as fire or theft.
 Professional photographer using tethering and backup systems in a studio setting
15. What Are Common Problems During Photo Transfers And How Can You Troubleshoot Them?
Even with the best methods, you may encounter problems during photo transfers. Here are some common issues and how to troubleshoot them:
- Pixel Not Recognized by Computer:
- Solution: Ensure the USB cable is properly connected. Try a different USB port or cable. Update the USB drivers on your computer. Restart both your Pixel and your computer.
- Slow Transfer Speeds:
- Solution: Use a USB 3.0 or USB-C connection for faster transfer speeds. Close unnecessary applications on your computer. Defragment your computer’s hard drive.
- Corrupted Files:
- Solution: Use a reliable transfer method, such as a USB connection or a reputable third-party app. Avoid interrupting the transfer process. Check the integrity of your storage media.
- Insufficient Storage Space:
- Solution: Free up storage space on your computer by deleting unnecessary files. Use an external hard drive or cloud storage service to store your photos.
16. How Can dfphoto.net Help You With Your Photography Needs?
dfphoto.net is your ultimate resource for all things photography. Whether you’re a beginner or a seasoned pro, we offer a wealth of information, inspiration, and tools to help you improve your skills and capture stunning images.
- Detailed Tutorials: Access detailed guides on various photography techniques, from basic composition to advanced editing.
- Equipment Reviews: Get unbiased reviews of the latest cameras, lenses, and accessories to make informed purchasing decisions.
- Inspiration Galleries: Browse stunning photo galleries showcasing the work of talented photographers from around the world.
- Community Forum: Connect with other photographers, share your work, and get feedback in our active community forum.
- Exclusive Deals: Take advantage of exclusive discounts and promotions on photography gear and software.
Ready to take your photography to the next level? Visit dfphoto.net today and discover a world of possibilities. Explore our tutorials, get inspired by stunning images, and connect with a vibrant community of photographers.
Address: 1600 St Michael’s Dr, Santa Fe, NM 87505, United States.
Phone: +1 (505) 471-6001
Website: dfphoto.net
17. What Future Trends Will Affect Photo Transfer?
As technology advances, the methods and tools for transferring photos will continue to evolve. Keep an eye on these emerging trends:
- 5G and Wi-Fi 6: Faster wireless speeds will make cloud-based photo transfer methods more efficient and reliable.
- Improved Cloud Integration: Seamless integration between devices and cloud services will simplify the photo transfer process.
- AI-Powered Photo Management: Artificial intelligence will play a larger role in organizing, editing, and managing photo libraries.
- Enhanced Security Measures: Advanced security protocols will protect your photos from unauthorized access and data breaches.
18. FAQs About Transferring Photos From Pixel To Computer
18.1. How do I transfer photos from my Google Pixel to my computer using a USB cable?
Connect your Pixel to your computer using a USB cable, select “File Transfer” or “MTP” mode on your phone, then access your phone’s storage from your computer’s file explorer and copy the photos.
18.2. Can I transfer photos from my Google Pixel to my computer wirelessly?
Yes, you can use Google Photos, Google Drive, or other cloud storage services to transfer photos wirelessly.
18.3. How do I use Google Photos to transfer photos from my Pixel to my computer?
Enable “Backup & Sync” in the Google Photos app on your Pixel, then access Google Photos on your computer’s web browser and download the photos.
18.4. What is the best way to transfer large video files from my Google Pixel to my computer?
Using a USB cable is generally the fastest and most reliable way to transfer large video files.
18.5. Why is my computer not recognizing my Google Pixel when I connect it with a USB cable?
Ensure the USB cable is properly connected, try a different USB port, update your computer’s USB drivers, and select “File Transfer” or “MTP” mode on your phone.
18.6. How do I transfer photos from my Google Pixel to my Mac computer?
The process is the same as transferring to a Windows computer. Use a USB cable and select “File Transfer” mode, then access your phone’s storage from Finder on your Mac. You may need to install Android File Transfer software.
18.7. Is it safe to use third-party apps to transfer photos from my Google Pixel to my computer?
Use reputable third-party apps from trusted developers to ensure your data is protected. Check reviews and permissions before installing any app.
18.8. How do I delete photos from my Google Pixel after transferring them to my computer?
After verifying that the photos have been successfully transferred and backed up, you can delete them from your Pixel through the Gallery app or Google Photos app.
18.9. What should I do if my photo transfer is interrupted and some files are corrupted?
Try transferring the photos again using a reliable method. Check the integrity of your storage media and ensure your USB cable is not damaged.
18.10. How much free storage do I get with Google Photos, and what happens when I run out?
Google Photos offers 15 GB of free storage, shared across Google Drive and Gmail. When you run out of storage, you can purchase additional storage through a Google One subscription.