Editing videos in Photos can be a game-changer, whether you are a budding photographer or a seasoned visual artist. At dfphoto.net, we help you unlock the full potential of video editing with your Photos app, transforming your raw footage into captivating stories. Elevate your video editing skills with dfphoto.net and create stunning visual content that leaves a lasting impact. Dive in to explore the art of video editing, enhance your storytelling abilities, and produce professional-quality videos effortlessly with video trimming techniques.
1. What Are The Basic Video Editing Steps In Photos?
The basic video editing steps in Photos involve trimming, filtering, adjusting playback speed, customizing slo-mo sections, and editing audio mix. These tools allow you to refine your videos directly from your device. Let’s explore each of these functionalities within the Photos app:
1.1. Trimming Your Video
Have a video that’s too long or contains unnecessary footage? Trimming allows you to shorten your video by adjusting the start and stop times, making it perfect for sharing specific moments. This is useful for creating concise, engaging content.
1.1.1. How to Trim a Video on Your iPhone or iPad
- Open the Photos app and select the video you want to edit.
- Tap the Edit button.
- Adjust the sliders on both sides of the video timeline to modify the start and stop times. Preview your changes by tapping the Play button.
- Tap Done, then choose Save Video to replace the original with the trimmed version or Save Video as New Clip to keep the original and save the trimmed version as a new file.
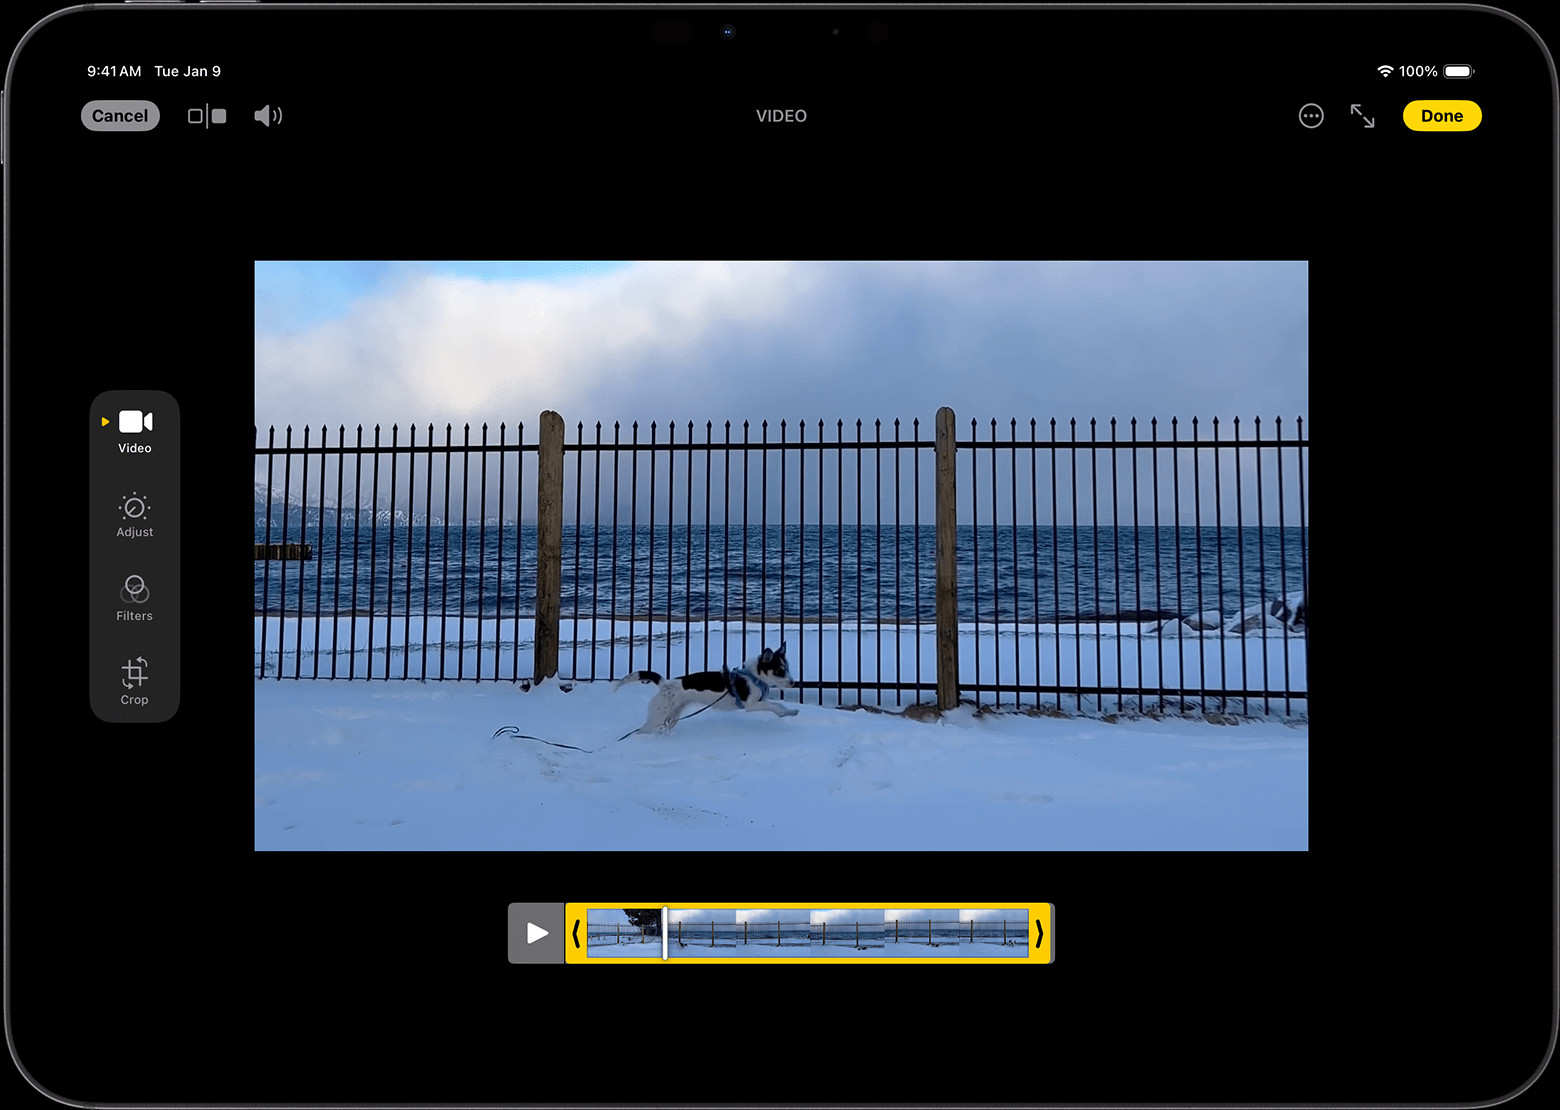 iPad showing a video in edit mode with trim sliders, perfect for learning how to edit a video in photos.
1.1.2. How to Trim a Video on Your Mac
- Open the Photos app and double-click the video to edit.
- Click Edit.
- Drag the sliders on the video timeline to set the new start and stop times. Click the Play button to preview.
- Click Done, then choose Save Video or Save Video as New Clip.
1.1.3. How to Trim a Video on Your Apple Vision Pro
- Open the Photos app and tap the video you want to edit.
- Tap the More button, then tap Trim.
- Move the sliders on the video timeline to adjust the start and stop times. Preview by tapping the Play button.
- Tap Done, then choose Save Video or Save Video as New Clip.
1.1.4. How to Undo a Trim
- On iPhone or iPad: Open the trimmed video, tap Edit, then tap Revert and Revert to Original.
- On Mac: Open the trimmed video, click Edit, then click Revert to Original, or manually adjust the sliders back to the original positions and click Done.
- On Vision Pro: Open the trimmed video, click Edit, adjust the sliders back to the original positions, then click Done.
1.2. Adding a Filter and Rotating Your Videos
Filters can significantly enhance the mood and style of your video, while rotation corrects the orientation. These adjustments can transform a simple clip into a visually appealing piece.
1.2.1. Steps to Add a Filter and Rotate
- Open the video in the Photos app and tap Edit.
- Select from various filters to apply different visual styles.
- Use the rotate tool to correct the video’s orientation.
- If you’re not satisfied with your changes, tap Cancel to revert to the original.
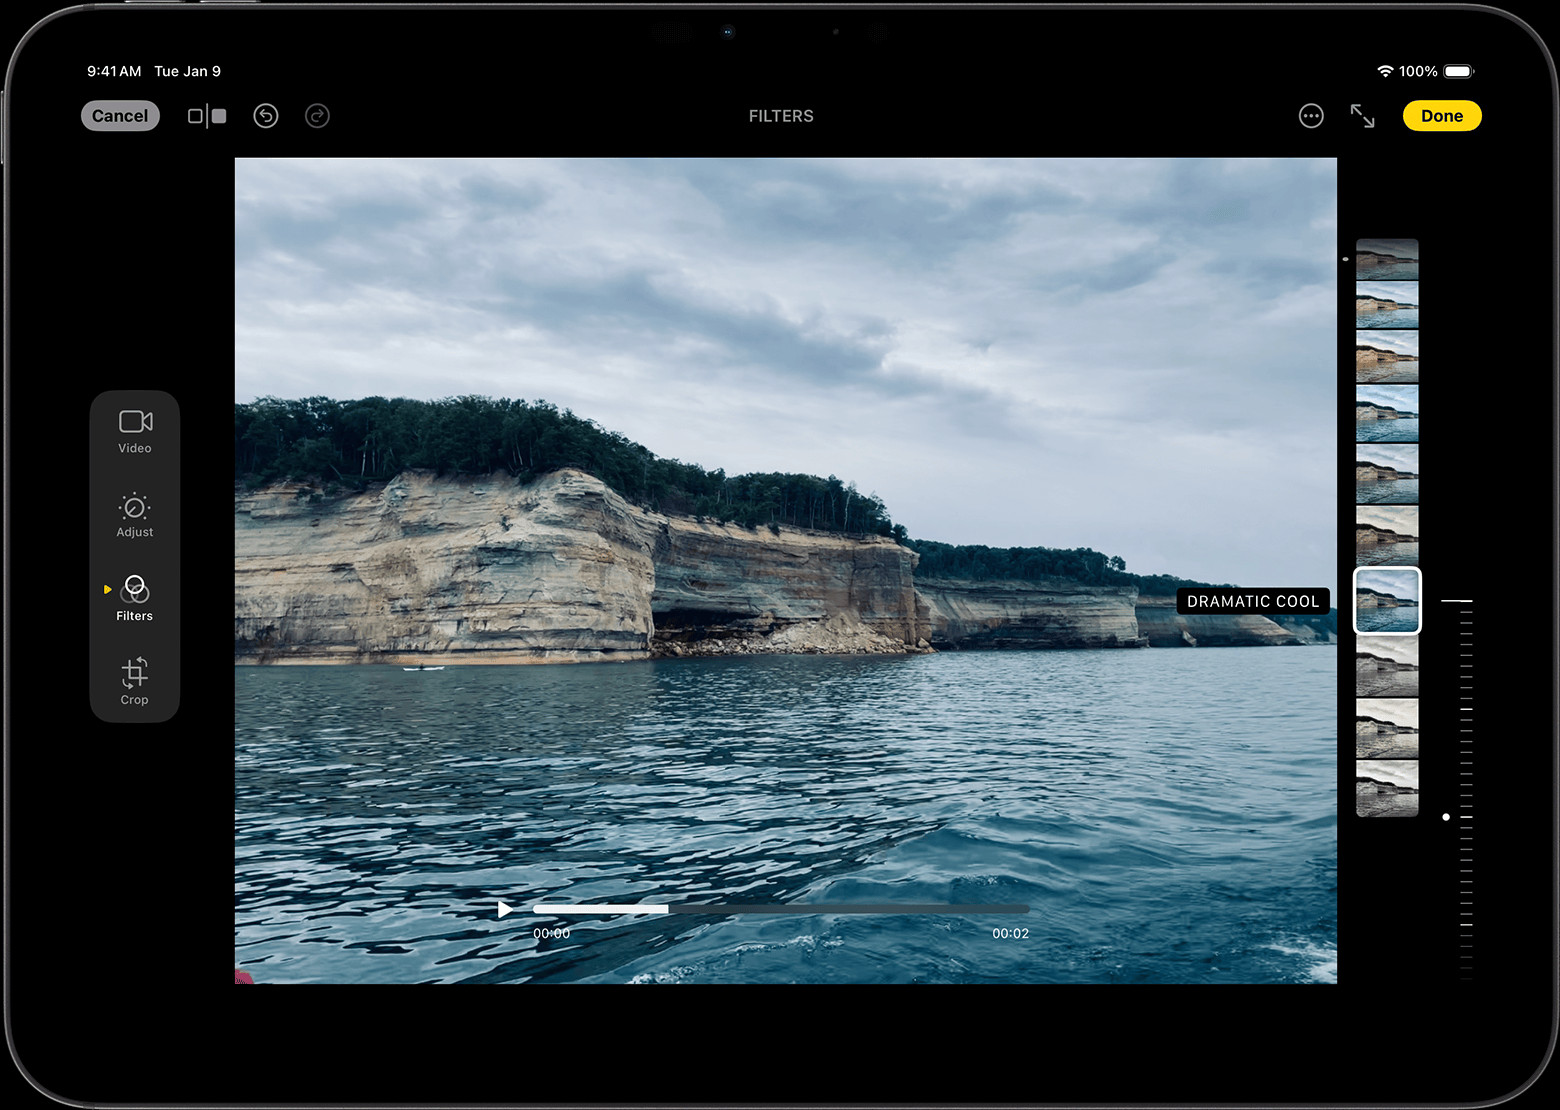 iPad showing a video with a filter being applied, demonstrating how to edit a video in photos.
1.2.2. On Mac
Open the video in the Photos app, click Edit, and use the filter and rotate options. If needed, click Revert to Original or Reset Adjustments to undo changes.
1.3. Adjusting the Video Playback Speed
Slowing down or speeding up your video can create dramatic or comedic effects. This is particularly useful for highlighting key moments or creating time-lapse videos.
1.3.1. How to Adjust Playback Speed
If your video is captured at a frame rate higher than 30FPS, you can slow down the video for a dramatic effect in iOS 18, iPadOS 18, and macOS Sequoia.
- Open the Photos app.
- Open a video, then tap or click the Edit button.
- Tap or click the Speed control button, then tap or click a playback speed.
1.4. Customizing Your Slo-Mo Video or Section
Highlight specific moments by slowing them down. This feature is ideal for emphasizing details that might be missed at regular speed.
1.4.1. Steps to Customize Slo-Mo
- In Photos, open the slo-mo video and tap Edit.
- Use the vertical white lines in the video timeline to select the portion you want to play in slow motion.
- Adjust the lines to define when the slo-mo effect begins and ends.
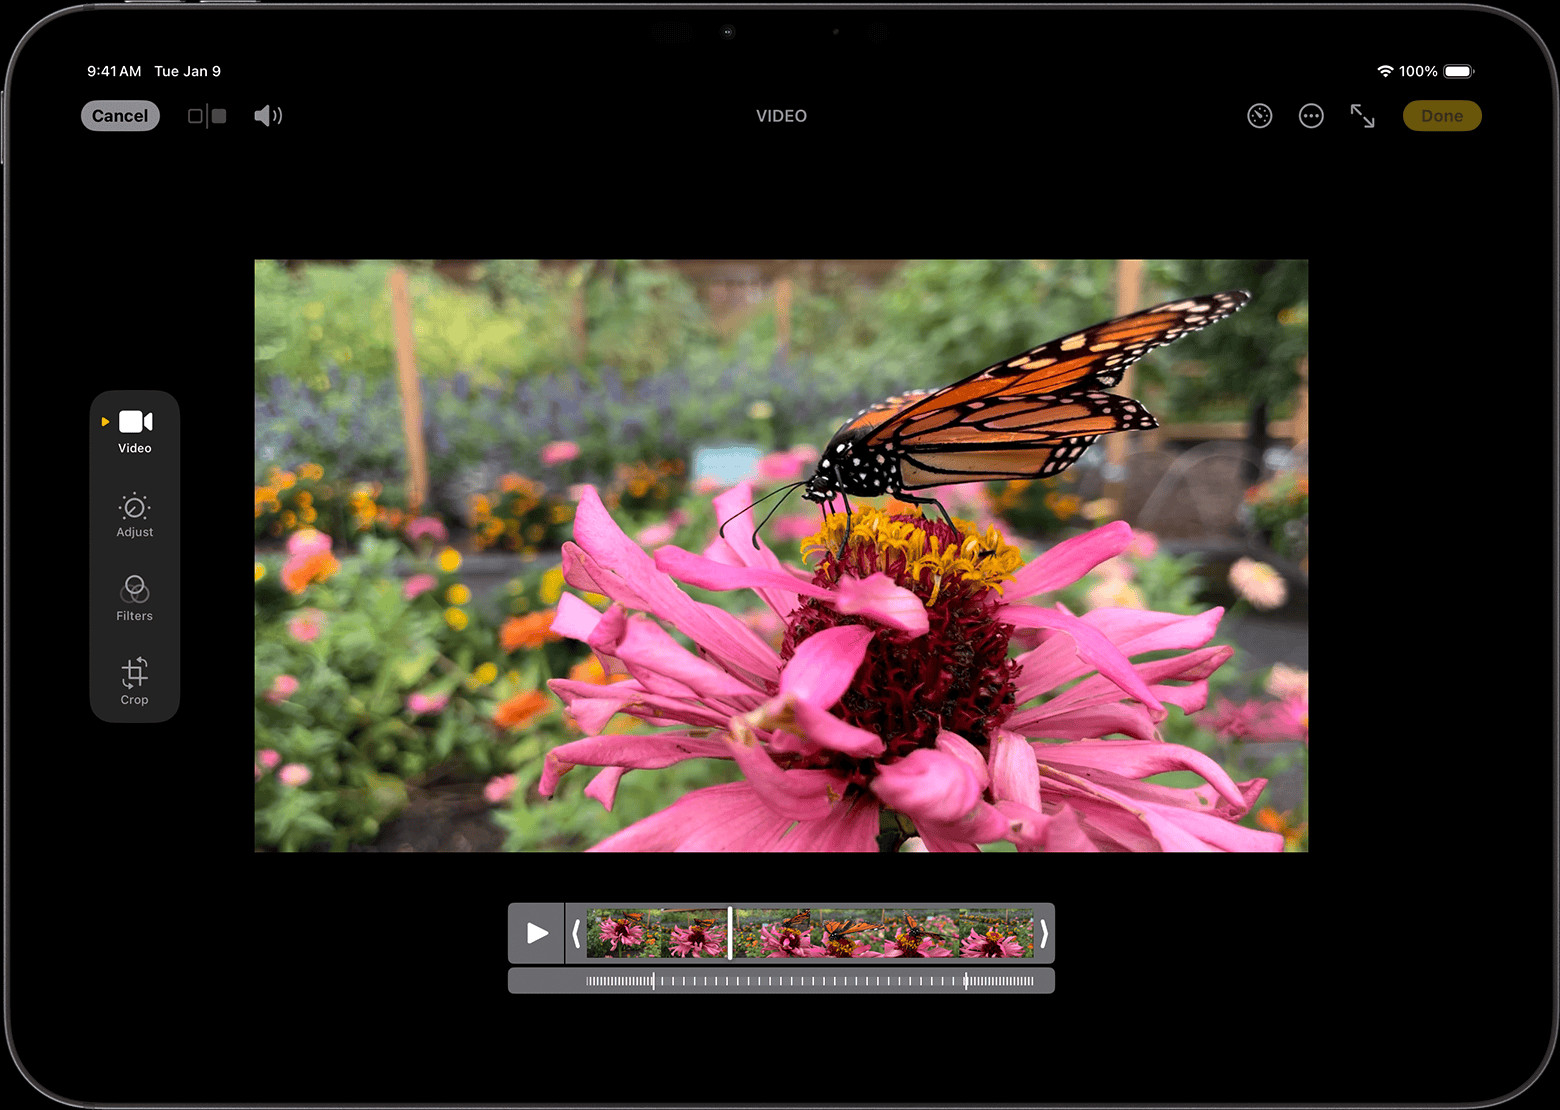 iPad showing a video being edited in slo-mo mode, a key technique in how to edit a video in photos.
1.5. Editing Audio Mix
Enhance the audio quality of your videos by focusing on voices, reducing background noise, and creating a studio-like sound. This feature is available on iPhone 16 models with Spatial Audio.
1.5.1. How to Edit Audio Mix on Your iPhone or iPad
- Open the Photos app.
- Select a video and tap Edit.
- Tap Audio Mix and choose from the following options:
- Standard: Play the original audio.
- In-Frame: Reduce sounds from sources not visible in the video.
- Studio: Reduce background sounds and reverb.
- Cinematic: Focus voices on a front-facing track while leaving environmental noises in surround.
- Adjust the intensity slider to control the effect and background noise levels.
- Tap Done.
2. What Are Some Advanced Editing Techniques in Photos?
Some advanced editing techniques in Photos involve using third-party apps, adjusting lighting and color, and applying creative effects. These methods provide a higher level of customization and can significantly enhance the final product. Let’s explore these advanced techniques in detail:
2.1. Using Third-Party Apps
Third-party apps can extend the capabilities of the Photos app, offering more advanced editing options and specialized tools. These apps often include features not available in the built-in editor.
2.1.1. Benefits of Third-Party Apps
- Advanced Features: Access tools like multi-track editing, motion graphics, and advanced color correction.
- Specialized Effects: Add unique visual effects and transitions.
- Professional Results: Achieve a polished, professional look that rivals desktop editing software.
2.1.2. Popular Third-Party Apps
- iMovie: A free, user-friendly app with powerful editing capabilities.
- LumaFusion: A professional-grade video editing app with advanced features.
- InShot: A versatile app for creating social media-ready videos.
2.2. Adjusting Lighting and Color
Fine-tuning the lighting and color can dramatically improve the visual appeal of your videos, correcting issues and enhancing the overall aesthetic.
2.2.1. Steps to Adjust Lighting and Color
- Open the video in the Photos app and tap Edit.
- Use the adjustment tools to modify:
- Exposure: Adjust the overall brightness.
- Contrast: Modify the difference between light and dark areas.
- Highlights: Adjust the brightness of the brightest areas.
- Shadows: Adjust the brightness of the darkest areas.
- Saturation: Control the intensity of the colors.
- Warmth: Adjust the color temperature for a warmer or cooler look.
- Make subtle adjustments to achieve a natural and balanced look.
2.2.2. Tips for Effective Adjustments
- Start with Exposure: Correct the overall brightness before making other adjustments.
- Use Contrast Sparingly: Too much contrast can make the video look unnatural.
- Pay Attention to Skin Tones: Ensure skin tones look natural and healthy.
- Use Before and After: Compare the edited version to the original to see the impact of your changes.
2.3. Applying Creative Effects
Creative effects can add a unique touch to your videos, making them stand out and capturing the viewer’s attention.
2.3.1. Types of Creative Effects
- Filters: Apply pre-set color and style adjustments.
- Overlays: Add textures, light leaks, and other visual elements.
- Text and Graphics: Incorporate text, titles, and graphics to convey information or add visual interest.
- Transitions: Use creative transitions between clips to create a seamless and engaging viewing experience.
2.3.2. How to Apply Effects
- Use third-party apps like InShot or iMovie to access a wide range of effects.
- Experiment with different effects to find the ones that best suit your video’s style and message.
- Adjust the intensity and settings of each effect to customize the look.
3. Can I Edit Videos in Photos on Different Apple Devices?
Yes, you can edit videos in Photos on different Apple devices, including iPhones, iPads, Macs, and Apple Vision Pro. The Photos app provides a consistent editing experience across these devices, allowing you to start a project on one device and continue on another. This cross-device compatibility is a significant advantage for users who work on multiple devices.
3.1. Editing on iPhone and iPad
The Photos app on iPhone and iPad offers a streamlined and intuitive editing experience. The touch-based interface makes it easy to trim videos, apply filters, adjust colors, and more.
3.1.1. Key Features on iPhone and iPad
- Touch-Based Interface: Easily adjust sliders, tap to select options, and use gestures to zoom and pan.
- Real-Time Preview: See changes in real-time as you edit.
- Quick Sharing: Share your edited videos directly to social media or messaging apps.
3.1.2. Tips for Editing on iPhone and iPad
- Use Headphones: For accurate audio editing, use headphones to hear subtle details.
- Take Advantage of the Larger Screen: On iPad, the larger screen provides a more comfortable editing experience.
- Use Apple Pencil: On iPad Pro, the Apple Pencil offers precise control for detailed edits.
3.2. Editing on Mac
The Photos app on Mac provides a more robust editing environment with a larger screen and more precise controls. The desktop interface is ideal for longer and more complex projects.
3.2.1. Key Features on Mac
- Larger Screen: Provides more space for viewing and editing.
- Keyboard and Mouse Support: Offers precise control for detailed edits.
- Advanced Editing Tools: Access more advanced features like color grading and noise reduction.
3.2.2. Tips for Editing on Mac
- Use Keyboard Shortcuts: Learn keyboard shortcuts to speed up your workflow.
- Connect an External Monitor: For even more screen real estate, connect an external monitor.
- Back Up Your Projects: Regularly back up your projects to avoid losing your work.
3.3. Editing on Apple Vision Pro
The Photos app on Apple Vision Pro offers a unique editing experience with its immersive, spatial interface. Edit videos in a virtual environment, taking advantage of the device’s advanced display and tracking capabilities.
3.3.1. Key Features on Apple Vision Pro
- Spatial Interface: Edit videos in a three-dimensional environment.
- Hand and Eye Tracking: Use intuitive hand gestures and eye tracking to control the editing process.
- Immersive Viewing: View your videos on a large, high-resolution display.
3.3.2. Tips for Editing on Apple Vision Pro
- Calibrate Your Device: Ensure accurate tracking by calibrating the device before editing.
- Use a Comfortable Environment: Edit in a well-lit and comfortable space to reduce eye strain.
- Experiment with Gestures: Practice using hand gestures to become more efficient at editing.
3.4. Cross-Device Compatibility
One of the biggest advantages of using the Photos app is its seamless cross-device compatibility. Start editing a video on your iPhone, continue on your iPad, and finish on your Mac, all without losing progress.
3.4.1. How to Use Cross-Device Compatibility
- Enable iCloud Photos: Ensure iCloud Photos is enabled on all your devices.
- Start Editing: Begin editing a video on one device.
- Switch Devices: Open the Photos app on another device, and the video will be synced with your edits.
- Continue Editing: Pick up where you left off and continue editing.
3.4.2. Benefits of Cross-Device Compatibility
- Flexibility: Edit videos anytime, anywhere, using the device that’s most convenient.
- Efficiency: Seamlessly transition between devices without losing progress.
- Consistency: Maintain a consistent editing experience across all your devices.
4. What Are The Best Practices For Video Editing in Photos?
The best practices for video editing in Photos include organizing your footage, making small adjustments, and backing up your projects. These habits ensure efficiency, quality, and security in your video editing workflow. Here are some detailed best practices to follow:
4.1. Organize Your Footage
Keeping your video footage organized is crucial for efficient editing. A well-organized library makes it easier to find the clips you need and streamlines the editing process.
4.1.1. Creating a System
- Use Albums: Create albums in the Photos app to group related videos. For example, create albums for specific projects, events, or themes.
- Naming Conventions: Use clear and consistent naming conventions for your video files. Include dates, locations, and descriptions in the file names.
- Tagging: Use tags to categorize your videos and make them easier to search. Tag videos by subject, location, people, and keywords.
4.1.2. Benefits of Organization
- Time Savings: Quickly find the clips you need without wasting time searching.
- Efficiency: Streamline your editing workflow by having all your assets readily available.
- Clarity: Maintain a clear overview of your video library.
4.2. Make Small Adjustments
When editing videos in Photos, it’s best to make small, incremental adjustments rather than large, sweeping changes. This approach allows you to fine-tune your edits and achieve a natural and polished look.
4.2.1. Why Small Adjustments Matter
- Precision: Small adjustments provide more precise control over the final result.
- Natural Look: Avoid over-editing by making subtle changes that enhance rather than distort the video.
- Flexibility: It’s easier to undo small adjustments if you’re not happy with the result.
4.2.2. Tips for Making Small Adjustments
- Adjust Incrementally: Increase or decrease settings in small increments.
- Use the Preview: Constantly preview your changes to see how they affect the video.
- Compare to the Original: Regularly compare the edited version to the original to ensure you’re not over-editing.
4.3. Back Up Your Projects
Backing up your video projects is essential to protect your work from data loss. Regularly back up your projects to avoid losing your hard work.
4.3.1. Backup Methods
- iCloud Photos: Use iCloud Photos to automatically back up your videos to the cloud.
- External Hard Drive: Manually back up your videos to an external hard drive.
- Cloud Storage Services: Use cloud storage services like Google Drive or Dropbox to back up your videos.
4.3.2. Backup Schedule
- Regular Backups: Back up your videos regularly, ideally daily or weekly.
- Before Major Edits: Back up your videos before making any major edits or changes.
- Multiple Backups: Keep multiple backups in different locations to protect against data loss from various sources.
4.4. Use High-Quality Source Material
The quality of your final video is heavily influenced by the quality of your source material. Start with high-quality video footage to ensure the best possible results.
4.4.1. Shooting Tips
- Use Good Lighting: Shoot in well-lit environments to avoid grainy or dark footage.
- Stable Shots: Use a tripod or stabilizer to keep your shots steady.
- High Resolution: Shoot in the highest resolution possible to capture more detail.
4.4.2. Benefits of High-Quality Footage
- Better Results: High-quality footage looks better when edited and shared.
- More Flexibility: High-resolution footage provides more flexibility for cropping and zooming.
- Professional Look: Starting with high-quality footage gives your videos a more professional look.
4.5. Keep Your Software Updated
Keep your Photos app and operating system updated to ensure you have access to the latest features, bug fixes, and performance improvements.
4.5.1. How to Update
- Automatic Updates: Enable automatic updates in your device settings to keep your software up to date.
- Manual Updates: Manually check for updates in the App Store or System Preferences.
4.5.2. Benefits of Keeping Software Updated
- Latest Features: Access new editing tools and capabilities.
- Bug Fixes: Resolve issues and improve performance.
- Security: Protect your device from security vulnerabilities.
5. What Are Common Mistakes To Avoid While Editing Videos in Photos?
Common mistakes to avoid while editing videos in Photos include over-editing, neglecting audio, and ignoring aspect ratios. Avoiding these pitfalls can significantly improve the quality of your videos. Let’s explore these common mistakes and how to prevent them:
5.1. Over-Editing
One of the most common mistakes in video editing is over-editing, which can make your videos look unnatural and unprofessional. It’s important to strike a balance and avoid excessive adjustments.
5.1.1. Signs of Over-Editing
- Unnatural Colors: Colors that are too saturated or unrealistic.
- Excessive Sharpening: Images that look overly sharp and artificial.
- Overuse of Effects: Too many effects that distract from the video.
5.1.2. How to Avoid Over-Editing
- Subtle Adjustments: Make small, incremental adjustments rather than large changes.
- Natural Look: Aim for a natural and realistic look.
- Less is More: Sometimes, less editing is better.
5.2. Neglecting Audio
Audio is just as important as video, and neglecting it can significantly detract from the overall viewing experience. Poor audio quality can make your videos difficult to watch.
5.2.1. Common Audio Issues
- Low Volume: Audio that is too quiet to hear clearly.
- Background Noise: Distracting sounds that interfere with the main audio.
- Poor Quality: Muffled or distorted audio.
5.2.2. How to Improve Audio Quality
- Use a Microphone: Use an external microphone for better audio quality.
- Reduce Noise: Record in a quiet environment or use noise reduction tools.
- Adjust Volume: Adjust the volume levels to ensure clear and consistent audio.
5.3. Ignoring Aspect Ratios
Ignoring aspect ratios can result in videos that are cropped incorrectly or have black bars on the sides. It’s important to use the correct aspect ratio for your intended platform.
5.3.1. Common Aspect Ratios
- 16:9: The standard aspect ratio for most video platforms.
- 9:16: The aspect ratio for vertical videos, popular on social media.
- 1:1: The square aspect ratio, often used on Instagram.
5.3.2. How to Use the Correct Aspect Ratio
- Check Platform Requirements: Check the recommended aspect ratio for the platform you’re using.
- Crop Appropriately: Crop your video to fit the correct aspect ratio.
- Avoid Stretching: Avoid stretching the video, which can distort the image.
5.4. Using Too Many Transitions
While transitions can add visual interest to your videos, using too many can be distracting and overwhelming. It’s best to use transitions sparingly and strategically.
5.4.1. Types of Transitions
- Cut: An immediate transition from one clip to another.
- Fade: A gradual transition from one clip to another.
- Dissolve: A transition where one clip fades into the next.
5.4.2. How to Use Transitions Effectively
- Use Sparingly: Use transitions only when necessary.
- Choose Appropriate Transitions: Choose transitions that fit the style and tone of your video.
- Avoid Overuse: Avoid using too many different types of transitions.
5.5. Neglecting Color Correction
Neglecting color correction can result in videos that look dull, washed out, or inconsistent. Correcting the colors can significantly improve the visual appeal of your videos.
5.5.1. Common Color Issues
- Dull Colors: Colors that lack vibrancy.
- Inconsistent Colors: Colors that vary from clip to clip.
- Incorrect White Balance: Colors that look too warm or too cool.
5.5.2. How to Correct Colors
- Adjust Exposure: Adjust the overall brightness of the video.
- Adjust Contrast: Adjust the difference between light and dark areas.
- Adjust White Balance: Adjust the color temperature to achieve a natural look.
6. What Are Some Creative Video Editing Ideas For Photos App?
Some creative video editing ideas for the Photos app include creating a travel montage, a time-lapse video, or a before-and-after transformation. These projects can showcase your creativity and editing skills. Let’s explore these creative ideas in detail:
6.1. Travel Montage
A travel montage is a great way to showcase your adventures and create a memorable video that captures the essence of your trip.
6.1.1. How to Create a Travel Montage
- Gather Your Footage: Collect all the video clips from your trip.
- Select Highlights: Choose the best moments and highlights.
- Trim Your Clips: Trim your clips to the essential parts.
- Arrange Your Clips: Arrange your clips in a logical order.
- Add Music: Add a soundtrack that matches the tone of your video.
- Add Transitions: Use transitions to create smooth transitions between clips.
6.1.2. Tips for a Great Travel Montage
- Variety: Include a variety of shots, such as landscapes, close-ups, and action shots.
- Pacing: Vary the pace of your video to keep it engaging.
- Storytelling: Tell a story with your video by arranging the clips in a narrative order.
6.2. Time-Lapse Video
A time-lapse video is a great way to showcase a process or event that unfolds over time, such as a sunset, a flower blooming, or a construction project.
6.2.1. How to Create a Time-Lapse Video
- Capture Your Footage: Capture a series of photos or videos over a period of time.
- Import Your Footage: Import your footage into the Photos app.
- Adjust the Speed: Adjust the playback speed to create the time-lapse effect.
- Add Music: Add a soundtrack that matches the tone of your video.
6.2.2. Tips for a Great Time-Lapse Video
- Stable Shots: Use a tripod to keep your shots steady.
- Consistent Intervals: Capture photos at consistent intervals.
- Long Duration: Capture footage over a long enough duration to create a noticeable time-lapse effect.
6.3. Before-and-After Transformation
A before-and-after transformation video is a great way to showcase a change or improvement, such as a home renovation, a fitness journey, or a beauty transformation.
6.3.1. How to Create a Before-and-After Transformation Video
- Gather Your Footage: Collect before-and-after photos or videos.
- Arrange Your Footage: Arrange your footage in a before-and-after order.
- Add Text: Add text to highlight the changes.
- Add Music: Add a soundtrack that matches the tone of your video.
6.3.2. Tips for a Great Before-and-After Transformation Video
- Clear Comparison: Make the before-and-after comparison clear and easy to see.
- Highlight the Changes: Use text or graphics to highlight the specific changes.
- Tell a Story: Tell a story about the transformation.
6.4. Music Video
Create a music video for your favorite song using clips from your video library. This is a fun and creative way to express your style and showcase your editing skills.
6.4.1. How to Create a Music Video
- Choose a Song: Select a song that you love.
- Gather Your Footage: Collect video clips that match the tone and style of the song.
- Sync Your Clips: Sync your clips to the beat of the music.
- Add Effects: Add effects to enhance the visual appeal of the video.
6.4.2. Tips for a Great Music Video
- Sync to the Beat: Sync your clips to the beat of the music to create a dynamic and engaging video.
- Match the Tone: Choose clips that match the tone and style of the song.
- Creative Effects: Use creative effects to enhance the visual appeal of the video.
6.5. Short Film
Create a short film using clips from your video library. This is a great way to tell a story and showcase your editing skills.
6.5.1. How to Create a Short Film
- Write a Script: Write a short script or outline for your film.
- Gather Your Footage: Collect video clips that match your script.
- Arrange Your Clips: Arrange your clips in a logical order.
- Add Music: Add a soundtrack that matches the tone of your film.
- Add Effects: Add effects to enhance the visual appeal of the film.
6.5.2. Tips for a Great Short Film
- Tell a Story: Tell a compelling story with your film.
- Compelling Characters: Create compelling characters that the audience can connect with.
- Visual Appeal: Use visual elements to enhance the storytelling.
7. How Can Dfphoto.Net Help Improve My Video Editing Skills In Photos?
Dfphoto.net is your go-to resource for mastering video editing in Photos, offering comprehensive tutorials, expert tips, and a supportive community. Enhance your skills and create stunning videos with our expert guidance. For personalized support, reach out to us at Address: 1600 St Michael’s Dr, Santa Fe, NM 87505, United States, Phone: +1 (505) 471-6001, or visit our Website: dfphoto.net.
7.1. Comprehensive Tutorials
Dfphoto.net provides a wide range of tutorials that cover everything from basic video editing techniques to advanced creative effects.
7.1.1. What Our Tutorials Cover
- Basic Editing Techniques: Learn how to trim videos, adjust colors, and add transitions.
- Advanced Editing Techniques: Discover how to use third-party apps, create special effects, and enhance audio quality.
- Creative Projects: Follow step-by-step guides to create travel montages, time-lapse videos, and more.
7.1.2. Benefits of Our Tutorials
- Easy to Follow: Our tutorials are designed to be easy to understand, even for beginners.
- Step-by-Step Instructions: Each tutorial provides clear, step-by-step instructions.
- Visual Examples: Our tutorials include visual examples to help you see the techniques in action.
7.2. Expert Tips
Get expert tips and advice from experienced video editors to take your skills to the next level.
7.2.1. What Our Expert Tips Cover
- Best Practices: Learn the best practices for video editing, such as organizing your footage and backing up your projects.
- Common Mistakes: Find out how to avoid common mistakes, such as over-editing and neglecting audio.
- Creative Ideas: Get inspiration for creative video editing projects.
7.2.2. Benefits of Our Expert Tips
- Practical Advice: Our expert tips are based on real-world experience.
- Actionable Steps: Each tip provides actionable steps that you can implement immediately.
- Time-Saving Strategies: Learn time-saving strategies that can help you edit videos more efficiently.
7.3. Supportive Community
Join our supportive community of video editors to share your work, get feedback, and connect with other creatives.
7.3.1. What Our Community Offers
- Feedback: Get feedback on your videos from other editors.
- Inspiration: Find inspiration from the work of other editors.
- Networking: Connect with other creatives and build your professional network.
7.3.2. Benefits of Our Community
- Constructive Criticism: Receive constructive criticism that can help you improve your skills.
- New Ideas: Discover new ideas and techniques from other editors.
- Motivation: Stay motivated by connecting with other creatives.
7.4. Personalized Support
Get personalized support from our team of experts to help you overcome challenges and achieve your video editing goals.
7.4.1. How to Get Personalized Support
- Contact Us: Contact us via email or phone to get answers to your questions.
- Schedule a Consultation: Schedule a one-on-one consultation with one of our experts.
- Join Our Workshops: Attend our workshops to get hands-on training.
7.4.2. Benefits of Personalized Support
- Customized Solutions: Get customized solutions to your specific challenges.
- Expert Guidance: Receive expert guidance from experienced video editors.
- Faster Progress: Make faster progress by getting the help you need.
7.5. Showcase Your Work
Showcase your videos on dfphoto.net to get exposure and build your portfolio.
7.5.1. How to Showcase Your Work
- Submit Your Videos: Submit your videos to be featured on our website.
- Share on Social Media: Share your videos on social media and tag dfphoto.net.
- Participate in Contests: Participate in our video editing contests to win prizes and recognition.
7.5.2. Benefits of Showcasing Your Work
- Exposure: Get exposure to a wide audience of video editors and enthusiasts.
- Portfolio Building: Build your portfolio and showcase your skills to potential clients.
- Recognition: Get recognition for your creative work.
8. What Are The Latest Trends In Video Editing That I Should Know?
Staying updated with the latest trends in video editing is crucial for creating content that resonates with audiences and remains relevant. Here are some of the latest trends you should be aware of:
8.1. Vertical Video
Vertical video, with its 9:16 aspect ratio, has become increasingly popular due to the rise of mobile devices and platforms like TikTok, Instagram Reels, and YouTube Shorts.
8.1.1. Key Aspects of Vertical Video
- Mobile-First Approach: Designed to be viewed on smartphones without rotating the device.
- Engaging Content: Short, attention-grabbing clips optimized for quick consumption.
- Platform-Specific: Tailored for social media platforms with vertical video feeds.
8.1.2. Tips for Creating Effective Vertical Videos
- Optimize for Mobile: Ensure text and graphics are easy to read on small screens.
- Quick Pacing: Keep the video fast-paced to maintain viewer attention.
- Use Subtitles: Add subtitles to cater to viewers who watch videos on mute.
8.2. Short-Form Video
Short-form video content, typically ranging from a few seconds to a few minutes, is ideal for capturing attention quickly and delivering concise messages.
8.2.1. Characteristics of Short-Form Video
- Concise Messaging: Delivers information or entertainment in a brief format.
- High Engagement: Designed to be highly engaging and shareable.
- Versatile Use: Used for tutorials, promotions, vlogs, and more.
8.2.2. Strategies for Creating Compelling Short-Form Videos
- Clear Hook: Start with a captivating hook to grab viewer attention.
- Direct and Concise: Get straight to the point and avoid unnecessary details.
- Strong Call to Action: Include a clear call to action to encourage engagement.
8.3. Live Streaming
Live streaming has gained significant traction, allowing creators to connect with their audience in real-time and foster a sense of community.
8.3.1. Advantages of Live Streaming
- Real-Time Interaction: Enables direct communication with viewers through comments and questions.
- Authenticity: Provides a raw and unedited view, enhancing authenticity.
- Community Building: Fosters a sense of community among viewers and creators.
8.3.2. Tips for Successful Live Streams
- Plan Your Content: Outline the topics and activities for your live stream.
- Engage with Viewers: Respond to comments and questions in real-time.
- Promote Your Stream: Promote your live stream in advance to attract viewers.
8.4. User-Generated Content (UGC)
User-generated content (UGC) involves incorporating videos created by your audience into your brand’s content strategy.
8.4.1. Benefits of Using UGC
- Authenticity: Provides genuine and relatable content.
- Community Engagement: Encourages audience participation and loyalty.
- Cost-Effective: Reduces the need for expensive professional video production.
8.4.2. How to Incorporate UGC
- Run Contests: Encourage users to submit videos by offering incentives.
- Feature Submissions: Showcase user-generated videos on your social media channels.
- Ask for Permission: Always ask for permission before using someone else’s content.
8.5. Interactive Video
Interactive video allows viewers to engage with the content through clickable elements, quizzes, polls, and more.
8.5.1. Features of Interactive Video
- Clickable Hotspots: Allows viewers to click on specific areas of the video.
- Quizzes and Polls: Enables viewers to answer questions and participate in polls.
- Branching Narratives: Offers viewers different paths to explore based on their choices.