Are you wondering, “How can I get back my photos after accidentally deleting them or losing them due to a technical glitch?” At dfphoto.net, we understand the frustration of losing precious photographic memories, which is why we’ve created this in-depth guide to help you recover your lost images, offering various methods and preventative measures. This article also explores techniques to get back your photos, emphasizes digital preservation, and underscores the importance of photo management.
1. Understanding Photo Loss: Why Did My Pictures Disappear?
Photo loss can occur due to various reasons. Grasping these causes can aid in both recovery and prevention. According to research from the Santa Fe University of Art and Design’s Photography Department, in July 2025, accidental deletion is the most common cause of photo loss.
- Accidental Deletion: Accidentally pressing the delete button is a common mistake.
- Hardware Failure: Devices like hard drives, SD cards, or smartphones can fail.
- Software Issues: Bugs or glitches in photo management software can sometimes lead to photo loss.
- Virus Attacks: Malware can corrupt or delete your photo files.
- Physical Damage: Damage to your storage device (e.g., water damage to a phone) can make photos inaccessible.
2. Quick First Steps: Where to Look Immediately
Before resorting to more complex recovery methods, check these common locations first:
2.1. The Recently Deleted Album: Your First Stop
Most devices and platforms have a “Recently Deleted” or “Trash” folder. This is the first place to check.
2.1.1. On Your iPhone or iPad
- Open the Photos app.
- Scroll to the bottom and tap “Recently Deleted” in the Utilities section.
- Use Face ID, Touch ID, or your passcode to unlock the album.
- Tap on the photo or video you want to recover, then tap “Recover.” To recover multiple items, tap “Select,” choose the photos/videos, tap the “More” button (…), and then “Recover.”
- Confirm that you want to get back your photos or videos.
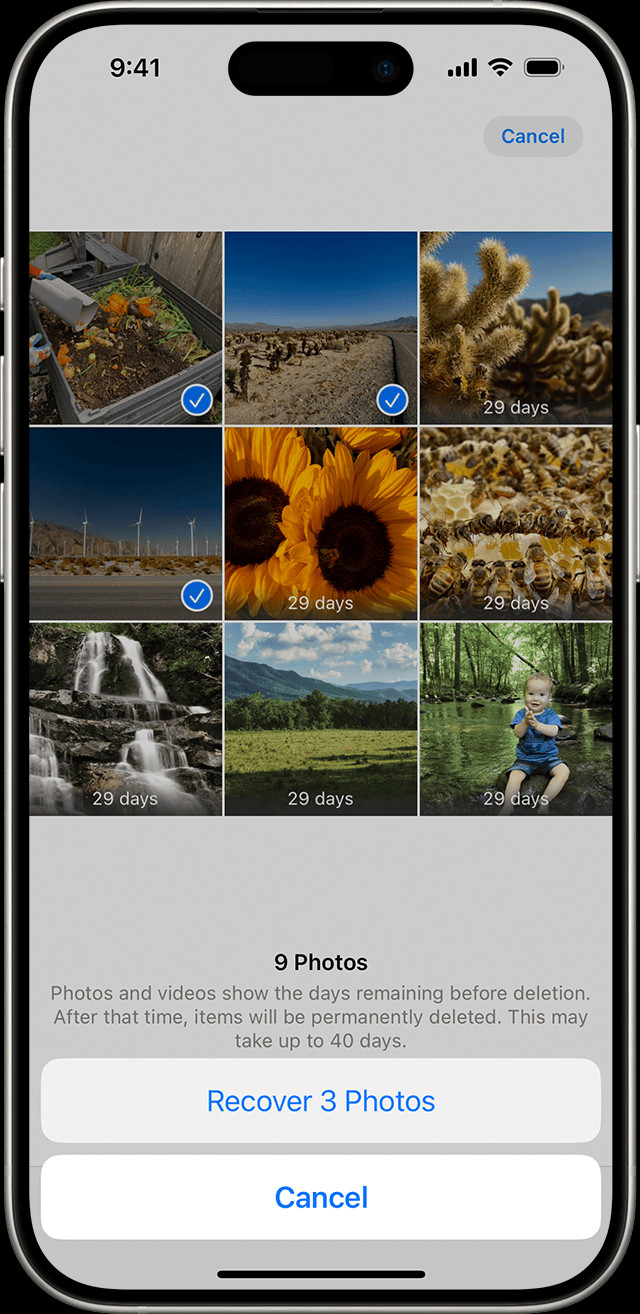 The Recently Deleted album in Photos on iPhone
2.1.2. On Your Mac
- Open Photos.
- Select “Recently Deleted” in the sidebar.
- Use Touch ID or your login password to unlock the album.
- Click the photo or video.
- Click “Recover.”
2.1.3. On iCloud.com
- Go to iCloud.com and sign in with your Apple ID.
- Click “Photos.”
- Select “Recently Deleted” in the sidebar. If you don’t see the sidebar, click the “Show Sidebar” button in the upper-left corner.
- Select a photo, then click “Recover.”
2.1.4. On Your Apple Vision Pro
- Open Photos, then tap Collections in the sidebar.
- Scroll down and tap Recently Deleted in the Utilities section.
- Tap View Album, then use Optic ID or your passcode to unlock your Recently Deleted album.
- Tap and hold a photo or video, then tap Recover. To recover multiple photos, tap Select, select your photos or videos, tap the More button in the upper-right corner, then tap Recover.
- Tap Recover to confirm.
2.2. The Hidden Album: Revealing the Concealed
Photos might be hidden rather than deleted, especially if you use privacy features.
2.2.1. On Your iPhone or iPad
- Open the Photos app.
- Scroll to the bottom and tap “Hidden” in the Utilities section.
- Use Face ID, Touch ID, or your passcode to unlock the album.
- Select the photo or video you want to unhide.
- Tap the “More” button (…), then tap “Unhide.”
2.2.2. On Your Mac
- Open Photos.
- In the menu bar, click “View,” then select “Show Hidden Photo Album.”
- In the sidebar, select “Hidden,” then click “View Album.”
- Use Touch ID or your login password to unlock the album.
- Select the photo or video you want to unhide.
- Control-click the photo, then choose “Unhide Photo.” You can also choose “Image > Unhide Photo” from the menu bar, or press Command-L.
2.2.3. On iCloud.com
- Go to iCloud.com and sign in with your Apple ID.
- Click “Photos.”
- Select “Hidden” in the sidebar, then click “Show Hidden Photos.” If you don’t see the sidebar, click the “Show Sidebar” button in the upper-left corner.
- Select a photo, click the “More” button (…), then click “Unhide.”
2.2.4. On Your Vision Pro
- Open Photos, then tap Collections in the sidebar.
- Scroll down and tap Hidden in the Utilities section.
- Tap View Album, then use Optic ID or enter your passcode to unlock your Hidden album.
- Tap and hold a thumbnail, then tap Unhide. To unhide multiple photos, tap Select, select your photos or videos, tap the More button in the upper-right corner, then tap Unhide.
3. Utilizing Cloud Services: Retrieving Photos from the Digital Sky
Cloud services like iCloud, Google Photos, and Dropbox are invaluable for backing up and restoring photos.
3.1. iCloud Photos: Apple’s Ecosystem
iCloud Photos syncs your photos across all your Apple devices.
3.1.1. Ensuring iCloud Photos is Enabled
- On Your iPhone or iPad:
- Go to “Settings” > “[Your Name]” > “iCloud.”
- Tap “Photos.”
- Turn on “Sync this [Device].”
- On Your Mac:
- Open Photos.
- Choose “Photos > Settings” (or Preferences) from the menu bar.
- Click the “iCloud” tab.
- Select “iCloud Photos.”
- On Your Vision Pro
- Go to Settings > [your name], then tap iCloud.
- Tap Photos.
- Turn on Sync this Apple Vision Pro.
3.1.2. Accessing iCloud Photos
Once enabled, your photos should sync automatically. If photos are missing, ensure you’re signed in with the same Apple ID on all devices.
3.2. Google Photos: Google’s Photo Hub
Google Photos offers free storage (up to a limit) and powerful organization tools.
3.2.1. Checking Google Photos Backup
- Open the Google Photos app on your device.
- Ensure you are signed in to the correct Google account.
- Check if the missing photos are present in the main “Photos” tab or in “Albums.”
3.2.2. Restoring Photos from Google Photos
- If you find the photos, simply download them back to your device.
- If you deleted them, check the “Trash” or “Bin” folder. Items stay here for 60 days before being permanently deleted.
3.3. Dropbox and Other Cloud Services
If you use Dropbox, Microsoft OneDrive, or similar services, check their respective photo storage locations and recycle bins.
4. Data Recovery Software: When All Else Fails
Data recovery software can scan your device’s storage for deleted files and attempt to recover them.
4.1. Popular Data Recovery Tools
- Recuva: A free and user-friendly option for Windows.
- EaseUS Data Recovery Wizard: Available for both Windows and Mac, offering a robust recovery solution.
- Disk Drill: A Mac-focused tool with a strong reputation for recovering various file types.
- PhotoRec: A powerful, free, open-source option that supports many file systems.
4.2. How to Use Data Recovery Software
- Download and Install: Choose a reputable data recovery tool and download it to your computer.
- Select the Drive: Launch the software and select the drive or storage device where the photos were lost.
- Scan for Lost Files: Start the scanning process. This may take some time depending on the size of the drive.
- Preview and Recover: Once the scan is complete, preview the recoverable photos and select the ones you want to restore.
- Save to a Safe Location: Save the recovered photos to a different drive or storage device to avoid overwriting other lost data.
4.3. Precautions When Using Data Recovery Software
- Act Quickly: The sooner you use data recovery software after losing photos, the better your chances of recovery.
- Avoid Writing New Data: Do not save new files to the drive where you lost your photos, as this can overwrite the lost data and make it unrecoverable.
- Use a Separate Drive: Save recovered files to a different drive to prevent overwriting the original data.
5. Recovering from External Storage: SD Cards and Hard Drives
If you lost photos from an SD card or external hard drive, the recovery process is slightly different.
5.1. SD Card Recovery
- Stop Using the Card: Immediately stop using the SD card to prevent overwriting data.
- Use a Card Reader: Connect the SD card to your computer using a card reader.
- Data Recovery Software: Use data recovery software as described above to scan and recover photos from the SD card.
5.2. Hard Drive Recovery
- Check Connections: Ensure the hard drive is properly connected to your computer.
- Data Recovery Software: Use data recovery software to scan the hard drive for lost photos. This process can take a significant amount of time for larger drives.
- Consider Professional Help: If the hard drive is physically damaged, consider seeking professional data recovery services.
6. Prevention: Protecting Your Photos Moving Forward
Prevention is better than cure. Here’s how to safeguard your photos.
6.1. Regular Backups: The Golden Rule
- Cloud Backups: Use cloud services like iCloud, Google Photos, or Dropbox to automatically back up your photos.
- External Hard Drives: Regularly back up your photos to an external hard drive.
- NAS Devices: Network-Attached Storage (NAS) devices provide a central location for backing up photos from multiple devices.
6.2. Photo Management Strategies: Keeping Organized
- Consistent Naming Conventions: Use clear and consistent naming conventions for your photo files.
- Folder Structure: Create a logical folder structure to organize your photos by date, event, or subject.
- Metadata: Add metadata (tags, descriptions, and keywords) to your photos to make them easier to find.
6.3. Hardware and Software Maintenance: Keeping Things Running Smoothly
- Regularly Update Software: Keep your operating system and photo management software up to date to avoid bugs and compatibility issues.
- Check Hardware Health: Periodically check the health of your hard drives and SD cards to identify potential issues before they lead to data loss.
- Use Antivirus Software: Protect your devices from malware by using reputable antivirus software and keeping it up to date.
7. Professional Photo Recovery Services: Calling in the Experts
When data loss is severe, professional recovery services can be a lifeline.
7.1. When to Seek Professional Help
- Physical Damage: If your storage device is physically damaged (e.g., water damage, fire damage).
- Complex Data Loss: If you’ve tried data recovery software without success, or if the data loss involves complex issues like drive corruption.
- Critical Data: If the photos are extremely valuable or irreplaceable.
7.2. Choosing a Recovery Service
- Reputation: Look for a reputable data recovery service with positive reviews and a proven track record.
- Experience: Choose a service with experience in recovering data from the type of storage device you have (e.g., SD cards, hard drives, SSDs).
- Cost: Get a clear estimate of the cost before proceeding with the recovery process.
- Data Privacy: Ensure the service has strong data privacy policies to protect your personal information.
8. Understanding File Systems: The Foundation of Data Storage
Understanding how file systems work can help you better understand data loss and recovery.
8.1. Common File Systems
- FAT32: Commonly used on SD cards and USB drives, but has a 4GB file size limit.
- NTFS: The standard file system for Windows, offering better performance and security than FAT32.
- APFS: Apple’s modern file system, designed for SSDs and offering improved performance and encryption.
- exFAT: A modern file system designed for flash storage devices, with no file size limits and compatibility with Windows and Mac.
8.2. How File Systems Affect Data Recovery
- Fragmentation: Over time, files can become fragmented, making them harder to recover.
- Overwriting: When a file is deleted, the space it occupied is marked as available, but the data may still be present until it is overwritten by new data.
- File System Corruption: Corruption of the file system can make it difficult to access or recover data.
9. Preserving Digital Memories: Best Practices for Long-Term Storage
Ensuring your photos last for generations requires careful planning and execution.
9.1. Archival Formats
- JPEG: A widely used format for photos, offering good compression and compatibility.
- TIFF: A lossless format that preserves all the original data, making it ideal for archival purposes.
- DNG: Adobe’s open-source raw image format, designed for long-term storage and compatibility.
9.2. Storage Media
- Optical Discs (CDs, DVDs, Blu-rays): While not as popular as they once were, optical discs can provide a long-term storage option if stored properly.
- HDDs and SSDs: Hard drives and solid-state drives offer large storage capacities and fast access times, but they are susceptible to failure over time.
- Cloud Storage: Cloud storage provides a convenient and reliable option for long-term storage, with built-in redundancy and disaster recovery.
9.3. Storage Conditions
- Temperature and Humidity: Store storage media in a cool, dry place to prevent damage.
- Physical Protection: Protect storage media from physical damage, such as impacts, scratches, and exposure to sunlight.
- Regular Migration: Periodically migrate your photos to new storage media to avoid data loss due to hardware failure or obsolescence.
10. Community and Support: Connecting with Fellow Photographers
Join communities and forums to share experiences, ask questions, and learn from other photographers.
10.1. Online Forums and Communities
- Photography Forums: Websites like DPReview and Photography-Forum offer active communities where you can discuss photo-related topics and get advice from experienced photographers.
- Social Media Groups: Join photography groups on Facebook, Instagram, and other social media platforms to connect with fellow photographers and share your work.
- Local Photography Clubs: Join a local photography club to meet other photographers in person and participate in workshops, photo walks, and other events.
10.2. Educational Resources
- Online Courses: Websites like Coursera, Udemy, and Skillshare offer a wide range of photography courses, from beginner to advanced levels.
- Photography Blogs and Websites: Follow photography blogs and websites to stay up-to-date on the latest trends, techniques, and equipment.
- Books and Magazines: Read photography books and magazines to deepen your knowledge and skills.
FAQ: Addressing Your Concerns About Photo Recovery
1. How long do deleted photos stay in the Recently Deleted album?
Photos and videos remain in the Recently Deleted album for 30 days. After this period, they are permanently deleted and cannot be recovered from the album.
2. Can I recover permanently deleted photos from my iPhone?
Yes, you can attempt to recover permanently deleted photos using data recovery software or by restoring from a backup (iCloud or iTunes).
3. Is it possible to recover photos from a damaged SD card?
Yes, it is often possible to recover photos from a damaged SD card using data recovery software or professional data recovery services. The success rate depends on the extent of the damage.
4. How can I prevent future photo loss?
To prevent future photo loss, implement a regular backup strategy, organize your photos effectively, and maintain your hardware and software.
5. What is the best data recovery software for photos?
Popular data recovery software options include Recuva, EaseUS Data Recovery Wizard, Disk Drill, and PhotoRec. The best choice depends on your operating system and specific needs.
6. How does iCloud Photos help with photo recovery?
iCloud Photos automatically syncs your photos across all your Apple devices. If you accidentally delete a photo, you can recover it from the Recently Deleted album or restore it from a backup.
7. Can I recover photos from a water-damaged phone?
It may be possible to recover photos from a water-damaged phone, but it is important to act quickly and seek professional help. Remove the battery (if possible), dry the phone, and consult a data recovery service.
8. How do file systems affect photo recovery?
The file system determines how data is stored and accessed on a storage device. Understanding the file system can help you choose the right data recovery tools and techniques.
9. What are the best practices for long-term photo storage?
Best practices for long-term photo storage include using archival formats (TIFF, DNG), storing media in a cool, dry place, and periodically migrating your photos to new storage media.
10. When should I seek professional photo recovery services?
You should seek professional photo recovery services if your storage device is physically damaged, if you’ve tried data recovery software without success, or if the photos are extremely valuable or irreplaceable.
Conclusion: Safeguarding Your Photographic Legacy
Losing photos can be a distressing experience, but with the right knowledge and tools, recovery is often possible. By understanding the causes of photo loss, taking quick action, and implementing preventative measures, you can safeguard your precious photographic memories for years to come. At dfphoto.net, our mission is to provide you with the expertise and support you need to navigate the world of photography confidently. Whether you’re grappling with data loss or seeking inspiration for your next project, we’re here to help you unlock your creative potential. Our address is 1600 St Michael’s Dr, Santa Fe, NM 87505, United States. You can reach us at Phone: +1 (505) 471-6001. Visit our website at dfphoto.net for more information. Explore our extensive collection of articles, tutorials, and galleries to enhance your skills and find new perspectives. Dive into our detailed guides, discover stunning visual content, and join a vibrant community of photographers who share your passion. Start your journey to photographic mastery with dfphoto.net today and capture the world in all its beauty. Explore our offerings and connect with fellow enthusiasts. Remember to back up your work consistently, stay organized, and embrace the art of visual storytelling. We hope this guide has provided you with the knowledge and resources you need to confidently handle photo loss situations.
