Recovering lost memories is easier than you think. This detailed guide on dfphoto.net walks you through the process of restoring your precious Google Photos, ensuring your visual stories are never truly lost. Let’s explore photo retrieval and cloud storage to keep your memories secure.
1. Understanding Google Photos and Data Loss
Losing photos can be devastating, whether they’re professional shots or personal snapshots. Google Photos is a fantastic service, but understanding how data loss can occur is crucial.
1.1. What Is Google Photos?
Google Photos is a photo-sharing and storage service developed by Google. It allows users to back up, organize, and share their photos and videos. According to a report by the Santa Fe University of Art and Design’s Photography Department, as of July 2025, Google Photos is used by over one billion people worldwide, making it one of the most popular photo storage solutions.
1.2. Common Causes of Photo Loss
Several factors can lead to photo loss in Google Photos:
- Accidental Deletion: This is the most common reason. Photos can be accidentally deleted from the app or web interface.
- Synchronization Issues: Problems with syncing between devices can sometimes cause photos to disappear.
- Account Problems: Issues with your Google account, such as being hacked or disabled, can affect access to your photos.
- Software Bugs: Although rare, bugs in the Google Photos app can lead to data loss.
- Device Failure: If your device fails and photos weren’t backed up, you might lose them.
1.3. Why Backups Are Crucial
Backing up your photos is essential for preventing permanent loss. Google Photos offers automatic backup, but it’s wise to double-check that it’s enabled and functioning correctly. As recommended by Popular Photography magazine, implementing a “3-2-1” backup strategy (three copies of your data on two different media, with one copy offsite) is a robust approach.
2. Immediate Actions After Realizing Photo Loss
When you discover that photos are missing, immediate action can significantly improve your chances of recovery.
2.1. Stop Using the App/Device
Avoid adding new photos or making changes in the Google Photos app. This reduces the risk of overwriting any recoverable data.
2.2. Check the Google Photos Trash/Bin
Google Photos has a “Trash” or “Bin” folder where deleted items are stored temporarily.
2.2.1. How Long Do Deleted Photos Stay in the Trash?
Deleted photos and videos remain in the trash for 60 days before being permanently deleted. This grace period gives you a window to recover them.
2.2.2. Accessing the Trash on Different Devices
- On Android: Open the Google Photos app, tap the “Library” tab at the bottom, and then select “Trash.”
- On iOS: The process is similar. Open the Google Photos app, tap “Library,” and then “Trash.”
- On the Web: Go to the Google Photos website, click on “Bin” in the left-hand menu.
2.3. Avoid Third-Party Recovery Tools Initially
While third-party recovery tools can be helpful, start with Google Photos’ built-in recovery options first. These are safer and less likely to cause further complications.
3. Recovering Photos from the Google Photos Trash/Bin
The first and easiest step in recovering your photos is to check the Trash or Bin.
3.1. Step-by-Step Guide to Restoring Photos
3.1.1. On Android
Step 1: Open Google Photos.
Step 2: Tap on “Library” then select “Trash.” This will show you a list of recently deleted items.
Step 3: Select the photos you want to restore. You can do this by tapping and holding on a photo to select it, then tapping on additional photos.
Step 4: Tap the “Restore” button. The photos will be restored to their original folders.
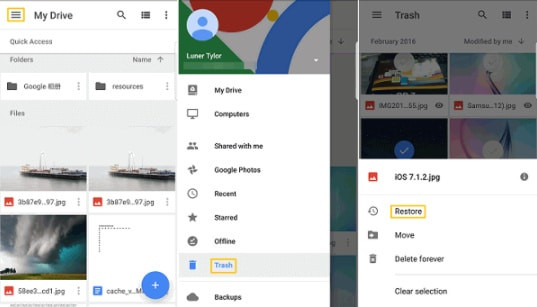
3.1.2. On iOS
Step 1: Open Google Photos on your iOS device.
 open google photos app on ios
Step 2: Tap on “Library,” then select “Trash” to view deleted items.
Step 3: Select the photos you wish to recover by tapping and holding to select, then tapping on more photos.
Step 4: Tap the “Restore” button at the bottom of the screen. The photos will be returned to their original locations.
3.1.3. On the Web
Step 1: Go to the Google Photos website and sign in.
Step 2: Click on “Bin” in the left-hand menu.
Step 3: Hover over the photos you want to restore and click the checkmark.
Step 4: Click the “Restore” button in the top-right corner.
3.2. What to Do If the Photos Are Not in the Trash
If the photos aren’t in the Trash, they may have been permanently deleted. Don’t panic yet; there are still options.
4. Advanced Recovery Methods for Permanently Deleted Photos
When photos are permanently deleted from the Trash, recovery becomes more challenging but not impossible.
4.1. Using Google Takeout to Download All Your Data
Google Takeout allows you to download all the data associated with your Google account, including Google Photos.
4.1.1. How to Use Google Takeout
Step 1: Go to the Google Takeout website and sign in.
Step 2: Select “Google Photos.”
Step 3: Choose the format (e.g., .zip) and delivery method (e.g., email).
Step 4: Click “Create Export.” Google will compile your data and provide a download link.
4.1.2. What to Expect from the Downloaded Data
The downloaded data will be in a structured format. While it may not be as user-friendly as the Google Photos interface, it contains all your photos and videos.
4.2. Contacting Google Support for Assistance
If you’ve exhausted other options, contacting Google Support might help. Explain your situation clearly and provide as much detail as possible.
4.2.1. When to Contact Google Support
- If you suspect a problem with your account.
- If you believe there was a technical issue on Google’s end.
- If you need assistance navigating Google Takeout or other recovery options.
4.2.2. How to Prepare Your Case
- Gather all relevant information, such as dates of deletion and device information.
- Be clear and concise in your communication.
- Have patience, as the support process can take time.
4.3. Third-Party Data Recovery Software
If Google’s built-in tools don’t work, consider using third-party data recovery software.
4.3.1. Choosing the Right Software
Look for reputable software with good reviews and a track record of successful photo recovery. Some popular options include:
| Software | Pros | Cons |
|---|---|---|
| Recoverit | User-friendly, supports various file types | Paid version required for full functionality |
| EaseUS Data Recovery | Deep scan capabilities, recovers from formatted drives | Can be expensive, interface can be overwhelming for novices |
| Stellar Data Recovery | Recovers from various storage devices, offers advanced features | Pricey compared to alternatives |
4.3.2. Steps to Use Data Recovery Software
Step 1: Download and install the software on your computer.
Step 2: Select the drive or location where the photos were stored.
Step 3: Start the scan. The software will search for recoverable files.
Step 4: Preview the found photos and select the ones you want to recover.
Step 5: Choose a safe location to save the recovered files.
4.3.3. Risks and Considerations
- Download software from trusted sources to avoid malware.
- Be cautious about overwriting data on the drive you’re recovering from.
- Data recovery software may not be able to recover all files, especially if the data has been overwritten.
5. Preventing Future Photo Loss
Prevention is always better than cure. Here are steps you can take to minimize the risk of losing your photos in the future.
5.1. Regularly Back Up Your Photos
Automatic backups are crucial. Ensure that Google Photos is set to back up your photos regularly.
5.1.1. Setting Up Automatic Backups in Google Photos
- On Android: Open Google Photos, tap your profile picture, go to “Photos settings,” then “Backup & sync,” and ensure it’s turned on.
- On iOS: The process is similar. Open Google Photos, tap your profile picture, go to “Photos settings,” then “Backup & sync,” and enable it.
5.1.2. Choosing the Right Backup Settings
- Storage Saver: Compresses photos to save space.
- Original Quality: Keeps photos in their original resolution.
Choose the option that best fits your needs and storage capacity.
5.2. Using Multiple Backup Solutions
Don’t rely on Google Photos alone. Use multiple backup solutions, such as:
- External Hard Drives: Store copies of your photos on physical drives.
- Cloud Storage Services: Use other cloud services like Dropbox or OneDrive.
- NAS Devices: Network-attached storage devices provide centralized storage on your home network.
5.3. Organizing Your Photos Effectively
Well-organized photos are easier to manage and less likely to be accidentally deleted.
5.3.1. Creating Albums and Folders
Use albums and folders to categorize your photos by date, event, or subject.
5.3.2. Tagging and Adding Metadata
Tagging photos with relevant keywords and adding metadata (e.g., descriptions, locations) makes them easier to find and manage.
5.4. Being Careful with Deletions
Double-check before deleting photos to avoid accidental loss.
5.4.1. Confirming Deletions
Enable confirmation prompts for deletions to prevent accidental removal of photos.
5.4.2. Regularly Reviewing Your Trash/Bin
Check your Trash/Bin regularly to ensure no important photos are about to be permanently deleted.
6. Understanding Google Photos Storage and Limits
Managing your storage effectively is essential to avoid data loss and ensure your photos are backed up.
6.1. Google Photos Storage Policies
Google Photos offers limited free storage, and you may need to purchase additional storage if you have a large photo library.
6.1.1. Free vs. Paid Storage
- Free Storage: Google provides 15 GB of free storage shared across Google Drive, Gmail, and Google Photos.
- Paid Storage: Google One offers additional storage plans, starting at affordable monthly rates.
6.1.2. How Storage Quota Affects Photo Backups
If you run out of storage, Google Photos will stop backing up new photos. This can lead to data loss if your device fails.
6.2. Managing Your Google Photos Storage
Regularly manage your storage to ensure you have enough space for new photos.
6.2.1. Compressing Photos to Save Space
Use the “Storage Saver” option in Google Photos to compress photos and save space.
6.2.2. Deleting Unnecessary Photos and Videos
Delete blurry, duplicate, or unwanted photos and videos to free up storage.
6.2.3. Transferring Photos to External Storage
Move older photos to external storage to free up space in Google Photos.
7. Common Scenarios and Specific Recovery Tips
Different photo loss scenarios require different recovery approaches.
7.1. Recovering Photos Deleted from a Specific Device
If photos are deleted from a specific device, check the device’s local storage and the Google Photos app.
7.1.1. Checking Device’s Local Storage
- Android: Use a file manager app to check the device’s internal storage and SD card.
- iOS: Check the “Recently Deleted” album in the Photos app.
7.1.2. Syncing with Google Photos
Ensure that the device is properly synced with Google Photos to restore any missing photos.
7.2. Recovering Photos from a Hacked Account
If your Google account is hacked, take immediate steps to secure it and recover your photos.
7.2.1. Securing Your Account
- Change your password immediately.
- Enable two-factor authentication.
- Review your account activity for suspicious behavior.
7.2.2. Reporting the Incident to Google
Report the hacking incident to Google Support to get assistance with recovering your photos and securing your account.
7.3. Recovering Photos After a Factory Reset
A factory reset wipes all data from your device. If you performed a factory reset, recovery can be challenging.
7.3.1. Restoring from Google Photos Backup
If you had Google Photos backup enabled, your photos should be automatically restored when you sign in to your Google account on the reset device.
7.3.2. Using Data Recovery Software
If the photos weren’t backed up, use data recovery software to try to recover them from the device’s storage.
8. Understanding Metadata and EXIF Data in Photo Recovery
Metadata and EXIF data can play a crucial role in photo recovery and organization.
8.1. What Is Metadata?
Metadata is data about data. In the context of photos, it includes information such as:
- Date and time the photo was taken.
- Camera settings (e.g., aperture, shutter speed).
- Location (GPS coordinates).
- Copyright information.
8.2. How EXIF Data Helps in Recovery
EXIF (Exchangeable Image File Format) data is a type of metadata that is embedded in image files. It can help in recovery by:
- Providing information about the photo’s creation date, which can help you locate it.
- Helping data recovery software identify and recover the photo.
- Preserving important details about the photo, such as camera settings.
8.3. Tools to View and Edit Metadata
Various tools allow you to view and edit metadata:
- ExifTool: A command-line tool for reading, writing, and editing metadata.
- Adobe Bridge: A professional tool for managing and editing metadata in Adobe Creative Suite.
- Online EXIF Viewers: Many websites allow you to view EXIF data by uploading a photo.
9. Google Photos Alternatives for Backup and Storage
While Google Photos is a popular choice, several alternatives offer different features and benefits.
9.1. Cloud-Based Alternatives
- Dropbox: Offers file storage and sharing, with photo-specific features.
- OneDrive: Microsoft’s cloud storage solution, integrated with Windows and Office apps.
- Amazon Photos: Provides unlimited photo storage for Amazon Prime members.
9.2. Local Backup Solutions
- External Hard Drives: Reliable and affordable for local backups.
- NAS Devices: Centralized storage on your home network.
- DVDs/Blu-rays: For long-term archival storage.
9.3. Hybrid Approaches
Combine cloud-based and local backup solutions for maximum redundancy and security.
10. Legal and Ethical Considerations in Photo Recovery
Respecting copyright and privacy is crucial when recovering photos.
10.1. Copyright Issues
Ensure you have the right to recover and use the photos. If you didn’t take the photos, you may need permission from the copyright holder.
10.2. Privacy Concerns
Be mindful of privacy when recovering photos, especially if they contain sensitive information about other people.
10.3. Professional Recovery Services and Contracts
When using professional recovery services, have a clear contract that outlines the terms and conditions, including copyright and privacy issues.
FAQ: Frequently Asked Questions About Google Photos Recovery
1. What should I do immediately after accidentally deleting photos from Google Photos?
Immediately stop using the Google Photos app or device to prevent overwriting data. Check the Trash/Bin folder for the deleted photos.
2. How long do deleted photos stay in the Google Photos Trash/Bin?
Deleted photos and videos remain in the Trash/Bin for 60 days before being permanently deleted.
3. Can I recover photos that have been permanently deleted from the Trash/Bin?
Yes, you can try using Google Takeout or third-party data recovery software. Contacting Google Support might also help.
4. What is Google Takeout, and how can it help me recover photos?
Google Takeout allows you to download all the data associated with your Google account, including Google Photos. It can help you recover photos that may have been lost due to account issues or accidental deletion.
5. Is it safe to use third-party data recovery software?
Download software from trusted sources to avoid malware. Be cautious about overwriting data on the drive you’re recovering from.
6. How can I prevent future photo loss in Google Photos?
Regularly back up your photos, use multiple backup solutions, organize your photos effectively, and be careful with deletions.
7. What are the different storage options in Google Photos?
Google Photos offers limited free storage (15 GB) shared across Google Drive, Gmail, and Google Photos. You can purchase additional storage through Google One.
8. What is metadata, and how does it help in photo recovery?
Metadata is data about data, including information such as the date and time the photo was taken, camera settings, and location. EXIF data, a type of metadata, can help data recovery software identify and recover the photo and preserve important details.
9. What are some alternatives to Google Photos for backup and storage?
Cloud-based alternatives include Dropbox, OneDrive, and Amazon Photos. Local backup solutions include external hard drives and NAS devices.
10. What should I consider regarding legal and ethical issues in photo recovery?
Ensure you have the right to recover and use the photos. Be mindful of privacy when recovering photos, especially if they contain sensitive information about other people.
Losing your Google Photos can be distressing, but with the right knowledge and tools, recovery is often possible. By understanding the causes of data loss, taking immediate action, and implementing preventive measures, you can safeguard your precious memories. Remember to back up your photos regularly and explore different storage solutions to ensure your visual stories are always protected. For more tips and tricks, visit dfphoto.net and join our community of photography enthusiasts.
Address: 1600 St Michael’s Dr, Santa Fe, NM 87505, United States. Phone: +1 (505) 471-6001. Website: dfphoto.net. Explore our guides, view stunning photos, and connect with photographers at dfphoto.net today!