A wedding photo booth can truly elevate your reception from memorable to legendary, providing entertainment and capturing candid moments that professional photographers might miss. However, the line between a wedding photo booth being the highlight of the party and a costly, underutilized corner can be thin. Having spent years in wedding photography and witnessed the evolution of photo booths, I’m sharing my top tips to ensure your Do It Yourself Wedding Photo Booth becomes an absolute hit!
Back when I started photographing weddings, photo booths were a novelty. You might occasionally find a standalone booth, reminiscent of arcade setups, but it wasn’t a standard wedding feature. The rise of digital cameras and accessible technology changed everything. Suddenly, creating custom photo booths became feasible and affordable. Wedding photographers and DJs began offering them as attractive add-ons. Throughout my career, a well-executed wedding photo booth consistently generated significant extra income, simply by setting up an engaging photo area at the reception.
Through trial and error, and refining several versions of my own photo booths, I discovered the crucial design elements that determine success. Get these right, and your DIY wedding photo booth will be the life of the party. Miss the mark, and you might end up with an expensive setup gathering dust, leaving you wondering if those “100 awful photos” were worth the investment.
The Power of Instant Prints: A DIY Essential
Let’s kick off with what I believe is the most impactful tip for your DIY wedding photo booth: include a printer! When planning my own wedding with Cristin, creating a custom photo booth was always on my list. When DNP Photo offered to let us test out their DP-QW410 printer and the WCM2 wireless module, my DIY photo booth plans immediately shifted into high gear. In my professional experience, I had always avoided on-site printing due to concerns about printer reliability, maintenance, speed, and cost. Honestly, adding a printer to my own wedding photo booth felt a bit risky, especially as I knew I’d be busy as the groom!
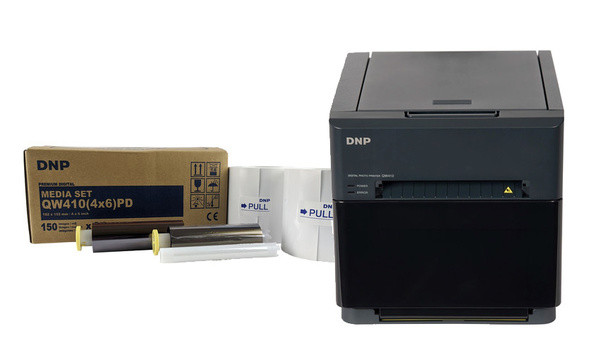 DNP DP-QW410 dye-sublimation printer producing vibrant, smudge-proof wedding photo booth prints
However, as you can see, the DP-QW410 printer was a game-changer. Its dye-sublimation technology delivers vibrant, smudge-proof prints in about 20 seconds each. It’s also surprisingly compact and lightweight. Each media roll yields 300 4×6 photos at a cost of roughly $0.21 per print.
The real magic of a printer in your DIY wedding photo booth is providing guests with a tangible keepsake. Think about it: business cards are easily discarded, but a fun photo of friends will likely end up on social media or a refrigerator, continuously seen and remembered. For a DIY setup, consider exploring more budget-friendly instant photo printers or even vintage Polaroid cameras for a unique touch. The instant gratification of a physical print significantly enhances the photo booth experience.
DIY Lighting for Professional-Looking Photo Booths
If you’re offering photo booth images as part of your wedding (or even for personal enjoyment at your own DIY wedding), the image quality, especially the lighting, needs to be impressive. Remember, even a DIY setup should aim for professional-looking results. Lighting setups can range from a simple single light to elaborate multi-light arrangements.
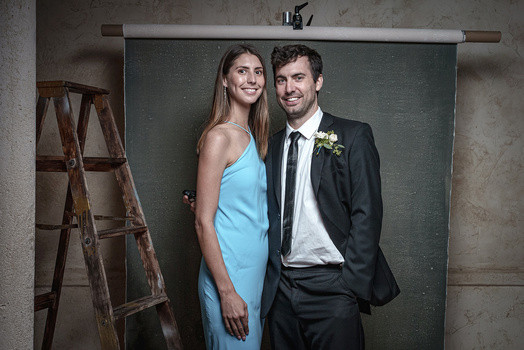
 Simple DIY wedding photo booth lighting setup using a single key light and backdrop
For a do it yourself wedding photo booth, simplicity and reliability are key. Having backup lights is always a smart move. My personal rule for wedding gigs was to have spares for everything. For a DIY approach, start with a basic key light setup. Consider using affordable LED continuous lights or even speedlights if you’re comfortable with off-camera flash. Umbrellas or softboxes can diffuse the light for a flattering look. If you’re feeling ambitious, adding a hair light and background light can elevate the photos further, but always prioritize having backups or a plan to simplify if equipment fails.
 Close-up of Profoto B10 light used for wedding photo booth, showcasing professional lighting equipment
For my wedding photo booth, I opted for a single Profoto B10 light, boomed overhead with a Manfrotto 420 boom stand. A 43″ Westcott Deep Diffusion Umbrella softened the light and controlled background spill. For a DIY project, you can achieve similar results with less expensive equipment. The key is to create soft, flattering light that makes everyone look their best.
Design an Open and Engaging DIY Photo Booth Space
I’ve always disliked enclosed photo booths that restrict the fun to a small group. The term “photo booth” often conjures images of cramped spaces, which is the opposite of what makes a wedding photo booth truly engaging. Traditional booths can be isolating and rarely become the center of attention. Instead, aim for a highly visible, open area that draws in guests from across the reception.
In my professional setup, I often used a 7×8 ft Lastolite HiLight backdrop. These are versatile and portable, creating either a gray background or a pure white high-key look when lit from within. For my wedding, I wanted a different aesthetic. Inspired by Annie Leibovitz’s style, I chose a hand-painted backdrop from Gravity Backdrops, hung against the venue’s stucco wall. Finding the right backdrop with the perfect texture and wedding vibe took some time. To avoid cluttering the space with light stands, I used a heavy umbrella base and super clamps to hang the backdrop directly, showcasing its painted edges.
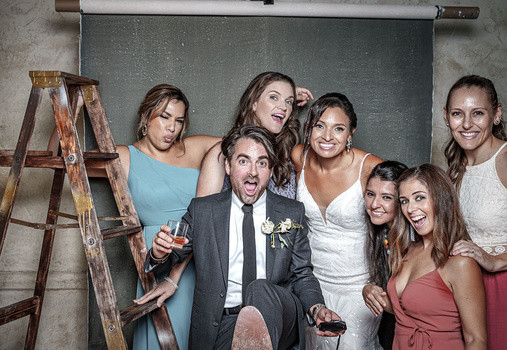 DIY wedding photo booth featuring a hand-painted backdrop and open space for group photos
For your DIY wedding photo booth, think creatively about backdrops. Fabric drapes, flower walls, sequin panels, or even a decorated wall in your venue can work beautifully. The open concept encourages spontaneity and allows more people to participate and watch the fun. Consider incorporating props related to your wedding theme or personality to personalize the space further.
Guest-Controlled Fun: The DIY Remote Trigger
The next crucial element for a successful photo booth is empowering your guests to trigger the camera themselves. I’m not a fan of countdown timers on screens, as the delay between the countdown and the actual photo can be awkward. Giving guests a physical remote, like a PocketWizard or radio remote, puts them in control.
 Wireless remote trigger for DIY wedding photo booth, allowing guest-controlled snapshots
This seemingly small detail dramatically improves the photos. When guests control the timing, they can capture action shots and dynamic poses. It encourages creativity and results in much more engaging and fun images. Camera compatibility with remote triggers varies, so research the best options for your DIY wedding photo booth camera. In the past, I used Nikon cameras with a 10-pin cable, but for my wedding, I used a Sony a7S III with a Micro USB cable. For a DIY approach, explore affordable wireless shutter releases available online – they are simple to use and greatly enhance the guest experience.
Crafting Your DIY Wedding Photo Booth Masterpiece
The final step in creating a successful do it yourself wedding photo booth is to assemble everything and refine your setup. As you offer (or use) your photo booth, you’ll naturally tweak and improve it. Consistency and automation are key. Address any issues promptly to ensure smooth operation next time. Ideally, your DIY photo booth should function almost independently, minimizing your intervention. Wedding days are hectic, and you don’t want photo booth problems distracting you from enjoying the celebration.
Maintaining a consistent look and lighting style for your photo booth is also important. A recognizable aesthetic builds brand identity, if you are offering this as a service. While offering customization can be tempting, it can compromise reliability and introduce complications. Once you’ve perfected your DIY photo booth design, stick with it and showcase images from that setup in your portfolio.
When introducing your do it yourself wedding photo booth concept, especially to potential clients, highlight its unique aspects. Many people associate “photo booths” with enclosed, impersonal setups. Emphasize that your DIY approach is different – fun, engaging, and unlike anything they’ve seen before. Explain how it encourages guest interaction, gets people involved, and empowers them to create their own memorable photos. By showcasing the fun and interactive nature of your DIY wedding photo booth and highlighting guest control, you can significantly enhance your wedding (or business) offerings and provide truly exciting photos for everyone.