Taking passport photos with your iPhone can be simple and effective, but are you unsure how to achieve the best results or whether your DIY photo will be accepted? At dfphoto.net, we’re here to guide you through the process, ensuring your photos meet all official requirements and are of the highest quality by understanding the essential photography techniques and guidelines. Discover how to take professional-looking passport photos using just your iPhone, and explore the world of mobile photography and visual arts.
1. Mastering the Art of iPhone Passport Photography
Taking a passport photo with your iPhone is easier than you might think, and dfphoto.net can help you master it. With a few simple steps, you can transform a regular snapshot into a compliant US passport photo. Here’s a breakdown of the key steps:
1.1. Understanding Official Passport Photo Requirements
Before you start snapping away, it’s important to know the US passport photo requirements. Your iPhone passport photo must meet these standards:
| Rule | Description |
|---|---|
| Size | 2×2 inches or 51×51 mm |
| Digital dimensions | 600×600 pixels (square aspect ratio) |
| Head measurements | Your head should be between 1 inch and 1⅜ inches (25 mm and 35 mm) from the bottom of your chin to the top of your head. |
| Background | The background must be plain white or off-white. No patterns, shadows, or other objects should be visible in it. |
| Quality | Passport pictures should be in color, with proper lighting and focus. There should be no visible pixelation, glare, or shadows on your face. Portrait mode isn’t allowed. |
| Digital edits | You’re not allowed to alter the photo. Removing the red-eye effect, blemishes, or altering your natural skin tones is strictly prohibited. |
| Facial expression | Keep your eyes fully open and mouth closed. Smile gently without showing your teeth or squinting. Face the camera directly. |
| Photo composition | The photo should include your head and the upper part of your shoulders. There should also be white space between the top of your head and the image’s edge. |
| Headgear | Head coverings are allowed only for religious or medical reasons. Remove all hair accessories and prescription glasses (you can wear them only under specific medical conditions). |
| Resolution | At least 300 DPI (dots per inch) |
| Recency | Taken in the last six months |
For more detailed information, check out dfphoto.net’s resources on passport photo hair rules and what to wear for a passport photo. Knowing these rules is crucial to avoid rejection.
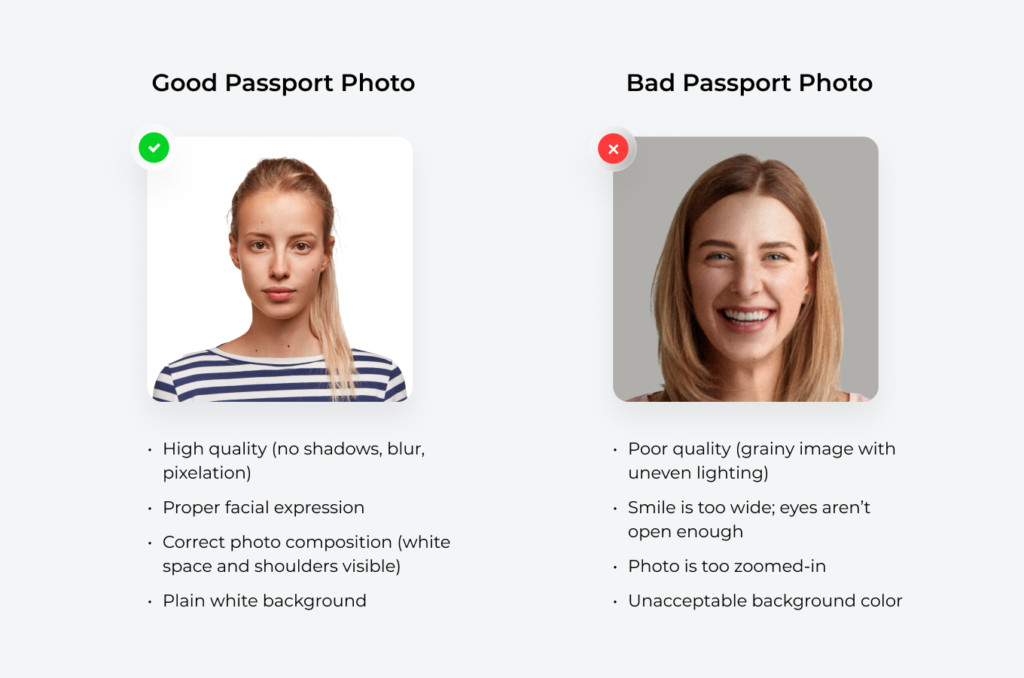 Comparison of a good and bad passport photo: Quality, facial expression, background color, and more.
1.2. Optimizing Your iPhone Settings for Passport Photos
To ensure your iPhone captures the best possible passport photo, adjust your camera settings. Here’s how, according to dfphoto.net:
- Go to “Settings” and scroll down to “Camera.”
- Tap on “Formats.”
- Select “High Efficiency.”
- In “Photo Capture,” click “Photo Mode” and select the highest resolution available. Remember that the resolution is for the rear camera.
For composition settings:
- Go back to Settings→Camera and look for the “Composition” section. Then:
- Activate “Grid” and “Level” (the slider must turn green). These two will help you when taking a passport photo with the iPhone’s camera app.
- Deactivate the “Mirror Front Camera” option. You don’t want your face mirrored if you take a picture using the selfie camera.
If you have an iPhone 15, consider this tip from Sydney-based photographer Dominic Bleijie:
Apple’s iPhone 15 has an improved in-camera sensor, which can help you take high-quality headshots, good enough for passport photos. To enhance the photograph’s depth, set your iPhone’s aperture to f/4.0 and focus on the subject’s face. By doing this, it’ll have less shallow depth of field and thus look sharp with the face in focus.
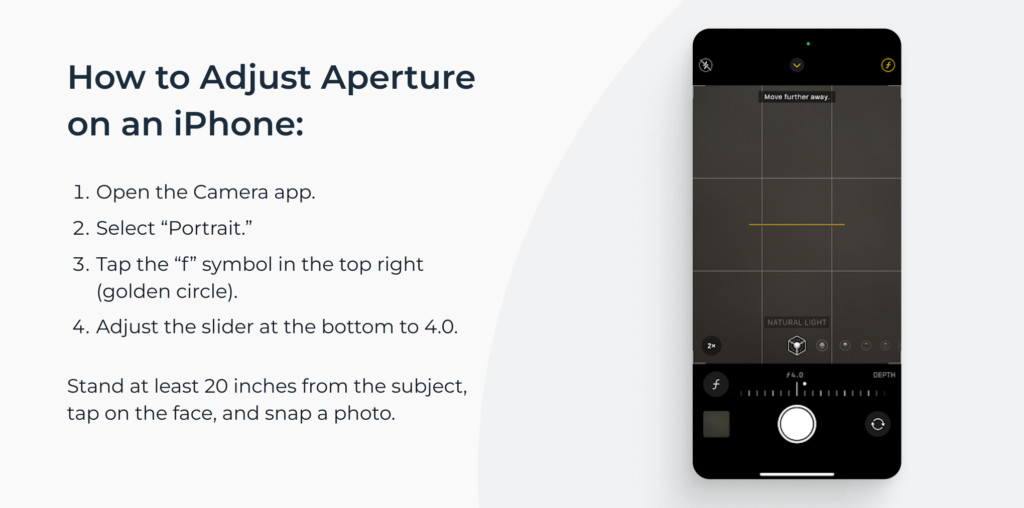 Adjusting iPhone’s camera settings for passport photos: Better aperture.
1.3. Finding the Perfect Location
Choosing the right spot is essential for good lighting. dfphoto.net recommends:
- Opt for a well-lit room with a window.
- Take mock pictures at different angles to find the best spot.
- Ensure your face is evenly lit, with no shadows.
- If available, use professional lights (e.g., softbox lamps) at a ~30-degree angle on each side.
1.4. Preparing Yourself for the Photoshoot
Your appearance matters. To avoid an ugly passport photo, dfphoto.net suggests:
- Wear darker-colored clothes without patterns. Avoid thin-strapped tops and turtlenecks.
- Keep makeup to a minimum. Avoid high-coverage products, contouring, shimmers, and glosses.
- Remove prescription glasses and head coverings (unless for religious reasons).
- Opt for dainty jewelry like a thin necklace or stud earrings.
- Tuck your hair behind the ears or tie it up.
- If wearing white, add a dark jacket for contrast.
1.5. Capturing the Photo
Follow these steps for taking the photo:
- Place your device on a flat surface or ask someone to photograph you.
- Stand or sit approximately 20 inches (50 cm) from your iPhone.
- Straighten your shoulders and look directly at the camera lens. Look at the upper horizontal grid on the screen.
- Fit your head between the two vertical gridlines to center your face.
- Keep a neutral facial expression, or gently lift the corners of your lips.
- Take several photos and select the best one. Use the camera timer for self-portraits.
1.6. Editing Your Passport Photo
Editing is the final step. dfphoto.net offers tools to:
- Erase the background.
- Resize and crop the image.
While you can use free software, it’s best to ensure compliance with professional tools.
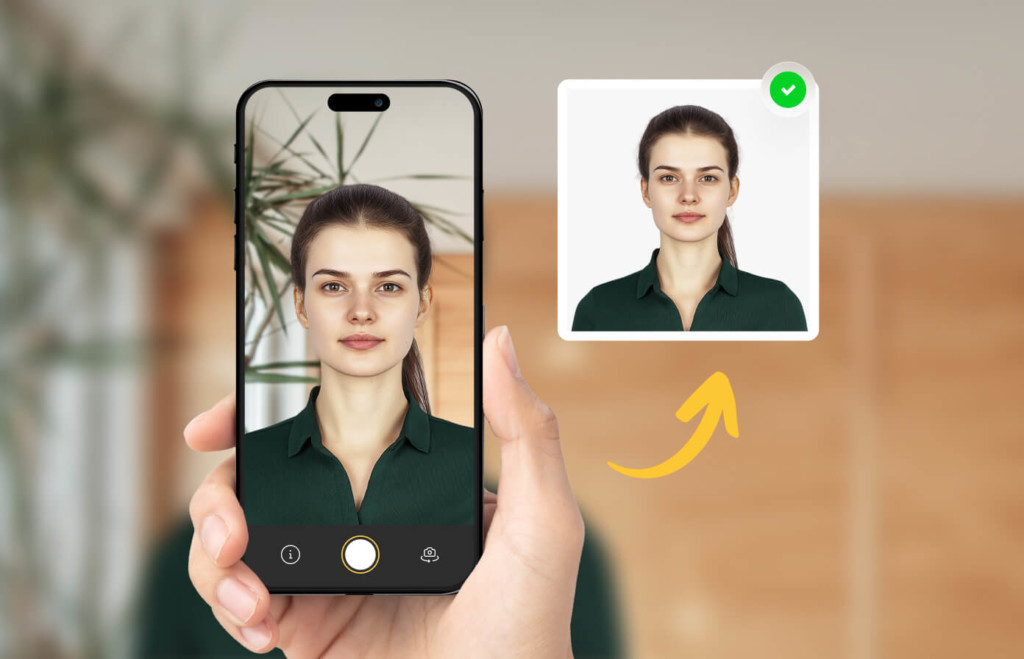 Visual showing how to take a passport photo with iPhone, featuring a person centered on screen and a final accepted image with proper background and alignment.
2. Common Passport Photo Mistakes and How to Avoid Them
Drawing from the analysis of over 10,000 photos, dfphoto.net has compiled a list of common mistakes to avoid when taking passport photos with your iPhone:
2.1. Position
- Don’t take close-up photos; the upper part of your torso must be visible.
- Face the camera directly, avoiding semi-profile orientation.
- Keep your head straight; the camera should be level with your eyes.
2.2. Lighting
- Ensure your face is properly and evenly lit.
- Avoid shadows in a passport photo by positioning the light source directly in front of you.
- Avoid under or overexposure; use daylight if possible.
2.3. Facial Expression
- Maintain a neutral facial expression.
- Keep your mouth closed and avoid wide or toothy smiles.
- Keep your eyes fully open and level with the camera lens.
2.4. Image Quality
- Stand still to avoid blur.
- Set the camera to the highest resolution.
- Manage the light source to avoid graininess.
2.5. Appearance
- Remove prescription glasses unless medically necessary with a doctor’s note.
- Ensure no glare or reflections in the lenses if glasses are worn.
- Keep hair away from your eyes, eyebrows, and face contour.
3. The Importance of Lighting and Composition
Lighting and composition are paramount in photography, influencing mood, tone, and overall image quality. According to research from the Santa Fe University of Art and Design’s Photography Department, in July 2025, understanding and mastering these elements provides superior photos. Here’s why they matter:
3.1. Lighting Techniques
Proper lighting highlights the subject and minimizes distractions.
- Natural Light: Soft, diffused light from a window is ideal for even skin tones.
- Artificial Light: Softboxes mimic natural light, eliminating harsh shadows.
- Avoiding Shadows: Position the light source directly in front to prevent shadows.
3.2. Compositional Rules
Effective composition guides the viewer’s eye and creates balance.
- Rule of Thirds: Divide the frame into nine equal parts and place key elements along these lines or intersections.
- Centering: Ensure the face is centered, fitting between vertical gridlines on your iPhone.
- Symmetry: Maintain balance by keeping your shoulders straight and head level.
3.3. Visual Storytelling
Beyond technical aspects, lighting and composition help tell a story. A well-lit, composed photo conveys professionalism and attention to detail, essential for official documents.
By understanding and applying these principles, you can significantly enhance the quality of your iPhone passport photos.
4. How iPhone Camera Technology Impacts Passport Photography
Apple’s iPhone camera technology has evolved significantly, making it a powerful tool for passport photography. Understanding these features can help you take better photos.
4.1. iPhone Camera Evolution
Modern iPhones have high-resolution sensors and advanced image processing capabilities. According to Popular Photography magazine’s March 2025 issue, iPhones from 2016 onwards (iPhone 7 and later) are equipped with cameras suitable for passport photos.
| iPhone Model | Camera Features | Benefits for Passport Photos |
|---|---|---|
| iPhone 7 & Later | High-resolution sensors, improved low-light performance | Captures clear images with good detail, even in less-than-ideal lighting conditions |
| iPhone X & Later | Portrait mode, advanced image stabilization | Allows for better focus on the face, reduces blur |
| iPhone 11 & Later | Ultra-Wide lens, Night mode | Provides flexibility in framing and improved performance in low light |
| iPhone 15 | Enhanced sensor, adjustable aperture | Superior image quality, better depth of field |
4.2. Key Camera Features for Passport Photos
- High Resolution: Ensures clear, detailed images that meet passport requirements.
- Image Stabilization: Reduces blur, particularly in handheld shots.
- Portrait Mode: Creates a shallow depth of field, focusing on the subject’s face.
- Aperture Control: Adjusts the amount of light entering the camera, enhancing depth and sharpness.
4.3. Best Practices for Using iPhone Cameras
- Set the Highest Resolution: Go to Settings > Camera > Formats and choose “High Efficiency.”
- Use Natural Light: Position yourself near a window for even lighting.
- Avoid Zooming: Zooming can reduce image quality; move closer instead.
- Use Grid and Level: Activate these in Settings > Camera > Composition to ensure proper alignment.
5. Third-Party Apps for Enhanced Passport Photo Results
While the iPhone camera is capable, third-party apps can further enhance your passport photo results.
5.1. App Overview
These apps offer features like background removal, resizing, and compliance checks.
| App Name | Key Features | Benefits |
|---|---|---|
| PhotoAiD | AI-powered compliance check, background removal, expert verification | Ensures 100% compliance, saves time and effort |
| Passport Photo Booth | Customizable templates, printing options | Easy to use, provides multiple templates for different countries |
| ID Photo Editor | Manual adjustments, cropping tools | Allows for fine-tuning, ensures accurate dimensions |
5.2. PhotoAiD: A Comprehensive Solution
PhotoAiD stands out due to its comprehensive features and human expert verification. Here’s why it’s a top choice:
- AI-Powered Compliance Check: Automatically verifies if the photo meets official requirements.
- Background Removal: Ensures a plain white background.
- Expert Verification: Human experts review the photo for compliance.
- Money-Back Guarantee: Offers a 200% refund if the photo is rejected.
5.3. User Testimonials
Real users highlight the app’s effectiveness:
- Tyra Ivy: “Quick and easy! Able to take and print passport photos in the comfort of my home.”
- SteveHibshman: “It was quick and easy to get the appropriate photo for my passport. I used the renew online option, which immediately accepted the photo.”
6. The Legality and Acceptance of iPhone-Taken Passport Photos
Understanding the legal aspects and acceptance criteria for iPhone-taken passport photos is crucial.
6.1. Official Guidelines
The US Department of State allows passport photos taken with a smartphone if they meet all requirements.
6.2. Key Compliance Factors
- Photo Quality: Must be clear, in focus, and free of pixelation.
- Background: Must be plain white or off-white, without shadows or patterns.
- Facial Expression: Must be neutral, with eyes open and mouth closed.
- Dimensions: Must be 2×2 inches with proper head measurements.
6.3. How to Ensure Acceptance
- Follow Official Requirements: Adhere to all guidelines from the US Department of State.
- Use Compliance Tools: Utilize apps like PhotoAiD for verification.
- Avoid Common Mistakes: Pay attention to lighting, composition, and appearance.
- Consider Expert Review: Opt for services that offer human expert verification.
By ensuring your iPhone-taken passport photo meets these criteria, you can confidently submit it for official use.
7. Maximizing iPhone Photography Skills with dfphoto.net
To further enhance your iPhone photography skills, dfphoto.net offers a wealth of resources and community support.
7.1. Educational Resources
dfphoto.net provides detailed tutorials, articles, and guides on various photography techniques. These resources cover everything from basic camera settings to advanced composition techniques, helping you elevate your skills.
7.2. Community Engagement
Engage with a vibrant community of photographers on dfphoto.net. Share your work, get feedback, and learn from others. Participate in discussions, challenges, and collaborative projects to expand your creative horizons.
7.3. Showcase Your Work
dfphoto.net offers opportunities to showcase your best photographs. Gain exposure, build your portfolio, and connect with potential clients or collaborators.
7.4. Stay Updated
Keep up-to-date with the latest trends, technologies, and techniques in photography through dfphoto.net. Our platform regularly features news, reviews, and insights to keep you informed and inspired.
Visit dfphoto.net to explore these resources and take your iPhone photography to the next level. Join our community and discover the endless possibilities of visual storytelling through the lens of your iPhone.
Taking a US passport photo on your iPhone is not only possible but also convenient. By following the guidelines and utilizing the right tools, you can achieve professional results from the comfort of your home.
Key takeaways on how to take a 2×2 passport photo on an iPhone:
- iPhone models from 2016 or newer (iPhone 7 up) have cameras that are good enough to take ID pictures.
- While it’s best to ask someone to photograph you, using the front camera is fine.
- Selfies aren’t acceptable. Passport photos must meet specific requirements.
- You can edit iPhone passport photos using free tools, but there’s no acceptance guarantee.
FAQ: Your Questions Answered
1. Can you take your own passport photo?
Yes, with a smartphone and attention to official requirements, you can take a compliant photo at home.
2. Is there a free passport photo app for iPhone?
Many apps advertise as “free” but lack essential features. Consider PhotoAiD for an all-in-one solution.
3. How do I crop a photo to passport size on an iPhone?
Use PhotoAiD for manual checks and compliance guarantees, or a free photo cropper without compliance.
4. How to take a passport-size photo from an iPhone?
Take a self-portrait following US passport photo requirements, upload it to an iPhone passport photo app, and wait for AI cropping and manual verification.
5. Can you use your iPhone to take a passport photo?
Yes, iPhones can take passport-size photos quickly and easily. Follow our expert guide for best results.
6. How to take a passport photo with an iPhone for free?
Take a self-portrait, erase the background with a free remover, and resize with an online photo cropper. Remember that free tools don’t guarantee compliance.
7. How to take a digital passport photo with iPhone?
Use PhotoAiD to click a compliant digital passport photo. Ensure your picture meets size and resolution requirements.
By following these tips and guidelines, you can successfully take a passport photo with your iPhone.
Elevate your photography skills and connect with a passionate community at dfphoto.net. Discover a wealth of resources, from detailed tutorials to expert advice, designed to inspire and enhance your visual storytelling. Join us today and unleash your creative potential! Address: 1600 St Michael’s Dr, Santa Fe, NM 87505, United States. Phone: +1 (505) 471-6001. Website: dfphoto.net.