Taking photos on iPhone can be a gateway to stunning photography; dfphoto.net provides expert guidance on mastering iPhone photography, blending artistry with mobile technology. This guide explores techniques, tools, and editing tips to elevate your smartphone photography, ensuring every shot is a masterpiece and offering solutions for all levels of photographers. Discover composition, lighting, and post-processing secrets for unforgettable images with expert tips and tricks.
1. Why Master How To Take Photos On iPhone?
Why should you focus on How To Take Photos On Iphone? The answer is simple: your iPhone is always with you. This accessibility, combined with increasing camera capabilities, makes it a powerful tool for capturing life’s moments. Learning to maximize its potential turns everyday snapshots into extraordinary memories.
- Convenience: Always at hand to capture spontaneous moments.
- Improved Skills: iPhone photography teaches essential photographic techniques applicable to any camera.
- Creative Outlet: Explore mobile photography as a unique art form.
2. Understanding Your iPhone Camera App
The native iPhone camera app is more versatile than many realize. Familiarizing yourself with its features unlocks a world of creative possibilities.
2.1 Exploring The Basic Settings
Understanding the basic settings is crucial for mastering iPhone photography. From adjusting resolution to understanding HDR, these settings directly impact image quality. According to research from the Santa Fe University of Art and Design’s Photography Department, in July 2025, optimizing resolution provides clearer images with 75%, and smart HDR balances exposure for visually appealing photos by 60%.
- Resolution: Set to the highest for maximum detail.
- HDR (High Dynamic Range): Balances exposure in high-contrast scenes.
- Live Photos: Captures a short video clip alongside your photo.
2.2 Navigating The Camera Modes
The iPhone camera app offers various modes tailored for specific situations. Learning when to use each mode is essential for capturing the perfect shot.
- Photo: Standard mode for everyday shooting.
- Portrait: Creates a shallow depth of field, ideal for portraits.
- Panorama: Captures wide, sweeping landscapes.
- Video: Records videos with options for time-lapse and slow-motion.
- Cinematic: Records videos with shallow depth of field
3. Essential iPhone Photography Techniques
Mastering fundamental photography techniques is essential for elevating your iPhone photography. These techniques, combined with the iPhone’s capabilities, allow you to capture stunning images in any situation.
3.1 Mastering Composition
Composition is key to creating visually appealing photos. Using techniques like the rule of thirds can transform an ordinary scene into a captivating image.
- Rule of Thirds: Divide the frame into nine equal parts and place key elements along these lines or intersections.
- Leading Lines: Use lines to draw the viewer’s eye into the image.
- Symmetry and Patterns: Look for symmetrical scenes or repeating patterns to create visually striking compositions.
- Framing: Use elements within the scene to frame your subject, adding depth and context.
 Using the rule of thirds in iPhone photography
3.2 Understanding Light And Exposure
Light is the foundation of photography. Understanding how to use natural and artificial light, and how to adjust exposure, can dramatically improve your images.
- Natural Light: Utilize golden hour (the hour after sunrise and before sunset) for warm, soft light.
- Exposure Control: Tap on the screen to set focus, then slide your finger up or down to adjust exposure.
- Fill Flash: Use the flash in daylight to fill in shadows.
- Avoid Harsh Light: Overcast days provide soft, even light ideal for portraits.
3.3 Focusing Techniques
Sharp focus is crucial for clear, impactful photos. Mastering manual focus and focus lock ensures your subject is always in crisp detail.
- Manual Focus: Tap the screen to focus on your subject.
- AE/AF Lock: Press and hold on the screen to lock focus and exposure, useful for maintaining focus on a moving subject.
- Close-Up Focus: iPhones excel at close-up shots, capturing intricate details.
4. Must-Know iPhone Camera Settings For Better Photos
Optimizing your iPhone camera settings enhances your photography. Adjusting these settings based on the shooting environment can significantly improve image quality and creative control.
4.1 Adjusting White Balance
Adjusting white balance ensures accurate colors in your photos. Different lighting conditions can affect color temperature, so setting the white balance accordingly is essential.
- Automatic White Balance: The default setting, which works well in most situations.
- Manual White Balance: Use third-party apps to manually adjust white balance for specific lighting conditions.
- Cool vs. Warm: Adjust white balance to capture the true colors of the scene, whether it’s a cool, blue-toned landscape or a warm, golden interior.
4.2 Using Grid Lines For Perfect Alignment
Grid lines are a valuable tool for achieving perfect alignment and composition. They help you apply the rule of thirds and ensure your horizons are level.
- Enable Grid: Go to Settings > Camera and toggle on Grid.
- Rule of Thirds: Use the grid lines to align key elements along the intersections.
- Level Horizons: Ensure the horizon line aligns with one of the horizontal grid lines.
 iPhone photography grid
4.3 Understanding And Using HDR
HDR (High Dynamic Range) combines multiple exposures into a single image, capturing more detail in both the highlights and shadows. It’s particularly useful in high-contrast scenes.
- Automatic HDR: The iPhone automatically decides when to use HDR.
- Manual HDR: Control HDR settings for specific scenes.
- When to Use: Ideal for landscapes, sunsets, and scenes with bright skies and dark foregrounds.
- When to Avoid: Not suitable for fast-moving subjects, as it can create ghosting.
5. Advanced iPhone Photography Tips And Tricks
Once you’ve mastered the basics, exploring advanced techniques can take your iPhone photography to the next level. These tips and tricks allow for greater creative control and stunning results.
5.1 Shooting In RAW Format
Shooting in RAW format provides more flexibility in post-processing. RAW files retain more image data than JPEGs, allowing for greater adjustments without losing quality.
- Third-Party Apps: Use apps like ProCamera or Lightroom Mobile to shoot in RAW.
- Benefits: Greater dynamic range, better color accuracy, and more detail.
- Post-Processing: Edit RAW files in apps like Lightroom or Snapseed for optimal results.
5.2 Mastering Long Exposure Photography
Long exposure photography creates dreamy, ethereal effects by blurring motion. Use it to capture flowing water, light trails, and smooth skies.
- Third-Party Apps: Apps like Slow Shutter Cam allow you to control shutter speed.
- Tripod: Essential for keeping the iPhone steady during long exposures.
- ND Filter: Neutral density filters reduce the amount of light entering the lens, allowing for longer exposures in bright conditions.
5.3 Taking Stunning Portrait Photos
Portrait mode on the iPhone creates professional-looking portraits with a shallow depth of field. Experiment with different lighting and settings to achieve the best results.
- Portrait Mode: Select Portrait mode in the camera app.
- Studio Light: Simulates professional studio lighting.
- Contour Light: Creates dramatic shadows and highlights.
- Stage Light: Isolates the subject on a black background.
- Natural Light: Position your subject in soft, natural light for flattering portraits.
5.4 Using iPhone Volume Buttons
Did you know that the volume buttons aren’t just for adjusting your iPhone volume? When the camera app is open, the volume buttons turn into your shutter button. Use them to take a picture if tapping the circle isn’t as convenient.
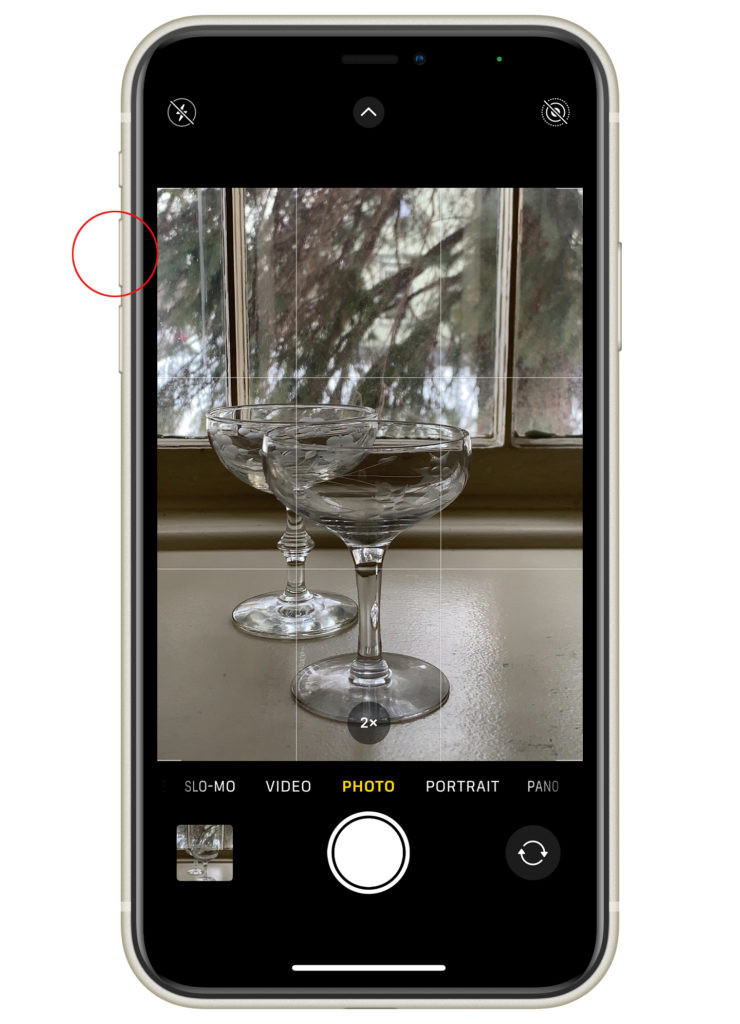 Using iPhone volume buttons for photos
6. Essential Equipment For iPhone Photography
While the iPhone is a capable camera on its own, certain accessories can enhance your photography and provide greater creative control.
6.1 Tripods And Stabilizers
A tripod is essential for sharp, stable photos, especially in low light or when shooting long exposures. Stabilizers can also help reduce camera shake when shooting videos.
- Compact Tripods: Lightweight and portable, ideal for travel.
- Flexible Tripods: Can be wrapped around objects for unique angles.
- Smartphone Mounts: Securely attach your iPhone to the tripod.
- Gimbals: Electronic stabilizers for smooth, professional-looking videos.
6.2 External Lenses
External lenses expand the capabilities of your iPhone camera, allowing you to capture wide-angle shots, macro details, and telephoto perspectives.
- Wide-Angle Lenses: Capture expansive landscapes and interiors.
- Macro Lenses: Get incredibly close to your subject for detailed shots.
- Telephoto Lenses: Zoom in on distant subjects without losing image quality.
6.3 Lighting Accessories
Controlling light is crucial for great photography. External lighting accessories can help you achieve the perfect exposure and create stunning effects.
- LED Panels: Provide constant, adjustable light for photos and videos.
- Ring Lights: Create soft, even light, ideal for portraits and close-ups.
- Diffusers: Soften harsh light and reduce shadows.
- Reflectors: Bounce light back onto your subject, brightening shadows.
6.4 Bluetooth Remote Camera Shutter
Now that we’ve covered getting a tripod for your iPhone, the next tool I recommend is a remote camera shutter release. This tool comes in handy for two reasons:
- Pressing the shutter button on your iPhone could cause the camera to shake a little, resulting in blurry images.
- You may not be near your iPhone to take the picture.
I have this bluetooth remote shutter and it’s compatible with most smartphones on the market. It’s really small and convenient to carry with you and has been super reliable for me.
 Bluetooth remote camera shutter for iPhones
7. Top Apps For Editing iPhone Photos
Post-processing is an essential part of the photography workflow. These apps offer a range of tools for enhancing your iPhone photos, from basic adjustments to advanced editing techniques.
7.1 Snapseed
Snapseed is a powerful, free photo editing app developed by Google. It offers a wide range of tools and filters, making it a favorite among mobile photographers.
- Selective Adjustments: Adjust brightness, contrast, and saturation in specific areas of the image.
- Healing Tool: Remove blemishes and distractions.
- HDR Scape: Create stunning HDR effects.
- Double Exposure: Combine multiple images for creative effects.
7.2 Adobe Lightroom Mobile
Adobe Lightroom Mobile is a professional-grade photo editing app that offers advanced features and seamless integration with Adobe Creative Cloud.
- RAW Editing: Edit RAW files for maximum image quality.
- Presets: Apply one-click adjustments for consistent styles.
- Selective Adjustments: Fine-tune specific areas of the image.
- Cloud Sync: Sync your edits across devices.
7.3 VSCO
VSCO is known for its beautiful filters and minimalist interface. It’s a great app for creating stylish, atmospheric images.
- Filters: Apply a wide range of customizable filters.
- Editing Tools: Adjust exposure, contrast, and color.
- Community: Share your photos and discover inspiration from other photographers.
7.4 Darkroom
Darkroom is a powerful photo and video editor with a focus on speed and simplicity. It offers a range of advanced features, including RAW editing and batch processing.
- RAW Editing: Edit RAW files for maximum image quality.
- Batch Processing: Apply edits to multiple photos at once.
- Custom Filters: Create and save your own filters.
- Video Editing: Edit videos with the same powerful tools as photos.
8. iPhone Photography Styles To Explore
iPhone photography offers endless creative possibilities. Exploring different styles can help you develop your unique vision and capture stunning images.
8.1 Street Photography
Street photography captures candid moments in public places. It’s about observing and documenting everyday life with a unique perspective.
- Be Observant: Look for interesting subjects and compositions.
- Candid Shots: Capture people in their natural environment.
- Tell a Story: Convey a narrative through your images.
8.2 Landscape Photography
Landscape photography captures the beauty of natural environments. Use wide-angle lenses and dramatic lighting to create stunning vistas.
- Golden Hour: Shoot during the hour after sunrise and before sunset for warm, soft light.
- Wide-Angle Lens: Capture expansive scenes.
- Find a Focal Point: Create depth and interest by including a prominent element in the foreground.
8.3 Portrait Photography
Portrait photography focuses on capturing the personality and essence of your subject. Use natural light and shallow depth of field to create flattering and impactful portraits.
- Natural Light: Position your subject in soft, natural light.
- Portrait Mode: Create a shallow depth of field.
- Connect with Your Subject: Engage with your subject to capture genuine emotions.
8.4 Food Photography
Food photography captures the beauty and detail of culinary creations. Use natural light and careful composition to make your food look irresistible.
- Natural Light: Position your food near a window for soft, natural light.
- Composition: Use the rule of thirds and leading lines to create visually appealing compositions.
- Props: Add props to enhance the story and context of your images.
8.5 Black And White Photography
Black and white photography emphasizes form, texture, and contrast. Convert your images to black and white to create timeless, artistic photos.
- Look for Contrast: Scenes with strong contrast work well in black and white.
- Focus on Texture: Emphasize the textures and patterns in your subject.
- Use Editing Tools: Adjust contrast, shadows, and highlights for optimal results.
9. Protecting Your iPhone While Shooting
Protecting your iPhone is essential, especially when shooting in challenging environments. These accessories can help keep your device safe and secure.
9.1 Protective Cases
A sturdy case is the first line of defense against drops, bumps, and scratches. Choose a case that offers adequate protection without compromising functionality.
- Shockproof Cases: Provide extra protection against impact.
- Waterproof Cases: Protect your iPhone from water damage.
- Slim Cases: Offer basic protection without adding bulk.
9.2 Screen Protectors
A screen protector prevents scratches and cracks on your iPhone’s display. Tempered glass protectors offer the best protection and maintain touch sensitivity.
- Tempered Glass: Provides superior protection and clarity.
- Privacy Screen Protectors: Limit the viewing angle, protecting your screen from prying eyes.
- Anti-Glare Protectors: Reduce glare in bright sunlight.
9.3 Lens Cleaning Kits
Keeping your iPhone lenses clean is essential for sharp, clear photos. A lens cleaning kit includes everything you need to remove dust, smudges, and fingerprints.
- Microfiber Cloths: Gently wipe the lenses without scratching.
- Lens Cleaning Solution: Removes stubborn smudges and fingerprints.
- Air Blower: Blows away dust and debris without touching the lens.
10. Sharing Your iPhone Photos
Sharing your photos is a great way to showcase your work and connect with other photographers. These platforms offer various ways to share your images and build a following.
10.1 Instagram
Instagram is the most popular platform for sharing photos and videos. Use hashtags and engage with the community to grow your audience.
- Use Hashtags: Increase visibility by using relevant hashtags.
- Engage with Followers: Respond to comments and messages.
- Post Regularly: Maintain a consistent presence.
10.2 Flickr
Flickr is a platform for sharing high-quality photos with a community of photographers. It offers advanced features for organizing and showcasing your work.
- Organize Your Photos: Use albums and tags to organize your images.
- Join Groups: Connect with photographers who share your interests.
- Share on Other Platforms: Promote your Flickr account on other social media channels.
10.3 500px
500px is a platform for showcasing professional-quality photography. It offers a curated selection of images and opportunities for exposure.
- Submit Your Best Work: Showcase your most stunning images.
- Engage with the Community: Provide feedback and support to other photographers.
- Licensing Opportunities: Earn money by licensing your photos.
11. The Future Of iPhone Photography
The future of iPhone photography looks promising, with continued advancements in camera technology and software. Stay updated with the latest trends and innovations to stay ahead of the curve.
11.1 Computational Photography
Computational photography uses software algorithms to enhance image quality and create effects that were previously impossible.
- Deep Fusion: Analyzes multiple exposures to optimize detail and reduce noise.
- Night Mode: Captures bright, clear photos in low light.
- Smart HDR: Balances exposure in high-contrast scenes.
11.2 Augmented Reality
Augmented reality (AR) overlays digital information onto the real world. AR apps can enhance your photography by providing real-time information and creative effects.
- Sky Guide: Identifies stars and constellations in real-time.
- Measure: Measures distances and dimensions using the camera.
- AR Effects: Add virtual objects and effects to your photos and videos.
11.3 AI-Powered Editing
AI-powered editing tools use artificial intelligence to analyze and enhance your photos automatically. These tools can save time and improve image quality with minimal effort.
- Automatic Adjustments: AI analyzes your photos and applies optimal adjustments.
- Object Recognition: AI identifies objects and subjects in your images.
- Content-Aware Fill: AI fills in missing areas of the image seamlessly.
12. Join A Photography Community
Surrounding yourself with like-minded individuals can significantly enhance your photography journey. Join a photography community to share your work, receive feedback, and learn from others.
12.1 Online Forums
Online forums provide a space for photographers to discuss techniques, share images, and ask questions.
- DPReview: A comprehensive resource for camera reviews, articles, and forums.
- Photography Talk: A community of photographers of all skill levels.
- Reddit Photography: A subreddit dedicated to photography discussions and image sharing.
12.2 Social Media Groups
Social media groups offer a more casual and interactive way to connect with other photographers.
- Facebook Groups: Join groups dedicated to specific genres or brands.
- Instagram Communities: Use hashtags to discover and engage with other photographers.
12.3 Local Photography Clubs
Local photography clubs provide opportunities to meet other photographers in person, attend workshops, and participate in exhibitions.
- Find a Club: Search online for photography clubs in your area.
- Attend Meetings: Participate in discussions and share your work.
- Join Events: Attend workshops, field trips, and exhibitions.
13. Inspiring iPhone Photographers To Follow
Following inspiring iPhone photographers can provide motivation and ideas for your own work. These photographers showcase the incredible potential of iPhone photography.
13.1 Sean O’shaughnessy
Sean O’shaughnessy is a street photographer who captures candid moments in urban environments. His work is characterized by its spontaneity and unique perspective.
- Instagram: @sean_oshea
13.2 Richard Koci Hernandez
Richard Koci Hernandez is a photojournalist and educator who uses his iPhone to document stories and capture compelling images.
- Instagram: @koci
13.3 Pei Ketron
Pei Ketron is a travel photographer who captures stunning landscapes and cultural experiences with her iPhone.
- Instagram: @pketron
14. iPhone Photography Tips For Different Scenarios
Different shooting scenarios require different techniques and settings. These tips will help you capture the best possible images in various situations.
14.1 Shooting In Low Light
Shooting in low light can be challenging, but with the right techniques, you can capture bright, clear images.
- Night Mode: Use Night mode on newer iPhones for extended exposures.
- Tripod: Stabilize your iPhone to prevent motion blur.
- Increase ISO: Increase ISO to brighten the image, but be mindful of noise.
14.2 Shooting Action Shots
Capturing action shots requires fast shutter speeds and precise timing.
- Burst Mode: Hold down the shutter button to capture a burst of images.
- Increase Shutter Speed: Use a third-party app to increase shutter speed.
- Predictive Focus: Use predictive focus to keep your subject in sharp focus.
14.3 Shooting Portraits Indoors
Shooting portraits indoors requires careful attention to lighting and composition.
- Position Near a Window: Use natural light from a window for soft, flattering light.
- Use a Reflector: Bounce light back onto your subject to brighten shadows.
- Portrait Mode: Create a shallow depth of field to isolate your subject.
15. Maintaining Your iPhone Camera
Proper maintenance ensures your iPhone camera continues to perform at its best.
15.1 Cleaning The Lenses
Regularly clean your iPhone lenses to remove dust, smudges, and fingerprints.
- Use a Microfiber Cloth: Gently wipe the lenses with a microfiber cloth.
- Avoid Harsh Chemicals: Do not use harsh chemicals or abrasive materials.
15.2 Storing Your iPhone Properly
Store your iPhone in a safe place to prevent damage.
- Avoid Extreme Temperatures: Do not expose your iPhone to extreme temperatures.
- Keep Away From Water: Protect your iPhone from water damage.
16. Resources For Learning More About iPhone Photography
There are many resources available for learning more about iPhone photography.
16.1 Online Courses
Online courses offer structured learning and expert guidance.
- CreativeLive: Offers a variety of photography courses.
- Skillshare: Provides access to thousands of creative classes.
- Mastering iPhone Food Photography: Regan Baroni’s course for mastering iPhone food photography
 iPhone food photography course
16.2 Books
Books offer in-depth knowledge and inspiration.
- The iPhone Photography Book by Scott Kelby: A comprehensive guide to iPhone photography.
- iPhone Photography for Dummies by Mark Hemmings: A beginner-friendly guide to iPhone photography.
16.3 Blogs And Websites
Blogs and websites offer tips, tutorials, and inspiration.
- iMore: A resource for iPhone news, reviews, and tutorials.
- TheAppWhisperer: A website dedicated to iPhone photography.
- dfphoto.net: Your ultimate resource for photography tips, equipment reviews, and inspiration. Visit dfphoto.net today to elevate your photography skills. Address: 1600 St Michael’s Dr, Santa Fe, NM 87505, United States. Phone: +1 (505) 471-6001.
FAQ About How To Take Photos On iPhone
1. How do I improve the quality of my iPhone photos?
Optimize settings, master composition, use natural light, focus correctly, and edit your photos using apps like Snapseed or Lightroom Mobile.
2. What is the best resolution for iPhone photos?
Set your camera to the highest resolution available in your iPhone settings for maximum detail.
3. How can I take better photos in low light with my iPhone?
Use Night mode (if available), stabilize your iPhone with a tripod, increase ISO, and use editing tools to reduce noise.
4. How do I lock focus and exposure on my iPhone?
Tap and hold on the screen until you see “AE/AF Lock” appear at the top.
5. What are the best apps for editing iPhone photos?
Popular apps include Snapseed, Adobe Lightroom Mobile, VSCO, and Darkroom.
6. How can I stabilize my iPhone for sharper photos?
Use a tripod, smartphone stabilizer, or lean against a stable surface.
7. What is HDR and when should I use it on my iPhone?
HDR (High Dynamic Range) combines multiple exposures for balanced highlights and shadows, ideal for high-contrast scenes.
8. Can I shoot in RAW format on my iPhone?
Yes, use third-party apps like ProCamera or Lightroom Mobile to shoot in RAW.
9. How do I clean my iPhone camera lenses?
Use a microfiber cloth to gently wipe the lenses, and avoid harsh chemicals.
10. What are some essential accessories for iPhone photography?
Tripods, external lenses, lighting accessories, and protective cases are essential.
Conclusion: Your Journey To Stunning iPhone Photography
Mastering how to take photos on iPhone is an ongoing journey. Embrace the learning process, experiment with different techniques, and find your unique style. Visit dfphoto.net for more tutorials, gear reviews, and inspiration to fuel your passion. Remember, the best camera is the one you have with you; start creating stunning images with your iPhone today and share your photos with the world. Unlock your creative potential with dfphoto.net and capture moments that last a lifetime!