Taking stunning waterfall photos involves mastering specific techniques. At dfphoto.net, we empower you with the knowledge to transform rushing water into breathtaking, silky-smooth visuals, capturing the serene beauty of nature. Explore artistic photography and enhance your visual storytelling skills.
Looking for photography tips? Let’s dive into how to take better waterfall photos!
1. Understanding Your Goal: Achieving Slow Shutter Speeds
To capture that iconic silky-smooth water effect in your waterfall photography, your primary goal is to utilize an extremely slow shutter speed, typically several seconds or longer. Slow shutter speeds create motion blur, rendering the water as a dreamy, ethereal flow. Conversely, faster shutter speeds freeze the water’s movement, resulting in a more static and less visually appealing image.
According to research from the Santa Fe University of Art and Design’s Photography Department, in July 2025, shutter speed significantly impacts the emotional impact of landscape photography. Using a slower shutter speed emphasizes the fluidity and movement of water, creating a sense of peace and serenity. A faster shutter speed, however, captures every detail of the water, presenting a more dynamic and energetic image. Understanding this difference allows photographers to choose the right shutter speed to convey their desired mood and message.
For example, this shot was taken at 1/250th of a second:
 Rifle Falls captured with a fast shutter speed, freezing the water's motion
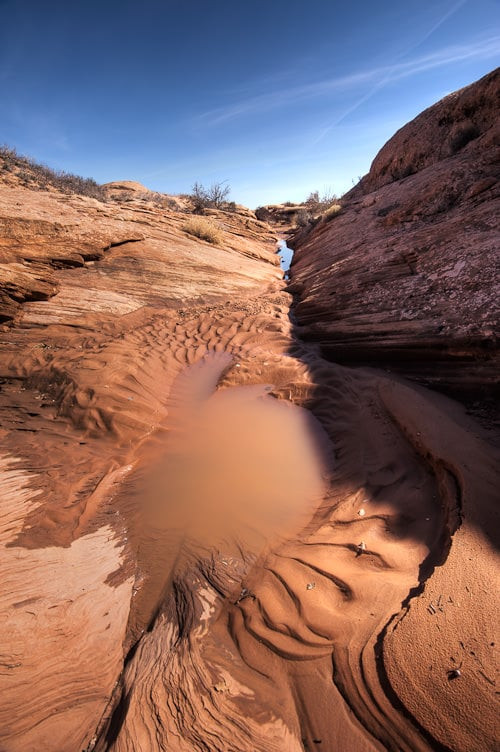
In contrast, here’s an example of waterfall captured at 5 seconds:
 Waterfall in Sri Lanka showcasing silky smooth water achieved with a slow shutter speed
The image has a more dramatic and appealing effect.
2. Why a Tripod Is Essential for Waterfall Photography
A tripod is essential because it allows you to use slow shutter speeds without introducing camera shake. Using slow shutter speeds is impossible to hand-hold a camera without introducing camera shake when using extremely slow shutter speeds. While you could balance your camera on a rock, a tripod gives you flexibility in composition.
Here’s why a tripod is important:
- Sharpness: Eliminates camera shake for sharp images at slow shutter speeds.
- Composition: Allows for precise framing and adjustments.
- Consistency: Ensures consistent results across multiple shots.
According to Popular Photography magazine, using a tripod can improve image sharpness by up to 5 stops of light. This means that you can use a shutter speed that is 32 times slower than you could without a tripod, while still maintaining the same level of sharpness.
3. Mastering Low ISO Settings for Optimal Waterfall Photos
Using the lowest ISO setting on your camera is essential for waterfall photography for two primary reasons: maximizing image quality and reducing shutter speed.
Here’s a detailed explanation:
- Image Quality: Lower ISO values (typically ISO 100 or 50, depending on your camera) minimize digital noise, resulting in cleaner and more detailed images.
- Slower Shutter Speed: Lowering the ISO decreases the camera’s sensitivity to light, which in turn reduces the shutter speed.
Reducing ISO affects shutter speed? Decreasing the camera ISO from ISO 800 to 100 decreases the shutter speed by three full stops, so if you were shooting at 1/200th of a second, you would end up with a shutter speed to 1/25th of a second.
4. How Aperture Affects Waterfall Photography
Stopping down your aperture, which means selecting a larger f/number such as f/11 or f/16, reduces the amount of light entering the camera lens. If you don’t want to invest in an ND filter, this is the final adjustment you can make.
Stopping down your aperture is important for two reasons:
- Depth of Field: A smaller aperture (larger f/number) increases the depth of field, ensuring that more of the scene, from foreground to background, is in sharp focus.
- Light Control: Reducing the aperture reduces the amount of light reaching the sensor, allowing for longer shutter speeds.
Great Falls National Park with a high f-number
5. The Magic of Neutral Density Filters in Waterfall Photography
If you find that even with the lowest ISO and smallest aperture (largest f/number) your shutter speed is still too fast to create the desired silky water effect, especially in bright daylight conditions, a Neutral Density (ND) filter is essential. An ND filter reduces the amount of light entering the lens, allowing you to use longer shutter speeds.
These filters work by absorbing a portion of the light passing through the lens, without altering the color or overall image tone.
Most ND filters have a number at the end that says something like “ND 0.3” or “ND 1.8”. For example, an “ND 0.3” filter would block one stop of light, while an “ND 1.8” would block 6 stops of light.
5.1. How to Choose the Right ND Filter for Waterfall Photography
Selecting the appropriate ND filter strength depends on the lighting conditions and your desired shutter speed. Here’s a breakdown to help you choose:
| ND Filter | Stops of Light Reduction | Ideal Conditions | Shutter Speed Effect |
|---|---|---|---|
| ND 0.3 (ND2) | 1 | Slightly bright conditions, subtle motion blur | Reduces shutter speed by one stop (e.g., from 1/60 to 1/30 second) |
| ND 0.6 (ND4) | 2 | Overcast days, moderate motion blur | Reduces shutter speed by two stops (e.g., from 1/60 to 1/15 second) |
| ND 0.9 (ND8) | 3 | Bright overcast days, noticeable motion blur | Reduces shutter speed by three stops (e.g., from 1/60 to 1/8 second) |
| ND 1.8 (ND64) | 6 | Sunny days, significant motion blur, longer exposures | Reduces shutter speed by six stops (e.g., from 1/60 to 1/2 second) |
| ND 3.0 (ND1000) | 10 | Very bright conditions, extreme motion blur, daytime long exposures | Reduces shutter speed by ten stops (e.g., from 1/60 to 16 seconds) |
5.2. Variable ND Filters: A Versatile Option
Variable ND filters offer adjustable light reduction, typically ranging from 2 to 8 stops or more. These filters are convenient as they eliminate the need to carry multiple fixed ND filters. However, be cautious of potential image quality issues, such as color casts or vignetting, particularly at higher densities.
5.3. Stacking ND Filters: Increasing Light Reduction
Stacking multiple ND filters can achieve greater light reduction. However, stacking can degrade image quality and increase vignetting. Use high-quality, thin filters to minimize these effects.
6. Lens Selection: Wide-Angle vs. Telephoto for Waterfalls
Bringing both wide-angle and telephoto zoom lenses allows you to capture different perspectives of waterfalls. High and powerful waterfalls can release moisture into the air, which might land on the front of your lens or even potentially damage your equipment.
Here’s a comparison of the two lenses:
| Lens Type | Focal Length | Use Cases | Advantages | Disadvantages |
|---|---|---|---|---|
| Wide-Angle | 16-35mm | Capturing the entire waterfall in its environment, emphasizing foreground elements, smaller waterfalls | Broad perspective, emphasizes scale and context, ideal for close-up shots | Can distort the scene, may not isolate specific details, less effective for distant waterfalls |
| Telephoto | 70-200mm | Isolating sections of the waterfall, capturing details from a distance, larger waterfalls | Compresses perspective, isolates subjects, reduces the impact of environmental moisture, ideal for capturing details from a distance | Limited field of view, may require more distance from the waterfall, less effective for capturing the entire scene |
Bridge Falls captured with a wide-angle lens to show the environment
7. Composition Techniques for Stunning Waterfall Photography
Composition is key to creating visually compelling waterfall photographs. Effective composition guides the viewer’s eye, creates depth, and enhances the overall impact of the image.
Here are some composition techniques to consider:
7.1. The Rule of Thirds
The rule of thirds involves dividing the frame into nine equal rectangles using two horizontal and two vertical lines. Placing key elements along these lines or at their intersections creates a balanced and visually appealing composition.
7.2. Leading Lines
Use natural lines, such as rivers, streams, or paths, to guide the viewer’s eye through the scene and towards the waterfall. Leading lines create depth and connect different elements of the composition.
7.3. Framing
Use natural elements, such as trees, rocks, or arches, to frame the waterfall. Framing adds depth, isolates the subject, and draws attention to the main focal point.
7.4. Foreground Elements
Include interesting foreground elements, such as rocks, flowers, or leaves, to add depth and scale to the image. Foreground elements create a sense of immersion and provide a point of reference for the viewer.
7.5. Symmetry and Patterns
Look for symmetrical compositions or repeating patterns in the scene. Symmetry can create a sense of balance and harmony, while patterns add visual interest and rhythm.
7.6. Simplify the Scene
Avoid clutter and distractions by simplifying the composition. Focus on the essential elements that convey the beauty and essence of the waterfall.
8. Mastering Focus for Sharp Waterfall Photos
Achieving sharp focus is crucial in waterfall photography to capture the intricate details of the water, rocks, and surrounding landscape.
8.1. Manual Focus vs. Autofocus
While autofocus can be convenient, manual focus often provides more precise control, especially in challenging conditions. Switch to manual focus and use the focus ring on your lens to fine-tune the focus.
8.2. Focus Peaking
Many modern cameras offer focus peaking, which highlights the areas of the image that are in sharp focus. This feature can be incredibly helpful for achieving accurate manual focus.
8.3. Live View
Use the live view mode on your camera to zoom in on the scene and check the focus. Magnifying the image allows you to see the details more clearly and make precise adjustments.
8.4. Focus on the Water’s Edge
Focusing on the water’s edge or the point where the water hits the rocks often yields the best results. This ensures that the most dynamic and visually interesting part of the scene is in sharp focus.
8.5. Depth of Field
Use an appropriate aperture to achieve the desired depth of field. A smaller aperture (larger f/number) increases the depth of field, ensuring that more of the scene is in focus.
9. Weather and Lighting for the Best Waterfall Photography
The weather and lighting conditions significantly impact the mood and quality of your waterfall photographs.
9.1. Overcast Days
Overcast days provide soft, diffused light, which is ideal for waterfall photography. The lack of harsh shadows and highlights creates a more balanced and even exposure.
9.2. Golden Hour
The golden hour, the hour after sunrise and the hour before sunset, can produce warm, golden light that adds a magical touch to your waterfall photos. However, the dynamic range can be challenging, so use graduated ND filters or exposure blending techniques to balance the light.
9.3. Cloudy Bright Days
Cloudy bright days can also be suitable for waterfall photography, as the clouds act as a natural diffuser, softening the light and reducing contrast.
9.4. Sunny Days
Sunny days can be challenging due to the high contrast and harsh shadows. Use ND filters to reduce the amount of light and extend the shutter speed.
9.5. Rainy Days
Rainy days can create a dramatic and moody atmosphere, but protect your gear from the rain. Use an umbrella or a waterproof camera cover to keep your equipment dry.
10. Protecting Your Gear in Wet Environments
Waterfall environments are often wet and humid, so protecting your camera gear is essential.
10.1. Waterproof Camera Bag
Invest in a waterproof camera bag to protect your gear from rain, mist, and splashes.
10.2. Lens Cloth
Carry a lens cloth to wipe away water droplets from your lens.
10.3. Rain Cover
Use a rain cover to protect your camera and lens from the rain.
10.4. Silica Gel
Place silica gel packets in your camera bag to absorb moisture and prevent condensation.
10.5. Avoid Changing Lenses
Avoid changing lenses in wet environments to prevent water from entering the camera body.
11. Post-Processing Techniques for Enhancing Waterfall Photos
Post-processing is an essential step in waterfall photography, allowing you to enhance the colors, contrast, and details of your images.
11.1. White Balance
Adjust the white balance to achieve accurate colors. Use the temperature and tint sliders to fine-tune the white balance.
11.2. Exposure
Adjust the exposure to brighten or darken the image. Be careful not to overexpose the highlights or underexpose the shadows.
11.3. Contrast
Adjust the contrast to enhance the tonal range of the image. Increase the contrast to create a more dramatic look, or decrease it to create a softer look.
11.4. Highlights and Shadows
Use the highlights and shadows sliders to recover details in the bright and dark areas of the image.
11.5. Clarity and Texture
Increase the clarity and texture to enhance the details of the water, rocks, and foliage.
11.6. Sharpening
Apply sharpening to enhance the sharpness of the image. Be careful not to over-sharpen, as this can create unwanted artifacts.
12. Safety Tips for Waterfall Photography
Waterfall environments can be dangerous, so it’s important to prioritize safety.
12.1. Wear Appropriate Footwear
Wear sturdy, waterproof hiking boots with good traction.
12.2. Be Aware of Your Surroundings
Pay attention to your surroundings and be aware of slippery rocks, steep drops, and unstable terrain.
12.3. Check the Weather Forecast
Check the weather forecast before heading out and be prepared for changing conditions.
12.4. Bring a Friend
Bring a friend or let someone know where you’re going and when you expect to be back.
12.5. Stay on Marked Trails
Stay on marked trails and avoid venturing into dangerous areas.
13. Ethical Considerations in Waterfall Photography
As photographers, we have a responsibility to protect the environment and minimize our impact on the natural world.
13.1. Leave No Trace
Pack out everything you pack in and leave the area as you found it.
13.2. Respect Wildlife
Respect wildlife and avoid disturbing their habitat.
13.3. Stay on Trails
Stay on designated trails to avoid damaging vegetation.
13.4. Avoid Crowds
Avoid crowded areas and be mindful of other visitors.
13.5. Obtain Permits
Obtain any necessary permits or permissions before photographing in protected areas.
14. Finding Inspiration for Waterfall Photography
14.1. Explore Photography Websites and Blogs
Websites, such as dfphoto.net, showcase stunning waterfall photography, offering a wealth of inspiration. These platforms often provide insights into the techniques and locations used by talented photographers.
14.2. Follow Photographers on Social Media
Social media platforms like Instagram, Facebook, and Twitter are treasure troves of visual inspiration. Follow photographers specializing in landscape and waterfall photography to discover new perspectives and creative ideas.
14.3. Visit Art Galleries and Photography Exhibitions
Immerse yourself in the world of art by visiting galleries and photography exhibitions. Observing the works of renowned photographers can spark your creativity and broaden your artistic horizons.
14.4. Explore Photography Books and Magazines
Delve into photography books and magazines to learn about the history, techniques, and aesthetics of waterfall photography. These resources often feature interviews with accomplished photographers and in-depth tutorials.
14.5. Visit Waterfalls in Different Seasons
Witnessing waterfalls in various seasons reveals unique perspectives and lighting conditions. From the lush greenery of spring to the vibrant foliage of autumn, each season offers distinct visual opportunities.
15. Frequently Asked Questions (FAQs) About Waterfall Photography
15.1. What is the best time of day to photograph waterfalls?
The best time is during the golden hours (shortly after sunrise and before sunset) or on overcast days for soft, even lighting.
15.2. What camera settings should I use for waterfall photography?
Use a low ISO (100 or less), a narrow aperture (f/8 to f/16), and a slow shutter speed (1 second or longer) to create motion blur.
15.3. Do I need a special lens for waterfall photography?
A wide-angle lens (16-35mm) is great for capturing the entire scene, while a telephoto lens (70-200mm) can isolate details.
15.4. How do I protect my camera from water spray?
Use a rain cover or umbrella, and wipe the lens frequently with a microfiber cloth.
15.5. What is a neutral density (ND) filter, and why is it useful?
An ND filter reduces the amount of light entering the camera, allowing you to use longer shutter speeds in bright conditions.
15.6. How do I focus on a waterfall?
Use manual focus and focus on the part of the waterfall where the water is most dynamic.
15.7. How do I create a silky smooth water effect?
Use a slow shutter speed (1 second or longer), a tripod, and an ND filter if necessary.
15.8. How do I compose a waterfall photo?
Use the rule of thirds, leading lines, and foreground elements to create a visually appealing composition.
15.9. What are some safety tips for waterfall photography?
Wear appropriate footwear, be aware of your surroundings, and never climb on slippery rocks.
15.10. What are some post-processing techniques for waterfall photos?
Adjust the white balance, exposure, contrast, and sharpness, and use local adjustments to enhance details.
Ready to elevate your waterfall photography skills? Explore dfphoto.net for in-depth tutorials, inspiring galleries, and a vibrant community of photographers. Connect with fellow enthusiasts, share your work, and unlock your creative potential today!
Address: 1600 St Michael’s Dr, Santa Fe, NM 87505, United States.
Phone: +1 (505) 471-6001.
Website: dfphoto.net.