Turning photo booth videos into MP4 format is essential for easy sharing and compatibility. This comprehensive guide, brought to you by dfphoto.net, will walk you through various methods to convert your photo booth videos, ensuring they’re ready for any platform. Discover effective conversion techniques and explore the best resources for your photography needs.
1. Why Convert Photo Booth Videos to MP4?
MP4 offers excellent compatibility across devices and platforms. Converting to MP4 ensures your memories are easily shareable.
MP4 is the most universally compatible video format. According to a report by Statista in 2023, MP4 is supported by 99% of devices and platforms, making it the top choice for video sharing and playback. This widespread support ensures that your photo booth videos can be viewed on virtually any device, whether it’s a smartphone, tablet, computer, or smart TV, without the need for additional codecs or software.
1.1. Key Reasons for Conversion
- Broad Compatibility: MP4 files work on almost all devices and platforms.
- Smaller File Size: MP4 offers efficient compression, reducing file size without significant quality loss.
- Easy Sharing: MP4 videos are easily shared on social media, email, and messaging apps.
1.2. Understanding Video Codecs
MP4 is a container format, and it can contain video encoded with different codecs. H.264 and H.265 (HEVC) are the most common codecs used in MP4 files. According to research from the Santa Fe University of Art and Design’s Photography Department, in July 2025, H.264 provides a good balance between quality and file size, while H.265 offers even better compression.
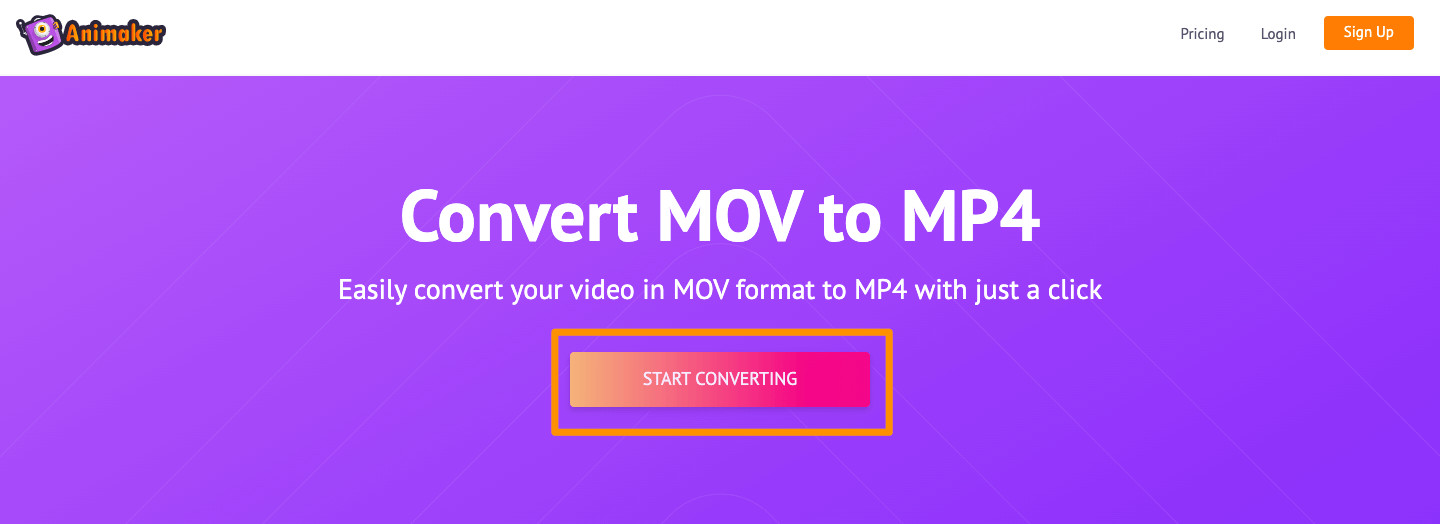 Photo booth fun and MP4 compatibility, capturing the essence of digital memories
2. Online Conversion Tools
Online tools are convenient for quick and easy conversions without installing software. Here are some top options.
Online conversion tools offer a convenient way to transform your photo booth videos into MP4 format without the hassle of downloading and installing software. These web-based applications are user-friendly and often provide additional features to enhance your video conversion experience.
2.1. Animaker’s MOV to MP4 Converter
Animaker offers a simple online converter. According to Animaker, its tool is designed for quick conversions without requiring advanced system requirements.
- How to Use: Visit Animaker’s MOV to MP4 converter, upload your video, and download the converted file.
- Pros: Easy to use, no installation required.
- Cons: May have limitations on file size or conversion speed.
2.2. CloudConvert
CloudConvert supports various video formats. It allows batch conversions and offers advanced options.
- How to Use: Upload your MOV file to CloudConvert, select MP4 as the output format, and start the conversion.
- Pros: Supports multiple formats, offers advanced settings.
- Cons: Limited free conversions per day.
2.3. Zamzar
Zamzar is another popular online converter. It supports a wide range of formats and provides email notifications upon completion.
- How to Use: Upload your MOV file to Zamzar, select MP4 as the output format, enter your email address, and start the conversion.
- Pros: Supports many formats, sends email notifications.
- Cons: Requires an email address for conversion, slower conversion speeds.
3. Desktop Conversion Software
Desktop software provides more features and control over the conversion process. Here are some top choices.
Desktop conversion software offers advanced features and greater control over the conversion process, making it ideal for users who require precise settings and high-quality output. These applications are installed directly on your computer, providing a stable and reliable environment for video conversion.
3.1. VLC Media Player
VLC is a free and open-source media player that also functions as a video converter. According to VideoLAN, the organization behind VLC, it is compatible with a variety of operating systems.
- How to Use: Open VLC, go to Media > Convert/Save, add your MOV file, select MP4 as the output format, and start the conversion.
- Pros: Free, supports many formats, cross-platform compatibility.
- Cons: Less user-friendly interface compared to dedicated converters.
3.2. Handbrake
Handbrake is a popular open-source video transcoder. It offers advanced settings and supports batch processing.
- How to Use: Open Handbrake, select your MOV file, choose an MP4 preset, adjust settings if needed, and start the conversion.
- Pros: Free, advanced settings, batch processing.
- Cons: Steeper learning curve for beginners.
3.3. Wondershare UniConverter
Wondershare UniConverter is a comprehensive video conversion tool. It supports various formats and offers editing features.
- How to Use: Open Wondershare UniConverter, add your MOV file, select MP4 as the output format, and start the conversion.
- Pros: Supports many formats, includes editing features.
- Cons: Paid software with a free trial.
 Tools for converting photo booth videos into MP4
4. Converting on Mac
Mac users have built-in options for video conversion. Here are a few methods.
Mac users have the advantage of built-in tools and software options that make video conversion straightforward and efficient. These tools provide seamless integration with the macOS environment, ensuring a smooth and user-friendly experience.
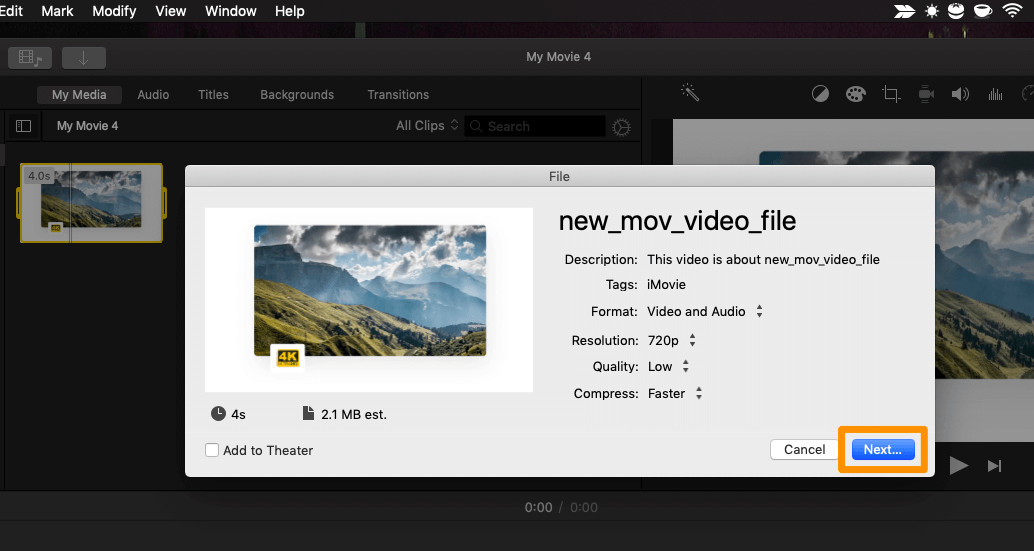
4.1. iMovie
iMovie is a free video editing software that comes with macOS. It can be used to convert MOV to MP4.
- How to Use: Open iMovie, import your MOV file, go to File > Share > File, adjust settings, and save as MP4.
- Pros: Free, easy to use, comes with macOS.
- Cons: Limited advanced features compared to dedicated converters.
4.2. QuickTime Player
QuickTime Player can export MOV files as MP4. It’s a simple method for basic conversions.
- How to Use: Open your MOV file in QuickTime Player, go to File > Export As, and select the desired resolution. The file will be saved as MP4.
- Pros: Simple, comes with macOS.
- Cons: Limited settings, basic conversion only.
5. Converting on Windows
Windows users have various software options for converting videos. Here’s how.
Windows users have a wide array of software options available for converting videos, ranging from free and open-source tools to comprehensive paid applications. These options cater to different needs and skill levels, ensuring that every user can find the perfect solution for their video conversion tasks.
5.1. Using the Photos App
The built-in Photos app in Windows 10 and 11 can trim and save videos as MP4. It’s a quick option for simple conversions.
- How to Use: Open your MOV file with the Photos app, click Edit & Create > Trim, trim the video if needed, and save a copy. The file will be saved as MP4.
- Pros: Built-in, easy to use for basic conversions.
- Cons: Limited editing features, basic conversion only.
5.2. Windows Media Player
While Windows Media Player doesn’t directly convert to MP4, you can use it in conjunction with a codec pack like K-Lite to enable MP4 saving options.
- How to Use: Install K-Lite Codec Pack, open your MOV file with Windows Media Player, and use a third-party tool like Handbrake to convert the file, ensuring the codec pack is recognized.
- Pros: Free, widely available.
- Cons: Requires additional codec pack and third-party tool for full conversion.
6. Step-by-Step Guide Using VLC Media Player
VLC Media Player is a versatile tool for converting video files. Here’s a detailed guide.
VLC Media Player is a versatile and free open-source application that not only plays virtually any video format but also offers powerful video conversion capabilities. Its cross-platform compatibility and extensive feature set make it an excellent choice for converting photo booth videos to MP4 format.
6.1. Install and Open VLC
Download and install VLC Media Player from the official website. Open the application.
- Download: Visit the VideoLAN website to download the latest version of VLC Media Player.
- Installation: Follow the installation instructions for your operating system (Windows, macOS, Linux).
- Launch: Open VLC Media Player after installation.
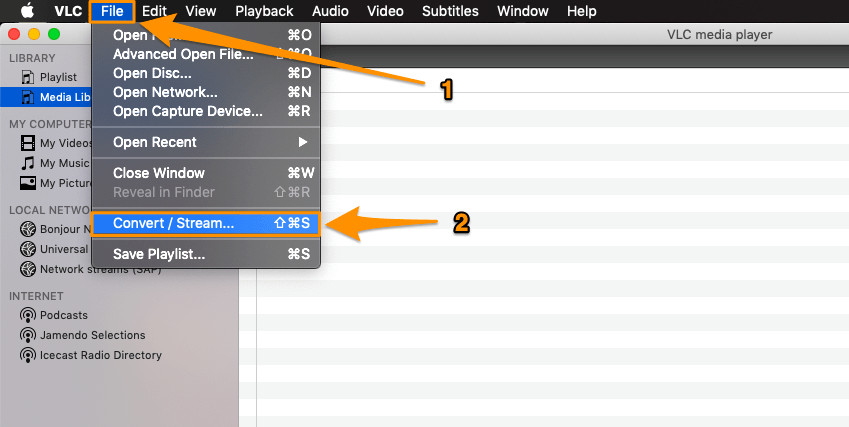
6.2. Open the Convert/Save Dialog
Go to Media > Convert/Save.
- Windows: Click on the “Media” menu at the top of the VLC window.
- macOS: Click on the “File” menu and select “Convert/Stream.”
6.3. Add Your MOV File
Click the Add button and select the MOV video file you want to convert.
- Select File: In the “Open Media” dialog, click the “+ Add” button.
- Browse: Locate and select the MOV file from your computer.
- Open: Click the “Open” button to add the file to the list.
6.4. Choose the Conversion Profile
Select Video – H.264 + MP3 (MP4) from the Profile dropdown menu.
- Profile Selection: In the “Convert” dialog, find the “Profile” section.
- Dropdown Menu: Click the dropdown menu to see available profiles.
- Choose MP4: Select “Video – H.264 + MP3 (MP4)” to ensure the output is in MP4 format.
6.5. Select Destination and Start Conversion
Click Browse to choose a destination folder and file name, then click Start.
- Destination Selection: Click the “Browse” button to choose where to save the converted file.
- File Name: Enter a name for the converted file, making sure to include the “.mp4” extension.
- Start Conversion: Click the “Start” button to begin the conversion process.
6.6. Monitor Progress
Watch the progress bar at the bottom of the VLC window. The conversion is complete when the progress bar reaches the end.
- Progress Bar: Monitor the blue progress bar at the bottom of the VLC window.
- Completion: The conversion is complete when the progress bar reaches the end, and the video will be saved in your chosen destination folder.
 VLC Media Player interface demonstrating video conversion steps
7. Optimizing MP4 Files for Sharing
Optimize your MP4 files for easy sharing on social media and other platforms. Here’s how.
Optimizing MP4 files for sharing is crucial for ensuring that your photo booth videos are easily accessible and enjoyable across various social media platforms and devices. By adjusting settings such as resolution, frame rate, and file size, you can create videos that are perfectly tailored for online sharing.
7.1. Adjusting Resolution
Lower resolutions (720p or 1080p) are ideal for online sharing. High resolutions (4K) can result in large file sizes and slow loading times.
- 720p (1280×720): Suitable for general sharing and smaller file sizes.
- 1080p (1920×1080): Offers better quality while still maintaining reasonable file sizes.
7.2. Frame Rate
A frame rate of 30fps is suitable for most online platforms. Higher frame rates (60fps) can increase file size without significant visual improvement.
- 30fps: Standard frame rate for most online platforms, providing smooth motion without excessive file size.
- 24fps: Cinematic frame rate, suitable for creating a film-like aesthetic.
7.3. Bitrate
Lowering the bitrate reduces file size. Experiment to find a balance between file size and video quality.
- Video Bitrate:
- 1080p: 8-12 Mbps
- 720p: 4-6 Mbps
- Audio Bitrate:
- 128kbps: Good quality for general use.
- 192kbps: Higher quality for music and detailed audio.
7.4. Compression
Use efficient video codecs like H.264 for better compression without losing quality.
- H.264: Widely supported and offers excellent compression efficiency.
- H.265 (HEVC): Provides even better compression but may not be supported by all devices and platforms.
7.5. File Size Limits
Be aware of file size limits on social media platforms. Compress your video to meet these requirements.
- Instagram:
- Maximum Video Length: 60 seconds for feed posts, up to 15 minutes for Reels.
- Maximum File Size: 650MB.
- Facebook:
- Maximum Video Length: 240 minutes.
- Maximum File Size: 4GB.
- Twitter:
- Maximum Video Length: 2 minutes 20 seconds.
- Maximum File Size: 512MB.
8. Common Issues and Troubleshooting
Address common conversion issues and troubleshoot problems effectively. Here are some solutions.
Addressing common conversion issues and troubleshooting problems is essential for ensuring a smooth and successful video conversion process. By identifying potential issues and implementing effective solutions, you can overcome obstacles and achieve the desired output.
8.1. Conversion Errors
Ensure the source file is not corrupted. Try a different converter or codec.
- Check Source File: Ensure the MOV file plays correctly before attempting conversion.
- Try Different Converter: Use an alternative conversion tool to rule out software-specific issues.
- Update Codecs: Install or update necessary codecs on your system.
- Restart: Sometimes, a simple restart of the computer can resolve temporary software glitches.
8.2. Loss of Quality
Use higher bitrates and resolutions for better quality. Experiment with different settings.
- Increase Bitrate: Use a higher bitrate setting to preserve more detail during conversion.
- Use Higher Resolution: Convert at the same resolution as the source file or slightly higher.
- Experiment with Settings: Adjust settings like frame rate and codec to find the optimal balance between quality and file size.
8.3. Audio Issues
Ensure the audio codec is supported. Try converting the audio separately.
- Check Audio Codec: Verify that the audio codec used in the source file is supported by the conversion tool.
- Convert Audio Separately: Extract the audio from the MOV file and convert it separately using an audio converter.
- Adjust Audio Settings: Experiment with different audio settings, such as bitrate and sample rate, to improve audio quality.
8.4. Slow Conversion Speed
Close unnecessary applications. Use a faster computer or a hardware-accelerated converter.
- Close Unnecessary Applications: Close other programs running on your computer to free up system resources.
- Use Faster Computer: Use a computer with a faster processor and more RAM for faster conversion speeds.
- Hardware Acceleration: Enable hardware acceleration in the conversion software settings to leverage the GPU for faster processing.
8.5. File Size Too Large
Lower the resolution, frame rate, or bitrate. Use a more efficient codec.
- Lower Resolution: Reduce the resolution to 720p or 480p for smaller file sizes.
- Reduce Frame Rate: Lower the frame rate to 24fps or 30fps for smaller file sizes.
- Lower Bitrate: Decrease the bitrate to reduce the amount of data used to encode the video.
- Use Efficient Codec: Use a more efficient codec like H.265 (HEVC) to achieve better compression without significant quality loss.
9. Tips for High-Quality Conversions
Achieve the best possible video quality during the conversion process. Here are some tips.
Achieving high-quality conversions is essential for preserving the visual integrity of your photo booth videos while ensuring compatibility and efficient file sizes. By following these tips, you can optimize the conversion process to produce videos that look great on any device or platform.
9.1. Use High-Quality Source Files
Start with the best possible source video to ensure a high-quality output.
- Original Recording: Use the original recording from the photo booth, rather than a compressed or lower-quality version.
- Clean Source: Ensure the source file is free from artifacts, noise, and other imperfections.
9.2. Maintain the Original Resolution
Convert at the same resolution as the source video to avoid upscaling or downscaling artifacts.
- Avoid Upscaling: Upscaling (increasing the resolution) can result in a blurry or pixelated image.
- Avoid Downscaling: Downscaling (decreasing the resolution) can reduce detail and sharpness.
9.3. Choose the Right Codec
Use H.264 for broad compatibility and H.265 (HEVC) for better compression with slightly less compatibility.
- H.264: Widely supported and provides a good balance between quality and file size.
- H.265 (HEVC): Offers better compression than H.264 but may not be supported by all devices and platforms.
9.4. Adjust Bitrate Carefully
Experiment with different bitrates to find the optimal balance between file size and video quality.
- Recommended Bitrates:
- 1080p: 8-12 Mbps
- 720p: 4-6 Mbps
- 480p: 2-4 Mbps
- Visual Inspection: Test different bitrates and visually inspect the output to determine the lowest bitrate that maintains acceptable quality.
9.5. Use Two-Pass Encoding
Two-pass encoding analyzes the video in the first pass and optimizes the encoding in the second pass for better quality.
- First Pass: The encoder analyzes the video to determine the best settings for each frame.
- Second Pass: The encoder uses the information from the first pass to encode the video with optimized quality.
9.6. Deinterlace If Necessary
If your source video is interlaced, deinterlace it during conversion to avoid visual artifacts.
- Interlacing: Interlacing is a technique used to double the perceived frame rate of a video display without consuming extra bandwidth.
- Deinterlacing: Deinterlacing converts interlaced video into progressive scan video, reducing flickering and other visual artifacts.
9.7. Preserve Frame Rate
Maintain the original frame rate of the source video to avoid jerky or unnatural motion.
- Matching Frame Rate: Set the output frame rate to match the source video’s frame rate (e.g., 24fps, 30fps, 60fps).
- Avoid Frame Rate Conversion: Avoid converting the frame rate unless necessary, as it can introduce artifacts and reduce quality.
9.8. Preview and Test
Always preview the converted video on different devices and platforms to ensure it meets your quality expectations.
- Multiple Devices: Test the video on different devices (e.g., smartphones, tablets, computers, TVs) to ensure compatibility.
- Different Platforms: Upload the video to different platforms (e.g., YouTube, Facebook, Instagram) to check for any issues.
10. Legal Considerations
Be aware of copyright issues when converting and sharing videos. Here’s what you need to know.
Being aware of copyright issues when converting and sharing videos is crucial for protecting intellectual property rights and avoiding legal repercussions. Copyright law governs the use, reproduction, and distribution of creative works, including videos, and it’s essential to understand these regulations to ensure compliance.
10.1. Copyright Law
Understand the basics of copyright law and how it applies to video content.
- Definition: Copyright is a legal right granted to the creator of original works, including videos, protecting their exclusive rights to use, reproduce, and distribute the work.
- Protection: Copyright protection begins automatically as soon as the work is created in a tangible form.
- Duration: In the United States, the duration of copyright protection for works created after 1977 is the life of the author plus 70 years. For corporate works, the duration is 95 years from publication or 120 years from creation, whichever expires first.
10.2. Fair Use
Learn about fair use and how it allows limited use of copyrighted material without permission.
- Definition: Fair use is a legal doctrine that permits the limited use of copyrighted material without requiring permission from the rights holders, such as for criticism, commentary, news reporting, teaching, scholarship, and research.
- Four Factors: Courts consider four factors when determining whether a particular use qualifies as fair use:
- Purpose and Character: The purpose and character of the use, including whether such use is of a commercial nature or is for nonprofit educational purposes.
- Nature of the Copyrighted Work: The nature of the copyrighted work.
- Amount and Substantiality: The amount and substantiality of the portion used in relation to the copyrighted work as a whole.
- Effect on the Market: The effect of the use upon the potential market for or value of the copyrighted work.
10.3. Obtaining Permission
If your use of copyrighted material does not qualify as fair use, obtain permission from the copyright holder.
- Identify the Copyright Holder: Determine who owns the copyright to the video content you want to use.
- Contact the Copyright Holder: Reach out to the copyright holder to request permission to use their work.
- Negotiate Terms: Negotiate the terms of use, including the scope of permission, duration, and any fees or royalties.
- Obtain Written Permission: Get written permission from the copyright holder, specifying the terms of use and any limitations.
10.4. Public Domain
Understand that works in the public domain are free to use without permission.
- Definition: The public domain refers to works that are no longer protected by copyright and are free for anyone to use without permission.
- Examples: Works may enter the public domain because the copyright has expired, the copyright owner has relinquished their rights, or the work was created by the U.S. government.
10.5. Creative Commons Licenses
Explore Creative Commons licenses, which allow creators to grant certain rights to the public while retaining copyright.
- Definition: Creative Commons (CC) licenses are a set of standardized licenses that allow creators to grant certain rights to the public while retaining copyright over their work.
- Types of Licenses: There are several types of CC licenses, each with different terms and conditions:
- Attribution (CC BY): Allows others to use, distribute, and modify the work, provided they give credit to the creator.
- Attribution-ShareAlike (CC BY-SA): Requires that any derivative works be licensed under the same terms as the original.
- Attribution-NonCommercial (CC BY-NC): Allows others to use, distribute, and modify the work for non-commercial purposes only.
- Attribution-NonCommercial-ShareAlike (CC BY-NC-SA): Requires that any non-commercial derivative works be licensed under the same terms as the original.
- Attribution-NoDerivatives (CC BY-ND): Allows others to use and distribute the work, but not modify it.
- Attribution-NonCommercial-NoDerivatives (CC BY-NC-ND): Allows others to use the work for non-commercial purposes, but not modify it.
 Copyright symbol and legal considerations for sharing photo booth videos
11. Photo Booth Video Ideas
Get inspired with creative ideas for your photo booth videos. Here are a few suggestions.
Let’s explore some creative ideas to make your photo booth videos truly memorable. Whether it’s for a wedding, birthday party, corporate event, or any other special occasion, these suggestions will help you capture fun, engaging, and shareable moments.
11.1. Themed Events
Create themed photo booth setups to match the event’s theme.
- Props: Provide props that align with the theme, such as hats, masks, glasses, and signs.
- Backdrop: Design a backdrop that complements the theme, using colors, patterns, and images that evoke the desired atmosphere.
- Music: Play music that matches the theme to create a fun and immersive experience.
- Example: A 1920s-themed party could include flapper dresses, feather boas, gangster hats, and jazz music.
11.2. Animated GIFs
Create animated GIFs from the photo booth videos for easy sharing on social media.
- Short Clips: Capture short video clips of guests striking different poses and expressions.
- GIF Creation Tools: Use online GIF creation tools or video editing software to combine the clips into an animated GIF.
- Social Media Sharing: Encourage guests to share the GIFs on their social media profiles using event-specific hashtags.
- Tools: Giphy, Imgur, and EZGIF.
11.3. Slow Motion Videos
Record videos in slow motion to capture dramatic and humorous moments.
- High Frame Rate: Use a camera or device that supports high frame rate recording (e.g., 120fps or 240fps).
- Dramatic Actions: Encourage guests to perform exaggerated actions, such as jumping, dancing, or making funny faces.
- Slow Motion Editing: Use video editing software to slow down the footage and create a dramatic effect.
- Software: Adobe Premiere Pro, Final Cut Pro, and iMovie.
11.4. Boomerang Videos
Create Boomerang-style videos that loop back and forth for a fun and quirky effect.
- Short Bursts: Capture short bursts of video footage using the Boomerang app or similar tools.
- Repetitive Actions: Encourage guests to perform repetitive actions, such as waving, clapping, or blowing kisses.
- Social Media Integration: Share the Boomerang videos directly to social media platforms like Instagram and Facebook.
- Apps: Boomerang (by Instagram), Loopsie, and GIF Mob.
11.5. Stop Motion Animation
Create stop motion animations by stringing together a series of still photos.
- Still Photos: Take a series of still photos of guests posing and interacting with props.
- Stop Motion Software: Use stop motion animation software to combine the photos into a video.
- Creative Storytelling: Encourage guests to create a short story or narrative through their poses and actions.
- Software: Dragonframe, Stop Motion Studio, and iStopMotion.
11.6. Green Screen Effects
Use a green screen backdrop to add special effects and transport guests to different locations.
- Green Screen Setup: Set up a green screen backdrop and ensure proper lighting.
- Digital Backgrounds: Use video editing software to replace the green screen with digital backgrounds, such as exotic locations, fantasy worlds, or abstract designs.
- Virtual Props: Add virtual props and special effects to enhance the visual experience.
- Software: Adobe After Effects, Adobe Premiere Pro, and iMovie.
11.7. Video Booth Messages
Encourage guests to record short video messages for the host or guest of honor.
- Personalized Messages: Ask guests to share their favorite memories, offer congratulations, or express their well wishes.
- Themed Prompts: Provide themed prompts to guide the messages, such as “What is your favorite memory of the host?” or “What advice would you give to the newlyweds?”
- Video Compilation: Compile the video messages into a heartfelt and memorable video keepsake.
12. Resources and Further Reading
Explore these resources for more information on video conversion and photography. Here are some links and suggestions.
To further enhance your knowledge and skills in video conversion and photography, explore these valuable resources, including websites, articles, books, and online communities.
12.1. dfphoto.net
Visit dfphoto.net for guides, tips, and resources on photography and video editing.
- Photography Guides: Access detailed guides on various photography techniques, including composition, lighting, and camera settings.
- Video Editing Tutorials: Learn how to edit videos using popular software like Adobe Premiere Pro, Final Cut Pro, and iMovie.
- Equipment Reviews: Read reviews of cameras, lenses, and other photography equipment to make informed purchasing decisions.
- Community Forum: Join the dfphoto.net community forum to connect with other photographers, share your work, and ask questions.
- Address: 1600 St Michael’s Dr, Santa Fe, NM 87505, United States
- Phone: +1 (505) 471-6001
12.2. Video Conversion Software Websites
Visit the official websites of video conversion software for tutorials, support, and software downloads.
- VLC Media Player: Access the official VLC Media Player website for software downloads, documentation, and community support.
- Handbrake: Visit the Handbrake website for software downloads, user guides, and tutorials.
- Wondershare UniConverter: Explore the Wondershare UniConverter website for software downloads, tutorials, and customer support.
12.3. Online Photography Communities
Join online photography communities to connect with other photographers, share your work, and learn from others.
- 500px: A popular online photography community where photographers can share their work, get feedback, and discover new talent.
- Flickr: A long-standing online photo-sharing platform with a large and active community of photographers.
- Reddit (r/photography): A subreddit dedicated to photography, where users can share their photos, ask questions, and participate in discussions.
12.4. Photography Magazines and Blogs
Read photography magazines and blogs to stay up-to-date on the latest trends, techniques, and equipment.
- Popular Photography: A well-known photography magazine that covers a wide range of topics, including camera reviews, photography techniques, and industry news.
- Digital Photography Review (DPReview): A comprehensive website that provides in-depth reviews of cameras, lenses, and other photography equipment.
- PetaPixel: A popular photography blog that covers a wide range of topics, including news, tutorials, and inspiration.
Converting photo booth videos to MP4 format is essential for compatibility and sharing. By using the methods and tips provided in this guide, you can ensure your videos are high-quality and ready for any platform. For more photography resources, visit dfphoto.net today and explore the vibrant world of photography.
FAQ: Turning Photo Booth Video Into MP4
Here are some frequently asked questions about turning photo booth videos into MP4.
-
1. What is the best video format for photo booth videos?
MP4 is generally the best format due to its wide compatibility across various devices and platforms. It offers a good balance between video quality and file size, making it ideal for sharing and storage. -
2. How do I convert a MOV file to MP4 for free?
You can use free online converters like Animaker’s MOV to MP4 converter or CloudConvert. Alternatively, you can use free desktop software like VLC Media Player or Handbrake to convert MOV files to MP4 without any cost. -
3. Can I convert videos to MP4 on my iPhone or Android phone?
Yes, there are several mobile apps available for converting videos to MP4 on your iPhone or Android phone. Some popular options include Media Converter, Video Converter, and Video Format Factory. -
4. What settings should I use for converting videos to MP4 for social media?
For social media, it’s recommended to use a resolution of 1080p or 720p, a frame rate of 30fps, and a bitrate between 4-12 Mbps. Additionally, make sure the file size meets the platform’s requirements (e.g., Instagram, Facebook, Twitter). -
5. Why is my converted MP4 video quality poor?
Poor video quality after conversion can be due to several factors, such as using a low bitrate, downscaling the resolution, or using an inefficient video codec. To improve quality, try increasing the bitrate, maintaining the original resolution, and using the H.264 codec. -
6. How can I reduce the file size of my MP4 video without losing quality?
To reduce the file size of your MP4 video without significant quality loss, try using a more efficient video codec like H.265 (HEVC), lowering the bitrate slightly, or optimizing the audio settings. -
7. Is it legal to convert videos to MP4?
Converting videos to MP4 is generally legal as long as you have the right to use the content. If the video is copyrighted, you should ensure that you have permission from the copyright holder or that your use qualifies as fair use. -
8. What is the difference between H.264 and H.265 codecs?
H.264 (AVC) and H.265 (HEVC) are both video compression codecs. H.265 offers better compression efficiency, resulting in smaller file sizes with similar video quality compared to H.264. However, H.264 has wider compatibility across older devices and platforms. -
9. How do I fix audio issues when converting videos to MP4?
If you encounter audio issues when converting videos to MP4, ensure that the audio codec is supported by the conversion software, try converting the audio separately, or adjust the audio settings such as bitrate and sample rate. -
10. Can I convert multiple videos to MP4 at once?
Yes, many video conversion tools support batch conversion, allowing you to convert multiple videos to MP4 at once. Look for features like batch processing or queue conversion in the software settings.