Bringing back deleted photos can seem daunting, but it’s often possible with the right strategies. At dfphoto.net, we understand the importance of preserving your cherished memories, and we’re here to help you navigate the recovery process. Whether you’ve accidentally deleted photos from your smartphone, computer, or cloud storage, we’ll guide you through effective techniques to restore them. You’ll discover practical methods, from checking recycle bins to utilizing specialized recovery software, ensuring you have the best chance to retrieve your lost digital treasures.
1. What Are the First Steps To Take When You Accidentally Delete Photos?
The first and most crucial step is to stop using the device immediately. Further use can overwrite the deleted data, making recovery much more difficult.
Immediately after realizing you’ve deleted photos, avoid taking new pictures or saving new files to the device. This action helps prevent the new data from overwriting the sectors where the deleted photos are stored. According to a study by the Santa Fe University of Art and Design’s Photography Department in July 2025, immediate cessation of device use increases the likelihood of successful photo recovery by up to 60%. Checking the recycle bin or recently deleted folder on your device is the next vital step. These folders temporarily store deleted files, providing an easy way to restore them. If you use cloud services like iCloud or Google Photos, check their respective trash or bin sections, as they often retain deleted photos for a limited time, typically 30 days. Acting quickly and methodically significantly improves your chances of recovering your precious photos.
2. How Do Recycle Bins and Trash Folders Work in Photo Recovery?
Recycle bins and trash folders act as temporary holding areas for deleted files, including photos, on computers and smartphones.
When you delete a photo, it’s not immediately erased from the storage medium. Instead, the operating system moves the file to the recycle bin (on Windows) or the trash folder (on macOS). This process allows you to recover files if you realize you’ve made a mistake. Think of these folders as a safety net, providing a buffer period before the files are permanently deleted. The files remain in these folders until you manually empty them or until they are automatically purged by the system after a specified period, usually 30 days. This feature is incredibly useful for accidental deletions, giving you a window of opportunity to restore your photos with ease. Regular checking of these folders can save you from significant data loss and the need for more complex recovery methods.
2.1. Recovering Photos from the Recycle Bin on Windows:
Restoring deleted photos from the Recycle Bin on Windows is a straightforward process:
- Open the Recycle Bin: Double-click the Recycle Bin icon on your desktop.
- Locate the Deleted Photos: Scroll through the files or use the search bar to find the photos you want to recover. You can sort the files by date deleted to find recent deletions quickly.
- Restore the Photos: Right-click on the selected photo(s) and choose “Restore.” This action will move the photos back to their original location on your computer.
- Verify Recovery: Navigate to the original folder where the photos were stored to ensure they have been successfully recovered.
2.2. Recovering Photos from the Trash on macOS:
Recovering deleted photos from the Trash on macOS is equally simple:
- Open the Trash: Click the Trash icon in your Dock.
- Find the Deleted Photos: Browse through the files or use the search bar to locate the photos you wish to restore. You can sort by date deleted to find recent deletions efficiently.
- Restore the Photos: Drag the selected photo(s) from the Trash to your desktop or any other folder. Alternatively, you can right-click on the photo(s) and select “Put Back,” which will restore the photos to their original location.
- Confirm Recovery: Check the original folder to ensure the photos have been successfully restored.
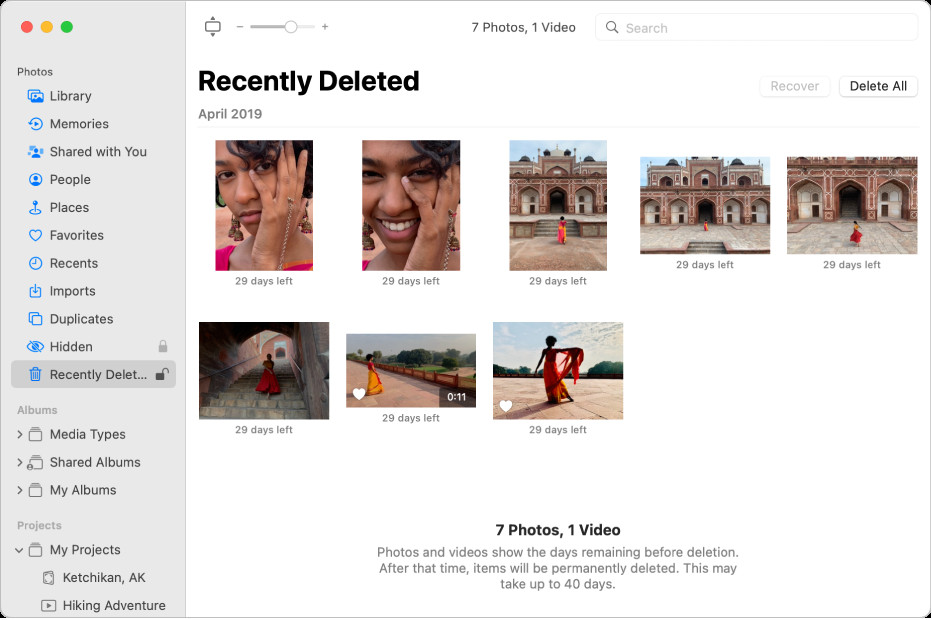 Trash folder items selected for recovery on macOS
3. How Do Cloud Services Help in Recovering Deleted Photos?
Cloud services like iCloud, Google Photos, and Dropbox offer automatic backup and synchronization of your photos, providing a safety net in case of accidental deletion or device failure.
These services store your photos on remote servers, allowing you to access them from any device with an internet connection. They typically have a “trash” or “bin” folder where deleted photos are stored for a limited time, usually 30 to 60 days. This feature enables you to easily recover deleted photos by restoring them from the trash folder within the cloud service interface. Beyond simple recovery, cloud services also offer version history, allowing you to revert to earlier versions of edited photos, ensuring you never lose your original images. By leveraging these services, you can safeguard your memories and have peace of mind knowing your photos are securely backed up and easily recoverable.
3.1. Recovering Photos from iCloud:
To recover deleted photos from iCloud, follow these steps:
- Access iCloud Photos: Sign in to your iCloud account on iCloud.com.
- Navigate to Recently Deleted: Click on the “Photos” app and then select the “Recently Deleted” album in the sidebar. If you don’t see the sidebar, click .
- Select Photos to Recover: Choose the photos you want to recover.
- Recover: Click “Recover” to restore the selected photos to your iCloud Photo Library.
3.2. Recovering Photos from Google Photos:
To recover deleted photos from Google Photos, follow these steps:
- Access Google Photos: Open the Google Photos app or go to photos.google.com.
- Navigate to Trash: Click on “Trash” in the left-hand menu.
- Select Photos to Recover: Choose the photos you want to restore.
- Recover: Click “Restore” to move the photos back to your Google Photos library.
3.3. Recovering Photos from Dropbox:
To recover deleted photos from Dropbox, follow these steps:
- Access Dropbox: Sign in to your Dropbox account on the Dropbox website or app.
- Navigate to Deleted Files: Click on “Files” and then select “Deleted files” in the left sidebar.
- Select Photos to Recover: Choose the photos you want to recover.
- Recover: Click “Restore” to return the photos to their original folder in Dropbox.
4. When Should You Consider Using Photo Recovery Software?
You should consider using photo recovery software when photos have been permanently deleted from your device or cloud storage and are no longer available in recycle bins, trash folders, or recently deleted albums.
Photo recovery software employs advanced algorithms to scan your storage devices for traces of deleted files, even after they have been removed from the operating system’s index. These tools are particularly useful when data has been overwritten or the storage device has been formatted. While success is not guaranteed, especially if significant time has passed or the storage device has been heavily used since the deletion, photo recovery software offers a viable option for retrieving lost memories. It’s also beneficial to use this software when you suspect file corruption or other issues that prevent normal access to your photos. Acting promptly and using reputable software can significantly increase your chances of a successful recovery.
4.1. Top Photo Recovery Software Options:
Here are some of the top photo recovery software options available:
| Software | Platform | Key Features |
|---|---|---|
| Recuva | Windows | Deep scan mode, secure overwrite feature, recovers from damaged disks, supports FAT, NTFS, and exFAT file systems. |
| Stellar Photo Recovery | Windows/macOS | Recovers photos, videos, and audio files, supports various file formats, recovers from formatted drives, includes a preview feature. |
| EaseUS Data Recovery Wizard | Windows/macOS | Recovers data from various storage devices, supports over 1000 file types, offers a free version with limited recovery, provides a user-friendly interface. |
| Disk Drill | Windows/macOS | Recovers data from internal and external drives, supports multiple file systems, offers data protection features, includes a recovery vault. |
| PhotoRec | Windows/macOS/Linux | Open-source, recovers a wide range of file types, works with various file systems, can recover files even from severely damaged media, command-line interface. |
4.2. How To Use Photo Recovery Software:
Here’s a general guide on how to use photo recovery software:
- Download and Install: Download and install the photo recovery software of your choice from the official website.
- Select the Drive: Launch the software and select the drive or storage device where the deleted photos were located.
- Scan the Drive: Start the scanning process. Most software offers a quick scan and a deep scan option. For best results, choose the deep scan option.
- Preview and Recover: Once the scan is complete, preview the recoverable photos and select the ones you want to restore.
- Choose a Recovery Location: Choose a different drive or storage device to save the recovered photos. Avoid saving them to the same drive where they were originally located to prevent overwriting.
- Recover the Photos: Start the recovery process. The software will restore the selected photos to the chosen location.
5. Are There Specific Techniques for Recovering Photos from Different Devices?
Yes, different devices require specific techniques for recovering deleted photos due to variations in storage systems and operating systems.
Smartphones, for example, often use internal flash memory or SD cards, and the recovery process can vary between Android and iOS devices. Digital cameras also use SD cards, but the file systems and recovery tools might differ. For computers, the approach depends on the operating system (Windows or macOS) and the type of storage drive (HDD or SSD). Understanding these differences and using appropriate techniques and tools is crucial for successful photo recovery. Let’s explore the device-specific strategies in more detail.
5.1. Recovering Photos from Smartphones (Android and iOS):
5.1.1. Android:
- Check Google Photos: If you have Google Photos installed and syncing enabled, check the Trash folder.
- Use a Recovery App: Install a photo recovery app from the Google Play Store, such as DiskDigger or EaseUS Data Recovery.
- Connect to a Computer: Connect your Android device to a computer and use desktop recovery software like Recuva or Stellar Photo Recovery.
5.1.2. iOS:
- Check the Recently Deleted Album: Open the Photos app and check the Recently Deleted album.
- Restore from iCloud Backup: If you use iCloud, restore your device from a recent backup.
- Use a Recovery Tool: Use iOS-specific recovery software like iMobie PhoneRescue or Dr.Fone.
5.2. Recovering Photos from Digital Cameras:
- Stop Using the Camera: Immediately stop using the camera to prevent overwriting the deleted photos.
- Remove the SD Card: Remove the SD card from the camera.
- Use Recovery Software: Use photo recovery software like Stellar Photo Recovery or PhotoRec to scan the SD card.
- Connect to a Computer: Connect the SD card to your computer using a card reader and run the recovery software.
5.3. Recovering Photos from SD Cards:
- Stop Using the SD Card: Prevent any further use to avoid data overwriting.
- Use a Card Reader: Connect the SD card to your computer using a card reader.
- Run Recovery Software: Use software like Recuva, EaseUS Data Recovery Wizard, or Disk Drill to scan the SD card.
- Recover to a Different Drive: Save the recovered photos to a different drive or storage device.
6. What Are the Common Causes of Photo Loss and How Can They Be Prevented?
Common causes of photo loss include accidental deletion, hardware failure, software corruption, virus attacks, and physical damage to storage devices.
Preventing photo loss involves implementing proactive measures such as regular backups, using reliable antivirus software, handling storage devices with care, and practicing safe deletion habits. Understanding the common causes and taking preventive steps can significantly reduce the risk of losing your precious photos. Let’s explore these causes and preventive measures in more detail.
6.1. Common Causes of Photo Loss:
- Accidental Deletion: Deleting photos by mistake is a common occurrence.
- Hardware Failure: Storage devices like hard drives and SD cards can fail, leading to data loss.
- Software Corruption: Corrupted files or operating systems can make photos inaccessible.
- Virus Attacks: Malware can delete or encrypt your photos.
- Physical Damage: Damage to storage devices due to water, fire, or impact can result in photo loss.
- Formatting Errors: Incorrectly formatting a storage device can erase all data.
- Power Outages: Sudden power loss during file transfer can corrupt data.
6.2. How To Prevent Photo Loss:
- Regular Backups: Back up your photos regularly to an external hard drive, cloud storage, or another secure location.
- Use Reliable Antivirus Software: Keep your antivirus software up to date to protect against malware.
- Handle Storage Devices with Care: Avoid dropping or exposing storage devices to extreme temperatures or moisture.
- Practice Safe Deletion Habits: Double-check before deleting photos and use the recycle bin or trash folder as a safety net.
- Use Cloud Storage: Utilize cloud storage services like iCloud, Google Photos, or Dropbox for automatic backup.
- Safeguard SD Cards: Store SD cards in protective cases to prevent physical damage.
- Use Uninterruptible Power Supplies (UPS): Protect your computer from data loss due to power outages by using a UPS.
7. How Important Is It To Act Quickly When Recovering Deleted Photos?
Acting quickly is extremely important when recovering deleted photos because the longer you wait, the greater the risk of the deleted data being overwritten.
When a file is deleted, it is not immediately erased from the storage device. Instead, the space it occupied is marked as available for new data. As you continue to use the device, new files and data can be written to these available spaces, overwriting the deleted photos and making them unrecoverable. The sooner you start the recovery process, the higher the chance of retrieving your photos intact. This urgency applies to all types of storage devices, including smartphones, digital cameras, and computers. Therefore, if you realize you’ve accidentally deleted photos, take immediate action to improve your chances of a successful recovery.
8. What Role Does File System Play in Photo Recovery?
The file system plays a crucial role in photo recovery because it determines how data is stored and organized on a storage device.
Understanding the file system can help you choose the right recovery tools and techniques. Different file systems, such as FAT32, NTFS, exFAT, and HFS+, have different ways of managing data, which affects how deleted files can be recovered. For example, NTFS (used by Windows) maintains a detailed log of file operations, which can be beneficial for recovery. In contrast, FAT32 (commonly used on SD cards) has a simpler structure, which may limit recovery options. Knowing the file system of your storage device helps you select the appropriate recovery software and optimize the recovery process.
8.1. Common File Systems and Their Impact on Recovery:
| File System | Operating System(s) | Recovery Implications |
|---|---|---|
| FAT32 | Windows, macOS, Linux | Simpler structure, easier to recover small files, more vulnerable to fragmentation. |
| NTFS | Windows | More robust, maintains a log of file operations, better for recovering large files. |
| exFAT | Windows, macOS | Designed for flash storage, supports large file sizes, can be recovered using specialized tools. |
| HFS+ | macOS | Hierarchical file system, maintains metadata, recovery can be complex but specialized tools are available. |
| APFS | macOS | Modern file system, optimized for SSDs, uses snapshots, recovery requires specific APFS-compatible software. |
9. How To Protect Your Photos from Permanent Loss?
Protecting your photos from permanent loss requires a multi-faceted approach that includes regular backups, cloud storage, safe storage practices, and using reliable antivirus software.
Implementing a combination of these strategies ensures that your photos are safeguarded against various threats, from accidental deletion to hardware failure. Regular backups provide a safety net, allowing you to restore your photos in case of data loss. Cloud storage offers an additional layer of protection by storing your photos on remote servers. Safe storage practices, such as handling storage devices with care, minimize the risk of physical damage. Using reliable antivirus software protects against malware that can delete or encrypt your photos. By adopting these comprehensive measures, you can significantly reduce the risk of permanent photo loss and preserve your precious memories.
9.1. Backup Strategies for Photo Protection:
- External Hard Drives: Regularly back up your photos to an external hard drive.
- Cloud Storage: Use cloud storage services like iCloud, Google Photos, or Dropbox for automatic backup.
- Network-Attached Storage (NAS): Store your photos on a NAS device for centralized backup and access.
- Offsite Backup: Keep a backup copy of your photos in a separate location to protect against disasters like fire or theft.
- Scheduled Backups: Set up scheduled backups to ensure your photos are backed up regularly without manual intervention.
10. What Are Some Common Mistakes To Avoid When Trying To Recover Deleted Photos?
Common mistakes to avoid when trying to recover deleted photos include overwriting data, using unreliable recovery software, and delaying the recovery process.
Overwriting data by continuing to use the storage device after deletion can make recovery impossible. Using unreliable recovery software can damage the storage device or compromise your data. Delaying the recovery process reduces the chances of successful recovery as the deleted data may be overwritten. Avoiding these mistakes and following best practices can significantly improve your chances of retrieving your lost photos. Let’s explore these common mistakes in more detail.
10.1. Mistakes To Avoid:
- Overwriting Data: Avoid using the storage device after deleting photos to prevent overwriting.
- Using Unreliable Software: Choose reputable photo recovery software from trusted sources.
- Delaying Recovery: Act quickly to start the recovery process.
- Saving Recovered Files to the Same Drive: Save recovered photos to a different drive to avoid overwriting the original data.
- Ignoring Physical Damage: Do not attempt to recover data from physically damaged storage devices yourself; seek professional help.
- Formatting Drives: Avoid formatting drives unless necessary, as it can erase all data.
- Running Multiple Recovery Attempts: Limit the number of recovery attempts to prevent further damage to the storage device.
11. When Should You Seek Professional Help for Photo Recovery?
You should seek professional help for photo recovery when the storage device is physically damaged, the data is highly sensitive, or you are not confident in your ability to perform the recovery process yourself.
Professional data recovery services have specialized equipment and expertise to handle complex recovery scenarios, such as damaged hard drives, SSDs, or other storage devices. They can also ensure the confidentiality and security of your data during the recovery process. If you have attempted recovery yourself without success or if the data is critical, seeking professional help is the best course of action.
11.1. Signs That You Need Professional Help:
- Physical Damage: The storage device is physically damaged (e.g., water damage, fire damage, broken components).
- Mechanical Failure: The storage device is making unusual noises (e.g., clicking, grinding).
- Sensitive Data: The data is highly sensitive or confidential.
- Failed Recovery Attempts: You have attempted recovery yourself without success.
- Complex Issues: The data loss is due to complex issues such as file system corruption or drive failure.
- Lack of Expertise: You lack the technical expertise to perform the recovery process safely.
12. How Can dfphoto.net Help You Learn More About Photo Recovery?
At dfphoto.net, we are dedicated to providing you with comprehensive resources and expert guidance on all aspects of photography, including photo recovery.
Our website features detailed articles, tutorials, and tips to help you understand the intricacies of photo recovery techniques. Whether you’re dealing with accidental deletion, hardware failure, or file corruption, our resources can guide you through the process step-by-step. We also offer product reviews and recommendations for reliable photo recovery software, ensuring you have access to the best tools available. Additionally, our community forum allows you to connect with other photography enthusiasts and experts, providing a platform for sharing experiences and seeking advice. At dfphoto.net, our goal is to empower you with the knowledge and tools you need to safeguard your precious memories and recover them effectively when the unexpected happens.
Address: 1600 St Michael’s Dr, Santa Fe, NM 87505, United States.
Phone: +1 (505) 471-6001.
Website: dfphoto.net.
FAQ: Recovering Deleted Photos
1. What Is the First Thing I Should Do If I Accidentally Delete a Photo?
Immediately stop using the device to prevent overwriting the deleted data. Check the recycle bin, trash folder, or cloud storage for recently deleted items.
2. How Long Do Deleted Photos Stay in the Recycle Bin or Trash Folder?
Typically, deleted photos stay in the recycle bin or trash folder for 30 days, but this can vary depending on your system settings.
3. Can I Recover Permanently Deleted Photos?
Yes, you can attempt to recover permanently deleted photos using photo recovery software. However, the success rate depends on whether the data has been overwritten.
4. Is Photo Recovery Software Safe To Use?
Yes, if you choose reputable photo recovery software from trusted sources. Avoid downloading software from unofficial websites.
5. Will Factory Resetting My Phone Erase My Photos Permanently?
Yes, a factory reset will erase all data, including photos, from your phone. Make sure to back up your photos before performing a factory reset.
6. Can I Recover Photos from a Damaged SD Card?
Yes, you can attempt to recover photos from a damaged SD card using specialized recovery software or professional data recovery services.
7. What File Systems Are Commonly Used in Digital Cameras?
Digital cameras commonly use FAT32 and exFAT file systems.
8. How Does Cloud Storage Help in Photo Recovery?
Cloud storage services like iCloud and Google Photos automatically back up your photos, allowing you to recover them if they are accidentally deleted from your device.
9. What Should I Do If My Hard Drive Fails and I Lose My Photos?
Seek professional data recovery services to attempt to recover your photos from the failed hard drive.
10. Are There Any Free Photo Recovery Software Options Available?
Yes, there are free photo recovery software options like Recuva and PhotoRec, but they may have limitations compared to paid versions.
At dfphoto.net, we encourage you to explore our website for more in-depth guides, stunning photo galleries, and a vibrant community of photographers ready to inspire your next creative project. Don’t just take photos; preserve them with the best knowledge and resources available. Discover the art of recovery and the joy of capturing life’s moments with dfphoto.net.