Sending iPhone photos to email is simple. This guide from dfphoto.net will walk you through attaching photos, scanning documents, and even creating drawings to send via email on your iPhone, ensuring your visual stories reach their destination seamlessly with image transfers.
1. Why Email Photos from Your iPhone?
There are several reasons why emailing photos from your iPhone is a useful skill:
- Sharing Memories: Easily share photos with friends and family who may not use social media or cloud services.
- Professional Use: Send photos to clients, colleagues, or editors for work-related purposes.
- Backup: Email photos to yourself as an additional backup method, ensuring images of digital preservation.
- Platform Compatibility: Emailing ensures compatibility across different devices and operating systems.
- Simple Transfer: A straightforward way to move photos from your iPhone to a computer or another device.
2. Understanding Your Options for Image Transfer
Before diving into the steps, it’s important to understand the different ways you can send photos via email:
- Attaching from the Photos App: This is the most common method, allowing you to select photos directly from your iPhone’s photo library.
- Attaching from the Mail App: You can attach photos while composing an email.
- Using Mail Drop: For large files, Mail Drop uploads the photos to iCloud and sends a link to the recipient, ensuring images of sharing digital preservation.
3. Step-by-Step Guide: Attaching Photos from the Photos App
This is the most straightforward method for sending your iPhone photos via email.
3.1. Open the Photos App: Locate and tap the Photos app icon on your iPhone’s home screen.
3.2. Select the Photos:
- Browse Your Library: Navigate to the album or date where the photos you want to send are located.
- Tap Select: In the top-right corner of the screen, tap the “Select” button.
- Choose Your Photos: Tap on each photo you want to include in your email. A blue checkmark will appear on each selected photo.
3.3. Share the Photos:
- Tap the Share Icon: In the bottom-left corner of the screen, tap the share icon (a square with an arrow pointing upwards).
- Choose Mail: In the share sheet that appears, scroll through the options and tap the “Mail” icon. This will open a new email message with the selected photos attached.
3.4. Compose and Send Your Email:
- Recipient: Enter the email address of the person you want to send the photos to.
- Subject: Add a subject line to your email (e.g., “Photos from Santa Fe Trip”).
- Body: Write a brief message in the body of the email (optional).
- Send: Tap the “Send” button in the top-right corner of the screen.
 Selecting photos to share via email on an iPhone
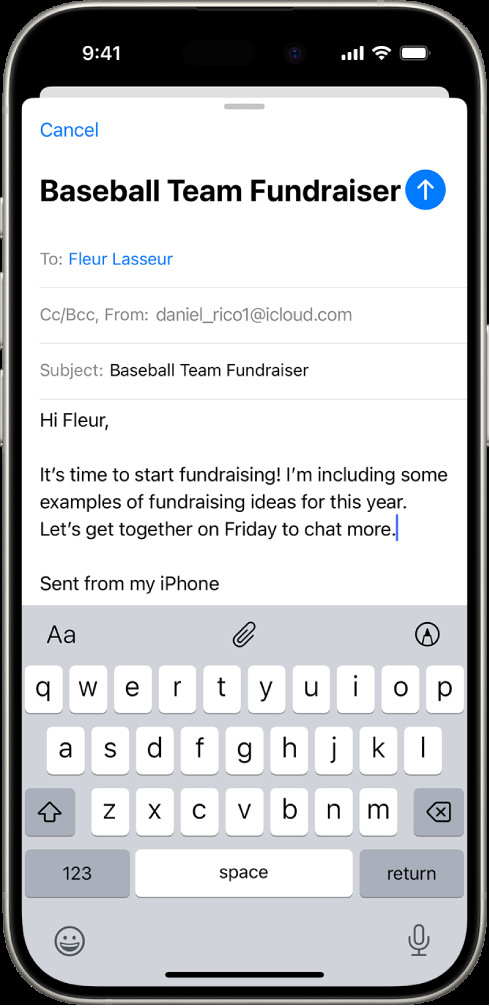
Example of composing an email on an iPhone with photos attached for digital sharing.
4. Step-by-Step Guide: Attaching Photos from the Mail App
This method is useful when you’re already composing an email and decide to add photos.
4.1. Open the Mail App: Locate and tap the Mail app icon on your iPhone’s home screen.
4.2. Start a New Email:
- Tap the Compose Icon: In the bottom-right corner of the screen, tap the compose icon (a square with a pencil).
- Alternatively, tap the Compose icon (a square with a pencil)
4.3. Compose Your Email:
- Recipient: Enter the email address of the person you want to send the photos to.
- Subject: Add a subject line to your email (e.g., “Photos from dfphoto.net”).
- Body: Write your message in the body of the email.
4.4. Attach the Photos:
- Tap in the email body: Tap where you want to insert the photo.
- Tap the Insert Photo or Video Icon: Above the keyboard, tap the “>” icon or tap on the keyboard and then tap on the photo icon
- Browse Your Library: The Photos app will open, allowing you to browse your library.
- Select Your Photos: Tap on each photo you want to include in your email.
- Tap Choose: After selecting your photos, tap “Choose” to attach them to the email.
4.5. Send Your Email: Tap the “Send” button in the top-right corner of the screen.
5. Dealing with Large Files: Using Mail Drop
Sometimes, your photos may be too large to send as regular attachments. In this case, Mail Drop is your best option.
5.1. What is Mail Drop? Mail Drop is an Apple service that allows you to send large files (up to 5 GB) via iCloud. Instead of attaching the files directly to the email, Mail Drop uploads them to iCloud and sends a link to the recipient.
5.2. How to Use Mail Drop:
- Follow the steps above to attach your photos to an email.
- If the files are too large, Mail will automatically prompt you to use Mail Drop.
- Tap “Use Mail Drop.” Mail will upload the files to iCloud.
- The recipient will receive an email with a link to download the photos. The link will be active for 30 days.
5.3. Mail Drop Limits: According to Apple Support, Mail Drop has a limit of 5 GB per email. Also, recipients can download the attachments up to 30 days after you send them.
6. Optimizing Photos for Email: File Size and Compression
Sending high-resolution photos can be slow and consume a lot of data. Here are some tips for optimizing your photos for email:
6.1. Resize Your Photos:
- Before Attaching: Use a photo editing app to resize your photos to a smaller resolution before attaching them to the email. For most purposes, a resolution of 2048 pixels on the longest side is sufficient.
- iPhone’s Built-in Option: When sharing from the Photos app, iPhone sometimes offers options to send the photos in smaller sizes (Small, Medium, Large, Actual Size). Choose a smaller size to reduce the file size.
6.2. Compress Your Photos:
- Zip Files: You can compress your photos into a zip file before attaching them to the email. This can reduce the file size and make it easier to send multiple photos.
- Online Compression Tools: Use online tools to compress your photos without losing too much quality.
6.3. File Format:
- JPEG: This is the most common file format for photos and offers a good balance between file size and image quality.
- HEIC: This is a more efficient file format used by newer iPhones. However, some email clients or devices may not support HEIC. In this case, your iPhone will automatically convert the photos to JPEG when sending them via email.
7. Scanning Documents and Attaching Them to Email
Besides photos, you can also scan documents and send them as PDF attachments.
7.1. Using the Notes App:
- Open the Notes App: Locate and tap the Notes app icon on your iPhone’s home screen.
- Create a New Note: Tap the compose icon (a square with a pencil) to start a new note.
- Tap the Camera Icon: Above the keyboard, tap the camera icon.
- Choose “Scan Documents”: Select “Scan Documents” from the options.
- Scan the Document: Position your iPhone so that the document page appears on the screen. The iPhone will automatically capture the page. You can also tap the shutter button to capture the page manually.
- Adjust the Scan: After scanning, you can crop, rotate, or adjust the color of the scan.
- Tap “Keep Scan”: If you’re satisfied with the scan, tap “Keep Scan.”
- Tap “Save”: After scanning all the pages, tap “Save.”
- Share the Scan: Tap the share icon (a square with an arrow pointing upwards) in the top-right corner of the screen.
- Choose Mail: In the share sheet that appears, tap the “Mail” icon. This will open a new email message with the scanned document attached as a PDF file.
7.2. Using the Files App:
- Open the Files App: Locate and tap the Files app icon on your iPhone’s home screen.
- Browse to the Location: Navigate to the folder where you want to save the scanned document.
- Tap the More Icon: In the top-right corner of the screen, tap the more icon (three dots).
- Choose “Scan Documents”: Select “Scan Documents” from the options.
- Follow the steps above to scan the document.
- The scanned document will be saved as a PDF file in the Files app.
- You can then attach the PDF file to an email as described in section 4.
An iPhone displaying options for attaching documents to an email for digital transfers.
8. Creating and Attaching Drawings to Email
Sometimes, you may want to illustrate an idea or add a personal touch to your email. You can create and attach drawings directly from the Mail app.
8.1. Open the Mail App: Locate and tap the Mail app icon on your iPhone’s home screen.
8.2. Start a New Email or Reply to an Existing One:
- Tap the Compose Icon: In the bottom-right corner of the screen, tap the compose icon (a square with a pencil).
- Alternatively, open an existing email and tap the reply icon.
8.3. Insert a Drawing:
- Tap in the email body: Tap where you want to insert the drawing.
- Tap the Markup Icon: Above the keyboard, tap the markup icon (a pen inside a circle).
- Alternatively, tap in the message where you want to insert a drawing, then tap above the keyboard.
8.4. Create Your Drawing:
- Use the Markup Tools: The Markup toolbar will appear at the bottom of the screen. You can choose different drawing tools (pen, pencil, highlighter), colors, and line thicknesses.
- Draw with Your Finger: Use your finger to draw on the screen.
- Erase Mistakes: Use the eraser tool to correct any mistakes.
8.5. Insert the Drawing:
- Tap “Done”: When you’re finished with your drawing, tap “Done” in the top-right corner of the screen.
- Tap “Insert Drawing”: Then, tap “Insert Drawing” to add the drawing to your email as an attachment.
8.6. Send Your Email: Tap the “Send” button in the top-right corner of the screen.
9. Troubleshooting Common Issues
Here are some common issues you may encounter when sending photos via email and how to troubleshoot them:
9.1. Email Won’t Send:
- Check Your Internet Connection: Make sure your iPhone is connected to a stable Wi-Fi or cellular network.
- Check Your Email Account Settings: Verify that your email account settings are correct (incoming and outgoing mail servers, username, password).
- Restart Your iPhone: Sometimes, a simple restart can fix temporary glitches.
9.2. Photos Are Too Large:
- Use Mail Drop: As described in section 5, Mail Drop is the best option for sending large files.
- Resize or Compress Your Photos: As described in section 6, resizing or compressing your photos can significantly reduce their file size.
9.3. Recipient Can’t Open the Photos:
- Check the File Format: Make sure the photos are in a common file format like JPEG. If you’re using HEIC, the recipient may need to update their software or use a converter to open the photos.
- Resend the Photos: Sometimes, the photos may be corrupted during transmission. Try resending them.
9.4. Photos Appear Blurry:
- Original Quality: Ensure that you are sending the original quality photos and not a compressed version.
- Email Client Compression: Some email clients compress images automatically. Ask the recipient to check their email settings or try a different email client.
10. Advanced Tips and Tricks
Here are some advanced tips and tricks to enhance your email photo-sending experience:
10.1. Using Third-Party Apps:
- File Transfer Apps: Apps like Dropbox, Google Drive, or WeTransfer can be used to send large files easily. Upload your photos to the app and share the download link via email.
- Photo Editing Apps: Apps like Adobe Lightroom Mobile or Snapseed offer advanced editing features and allow you to resize and compress photos before sending them via email.
10.2. Creating Photo Albums:
- Organize Your Photos: Create photo albums in the Photos app to organize your photos before sending them. This makes it easier to select and share specific photos.
- Shared Albums: Use iCloud Shared Albums to share photos with multiple people. This is a great way to collaborate on photo projects or share memories with family and friends.
10.3. Automating the Process:
- Shortcuts App: Use the Shortcuts app to create custom workflows for sending photos via email. For example, you can create a shortcut that automatically resizes and compresses photos before attaching them to an email.
11. Why Choose dfphoto.net for Your Photography Needs?
At dfphoto.net, we understand the importance of sharing your visual stories seamlessly. Whether you’re a professional photographer or an amateur enthusiast, our website offers a wealth of resources to help you master the art of photography.
- Comprehensive Guides: Access detailed tutorials on various photography techniques, from basic composition to advanced editing.
- Inspiration and Ideas: Discover stunning photo galleries and featured photographers to spark your creativity.
- Equipment Reviews: Stay up-to-date with the latest camera gear and accessories through our in-depth reviews.
- Community Forum: Connect with fellow photographers, share your work, and get feedback in our vibrant community forum.
12. The Future of Sharing Photos
The way we share photos is constantly evolving. Here are some emerging trends in photo sharing:
- Cloud-Based Services: Services like iCloud Photos, Google Photos, and Dropbox are becoming increasingly popular for storing and sharing photos.
- AI-Powered Photo Management: AI is being used to automatically organize, edit, and share photos.
- Augmented Reality (AR): AR is being used to create immersive photo experiences, allowing you to share photos in new and exciting ways.
- Blockchain Technology: Blockchain is being used to protect photo copyrights and ensure the authenticity of digital images.
13. Call to Action
Ready to take your photography skills to the next level? Visit dfphoto.net today to explore our comprehensive guides, discover inspiring photo galleries, and connect with a vibrant community of photographers. Unlock your creative potential and share your visual stories with the world at dfphoto.net.
Address: 1600 St Michael’s Dr, Santa Fe, NM 87505, United States.
Phone: +1 (505) 471-6001.
Website: dfphoto.net.
A visual metaphor for modern digital photography and the ease of sharing images.
14. FAQ: Frequently Asked Questions About Sending iPhone Photos to Email
14.1. How do I send multiple photos in one email on my iPhone?
You can send multiple photos in one email by selecting them in the Photos app and tapping the share icon, then choosing Mail. Alternatively, you can attach multiple photos while composing an email in the Mail app.
14.2. Why are my photos blurry when I email them from my iPhone?
Photos may appear blurry if they are compressed during the sending process. To avoid this, try sending them using Mail Drop or resizing them to a smaller size before attaching them to the email.
14.3. Can I send a Live Photo via email?
Yes, you can send a Live Photo via email, but it will be sent as a still image. The recipient will not be able to view the moving part of the Live Photo unless they have a compatible device and software.
14.4. How do I send large video files via email from my iPhone?
For large video files, use Mail Drop. Attach the video to your email, and if it exceeds the size limit, Mail will prompt you to use Mail Drop. This uploads the video to iCloud and sends a link to the recipient.
14.5. Is there a limit to the number of photos I can send in one email?
While there is no strict limit, sending too many photos in one email can cause issues with file size and delivery. It’s best to keep the number of photos reasonable or use Mail Drop for large batches.
14.6. How do I scan a document and email it from my iPhone?
Use the Notes app or Files app to scan documents. Open the app, start a new note or browse to a location in Files, tap the camera icon, and select “Scan Documents.” After scanning, you can share the document as a PDF via email.
14.7. Can I draw on a photo and email it from my iPhone?
Yes, you can draw on a photo using the Markup feature in the Photos app or Mail app. Open the photo, tap “Edit,” then tap the markup icon. After drawing, you can share the edited photo via email.
14.8. How do I ensure the recipient can open the photos I send?
To ensure compatibility, use the JPEG file format, as it is widely supported across different devices and operating systems. If you’re using HEIC, your iPhone will automatically convert the photos to JPEG when sending them via email.
14.9. What is the best way to send photos to someone who doesn’t have an iPhone?
Emailing photos is a universal way to share them with anyone, regardless of their device. Just make sure to use a common file format like JPEG and consider resizing them for easier downloading.
14.10. How do I stop my iPhone from compressing photos when I email them?
To prevent compression, send the photos using Mail Drop or choose the “Actual Size” option when sharing from the Photos app. This will send the photos in their original quality, but keep in mind that it may result in larger file sizes.